Windows 8 To Go - Setup on a USB Flash Drive or USB Disk

How to Setup "Windows 8 To Go" on a USB Flash Drive or USB Disk in any Windows 7 and Windows 8

information   Information
This tutorial will show you how to manually setup Windows 8 To Go from any Windows 7 or Windows 8 (except Windows 8 RT) to be able to install and run Windows 8 from a USB flash drive or external USB disk. The procedure for the USB stick is discussed in Chapter A, the procedure for the USB attached disk is shown in Chapter B.

You should expect the whole process to take about 3 hours elapsed time if you do not have the WAIK on your system and about 1 hour if the WAIK is installed on your system.

If you install on a stick, it is very important to choose a fast USB stick of at least 16GB size. For the USB attached disk it is preferable to use a USB3 attachment, but USB2 should also work. In addition, you need a program to create a virtual CD and the Windows 8 .iso. The rest is done in Command Prompt.

For more information and details about Windows To Go workspaces, see: Windows To Go: Feature Overview

Note   Note
Those of you who have an Enterprise edition of Windows 8, you can also explore this option which is built into the Enterprise edition.

How to Create a "Windows To Go" Workspace on a USB Flash Drive in Windows 8 Enterprise

Tip   Tip
It is highly recommended to use a USB 3.0 flash drive or disk. Otherwise it will run like a snail from it.


Chapter A - Installation on a stick


Step 1 - Check the speed of your USB stick


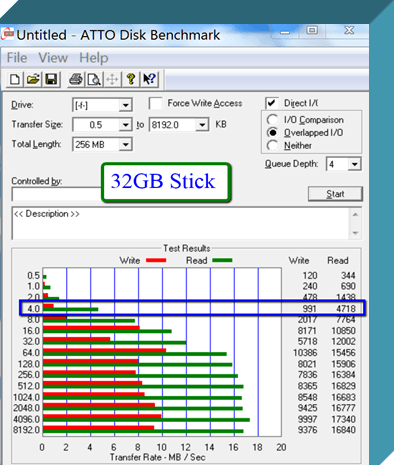
To measure the speed of your stick I recommend Atto Disk Benchmark. It will produce a benchmark result like this picture.
2012-03-28_1947.png


It is the example of a 32GB USB2 stick that is not very fast. Especially the 4K read/write speeds are pretty slow. It is important to focus on the 4K size because that is the blocksize that the system uses most of the time. The large blocksizes are unimportant.

Loading the system (appr. 600MB to 1GB) at boot time will take over 3 minutes at a read speed of 4.7MB/sec. But, since there are also other activities going on at this time, the boot is even longer.A stick with characteristics like this one is not recommended.

2012-03-28_1951.png


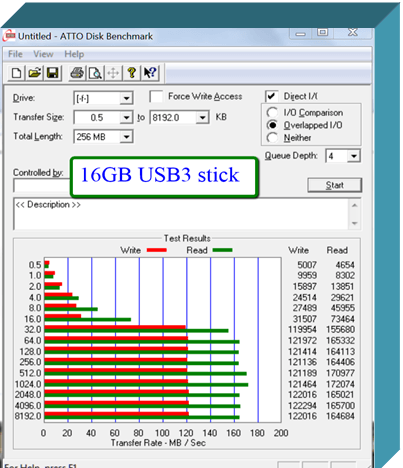
This is a USB3 stick which runs Windows 8 fluently. The initial system setup still takes a bit more time than on a fast disk, but it is not really out of the ordinary.

On this stick I have loaded the 64bit Windows 8 and I am very pleased with both the boot time and the execution of programs and system facilities.


Step 2 - Download the WAIK and extract the imagex file

If you do not have the WAIK (Windows Automated Installation Kit) on your system, then you have to download from this Microsoft site. This will be a bit lengthy because the WAIK is 1.7GB - figure a 2-hour download.

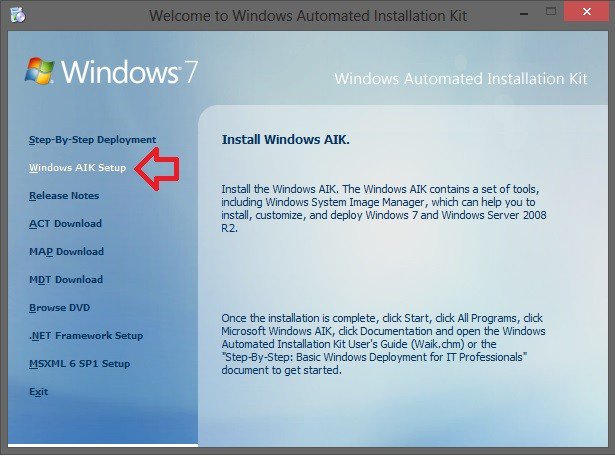
When you are done downloading the KB3AIK_EN.iso file, mount this .iso, open and run the StartCD.exe file to install WAIK on your system.
WAIK.jpg

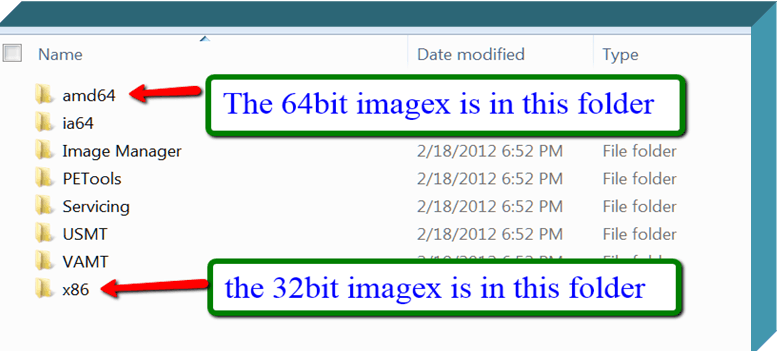
Then you have to copy the imagex.exe. You find that in C:\Program Files\Windows AIK\Tools. There is a 32bit version and a 64bit version.

2012-03-28_1953.png


You choose 32bit when you install a 32bit version of Windows 8 on your stick - 64bit when you install the 64bit version. Copy the one that corresponds to your Windows 8 .iso to the desktop. You can copy it to any other folder, but then you have to change the path in the installation command that we will run later in Command Prompt.

I have tried both the 32bit version (on the slow USB2 stick) and the 64bit version (on the fast USB3 stick). Both work as far as I can tell although there is a significant difference in performance.


Step 3 - Mount the Win8 .iso in a virtual BD ROM

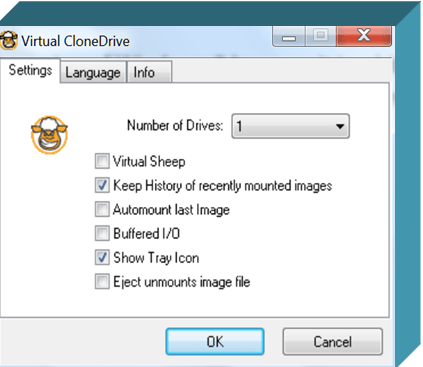
We first have to create a virtual BD ROM with theVirtual Clone Drive Program. Download, install and run this program. It is very simple. When you start the program, you get this window. Just click OK and you are done.

You then go to Computer and you find your BD ROM.

Note: If you are working in Windows 8, you can mount the .iso directly from File Explorer. Just right click on the .iso and you will find a mount option. See: ISO Images - Mount or Unmount


2012-03-28_1955.png


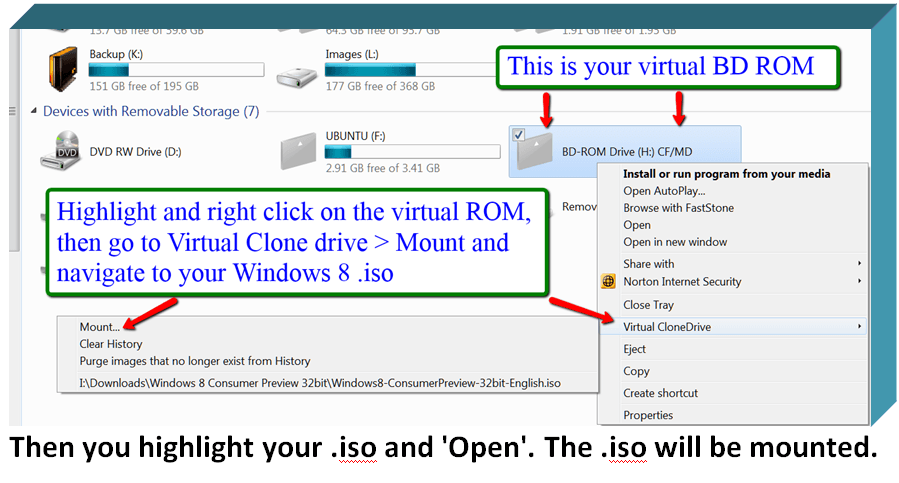
To mount the .iso in the BD ROM, follow the instructions in the next picture. Make sure you remember the drive letter of the BD ROM (in my case 'H:') because you will need that later.

2012-03-28_1959.png


Step 4 - Prepare your USB stick

We now have to define a primary active partition on the USB stick. For that we open an elevated Command Prompt (run as administrator). Type or paste each of the following commands (one by one) and hit Enter after each command.

Diskpart
List disk
Select disk n
(where n is the number that was given for your stick in List disk)
Clean
Create partition primary
Format fs=ntfs quick
Assign
Active
Exit


Your stick is now ready for the installation of Windows 8.


Step 5 - Install Windows 8 on the stick

This is very easy now with a command in Command Prompt. It may take a little while to transfer the whole system, so be patient. The Command is:

"C:\Users\Your Name\Desktop\imagex.exe" /apply H:\sources\install.wim 1 F:\

Your Name is the name of your system. H: is the letter of my BD ROM (step 3). If your BD ROM has another letter, you have to change that accordingly. F: is the drive letter of my stick (step 4). Here you also have to replace it if your stick is on another letter.

As last step you have to run a command to install the boot files. If you are installing on a Windows 7 system, use this command. You have to be aware that this installs a Win7 BCD which works but is slower than the Win8 UEFI BCD.

bcdboot F:\windows /s F:

If you are installing on a Windows 8 system, use this command below. This is the preferred BCD because it is faster for boot and shutdown. You can rerun this command in a Win8 system even if you already installed the Win7 BCD in a Win7 system. It will 'upgrade' the BCD to the Win8 (UEFI) level.

bcdboot F:\windows /s F: /f ALL

Here again F: is the letter for my stick which you may have to adjust.


Step 6 - Run Windows 8 from your USB stick

You are done with the installation and can now run Windows 8 off your stick. For that you have to change the boot sequence in the BIOS pointing at the USB stick as first boot device.

I run the stick version on my laptop and have made the USB #1 in the boot sequence. That way it loads Windows 8 from the stick when the stick is plugged in and Windows 7 from the SSD when there is no Windows 8 stick.

As I said earlier, a USB stick is no SSD - although the technology is similar. So be patient, especially with the initial setup where the system has to do a lot of write operations which are slow on a stick. But once the system is in full swing, it is quite some fun.

Warning: In Windows 7, I usually keep my bootmgr on the C: partition. With that setup I had some problems running Windows 8 from the stick. Each time it would corrupt my bootmgr. I then created a separate 400MB partition and moved the bootmgr there. That seems to cure the problem.


Chapter B - Installation on a USB attached disk


The procedure is very similar to what I described for the USB stick with a few exceptions.

Step 1 - Check the speed of the USB attached disk

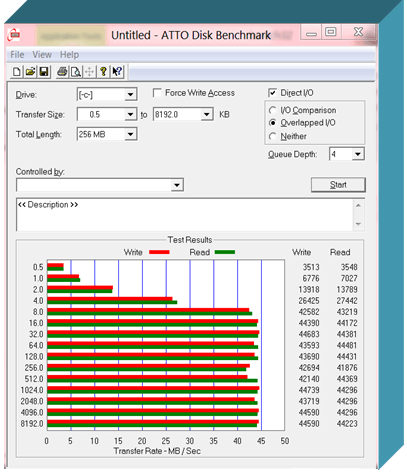
This is the HDD I run in a USB3 open enclosure. It is a 5400RPM disk that I had recovered from my laptop when I installed the SSD.

The R/W speeds at the 4K blocksize are very similar to my USB3 stick. The R/W speed at the bigger blocksizes is slower because the disk can only spin so fast.

Performance wise it felt slower than the performance on the USB3 stick but was still very acceptable.

2012-03-28_2002.png


Step 2 - Download the WAIK and extract the imagex file

This step is exactly the same as described for the stick.

Step 3 - Mount the Win8 .iso in a virtual BD ROM

This step is exactly the same as described for the stick. Make sure you apply the correct device letters for the BD ROM and the HDD.

Step 4 - Prepare your USB disk

Here I went a different route. I used Partition Wizardon my Windows 7 system to define a primary active partition on the HDD. That is easier than working with Command Prompt on a multi partition disk.

Note: There have been reports of problems when using Partition Wizard - although I did not encounter any problems myself. The report was that the final system did not boot. In such a case you might want to go back and use Command Prompt as the safer method.

Step 5 - Install Windows 8 on the disk

That is again the same procedure as for the stick. I did the installation step on my Windows 7 system but copied the BCD on my Windows 8 in Virtual Box.

Step 6 - Run Windows 8 from your USB disk

Change the boot sequence in the BIOS to boot from USB and off you go. The setup of Windows 8 took appr. 20 minutes (in the USB3 enclosure). During that setup, there is one reboot where you have to change the boot sequence again - else the system will boot into the first boot device it finds which is probably your default OS. When that was done, operation was as one would expect from a slow HDD.

I then tried it on my desktop in an eSata enclosure. The system first made some automatic adjustments for the different hardware. Then it ran flawlessly. The performance was about the same as from the USB3 enclosure. But both are slower than my USB3 stick.

If you have a USB disk with 20 to 25GB of free space lying around, it is certainly an alternative to run the Windows 8 CP from that. If nothing else, it is a lot of fun making the installation and seeing that it works.


Attachments

  • Windows_to_Go.png
    Windows_to_Go.png
    10.1 KB · Views: 425
Last edited by a moderator:
Warning: In Windows 7, I usually keep my bootmgr on the C: partition. With that setup I had some problems running Windows 8 from the stick. Each time it would corrupt my bootmgr. I then created a separate 400MB partition and moved the bootmgr there. That seems to cure the problem.

Great tutorial. I did not understand this warning though. What does it mean for when I take the USB stick "To go" on a friend's/client's system?
I am not sure I can answer what will happen on your customers systems. Usually a Windows 7 system will have an independent system partition. In that case there should be no problem - at least in my experience. I only encountered the problem on systems that had the bootmgr on the C partition.
 

My Computer

System One

  • OS
    Vista and Win7
    System Manufacturer/Model
    2xHP, 2xGateway, 1xDell, 1xSony
    Hard Drives
    5 SSDs and 12 HDs
Warning: In Windows 7, I usually keep my bootmgr on the C: partition. With that setup I had some problems running Windows 8 from the stick. Each time it would corrupt my bootmgr. I then created a separate 400MB partition and moved the bootmgr there. That seems to cure the problem.

Great tutorial. I did not understand this warning though. What does it mean for when I take the USB stick "To go" on a friend's/client's system?
I am not sure I can answer what will happen on your customers systems. Usually a Windows 7 system will have an independent system partition. In that case there should be no problem - at least in my experience. I only encountered the problem on systems that had the bootmgr on the C partition.

How can you tell where the bootmgr is located and move it?
 

My Computer

System One

  • OS
    Windows 8 Pro
    System Manufacturer/Model
    Built it myself
    CPU
    i7 2600K
    Motherboard
    Asrock Z77 Extreme4
    Memory
    16 GB
    Graphics Card(s)
    XFX nVidia GT 420
    Hard Drives
    Crucial SSD
    3TB HDD
    2TB HDD
    PSU
    Seasonic 750W
The bootmgr is located in the 'active' partition of the disk. In a multi disk sytem, this active partition can be on a different disk than the C partition. That can happen when you install Windows 7 to a disk that is not on the lowest port.
 

My Computer

System One

  • OS
    Vista and Win7
    System Manufacturer/Model
    2xHP, 2xGateway, 1xDell, 1xSony
    Hard Drives
    5 SSDs and 12 HDs
The bootmgr is located in the 'active' partition of the disk. In a multi disk sytem, this active partition can be on a different disk than the C partition. That can happen when you install Windows 7 to a disk that is not on the lowest port.

How do you move it, as you suggested earlier?
 

My Computer

System One

  • OS
    Windows 8 Pro
    System Manufacturer/Model
    Built it myself
    CPU
    i7 2600K
    Motherboard
    Asrock Z77 Extreme4
    Memory
    16 GB
    Graphics Card(s)
    XFX nVidia GT 420
    Hard Drives
    Crucial SSD
    3TB HDD
    2TB HDD
    PSU
    Seasonic 750W
It is an awkward concept -the "C: partition" - since the disk letter assignment is held within the registry of the active operating system.

At one time I had about 10 experimental OS variants - XP, 7, Embedded 7, 8, 32 and 64-bit. Windows 8 kept hiding the system disk (which was the Windows 7 64-bit C: drive with files I wanted to access) by removing the letter assignment, so I eventually used the B: drive assignment for the Windows 8 system drive, and chained the Windows 7 Bootloader off that. Presumably the Windows 8 boot system has access to the partition table and can change it by altering the partition type, thus hiding disks.

Whereas Windows 7 bootloader had knowledge of the drive letters - presumably by loading HKLM registry files, Windows 8 only knows the volume numbers, (or the GUID from the BCD) and does not read the registry, for speed. It's ok if there is only one type of boot disk, but if there is a mixture of SATA, IDE, SCSI, USB devices etc, the volume order can vary depending which volume is being booted from. Which leads to a mess.

You move the boot files with the BCDBOOT command. For instance if you want the machine to boot from the X: drive, and your windows folder is C:\windows


the command is

bcdboot c:\windows /s /f ALL x:

Of course, you also need to ensure that x: is on an active partition.

I have not found any conflicts with WIndows To Go on USB and the systems installed on the hard drives. If the Bios is set to boot from USB, The WindowsTG bootmanager leaves the hard disks alone until after the system is booted, when you can access the drives as normal.
 

My Computer

System One

  • OS
    Windows 8.1 Pro with Media Center
    Computer type
    PC/Desktop
    System Manufacturer/Model
    HP COMPAQ Presario CQ57
    CPU
    AMD E- 300 APU with Radion HD Graphics 1.30GHz
    Motherboard
    inbuilt
    Memory
    4GB
    Graphics Card(s)
    ATI
    Sound Card
    High Definition Audio on-board
    Monitor(s) Displays
    notebook
    Screen Resolution
    1366x768
    Hard Drives
    Seagate ST9500325AS
    Google drive 15GB
    Skydrive 25GB
    BT Cloud
    PSU
    external 20v
    Case
    Laptop
    Cooling
    pretty good
    Keyboard
    inbuilt
    Mouse
    touchpad
    Internet Speed
    BT Infinity Unlimited - 80 up 20 down =70/16 really
    Browser
    Chrome Canary usually
    Antivirus
    Windows Defender and Malwarebytes
    Other Info
    no Start menu modifications
    Upgraded with no issues to 8.0 and to 8.1

My Computer

System One

  • OS
    Vista and Win7
    System Manufacturer/Model
    2xHP, 2xGateway, 1xDell, 1xSony
    Hard Drives
    5 SSDs and 12 HDs
It is an awkward concept -the "C: partition" - since the disk letter assignment is held within the registry of the active operating system.

At one time I had about 10 experimental OS variants - XP, 7, Embedded 7, 8, 32 and 64-bit. Windows 8 kept hiding the system disk (which was the Windows 7 64-bit C: drive with files I wanted to access) by removing the letter assignment, so I eventually used the B: drive assignment for the Windows 8 system drive, and chained the Windows 7 Bootloader off that. Presumably the Windows 8 boot system has access to the partition table and can change it by altering the partition type, thus hiding disks.

Whereas Windows 7 bootloader had knowledge of the drive letters - presumably by loading HKLM registry files, Windows 8 only knows the volume numbers, (or the GUID from the BCD) and does not read the registry, for speed. It's ok if there is only one type of boot disk, but if there is a mixture of SATA, IDE, SCSI, USB devices etc, the volume order can vary depending which volume is being booted from. Which leads to a mess.

You move the boot files with the BCDBOOT command. For instance if you want the machine to boot from the X: drive, and your windows folder is C:\windows


the command is

bcdboot c:\windows /s /f ALL x:

Of course, you also need to ensure that x: is on an active partition.

I have not found any conflicts with WIndows To Go on USB and the systems installed on the hard drives. If the Bios is set to boot from USB, The WindowsTG bootmanager leaves the hard disks alone until after the system is booted, when you can access the drives as normal.

I am working on a 3TB drive. It is GPT, so apparently I cannot make it active with diskpart. Any way around that?
 

My Computer

System One

  • OS
    Windows 8 Pro
    System Manufacturer/Model
    Built it myself
    CPU
    i7 2600K
    Motherboard
    Asrock Z77 Extreme4
    Memory
    16 GB
    Graphics Card(s)
    XFX nVidia GT 420
    Hard Drives
    Crucial SSD
    3TB HDD
    2TB HDD
    PSU
    Seasonic 750W
As last step you have to run a command to install the boot files. If you are installing on a Windows 7 system, use this command. You have to be aware that this installs a Win7 BCD which works but is slower than the Win8 UEFI BCD.

bcdboot F:\windows /s F:

If you are installing on a Windows 8 system, use this command below. This is the preferred BCD because it is faster for boot and shutdown. You can rerun this command in a Win8 system even if you already installed the Win7 BCD in a Win7 system. It will 'upgrade' the BCD to the Win8 (UEFI) level.

bcdboot F:\windows /s F: /f ALL

Here again F: is the letter for my stick which you may have to adjust.

The command "bcdboot F:\windows /s F: /f ALL" did not work in Windows 8.

I had to use "bcdboot F:\windows /s F:" instead.
 

My Computer

System One

  • OS
    Windows 8 Pro
    System Manufacturer/Model
    Built it myself
    CPU
    i7 2600K
    Motherboard
    Asrock Z77 Extreme4
    Memory
    16 GB
    Graphics Card(s)
    XFX nVidia GT 420
    Hard Drives
    Crucial SSD
    3TB HDD
    2TB HDD
    PSU
    Seasonic 750W
The command with the /f ALL has to be issued from a Win 8 system. It does not work from cmd of Win 7.
 

My Computer

System One

  • OS
    Vista and Win7
    System Manufacturer/Model
    2xHP, 2xGateway, 1xDell, 1xSony
    Hard Drives
    5 SSDs and 12 HDs
When I issued the "clean" command on my 64GB USB drive, I got this message:

DiskPart has encountered an error: Access is denied
See the System Event Log for more information.

It did delete the existing partition. I don't know if it's related, but this drive shows up as having only 58GB, even in diskpart.

I will try /f All again.
 

My Computer

System One

  • OS
    Windows 8 Pro
    System Manufacturer/Model
    Built it myself
    CPU
    i7 2600K
    Motherboard
    Asrock Z77 Extreme4
    Memory
    16 GB
    Graphics Card(s)
    XFX nVidia GT 420
    Hard Drives
    Crucial SSD
    3TB HDD
    2TB HDD
    PSU
    Seasonic 750W
The 58GB is the binary value of appr. 62GB decimal which is probably the capacity of your SSD.

And what does the system event log say.
 

My Computer

System One

  • OS
    Vista and Win7
    System Manufacturer/Model
    2xHP, 2xGateway, 1xDell, 1xSony
    Hard Drives
    5 SSDs and 12 HDs
I was able to install Win 8 64-bit on the USB stick. Not sure why the "clean" command threw that error.

Win 8 To Go on USB has been a mixed bag. It worked on 40% of the 64-bit computers I tried it on.

It worked on 2 HP laptops.
It did not not work on 2 separate Dell desktops (quadcore and Nehalem-based).
It also did not work on the desktop I recently put together (Asrock motherboard, i7-2600k).

When I say it did not work, here is what happens:

It seems to be booting fine, and then a faint blue screen flashes for half a second and the computer shuts down. It happens so quickly I cannot read the message.
 

My Computer

System One

  • OS
    Windows 8 Pro
    System Manufacturer/Model
    Built it myself
    CPU
    i7 2600K
    Motherboard
    Asrock Z77 Extreme4
    Memory
    16 GB
    Graphics Card(s)
    XFX nVidia GT 420
    Hard Drives
    Crucial SSD
    3TB HDD
    2TB HDD
    PSU
    Seasonic 750W

Welcome to the forums!

Thanks for showing another working method :).
Yes but you still need WAIK components and in the video it says to download WAIK...

Agreed: you don't need the whole WAIK.

This is a personal choice of programs but you don't need ANY drive mounter only 7-Zip and imagex.exe (these two are bare minimum and all can be done). Extracting install.wim from the iso for the procedure works pretty well also.

Thanks
 

My Computer

System One

  • OS
    Windows 10 x64
    Computer type
    Laptop
    System Manufacturer/Model
    HP Envy DV6 7250
    CPU
    Intel i7-3630QM
    Motherboard
    HP, Intel HM77 Express Chipset
    Memory
    16GB
    Graphics Card(s)
    Intel HD4000 + Nvidia Geforce 630M
    Sound Card
    IDT HD Audio
    Monitor(s) Displays
    15.6' built-in + Samsung S22D300 + 17.3' LG Phillips
    Screen Resolution
    multiple resolutions
    Hard Drives
    Samsung SSD 250GB + Hitachi HDD 750GB
    PSU
    120W adapter
    Case
    small
    Cooling
    laptop cooling pad
    Keyboard
    Backlit built-in + big one in USB
    Mouse
    SteelSeries Sensei
    Internet Speed
    slow and steady
    Browser
    Chromium, Pale Moon, Firefox Developer Edition
    Antivirus
    Windows Defender
    Other Info
    That's basically it.
I used your link to the WAIK and it is the Win7 version... and on running the imagex command it kept giving me an error that it couldn't run, and was the wrong version. I tried and tried again to get this to work... perhaps it is because I'm using the latest version (Version 6.2.9200 Build 9200) <-- that's the Retail RTM of Win8 Pro from Dreamspark Premium, formerly known as the MSDN Academic Alliance.

I had to go here: About the Windows Assessment and Deployment Kit and download the new Windows Assessment and Deployment Kit (ADK) for Windows 8.

BIG NOTE HERE: Once you have dl and installed the Win8 ADK, go to: C:\Program Files\Windows Kits\8.0\Assessment and Deployment Kit\Deployment Tools\x86\DISM to locate the appropriate imagex.exe file !

NOTE: I did a 32 bit install, folder varies with your install and CPU type. I also simplified my paths by placing everything at the root of C:\ instead of the desktop!

It is working with 68% completed! I will update after it has finished!
 
Last edited:

My Computer

System One

  • OS
    Windows 7 Ultimate 64 bit Steve Ballmer Signature Edition
    System Manufacturer/Model
    Homebrew PC - "Alpha_Dawg"
    CPU
    Intel Core 2 Quad - Q9550 - 2.83GHz stock - OC'd to 3.6GHz
    Motherboard
    Gigabyte EP45-UD3P
    Memory
    4GB DDR2 800MHz (PC6400) OCZ Reaper
    Graphics Card(s)
    Nvidia GeForce GTX 460
    Sound Card
    Asus Xonar DX
    Monitor(s) Displays
    Samsung SyncMaster 2333HD
    Screen Resolution
    1920 x 1080
    Hard Drives
    WD Caviar Black 750GB/7200RPM/32MB cache
    WD Caviar Green 2.5TB/5400RPM/64MB cache
    WD Caviar Green 2.0TB/5400RPM/64MB cache
    PSU
    PC Power & Cooling Silencer 750
    Case
    Gigabyte 3D Aurora
    Cooling
    Case is Air - 5ea. 120mm fans (mix of Arctic and Xigmatec)
    Internet Speed
    50 mbps down/5 mbps up
    Other Info
    AVerMedia - AVerTVHD G2 Dual Tuner Card
It is a useful feature - finally MS are doing what Linux has been doing for years.

Sadly, it is only for Enterprise customers.

You don't need imagex and you don't need WAIK or part of it - there are several free programs that can manage wims.

Perhaps the easiest is Gimagex.

GImageX - AutoItScript
 

My Computer

System One

  • OS
    7/8/ubuntu/Linux Deepin
    Computer type
    PC/Desktop
ImageX Tool for Windows
Copyright (C) Microsoft Corp. All rights reserved.
Version: 6.2.9200.16384


[ 100% ] Applying progress

Successfully applied image.

Total elapsed time: 58 min 14 sec

8 GB USB 2.0 Flash, yes it took a while!
 

My Computer

System One

  • OS
    Windows 7 Ultimate 64 bit Steve Ballmer Signature Edition
    System Manufacturer/Model
    Homebrew PC - "Alpha_Dawg"
    CPU
    Intel Core 2 Quad - Q9550 - 2.83GHz stock - OC'd to 3.6GHz
    Motherboard
    Gigabyte EP45-UD3P
    Memory
    4GB DDR2 800MHz (PC6400) OCZ Reaper
    Graphics Card(s)
    Nvidia GeForce GTX 460
    Sound Card
    Asus Xonar DX
    Monitor(s) Displays
    Samsung SyncMaster 2333HD
    Screen Resolution
    1920 x 1080
    Hard Drives
    WD Caviar Black 750GB/7200RPM/32MB cache
    WD Caviar Green 2.5TB/5400RPM/64MB cache
    WD Caviar Green 2.0TB/5400RPM/64MB cache
    PSU
    PC Power & Cooling Silencer 750
    Case
    Gigabyte 3D Aurora
    Cooling
    Case is Air - 5ea. 120mm fans (mix of Arctic and Xigmatec)
    Internet Speed
    50 mbps down/5 mbps up
    Other Info
    AVerMedia - AVerTVHD G2 Dual Tuner Card
I followed the instructions to the tee and created W8 to Go on a 32GB Corsair Flash Voyager USB3 stick.

I booted from my stick (via my BIOS's boot menu when I hit F8 during the boot) and got the W8 logo and the progress circle thingamajig. Then I get an error message (the W8 light blue full screen message) that my PC encountered an error. The message went by so fast I couldn't read it.

My PC rebooted and again I hit F8 to boot from the stick. Again same error. I also let the reboot go without hitting F8 for the boot menu and W8 booted from my hard drive. I ran a chkdsk against the stick and it came back with no errors.

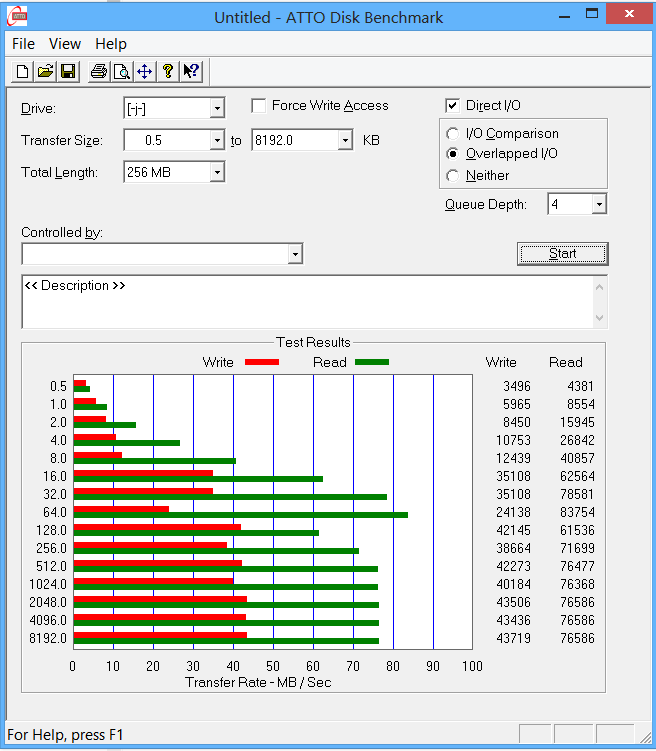
I've attached the speed results of my USB3 stick. While not a speed demon, but priced reasonably, I think the speed of the stick is sufficient and shouldn't be the cause of my problem.

***** The speed screen doesn't seem like it is showing up at least to me. It did on the Preview and I definitely saved it in the post. Here it is from ImageShack.

I changed by BIOS to boot from the USB3 stick first. I get a stop code of 0x00000001. The iso you are talking about is the iso I got from Technet, correct? If my boot is successful I should see the screens for setting up W8 the first time. Right?

****** looks like my brand new USB3 stick might be hosed. It doesn't appear in Explorer and Disk Management. It does show up in Device Manager but the Policies tab is missing and I can't populate it so something isn't right. Time to try it under a recovery disk.

Tried a new brand of USB3 flash drive, same error. It would be nice if someone responded to my problem even to say they really don't have a clue what my problem is all about. A lack of a response is making me doubt the sincerity of this sites mission statement or intent at least, people helping people.
 

Attachments

  • Capture.PNG
    Capture.PNG
    10.3 KB · Views: 104
Last edited:

My Computer

System One

  • OS
    Windows 8.1 Pro X64
    Computer type
    PC/Desktop
    System Manufacturer/Model
    Homemade Rig
    CPU
    Intel Core i7 Quad 3770K @ 5 Ghz
    Motherboard
    ASUS P8Z77-V Deluxe
    Memory
    Corsair Dominator-GT 16GB @ 2400 Mhz
    Graphics Card(s)
    Sapphire HD7970 3GB OC Edition
    Sound Card
    Realtek HD
    Monitor(s) Displays
    ASUS PA246Q & PA249Q IPS 24" LCD
    Screen Resolution
    1920x1200
    Hard Drives
    Samsung SSD 830, 840 256GB |
    2TB Seagate SATA3 |
    Hitachi eSata 500GB
    PSU
    Corsair Professional Series 1050W
    Case
    Corsair Obsididan 800D Full Tower
    Cooling
    Corsair H100 Liquid CPU Cooler
    Keyboard
    Logitech Wireless K520
    Mouse
    Microsoft Wireless Explorer
    Internet Speed
    120/35
    Browser
    Fx41
    Antivirus
    Windows Defender
    Other Info
    UEFI BIOS with a GPT SSD boot drive.
Back
Top