Windows 8 To Go - Setup on a USB Flash Drive or USB Disk

How to Setup "Windows 8 To Go" on a USB Flash Drive or USB Disk in any Windows 7 and Windows 8

information   Information
This tutorial will show you how to manually setup Windows 8 To Go from any Windows 7 or Windows 8 (except Windows 8 RT) to be able to install and run Windows 8 from a USB flash drive or external USB disk. The procedure for the USB stick is discussed in Chapter A, the procedure for the USB attached disk is shown in Chapter B.

You should expect the whole process to take about 3 hours elapsed time if you do not have the WAIK on your system and about 1 hour if the WAIK is installed on your system.

If you install on a stick, it is very important to choose a fast USB stick of at least 16GB size. For the USB attached disk it is preferable to use a USB3 attachment, but USB2 should also work. In addition, you need a program to create a virtual CD and the Windows 8 .iso. The rest is done in Command Prompt.

For more information and details about Windows To Go workspaces, see: Windows To Go: Feature Overview

Note   Note
Those of you who have an Enterprise edition of Windows 8, you can also explore this option which is built into the Enterprise edition.

How to Create a "Windows To Go" Workspace on a USB Flash Drive in Windows 8 Enterprise

Tip   Tip
It is highly recommended to use a USB 3.0 flash drive or disk. Otherwise it will run like a snail from it.


Chapter A - Installation on a stick


Step 1 - Check the speed of your USB stick


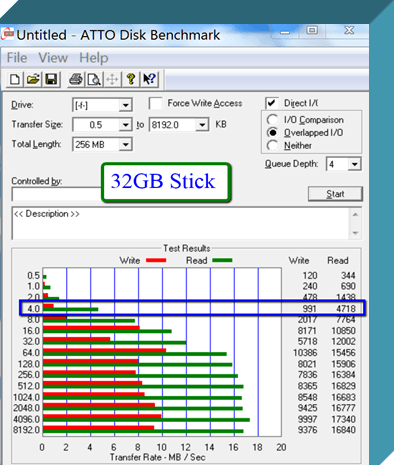
To measure the speed of your stick I recommend Atto Disk Benchmark. It will produce a benchmark result like this picture.
2012-03-28_1947.png


It is the example of a 32GB USB2 stick that is not very fast. Especially the 4K read/write speeds are pretty slow. It is important to focus on the 4K size because that is the blocksize that the system uses most of the time. The large blocksizes are unimportant.

Loading the system (appr. 600MB to 1GB) at boot time will take over 3 minutes at a read speed of 4.7MB/sec. But, since there are also other activities going on at this time, the boot is even longer.A stick with characteristics like this one is not recommended.

2012-03-28_1951.png


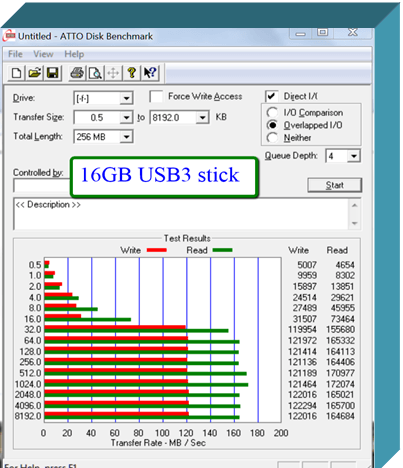
This is a USB3 stick which runs Windows 8 fluently. The initial system setup still takes a bit more time than on a fast disk, but it is not really out of the ordinary.

On this stick I have loaded the 64bit Windows 8 and I am very pleased with both the boot time and the execution of programs and system facilities.


Step 2 - Download the WAIK and extract the imagex file

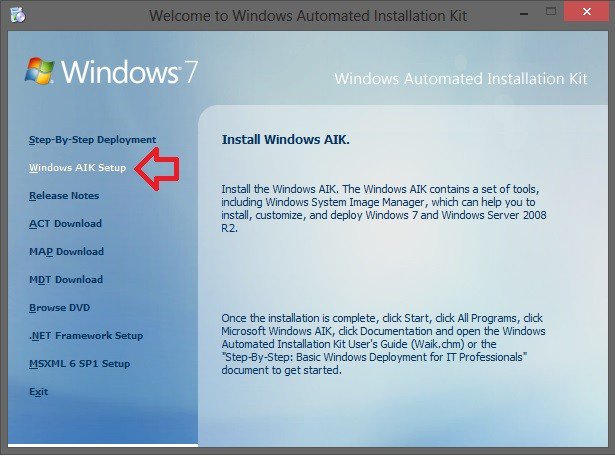
If you do not have the WAIK (Windows Automated Installation Kit) on your system, then you have to download from this Microsoft site. This will be a bit lengthy because the WAIK is 1.7GB - figure a 2-hour download.

When you are done downloading the KB3AIK_EN.iso file, mount this .iso, open and run the StartCD.exe file to install WAIK on your system.
WAIK.jpg

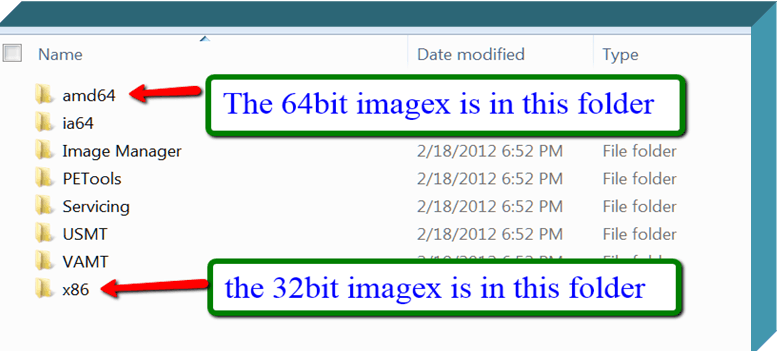
Then you have to copy the imagex.exe. You find that in C:\Program Files\Windows AIK\Tools. There is a 32bit version and a 64bit version.

2012-03-28_1953.png


You choose 32bit when you install a 32bit version of Windows 8 on your stick - 64bit when you install the 64bit version. Copy the one that corresponds to your Windows 8 .iso to the desktop. You can copy it to any other folder, but then you have to change the path in the installation command that we will run later in Command Prompt.

I have tried both the 32bit version (on the slow USB2 stick) and the 64bit version (on the fast USB3 stick). Both work as far as I can tell although there is a significant difference in performance.


Step 3 - Mount the Win8 .iso in a virtual BD ROM

We first have to create a virtual BD ROM with theVirtual Clone Drive Program. Download, install and run this program. It is very simple. When you start the program, you get this window. Just click OK and you are done.

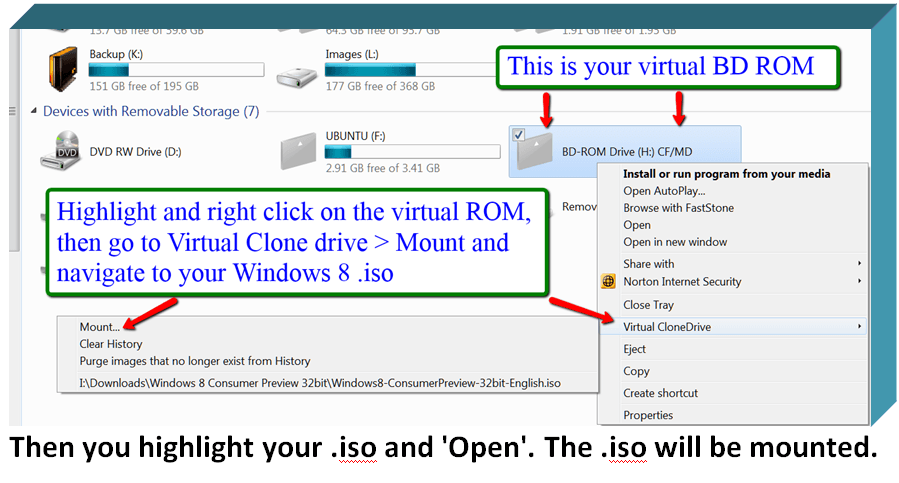
You then go to Computer and you find your BD ROM.

Note: If you are working in Windows 8, you can mount the .iso directly from File Explorer. Just right click on the .iso and you will find a mount option. See: ISO Images - Mount or Unmount
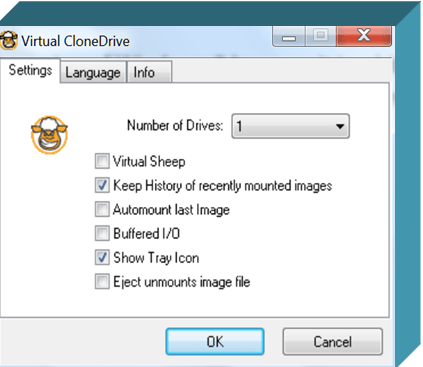


2012-03-28_1955.png


To mount the .iso in the BD ROM, follow the instructions in the next picture. Make sure you remember the drive letter of the BD ROM (in my case 'H:') because you will need that later.

2012-03-28_1959.png


Step 4 - Prepare your USB stick

We now have to define a primary active partition on the USB stick. For that we open an elevated Command Prompt (run as administrator). Type or paste each of the following commands (one by one) and hit Enter after each command.

Diskpart
List disk
Select disk n
(where n is the number that was given for your stick in List disk)
Clean
Create partition primary
Format fs=ntfs quick
Assign
Active
Exit


Your stick is now ready for the installation of Windows 8.


Step 5 - Install Windows 8 on the stick

This is very easy now with a command in Command Prompt. It may take a little while to transfer the whole system, so be patient. The Command is:

"C:\Users\Your Name\Desktop\imagex.exe" /apply H:\sources\install.wim 1 F:\

Your Name is the name of your system. H: is the letter of my BD ROM (step 3). If your BD ROM has another letter, you have to change that accordingly. F: is the drive letter of my stick (step 4). Here you also have to replace it if your stick is on another letter.

As last step you have to run a command to install the boot files. If you are installing on a Windows 7 system, use this command. You have to be aware that this installs a Win7 BCD which works but is slower than the Win8 UEFI BCD.

bcdboot F:\windows /s F:

If you are installing on a Windows 8 system, use this command below. This is the preferred BCD because it is faster for boot and shutdown. You can rerun this command in a Win8 system even if you already installed the Win7 BCD in a Win7 system. It will 'upgrade' the BCD to the Win8 (UEFI) level.

bcdboot F:\windows /s F: /f ALL

Here again F: is the letter for my stick which you may have to adjust.


Step 6 - Run Windows 8 from your USB stick

You are done with the installation and can now run Windows 8 off your stick. For that you have to change the boot sequence in the BIOS pointing at the USB stick as first boot device.

I run the stick version on my laptop and have made the USB #1 in the boot sequence. That way it loads Windows 8 from the stick when the stick is plugged in and Windows 7 from the SSD when there is no Windows 8 stick.

As I said earlier, a USB stick is no SSD - although the technology is similar. So be patient, especially with the initial setup where the system has to do a lot of write operations which are slow on a stick. But once the system is in full swing, it is quite some fun.

Warning: In Windows 7, I usually keep my bootmgr on the C: partition. With that setup I had some problems running Windows 8 from the stick. Each time it would corrupt my bootmgr. I then created a separate 400MB partition and moved the bootmgr there. That seems to cure the problem.


Chapter B - Installation on a USB attached disk


The procedure is very similar to what I described for the USB stick with a few exceptions.

Step 1 - Check the speed of the USB attached disk

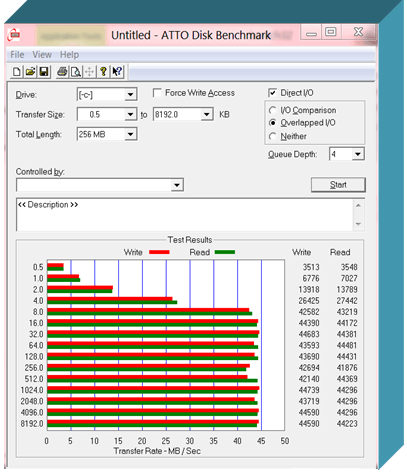
This is the HDD I run in a USB3 open enclosure. It is a 5400RPM disk that I had recovered from my laptop when I installed the SSD.

The R/W speeds at the 4K blocksize are very similar to my USB3 stick. The R/W speed at the bigger blocksizes is slower because the disk can only spin so fast.

Performance wise it felt slower than the performance on the USB3 stick but was still very acceptable.

2012-03-28_2002.png


Step 2 - Download the WAIK and extract the imagex file

This step is exactly the same as described for the stick.

Step 3 - Mount the Win8 .iso in a virtual BD ROM

This step is exactly the same as described for the stick. Make sure you apply the correct device letters for the BD ROM and the HDD.

Step 4 - Prepare your USB disk

Here I went a different route. I used Partition Wizardon my Windows 7 system to define a primary active partition on the HDD. That is easier than working with Command Prompt on a multi partition disk.

Note: There have been reports of problems when using Partition Wizard - although I did not encounter any problems myself. The report was that the final system did not boot. In such a case you might want to go back and use Command Prompt as the safer method.

Step 5 - Install Windows 8 on the disk

That is again the same procedure as for the stick. I did the installation step on my Windows 7 system but copied the BCD on my Windows 8 in Virtual Box.

Step 6 - Run Windows 8 from your USB disk

Change the boot sequence in the BIOS to boot from USB and off you go. The setup of Windows 8 took appr. 20 minutes (in the USB3 enclosure). During that setup, there is one reboot where you have to change the boot sequence again - else the system will boot into the first boot device it finds which is probably your default OS. When that was done, operation was as one would expect from a slow HDD.

I then tried it on my desktop in an eSata enclosure. The system first made some automatic adjustments for the different hardware. Then it ran flawlessly. The performance was about the same as from the USB3 enclosure. But both are slower than my USB3 stick.

If you have a USB disk with 20 to 25GB of free space lying around, it is certainly an alternative to run the Windows 8 CP from that. If nothing else, it is a lot of fun making the installation and seeing that it works.


Attachments

  • Windows_to_Go.png
    Windows_to_Go.png
    10.1 KB · Views: 422
Last edited by a moderator:
Great tutorial, thanks very much. First really good argument for USB 3 I've come across, aside from the usual impulse to go "Faster, FASTER!" in today's world. I'm thinking long and hard about adding USB 3 to my Lenovo notebooks (X220 Tablet and T520) via the regular (X220 Tablet) and half-size (T520) PCIe card mounts in those devices. I can pick up 2 or 3 ports' worth of USB 3 for around $35-40. Anybody have any recommendations for such devices? Horror stories? I'm as happy to be steered away from the bad stuff as I am to learn about the good stuff, so please share. From what I see on Newegg, the Startech device looks pretty good. And thanks again,
--Ed--
For your PCI Express slot on the laptop you have the USB3 option and the eSata option. Although the specs for eSata are slower than USB3, in the real world it is faster. But, of course, eSata is only good for disks in an eSata enclosure - ideally an SSD.
 

My Computer

System One

  • OS
    Vista and Win7
    System Manufacturer/Model
    2xHP, 2xGateway, 1xDell, 1xSony
    Hard Drives
    5 SSDs and 12 HDs
I have eSata ports on the front of the case here but ended up with a fan cooled USB 2.0 enclosure that's been working out well as far as the 1tb drive presently in it. The live 88 stick however was made up here using a 32gb Kingston Data Traveler flash drive which worked well for the CP.

I have to wonder if someone wrote up a similar guide for 7? I wanted to show a few people how much better 7 was over Vista or XP!
 

My Computer

System One

  • OS
    1st W10 Professional x64/W7 Ultimate x64 - 2nd Remote system: W10 Insider Builds/W7 Professional
    Computer type
    PC/Desktop
    System Manufacturer/Model
    Custom Builds
    CPU
    AMD Phenom II X4 975 Deneb 3.6ghz -2nd case AMD Atholon II 3.2ghz
    Motherboard
    Gigabyte GA-790XTA-UD4
    Memory
    Kingston Hyper-X DDR3 1600mhz 16gb - 2nd case Kingston Hyper-X "Fury" DDR3 1600mhz 8gb
    Graphics Card(s)
    MSI Radeon HD 5750 1gb - 2nd AMD Radeon 6450
    Sound Card
    Creative Xtreme Gamer - 2nd case Realtek Onboard audio
    Monitor(s) Displays
    Acer 19" dual monitor setup - 2nd case HP 20" lcd
    Screen Resolution
    1440x900 same on both builds
    Hard Drives
    1st build
    WD Caviar Black Edition Sata II 1tb two OS drives
    WD RE "Heavy Duty Sata II 2tb two Storage/Backup
    2nd build
    WD Blue Sata II 500gb
    WD Black Edition Sata III 1tb
    WD Green Power Sata II 1tb in external usb enclosure
    PSU
    Corsair TX750H 750w -Corsair 500w
    Case
    Antec 900-2 -NXZT Vulcan Mini tower/carrying handle
    Cooling
    120mm front pair, 120 rear 200cm top - 120mm Front intake 200mm side cover
    Keyboard
    Azio Blue led back lit both builds.
    Mouse
    MSI DS200 11 button programmable Gaming optical mouse - Odessa 3 button dual scroll trackball
    Internet Speed
    30mbps
    Other Info
    two MSI 22x ide dvd burners, 25 usb flash drives used for Linux Live, live data recovery 128gb, and Windows 7, 10 usb installation keys
I have to wonder if someone wrote up a similar guide for 7? I wanted to show a few people how much better 7 was over Vista or XP!
For /7, you need the Enterprise edition - because of the licensing. For /8 it only works right now because the license is free. After January 2013, that will stop too.
 
Last edited:

My Computer

System One

  • OS
    Vista and Win7
    System Manufacturer/Model
    2xHP, 2xGateway, 1xDell, 1xSony
    Hard Drives
    5 SSDs and 12 HDs
I have a question for the audience, has someone used a USB 3.0 flash drive on a USB 2.0 port? And if so, is that acceptably fast?

Good question:
Yse I guess you get the maximum speed of USB 2.0 (practically around 40 mb/s max more or less).

Don't have any USB 3.0 devices yet since I don't have USB 3.0 ports (better to run at optimal speeds).

That would be 30mb per second not 40 as far as 2.0 is concerned. And even that is never maintained steadily! People goof themselves thinking that each bus will alsways see the "maximum" speed at all times? Not so! Under "ideal" conditions you will simply peak at the maximum speed. As far as plugging a 3.0 device into a 2.0 port the obvious would be plugging a device designed to run on a faster bus being into the slower and not able to run any faster then the slower bus's speed if reaching peak.

Bench testing two identical installs on the same brand and same flash drives only one being the 3.0 stick and the other a 2.0 stick would be interesting. The only difference for the exact same model as well as size and brand would then be the results from each bus when comparing boot times and other things.

I would figure that since the flash on a USB 3.0 stick would prove to be faster on the USB 2.0 port since USB 2.0 flash speed is hindered genuinely by the slow speed of the flash. I think the same type of flash memory is used with USB 3.0 drives as SSDs.
 

My Computer

System One

  • OS
    Windows 8.1 Pro
    Computer type
    PC/Desktop
    System Manufacturer/Model
    ASUS
    CPU
    AMD FX 8320
    Motherboard
    Crosshair V Formula-Z
    Memory
    16 gig DDR3
    Graphics Card(s)
    ASUS R9 270
    Screen Resolution
    1440x900
    Hard Drives
    1 TB Seagate Barracuda (starting to hate Seagate)
    x2 3 TB Toshibas
    Windows 8.1 is installed on a SanDisk Ultra Plus 256 GB
    PSU
    OCZ 500 watt
    Case
    A current work in progres as I'll be building the physical case myself. It shall be fantastic.
    Cooling
    Arctic Cooler with 3 heatpipes
    Keyboard
    Logitech K750 wireless solar powered keyboard
    Mouse
    Microsoft Touch Mouse
    Browser
    Internet Explorer 11
    Antivirus
    Windows Defender, but I might go back on KIS 2014
I have eSata ports on the front of the case here but ended up with a fan cooled USB 2.0 enclosure that's been working out well as far as the 1tb drive presently in it. The live 88 stick however was made up here using a 32gb Kingston Data Traveler flash drive which worked well for the CP.

I have to wonder if someone wrote up a similar guide for 7? I wanted to show a few people how much better 7 was over Vista or XP!
You can use Windows 7 Embedded Standard and I think it's a similar process to install it on a flash drive as it is doing it with 8. Also, you could try using a .vhd file and install 7 onto that and copy it over to the flash drive, make the flash drive a bootable device and make the virtual hard drive a bootable drive as well.

That's what I actually used to get Windows 7 onto my flash drive before I got 8 installed natively onto it. It seemed to work a bit better than 8, but Windows 8 is still an unfinished product.
 

My Computer

System One

  • OS
    Windows 8.1 Pro
    Computer type
    PC/Desktop
    System Manufacturer/Model
    ASUS
    CPU
    AMD FX 8320
    Motherboard
    Crosshair V Formula-Z
    Memory
    16 gig DDR3
    Graphics Card(s)
    ASUS R9 270
    Screen Resolution
    1440x900
    Hard Drives
    1 TB Seagate Barracuda (starting to hate Seagate)
    x2 3 TB Toshibas
    Windows 8.1 is installed on a SanDisk Ultra Plus 256 GB
    PSU
    OCZ 500 watt
    Case
    A current work in progres as I'll be building the physical case myself. It shall be fantastic.
    Cooling
    Arctic Cooler with 3 heatpipes
    Keyboard
    Logitech K750 wireless solar powered keyboard
    Mouse
    Microsoft Touch Mouse
    Browser
    Internet Explorer 11
    Antivirus
    Windows Defender, but I might go back on KIS 2014
What I was mainly pointing to was when 7 was still seen in beta and RC form not RTM. I ran across one guide to see the 7 RC run from a flash drive using Portable VirtualBox. This wouldn't be for any long term use to start with as the W8 portable installs here would only be temporary as well.

Likewise I know how you feel about wanting to show how different 7 is to the two previous versions as well with some hanging onto XP with one friend willing to look at Vista due to his better half's Vista laptop. Since his old XP case bit the dust I am in the process of getting the old Vista build running again.

He didn't have much of an opinion for 8 however when showing him how it looks and feels when making up a flash drive using the guide here for the CP install. But he didn't like the 7 RC either when I had that set up at one point on his old XP case to dual boot the then new version either.
 

My Computer

System One

  • OS
    1st W10 Professional x64/W7 Ultimate x64 - 2nd Remote system: W10 Insider Builds/W7 Professional
    Computer type
    PC/Desktop
    System Manufacturer/Model
    Custom Builds
    CPU
    AMD Phenom II X4 975 Deneb 3.6ghz -2nd case AMD Atholon II 3.2ghz
    Motherboard
    Gigabyte GA-790XTA-UD4
    Memory
    Kingston Hyper-X DDR3 1600mhz 16gb - 2nd case Kingston Hyper-X "Fury" DDR3 1600mhz 8gb
    Graphics Card(s)
    MSI Radeon HD 5750 1gb - 2nd AMD Radeon 6450
    Sound Card
    Creative Xtreme Gamer - 2nd case Realtek Onboard audio
    Monitor(s) Displays
    Acer 19" dual monitor setup - 2nd case HP 20" lcd
    Screen Resolution
    1440x900 same on both builds
    Hard Drives
    1st build
    WD Caviar Black Edition Sata II 1tb two OS drives
    WD RE "Heavy Duty Sata II 2tb two Storage/Backup
    2nd build
    WD Blue Sata II 500gb
    WD Black Edition Sata III 1tb
    WD Green Power Sata II 1tb in external usb enclosure
    PSU
    Corsair TX750H 750w -Corsair 500w
    Case
    Antec 900-2 -NXZT Vulcan Mini tower/carrying handle
    Cooling
    120mm front pair, 120 rear 200cm top - 120mm Front intake 200mm side cover
    Keyboard
    Azio Blue led back lit both builds.
    Mouse
    MSI DS200 11 button programmable Gaming optical mouse - Odessa 3 button dual scroll trackball
    Internet Speed
    30mbps
    Other Info
    two MSI 22x ide dvd burners, 25 usb flash drives used for Linux Live, live data recovery 128gb, and Windows 7, 10 usb installation keys
I have eSata ports on the front of the case here but ended up with a fan cooled USB 2.0 enclosure that's been working out well as far as the 1tb drive presently in it. The live 88 stick however was made up here using a 32gb Kingston Data Traveler flash drive which worked well for the CP.

I have to wonder if someone wrote up a similar guide for 7? I wanted to show a few people how much better 7 was over Vista or XP!
You can use Windows 7 Embedded Standard and I think it's a similar process to install it on a flash drive as it is doing it with 8. Also, you could try using a .vhd file and install 7 onto that and copy it over to the flash drive, make the flash drive a bootable device and make the virtual hard drive a bootable drive as well.

That's what I actually used to get Windows 7 onto my flash drive before I got 8 installed natively onto it. It seemed to work a bit better than 8, but Windows 8 is still an unfinished product.

Both VM Player and VBox allow you to choose the type of VM where the option for a VHD would be a thought. One of the guides seen for a custom install of 7 on a flash drive would be able to see this done for a temp with any edition using VBox as the host for the VM you can carry with you as explained in one guide. How To Install Windows 7 On USB Flash Drive

The thing I had in mind however was through the use of the WAIK to see a temp 7 install using just about the same procedures pointed out in the guide here for 8. Once I have a new mini tower case running the RP will have a new home besides a VM where the 7 flash drive set up would allow me to show others still running XP or Vista the improvements as well as differences between the two newer versions.
 

My Computer

System One

  • OS
    1st W10 Professional x64/W7 Ultimate x64 - 2nd Remote system: W10 Insider Builds/W7 Professional
    Computer type
    PC/Desktop
    System Manufacturer/Model
    Custom Builds
    CPU
    AMD Phenom II X4 975 Deneb 3.6ghz -2nd case AMD Atholon II 3.2ghz
    Motherboard
    Gigabyte GA-790XTA-UD4
    Memory
    Kingston Hyper-X DDR3 1600mhz 16gb - 2nd case Kingston Hyper-X "Fury" DDR3 1600mhz 8gb
    Graphics Card(s)
    MSI Radeon HD 5750 1gb - 2nd AMD Radeon 6450
    Sound Card
    Creative Xtreme Gamer - 2nd case Realtek Onboard audio
    Monitor(s) Displays
    Acer 19" dual monitor setup - 2nd case HP 20" lcd
    Screen Resolution
    1440x900 same on both builds
    Hard Drives
    1st build
    WD Caviar Black Edition Sata II 1tb two OS drives
    WD RE "Heavy Duty Sata II 2tb two Storage/Backup
    2nd build
    WD Blue Sata II 500gb
    WD Black Edition Sata III 1tb
    WD Green Power Sata II 1tb in external usb enclosure
    PSU
    Corsair TX750H 750w -Corsair 500w
    Case
    Antec 900-2 -NXZT Vulcan Mini tower/carrying handle
    Cooling
    120mm front pair, 120 rear 200cm top - 120mm Front intake 200mm side cover
    Keyboard
    Azio Blue led back lit both builds.
    Mouse
    MSI DS200 11 button programmable Gaming optical mouse - Odessa 3 button dual scroll trackball
    Internet Speed
    30mbps
    Other Info
    two MSI 22x ide dvd burners, 25 usb flash drives used for Linux Live, live data recovery 128gb, and Windows 7, 10 usb installation keys
whs

I'd like to try using your tutorial.

Before I proceed.

Nelson
 

Attachments

  • Screenshot (5).png
    Screenshot (5).png
    13.1 KB · Views: 123
Last edited:

My Computer

System One

  • OS
    8 Release Preview, 7 Home Premium
    System Manufacturer/Model
    ASUS K53SJ Notebook
    CPU
    CPU @ 2.10GHz
    Motherboard
    Intel(R) Core(TM) i3-2310M Processor
    Memory
    DDR3 1333 MHz SDRAM, 2 x SO-DIMM socket for expansion up to 8 G SDRAM
    Graphics Card(s)
    NVIDIA® GeForce® GT 520M with 1GB DDR3 VRAM
    Monitor(s) Displays
    15.6" 16:9 HD (1366x768) LED Backlight
    Hard Drives
    500GB 5400rpm/7200rpm
    Case
    Aluminum Blue
    Keyboard
    Built in
    Mouse
    HP 2.4 GHz Wireless Optical Mobile Mouse
    Other Info
    Qualcomm Atheros AR9002WB-1NG Wireless Network Adapter
    Realtek PCIe GBE Family Controller
    Microsoft Wi-Fi Direct Virtual Adapter
    Bluetooth Device (Personal Area Network)
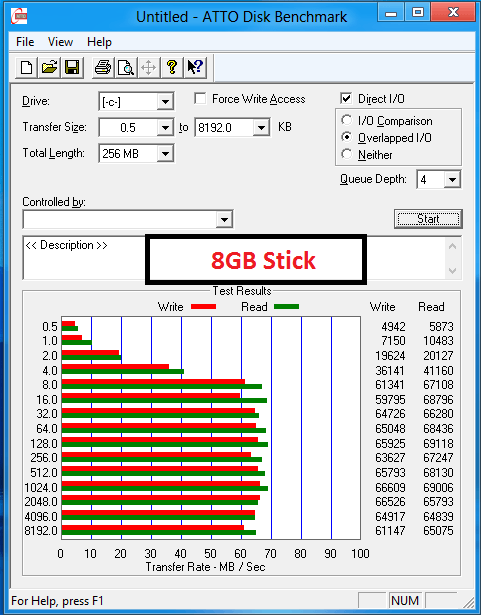
That stick looks OK from a performance point of view but don't expect super performance. 8GB will probably work but it is tight.
 

My Computer

System One

  • OS
    Vista and Win7
    System Manufacturer/Model
    2xHP, 2xGateway, 1xDell, 1xSony
    Hard Drives
    5 SSDs and 12 HDs
whs

My mistake, got the wrong drive that I've process. The previous post was drive C:

Here is the Drive H:

4szbza.png


WAIK still download.. :D
 

My Computer

System One

  • OS
    8 Release Preview, 7 Home Premium
    System Manufacturer/Model
    ASUS K53SJ Notebook
    CPU
    CPU @ 2.10GHz
    Motherboard
    Intel(R) Core(TM) i3-2310M Processor
    Memory
    DDR3 1333 MHz SDRAM, 2 x SO-DIMM socket for expansion up to 8 G SDRAM
    Graphics Card(s)
    NVIDIA® GeForce® GT 520M with 1GB DDR3 VRAM
    Monitor(s) Displays
    15.6" 16:9 HD (1366x768) LED Backlight
    Hard Drives
    500GB 5400rpm/7200rpm
    Case
    Aluminum Blue
    Keyboard
    Built in
    Mouse
    HP 2.4 GHz Wireless Optical Mobile Mouse
    Other Info
    Qualcomm Atheros AR9002WB-1NG Wireless Network Adapter
    Realtek PCIe GBE Family Controller
    Microsoft Wi-Fi Direct Virtual Adapter
    Bluetooth Device (Personal Area Network)

My Computer

System One

  • OS
    Vista and Win7
    System Manufacturer/Model
    2xHP, 2xGateway, 1xDell, 1xSony
    Hard Drives
    5 SSDs and 12 HDs
I will contact and visit the re-seller here in my place if they have the Lexar JumpDrive Triton 32GB USB 3.0 Flash Drive.

For the mean time I'll use 1st the 8GB, if the installation get rough then I will take now the Lexar. :)
 

My Computer

System One

  • OS
    8 Release Preview, 7 Home Premium
    System Manufacturer/Model
    ASUS K53SJ Notebook
    CPU
    CPU @ 2.10GHz
    Motherboard
    Intel(R) Core(TM) i3-2310M Processor
    Memory
    DDR3 1333 MHz SDRAM, 2 x SO-DIMM socket for expansion up to 8 G SDRAM
    Graphics Card(s)
    NVIDIA® GeForce® GT 520M with 1GB DDR3 VRAM
    Monitor(s) Displays
    15.6" 16:9 HD (1366x768) LED Backlight
    Hard Drives
    500GB 5400rpm/7200rpm
    Case
    Aluminum Blue
    Keyboard
    Built in
    Mouse
    HP 2.4 GHz Wireless Optical Mobile Mouse
    Other Info
    Qualcomm Atheros AR9002WB-1NG Wireless Network Adapter
    Realtek PCIe GBE Family Controller
    Microsoft Wi-Fi Direct Virtual Adapter
    Bluetooth Device (Personal Area Network)
You don't need a 32GB stick - 16GB will suffice for the purpose.
 

My Computer

System One

  • OS
    Vista and Win7
    System Manufacturer/Model
    2xHP, 2xGateway, 1xDell, 1xSony
    Hard Drives
    5 SSDs and 12 HDs
So, 16 GB is good enough for space and what I need is the 3.0 speed? Correct me if I'm wrong.
 

My Computer

System One

  • OS
    8 Release Preview, 7 Home Premium
    System Manufacturer/Model
    ASUS K53SJ Notebook
    CPU
    CPU @ 2.10GHz
    Motherboard
    Intel(R) Core(TM) i3-2310M Processor
    Memory
    DDR3 1333 MHz SDRAM, 2 x SO-DIMM socket for expansion up to 8 G SDRAM
    Graphics Card(s)
    NVIDIA® GeForce® GT 520M with 1GB DDR3 VRAM
    Monitor(s) Displays
    15.6" 16:9 HD (1366x768) LED Backlight
    Hard Drives
    500GB 5400rpm/7200rpm
    Case
    Aluminum Blue
    Keyboard
    Built in
    Mouse
    HP 2.4 GHz Wireless Optical Mobile Mouse
    Other Info
    Qualcomm Atheros AR9002WB-1NG Wireless Network Adapter
    Realtek PCIe GBE Family Controller
    Microsoft Wi-Fi Direct Virtual Adapter
    Bluetooth Device (Personal Area Network)
Step 4 - Prepare your USB stick

We now have to define a primary active partition on the USB stick. For that we open an elevated Command Prompt (run as administrator). Type or paste each of the following commands (one by one) and hit Enter after each command.

In this step, I will execute the command in C: or H: (usb)
 

My Computer

System One

  • OS
    8 Release Preview, 7 Home Premium
    System Manufacturer/Model
    ASUS K53SJ Notebook
    CPU
    CPU @ 2.10GHz
    Motherboard
    Intel(R) Core(TM) i3-2310M Processor
    Memory
    DDR3 1333 MHz SDRAM, 2 x SO-DIMM socket for expansion up to 8 G SDRAM
    Graphics Card(s)
    NVIDIA® GeForce® GT 520M with 1GB DDR3 VRAM
    Monitor(s) Displays
    15.6" 16:9 HD (1366x768) LED Backlight
    Hard Drives
    500GB 5400rpm/7200rpm
    Case
    Aluminum Blue
    Keyboard
    Built in
    Mouse
    HP 2.4 GHz Wireless Optical Mobile Mouse
    Other Info
    Qualcomm Atheros AR9002WB-1NG Wireless Network Adapter
    Realtek PCIe GBE Family Controller
    Microsoft Wi-Fi Direct Virtual Adapter
    Bluetooth Device (Personal Area Network)
1. 16GB is enough
2. the stick I linked is a USB3 stick - so you need a USB3 port
3. you run command prompt from your OS which is C, but you select the USB stick as target
 

My Computer

System One

  • OS
    Vista and Win7
    System Manufacturer/Model
    2xHP, 2xGateway, 1xDell, 1xSony
    Hard Drives
    5 SSDs and 12 HDs
Here are the scenario, for I've been busy yesterday and can't finish the installation.

1st thing that I have made after the download, installation was I mounted the .ISO file and open the mount drive (I'm using Win8 OS, as you have mention in 1st post just to right click the iso file and mount is available, as it was present in the properties) were executable file was there but it didn't install properly.

2nd try was I've burn the .ISO file in a DVD/CD were DVD/CD drive will ask you to run the installer that I have executed the installer still it wasn't successful.

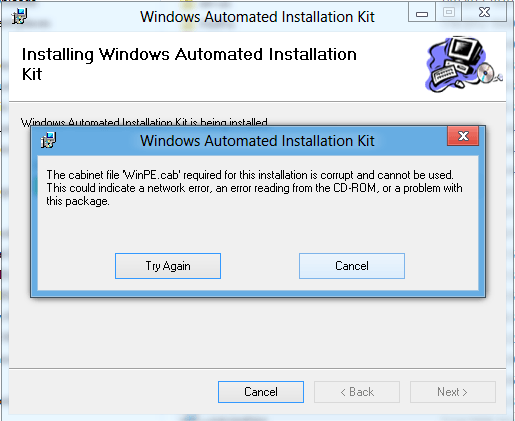
3rd try, was I use google search for the related troubleshoot Trouble installing Windows AIK for Win 7, 7zip was download and the ISO file extracted in the desktop when I RUN the program I still got the same error for WinPE.

Screenshot (7).png

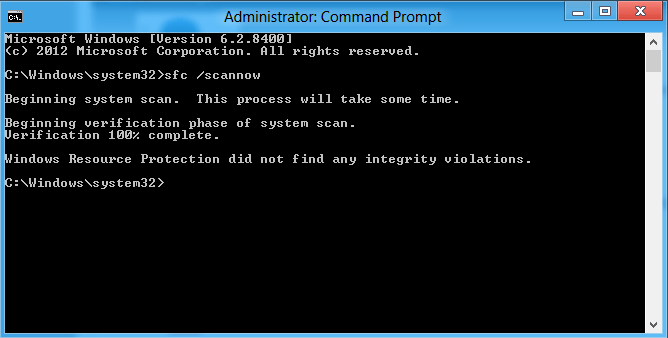
Then I use the command sfc /scannow replied by MBridge.

MCBridge,
If you found errors with
sfc /scannow
and found corrupted system files, then your system probably still has some problems.

Screenshot (8).png

And everything looks good for that scan.

Now, do I still need to download the iso file again?or is there any alternative way to resolve the iso?

Any suggestion for the WinPE to proceed the installation? :think:
 
Last edited:

My Computer

System One

  • OS
    8 Release Preview, 7 Home Premium
    System Manufacturer/Model
    ASUS K53SJ Notebook
    CPU
    CPU @ 2.10GHz
    Motherboard
    Intel(R) Core(TM) i3-2310M Processor
    Memory
    DDR3 1333 MHz SDRAM, 2 x SO-DIMM socket for expansion up to 8 G SDRAM
    Graphics Card(s)
    NVIDIA® GeForce® GT 520M with 1GB DDR3 VRAM
    Monitor(s) Displays
    15.6" 16:9 HD (1366x768) LED Backlight
    Hard Drives
    500GB 5400rpm/7200rpm
    Case
    Aluminum Blue
    Keyboard
    Built in
    Mouse
    HP 2.4 GHz Wireless Optical Mobile Mouse
    Other Info
    Qualcomm Atheros AR9002WB-1NG Wireless Network Adapter
    Realtek PCIe GBE Family Controller
    Microsoft Wi-Fi Direct Virtual Adapter
    Bluetooth Device (Personal Area Network)

My Computer

System One

  • OS
    Windows 8.1 Pro with Media Center
    Computer type
    PC/Desktop
    System Manufacturer/Model
    HP COMPAQ Presario CQ57
    CPU
    AMD E- 300 APU with Radion HD Graphics 1.30GHz
    Motherboard
    inbuilt
    Memory
    4GB
    Graphics Card(s)
    ATI
    Sound Card
    High Definition Audio on-board
    Monitor(s) Displays
    notebook
    Screen Resolution
    1366x768
    Hard Drives
    Seagate ST9500325AS
    Google drive 15GB
    Skydrive 25GB
    BT Cloud
    PSU
    external 20v
    Case
    Laptop
    Cooling
    pretty good
    Keyboard
    inbuilt
    Mouse
    touchpad
    Internet Speed
    BT Infinity Unlimited - 80 up 20 down =70/16 really
    Browser
    Chrome Canary usually
    Antivirus
    Windows Defender and Malwarebytes
    Other Info
    no Start menu modifications
    Upgraded with no issues to 8.0 and to 8.1
I'm now having a hard time for which one will start to figure out the command. :confused:
Still trying..
Maybe a few minutes more need to take a rest for I still have work for tomorrow.
 

My Computer

System One

  • OS
    8 Release Preview, 7 Home Premium
    System Manufacturer/Model
    ASUS K53SJ Notebook
    CPU
    CPU @ 2.10GHz
    Motherboard
    Intel(R) Core(TM) i3-2310M Processor
    Memory
    DDR3 1333 MHz SDRAM, 2 x SO-DIMM socket for expansion up to 8 G SDRAM
    Graphics Card(s)
    NVIDIA® GeForce® GT 520M with 1GB DDR3 VRAM
    Monitor(s) Displays
    15.6" 16:9 HD (1366x768) LED Backlight
    Hard Drives
    500GB 5400rpm/7200rpm
    Case
    Aluminum Blue
    Keyboard
    Built in
    Mouse
    HP 2.4 GHz Wireless Optical Mobile Mouse
    Other Info
    Qualcomm Atheros AR9002WB-1NG Wireless Network Adapter
    Realtek PCIe GBE Family Controller
    Microsoft Wi-Fi Direct Virtual Adapter
    Bluetooth Device (Personal Area Network)
Warning: In Windows 7, I usually keep my bootmgr on the C: partition. With that setup I had some problems running Windows 8 from the stick. Each time it would corrupt my bootmgr. I then created a separate 400MB partition and moved the bootmgr there. That seems to cure the problem.

Great tutorial. I did not understand this warning though. What does it mean for when I take the USB stick "To go" on a friend's/client's system?
 

My Computer

System One

  • OS
    Windows 8 Pro
    System Manufacturer/Model
    Built it myself
    CPU
    i7 2600K
    Motherboard
    Asrock Z77 Extreme4
    Memory
    16 GB
    Graphics Card(s)
    XFX nVidia GT 420
    Hard Drives
    Crucial SSD
    3TB HDD
    2TB HDD
    PSU
    Seasonic 750W
Back
Top