Windows 8 To Go - Setup on a USB Flash Drive or USB Disk

How to Setup "Windows 8 To Go" on a USB Flash Drive or USB Disk in any Windows 7 and Windows 8

information   Information
This tutorial will show you how to manually setup Windows 8 To Go from any Windows 7 or Windows 8 (except Windows 8 RT) to be able to install and run Windows 8 from a USB flash drive or external USB disk. The procedure for the USB stick is discussed in Chapter A, the procedure for the USB attached disk is shown in Chapter B.

You should expect the whole process to take about 3 hours elapsed time if you do not have the WAIK on your system and about 1 hour if the WAIK is installed on your system.

If you install on a stick, it is very important to choose a fast USB stick of at least 16GB size. For the USB attached disk it is preferable to use a USB3 attachment, but USB2 should also work. In addition, you need a program to create a virtual CD and the Windows 8 .iso. The rest is done in Command Prompt.

For more information and details about Windows To Go workspaces, see: Windows To Go: Feature Overview

Note   Note
Those of you who have an Enterprise edition of Windows 8, you can also explore this option which is built into the Enterprise edition.

How to Create a "Windows To Go" Workspace on a USB Flash Drive in Windows 8 Enterprise

Tip   Tip
It is highly recommended to use a USB 3.0 flash drive or disk. Otherwise it will run like a snail from it.


Chapter A - Installation on a stick


Step 1 - Check the speed of your USB stick


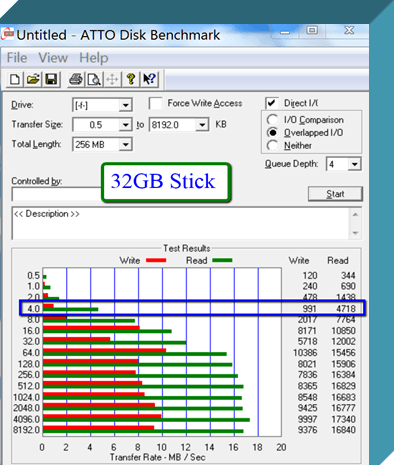
To measure the speed of your stick I recommend Atto Disk Benchmark. It will produce a benchmark result like this picture.
2012-03-28_1947.png


It is the example of a 32GB USB2 stick that is not very fast. Especially the 4K read/write speeds are pretty slow. It is important to focus on the 4K size because that is the blocksize that the system uses most of the time. The large blocksizes are unimportant.

Loading the system (appr. 600MB to 1GB) at boot time will take over 3 minutes at a read speed of 4.7MB/sec. But, since there are also other activities going on at this time, the boot is even longer.A stick with characteristics like this one is not recommended.

2012-03-28_1951.png


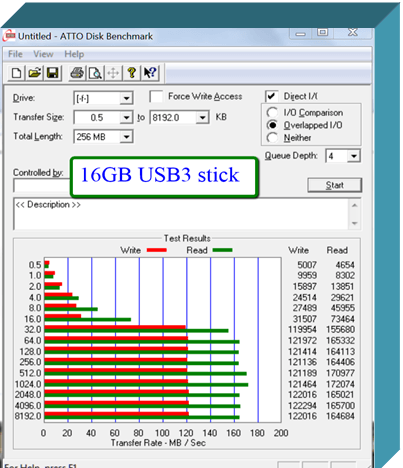
This is a USB3 stick which runs Windows 8 fluently. The initial system setup still takes a bit more time than on a fast disk, but it is not really out of the ordinary.

On this stick I have loaded the 64bit Windows 8 and I am very pleased with both the boot time and the execution of programs and system facilities.


Step 2 - Download the WAIK and extract the imagex file

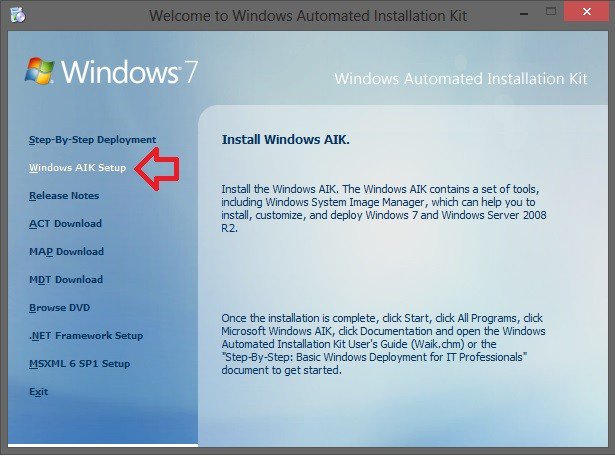
If you do not have the WAIK (Windows Automated Installation Kit) on your system, then you have to download from this Microsoft site. This will be a bit lengthy because the WAIK is 1.7GB - figure a 2-hour download.

When you are done downloading the KB3AIK_EN.iso file, mount this .iso, open and run the StartCD.exe file to install WAIK on your system.
WAIK.jpg

Then you have to copy the imagex.exe. You find that in C:\Program Files\Windows AIK\Tools. There is a 32bit version and a 64bit version.
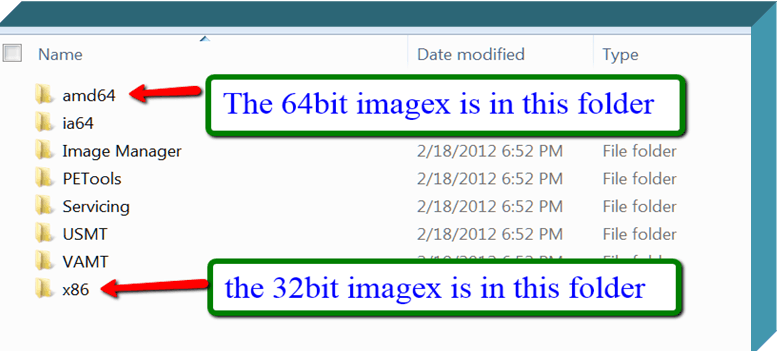

2012-03-28_1953.png


You choose 32bit when you install a 32bit version of Windows 8 on your stick - 64bit when you install the 64bit version. Copy the one that corresponds to your Windows 8 .iso to the desktop. You can copy it to any other folder, but then you have to change the path in the installation command that we will run later in Command Prompt.

I have tried both the 32bit version (on the slow USB2 stick) and the 64bit version (on the fast USB3 stick). Both work as far as I can tell although there is a significant difference in performance.


Step 3 - Mount the Win8 .iso in a virtual BD ROM

We first have to create a virtual BD ROM with theVirtual Clone Drive Program. Download, install and run this program. It is very simple. When you start the program, you get this window. Just click OK and you are done.

You then go to Computer and you find your BD ROM.

Note: If you are working in Windows 8, you can mount the .iso directly from File Explorer. Just right click on the .iso and you will find a mount option. See: ISO Images - Mount or Unmount
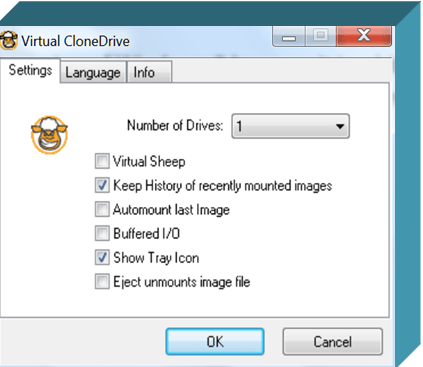


2012-03-28_1955.png


To mount the .iso in the BD ROM, follow the instructions in the next picture. Make sure you remember the drive letter of the BD ROM (in my case 'H:') because you will need that later.
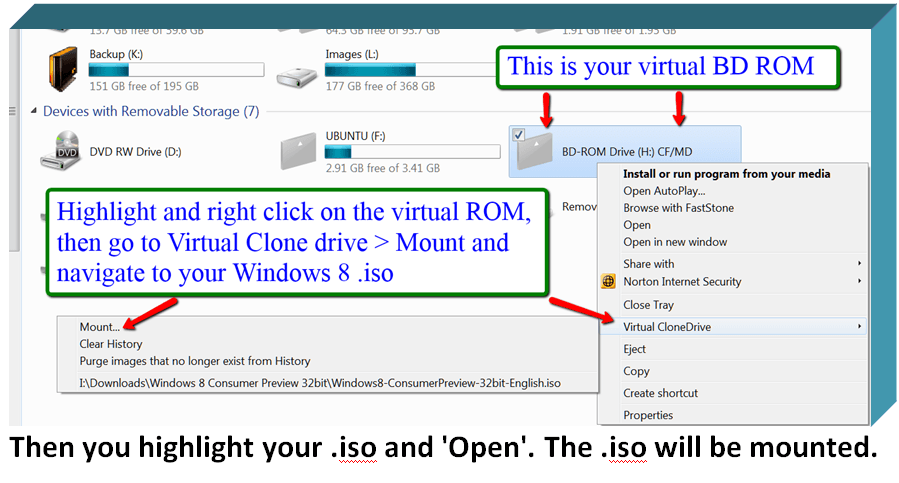

2012-03-28_1959.png


Step 4 - Prepare your USB stick

We now have to define a primary active partition on the USB stick. For that we open an elevated Command Prompt (run as administrator). Type or paste each of the following commands (one by one) and hit Enter after each command.

Diskpart
List disk
Select disk n
(where n is the number that was given for your stick in List disk)
Clean
Create partition primary
Format fs=ntfs quick
Assign
Active
Exit


Your stick is now ready for the installation of Windows 8.


Step 5 - Install Windows 8 on the stick

This is very easy now with a command in Command Prompt. It may take a little while to transfer the whole system, so be patient. The Command is:

"C:\Users\Your Name\Desktop\imagex.exe" /apply H:\sources\install.wim 1 F:\

Your Name is the name of your system. H: is the letter of my BD ROM (step 3). If your BD ROM has another letter, you have to change that accordingly. F: is the drive letter of my stick (step 4). Here you also have to replace it if your stick is on another letter.

As last step you have to run a command to install the boot files. If you are installing on a Windows 7 system, use this command. You have to be aware that this installs a Win7 BCD which works but is slower than the Win8 UEFI BCD.

bcdboot F:\windows /s F:

If you are installing on a Windows 8 system, use this command below. This is the preferred BCD because it is faster for boot and shutdown. You can rerun this command in a Win8 system even if you already installed the Win7 BCD in a Win7 system. It will 'upgrade' the BCD to the Win8 (UEFI) level.

bcdboot F:\windows /s F: /f ALL

Here again F: is the letter for my stick which you may have to adjust.


Step 6 - Run Windows 8 from your USB stick

You are done with the installation and can now run Windows 8 off your stick. For that you have to change the boot sequence in the BIOS pointing at the USB stick as first boot device.

I run the stick version on my laptop and have made the USB #1 in the boot sequence. That way it loads Windows 8 from the stick when the stick is plugged in and Windows 7 from the SSD when there is no Windows 8 stick.

As I said earlier, a USB stick is no SSD - although the technology is similar. So be patient, especially with the initial setup where the system has to do a lot of write operations which are slow on a stick. But once the system is in full swing, it is quite some fun.

Warning: In Windows 7, I usually keep my bootmgr on the C: partition. With that setup I had some problems running Windows 8 from the stick. Each time it would corrupt my bootmgr. I then created a separate 400MB partition and moved the bootmgr there. That seems to cure the problem.


Chapter B - Installation on a USB attached disk


The procedure is very similar to what I described for the USB stick with a few exceptions.

Step 1 - Check the speed of the USB attached disk

This is the HDD I run in a USB3 open enclosure. It is a 5400RPM disk that I had recovered from my laptop when I installed the SSD.

The R/W speeds at the 4K blocksize are very similar to my USB3 stick. The R/W speed at the bigger blocksizes is slower because the disk can only spin so fast.

Performance wise it felt slower than the performance on the USB3 stick but was still very acceptable.
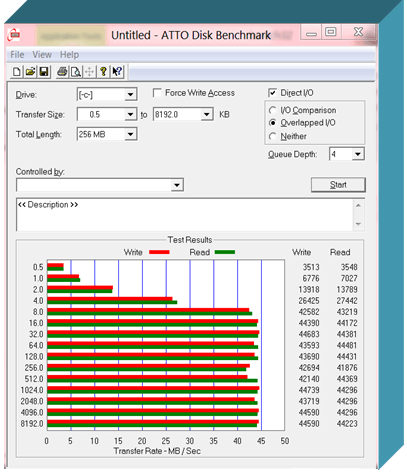

2012-03-28_2002.png


Step 2 - Download the WAIK and extract the imagex file

This step is exactly the same as described for the stick.

Step 3 - Mount the Win8 .iso in a virtual BD ROM

This step is exactly the same as described for the stick. Make sure you apply the correct device letters for the BD ROM and the HDD.

Step 4 - Prepare your USB disk

Here I went a different route. I used Partition Wizardon my Windows 7 system to define a primary active partition on the HDD. That is easier than working with Command Prompt on a multi partition disk.

Note: There have been reports of problems when using Partition Wizard - although I did not encounter any problems myself. The report was that the final system did not boot. In such a case you might want to go back and use Command Prompt as the safer method.

Step 5 - Install Windows 8 on the disk

That is again the same procedure as for the stick. I did the installation step on my Windows 7 system but copied the BCD on my Windows 8 in Virtual Box.

Step 6 - Run Windows 8 from your USB disk

Change the boot sequence in the BIOS to boot from USB and off you go. The setup of Windows 8 took appr. 20 minutes (in the USB3 enclosure). During that setup, there is one reboot where you have to change the boot sequence again - else the system will boot into the first boot device it finds which is probably your default OS. When that was done, operation was as one would expect from a slow HDD.

I then tried it on my desktop in an eSata enclosure. The system first made some automatic adjustments for the different hardware. Then it ran flawlessly. The performance was about the same as from the USB3 enclosure. But both are slower than my USB3 stick.

If you have a USB disk with 20 to 25GB of free space lying around, it is certainly an alternative to run the Windows 8 CP from that. If nothing else, it is a lot of fun making the installation and seeing that it works.


Attachments

  • Windows_to_Go.png
    Windows_to_Go.png
    10.1 KB · Views: 427
Last edited by a moderator:
my one and only intention was to make my windows 8 installation portable.... and I have succeeded :)

forget windows to go tutorials, fiddling with boot files....

PWBoot is the solution http://reboot.pro/6851/ go there, download the latest version, pick one of the two options and long live the creator of pwboot

CHEERS to you all
 

My Computer

System One

  • OS
    Windows 8 Enterprise
my one and only intention was to make my windows 8 installation portable.... and I have succeeded :)

forget windows to go tutorials, fiddling with boot files....

PWBoot is the solution http://reboot.pro/6851/ go there, download the latest version, pick one of the two options and long live the creator of pwboot

CHEERS to you all

Bad link.

Good link.PNG
 

My Computer

System One

  • OS
    ME, XP,Vista,Win7,Win8,Win8.1
    Computer type
    PC/Desktop
    Other Info
    Notebooks x 3

    Desktops x 5

    Towers x 4
Hi. I have a problem when I installed it on USB HDD. Windows is starting but after it loads there is black screen. Sorry for my bad english but i am from poland :)
 

My Computer

System One

  • OS
    Windows 7
Another reason for the black screen you are getting is that windows 8 and windows 7 creates a small partition, 350mb and 100mb respectively for the boot files when you install windows on an unpartitioned hard drive. this small partition is called system reserved and can be seen on the disk management utility

You should pre partition the hard drive so that you have only one partition for the windows installation, for example C, in which the windows setup will install the boot files also... this can be done by taking the hard drive you want to install windows on and plugging it into another computer, deleting the existing C partion and system reserved partition, and creating a single partition. now install your windows on the pre formatted C partition that you have just created and after that use pwboot.

Hope this will be of some help for you.
 

My Computer

System One

  • OS
    Windows 8 Enterprise
Note that if you delete existing partitions in setup and create a new partition and format it (during the disk selection phase), Windows does not create the extra partition either.
 

My Computer

System One

  • OS
    Windows 8.1 x64
    Computer type
    PC/Desktop
    System Manufacturer/Model
    Custom
    CPU
    Intel Core i7 4790K @ 4.5GHz
    Motherboard
    Asus Maximus Hero VII
    Memory
    32GB DDR3
    Graphics Card(s)
    Nvidia GeForce GTX970
    Sound Card
    Realtek HD Audio
    Hard Drives
    1x Samsung 250GB SSD
    4x WD RE 2TB (RAIDZ)
    PSU
    Corsair AX760i
    Case
    Fractal Design Define R4
    Cooling
    Noctua NH-D15
Nope, it wasn't a 2hr download. It's a 4.5hr download. That darn slow Internet.
 

My Computer

System One

  • OS
    Windows 10 Pro x64
    Computer type
    Laptop
    System Manufacturer/Model
    Lenovo Y520
    CPU
    Intel Core i5 7300HQ
    Motherboard
    OEM Lenovo
    Memory
    4GB DDR4-2400
    Graphics Card(s)
    NVIDIA GeForce GTX 1050
    Sound Card
    Realtek HD
    Monitor(s) Displays
    1 (2)
    Screen Resolution
    1920x1080
    Hard Drives
    Seagate 1TB 5400 RPM
    Keyboard
    OEM Lenovo
    Mouse
    Logitech G502 Proteus Core
    Internet Speed
    100 Mbps
    Browser
    Google Chrome
    Other Info
    PC:

    AMD Athlon X4 760K
    8GB DDR3-1866
    AMD Radeon RX 460
    Seagate 500 GB 7200 RPM
Warning: In Windows 7, I usually keep my bootmgr on the C: partition. With that setup I had some problems running Windows 8 from the stick. Each time it would corrupt my bootmgr. I then created a separate 400MB partition and moved the bootmgr there. That seems to cure the problem.

Great tutorial. I did not understand this warning though. What does it mean for when I take the USB stick "To go" on a friend's/client's system?
I am not sure I can answer what will happen on your customers systems. Usually a Windows 7 system will have an independent system partition. In that case there should be no problem - at least in my experience. I only encountered the problem on systems that had the bootmgr on the C partition.
After successfully booting a few instances this win to go system from the usb stick ,as you foresaw it's boot routine became corrupted(blank screen/no win logo).
Is there a way to repair stick's bootmgr without being necessary to prepare & reinstall/set the stick again from the beginning?
i have tried to rerun "bcdboot F:\windows /s F: /f ALL"command again but it doesn't help....
 

My Computer

System One

  • OS
    W8
Now do I use this to put windows 8 on a USb stick so I can download windows 8 onto anyones computer? in other words if my friend decides he wants a clean install of windows 8 I can bring my USB with this on it and perform the clean install?
 

My Computer

System One

  • OS
    Windows 8
    System Manufacturer/Model
    NP540U3C-A01UB
    CPU
    Intel(R) Core(TM) i5-3317U CPU @ 1.70GHz, 1701 Mhz, 2 Core(s), 4 Logical Processor(S)
    Motherboard
    Samsung
    Memory
    DDR3 4GB
    Graphics Card(s)
    Intel HD Graphics 4000
Now do I use this to put windows 8 on a USb stick so I can download windows 8 onto anyones computer? in other words if my friend decides he wants a clean install of windows 8 I can bring my USB with this on it and perform the clean install?

I do believe you will need to make a partition on the flash drive to do this. You may need to use a third party partitioning program to do so however.
 

My Computer

System One

  • OS
    Windows 8.1 Pro
    Computer type
    PC/Desktop
    System Manufacturer/Model
    ASUS
    CPU
    AMD FX 8320
    Motherboard
    Crosshair V Formula-Z
    Memory
    16 gig DDR3
    Graphics Card(s)
    ASUS R9 270
    Screen Resolution
    1440x900
    Hard Drives
    1 TB Seagate Barracuda (starting to hate Seagate)
    x2 3 TB Toshibas
    Windows 8.1 is installed on a SanDisk Ultra Plus 256 GB
    PSU
    OCZ 500 watt
    Case
    A current work in progres as I'll be building the physical case myself. It shall be fantastic.
    Cooling
    Arctic Cooler with 3 heatpipes
    Keyboard
    Logitech K750 wireless solar powered keyboard
    Mouse
    Microsoft Touch Mouse
    Browser
    Internet Explorer 11
    Antivirus
    Windows Defender, but I might go back on KIS 2014
Microsoft gave me a Windows 8 pro key today. Because the windows 8 that came with my computer is OEM. They told me they will do a clean install for me. Something I believe I could do on my own with the assistance of this site. Any way,

I need to buy a new USB drive because the cheap one I have would not work with the windows 7 usb/dvd download tool. I was wondering if I could just buy an External HDD instead of buying a USB drive? If so would it be a lot faster also? I might be trying to use this HDD for my PS3, recovery, system repairs, maybe even back ups, and saving pictures and documents. Would this all be possible from one external HDD? What about maybe even a external SSD? if so would it be worth it to use a SSD? would it be that much faster?

I know some of these answers would be opinions but that is why I would like to have a professionals opinion. I need to buy this by tomorrow afternoon to. So a quick answer would be great if possible.
 

My Computer

System One

  • OS
    Windows 8
    System Manufacturer/Model
    NP540U3C-A01UB
    CPU
    Intel(R) Core(TM) i5-3317U CPU @ 1.70GHz, 1701 Mhz, 2 Core(s), 4 Logical Processor(S)
    Motherboard
    Samsung
    Memory
    DDR3 4GB
    Graphics Card(s)
    Intel HD Graphics 4000
How can I get the 100MB recovery partition?

Hi

I got it, though I also needed to use Easybcd to be able to boot from the external disk.

But I have a question:
The way you explain we install Windows to a primary partition.
But we don't get the 100MB boot/recovery partition (that is automatically created when you install windows on a internal blank disk, and it's usually hidden).
How can I get that "recovery" partition created?
I cannot find the option with easeus, diskpart, nor other applications I've tried.
Nor can I get it created whit imagex, bcdboot or after rebooting.


regards
 

My Computer

System One

  • OS
    Windows 8
    Computer type
    Laptop
Hi there
I'd modify your tutorial so you can select whether to create a 32 bit or 64 bit system-- you don't actually have to "Install" Windows either.

After mounting the WAIK ISO use 7_Zip to open NEUTRAL_CAB and extract the F1_IMAGE for a 32 bit system or the F3_IMAGE for a 64 bit system. Rename the appropriate version to IMAGEX.EXE

(The F2 version is the rare ia-64 thing -- I doubt whether anybody has one of those CPU's).

Simply now mount the W8 iso (not the WAIK) and copy the \SOURCES\INSTALL.WIM file to the same directory as your created IMAGEX.EXE file.

assume target drive is E:

Create the W8 image C:\imagex_directory > IMAGEX.EXE /APPLY INSTALL.WIM 1 E:\ might take 35 mins or so.

now create the boot files

C:> BCDBOOT.EXE E:\WINDOWS /S E: /F ALL

Now it should boot just fine.

You shouldn't need EasyBCD to create the boot files -- use the BCDboot command from the W8 target system created or from a running W8 system.

BTW my system runs just great on an SSD -- I've also installed VMware workstation and run a W7 and an XP virtual machine on it !! performance is fine especially if using a USB3 slot -- USB2 is also fine on an SSD -- even on a standard external USB HDD it's not too bad at all -- even running a VM.

Cheers
jimbo
 

My Computer

System One

  • OS
    Linux Centos 7, W8.1, W7, W2K3 Server W10
    Computer type
    PC/Desktop
    Monitor(s) Displays
    1 X LG 40 inch TV
    Hard Drives
    SSD's * 3 (Samsung 840 series) 250 GB
    2 X 3 TB sata
    5 X 1 TB sata
    Internet Speed
    0.12 GB/s (120Mb/s)
Window to go

I am currently using "windows 8 enterprise", i want to know that if i use "window to go" on my external HDD (500 GB), is my HDD will be completely formatted?
 

My Computer

System One

  • OS
    Windows 8 Enterprise
Hello Naghmash, and welcome to Eight Forums.

Yes, the external HDD will be completely formatted during the process of having it used for Windows To Go.
 

My Computer

System One

  • OS
    64-bit Windows 10
    Computer type
    PC/Desktop
    System Manufacturer/Model
    Custom self built
    CPU
    Intel i7-8700K OC'd to 5 GHz
    Motherboard
    ASUS ROG Maximus XI Formula Z390
    Memory
    64 GB (4x16GB) G.SKILL TridentZ RGB DDR4 3600 MHz (F4-3600C18D-32GTZR)
    Graphics Card(s)
    ASUS ROG-STRIX-GTX1080TI-O11G-GAMING
    Sound Card
    Integrated Digital Audio (S/PDIF)
    Monitor(s) Displays
    2 x Samsung Odyssey G7 27"
    Screen Resolution
    2560x1440
    Hard Drives
    1TB Samsung 990 PRO M.2,
    4TB Samsung 990 PRO PRO M.2,
    8TB WD MyCloudEX2Ultra NAS
    PSU
    OCZ Series Gold OCZZ1000M 1000W
    Case
    Thermaltake Core P3
    Cooling
    Corsair Hydro H115i
    Keyboard
    Logitech wireless K800
    Mouse
    Logitech MX Master 3
    Internet Speed
    1 Gb/s Download and 35 Mb/s Upload
    Browser
    Internet Explorer 11
    Antivirus
    Malwarebyte Anti-Malware Premium
    Other Info
    Logitech Z625 speaker system,
    Logitech BRIO 4K Pro webcam,
    HP Color LaserJet Pro MFP M477fdn,
    APC SMART-UPS RT 1000 XL - SURT1000XLI,
    Galaxy S23 Plus phone
I've got Windows 7 32-bit to work on an USB 2.0 8GB flash drive, but damn, it's so slow!
Boot: 6-7 mins
Welcome screen: 3-4 mins
opening my computer: 50 seconds
and then BSOD, lol.
 

My Computer

System One

  • OS
    Windows 10 Pro x64
    Computer type
    Laptop
    System Manufacturer/Model
    Lenovo Y520
    CPU
    Intel Core i5 7300HQ
    Motherboard
    OEM Lenovo
    Memory
    4GB DDR4-2400
    Graphics Card(s)
    NVIDIA GeForce GTX 1050
    Sound Card
    Realtek HD
    Monitor(s) Displays
    1 (2)
    Screen Resolution
    1920x1080
    Hard Drives
    Seagate 1TB 5400 RPM
    Keyboard
    OEM Lenovo
    Mouse
    Logitech G502 Proteus Core
    Internet Speed
    100 Mbps
    Browser
    Google Chrome
    Other Info
    PC:

    AMD Athlon X4 760K
    8GB DDR3-1866
    AMD Radeon RX 460
    Seagate 500 GB 7200 RPM
I've got Windows 7 32-bit to work on an USB 2.0 8GB flash drive, but damn, it's so slow!
Boot: 6-7 mins
Welcome screen: 3-4 mins
opening my computer: 50 seconds
and then BSOD, lol.

Hi there
Does the Windows 7 system REALLY boot and run from the USB or do you need some type of boot manager on the Host machine. Windows 8 to go runs entirely from the external device - even if there's no HDD at all in the main computer.

Incidentally how did you get windows 7 to boot and run from the USB - I'm sure people would be interested in that as a lot of people can't get W8 enterprise to make W8 to go.

Flash drives are usually too slow for this purpose -- however a USB external HDD drive should give acceptable performance. If you are using large external USB drives you can create partitions on it too -- create a small Windows OS one using DISKPART and have the rest of the drive for data space.

BTW if you use an SSD for the windows to go system it should perform just fine even when connected to the computer via a SATA==>USB2 adapter and a USB2 slot.

(If you have any USB3 slots on your machine you can often improve the speed of USB2 devices by plugging them into a USB3 slot - the faster bus speed will transfer data faster even though reading data off the device will still be at USB2 speed - the cache in the device will overlap your slow read speeds with faster data transfer. - Note though a lot of machines won't recognize the USB3 port until after boot so your windows to go might not boot if connected to a USB3 slot).

There are posts around the net explaining how to get a W7 system to run from a USB device - however this usually means using the NATIVE boot loader on the HOST machine to attach a W7 VHD (not a Virtual machine BTW) and then boot from the attached USB VHD drive. THIS IS NOT THE SAME AS A WINDOWS TO GO SYSTEM.

A Windows to go system boots and runs ENTIRELY from the USB device whether or not there's anything in the Host system at all.

Remember also when creating a Windows to go system you can do it "manually" - you don't have to use "Certified devices".

Creating a Non-Certified Windows To Go USB Drive » ADMIN Magazine

Cheers
jimbo
 

My Computer

System One

  • OS
    Linux Centos 7, W8.1, W7, W2K3 Server W10
    Computer type
    PC/Desktop
    Monitor(s) Displays
    1 X LG 40 inch TV
    Hard Drives
    SSD's * 3 (Samsung 840 series) 250 GB
    2 X 3 TB sata
    5 X 1 TB sata
    Internet Speed
    0.12 GB/s (120Mb/s)
I've got Windows 7 32-bit to work on an USB 2.0 8GB flash drive, but damn, it's so slow!
Boot: 6-7 mins
Welcome screen: 3-4 mins
opening my computer: 50 seconds
and then BSOD, lol.

Hi there
Does the Windows 7 system REALLY boot and run from the USB or do you need some type of boot manager on the Host machine. Windows 8 to go runs entirely from the external device - even if there's no HDD at all in the main computer.

Incidentally how did you get windows 7 to boot and run from the USB - I'm sure people would be interested in that as a lot of people can't get W8 enterprise to make W8 to go.

Flash drives are usually too slow for this purpose -- however a USB external HDD drive should give acceptable performance. If you are using large external USB drives you can create partitions on it too -- create a small Windows OS one using DISKPART and have the rest of the drive for data space.

BTW if you use an SSD for the windows to go system it should perform just fine even when connected to the computer via a SATA==>USB2 adapter and a USB2 slot.

(If you have any USB3 slots on your machine you can often improve the speed of USB2 devices by plugging them into a USB3 slot - the faster bus speed will transfer data faster even though reading data off the device will still be at USB2 speed - the cache in the device will overlap your slow read speeds with faster data transfer. - Note though a lot of machines won't recognize the USB3 port until after boot so your windows to go might not boot if connected to a USB3 slot).

There are posts around the net explaining how to get a W7 system to run from a USB device - however this usually means using the NATIVE boot loader on the HOST machine to attach a W7 VHD (not a Virtual machine BTW) and then boot from the attached USB VHD drive. THIS IS NOT THE SAME AS A WINDOWS TO GO SYSTEM.

A Windows to go system boots and runs ENTIRELY from the USB device whether or not there's anything in the Host system at all.

Remember also when creating a Windows to go system you can do it "manually" - you don't have to use "Certified devices".

Creating a Non-Certified Windows To Go USB Drive » ADMIN Magazine

Cheers
jimbo

No, i don't need any boot manager on the computer, just do the /bootsect /nt60 [Drive] trick worked, and also the /bcdboot something, although you need another Windows PC to do the job.

Yes, the Windows did booted up but with missing drivers, and i don't have any x86 drivers ready, so... Wi-Fi barely works, Ethernet didn't work, Display is on 800x600, no sound, etc.

Basically i just do the steps from the tutorial, but instead of using Windows 8 install.wim, i use Windows 7 install.wim file. And it runs on USB 2.0 (i don't have any USB 3.0 ports).

I tested it on my laptop, but i already reformatted the USB disk, because it is so..slow...
 

My Computer

System One

  • OS
    Windows 10 Pro x64
    Computer type
    Laptop
    System Manufacturer/Model
    Lenovo Y520
    CPU
    Intel Core i5 7300HQ
    Motherboard
    OEM Lenovo
    Memory
    4GB DDR4-2400
    Graphics Card(s)
    NVIDIA GeForce GTX 1050
    Sound Card
    Realtek HD
    Monitor(s) Displays
    1 (2)
    Screen Resolution
    1920x1080
    Hard Drives
    Seagate 1TB 5400 RPM
    Keyboard
    OEM Lenovo
    Mouse
    Logitech G502 Proteus Core
    Internet Speed
    100 Mbps
    Browser
    Google Chrome
    Other Info
    PC:

    AMD Athlon X4 760K
    8GB DDR3-1866
    AMD Radeon RX 460
    Seagate 500 GB 7200 RPM
Back
Top