Windows 8 and Windows 8.1 ISO - Download or Create

ISO_file.png
How to Create or Download a Windows 8 and 8.1 ISO


If you purchased Windows 8/8.1 and have a "retail" Windows 8/8.1 product key, then this tutorial will show you how to create or download an upgrade Windows 8 ISO or full Windows 8.1 Update ISO file directly from Microsoft.

You must be signed in as an administrator to be able to do the steps in this tutorial.

You will need to have your Windows 8 or 8.1 product key number from your retail box package OR online order information in the confirmation email for your purchase.

For example, if you purchased Windows 8 or 8.1 online using the "Windows 8/8.1 Upgrade Assistant".


A Windows 8 product key will not directly activate Windows 8.1 Update. To be able to clean install Windows 8.1 Update and activate it with a Windows 8 product key, see:Clean Install - Windows 8


CONTENTS:
  • Option One: (recommended) Download Windows 8.1 Update ISO File with "Windows Installation Media Creation Tool"
  • Option Two: Download Windows 8.1 Update ISO File with Retail Windows 8 or 8.1 Key
  • Option Three: Download Windows 8 or Windows 8.1 Update ISO File with a Retail Key
  • Option Four: To Create a Windows 8 or 8.1 ISO File from "C:\ESD\Windows" Folder


OPTION ONE

Download Windows 8.1 Update ISO File with "Windows Installation Media Creation Tool"


This option allows you to download the latest Windows 8.1 ISO file without needing a product key.

If you have a retail Windows 8 or 8.1 PC, then you will still need to have a valid Windows 8 or 8.1 product key to be able to install and activate Windows 8.1.

If you have an OEM Windows 8 or 8.1 PC, then you will also be able to use this ISO to install and activate Windows 8.1 if you are installing the same edition of Windows the key is for. The Windows 8 or 8.1 product key embedded in the UEFI firmware of the OEM PC will be automatically detected and used during installation to activate Windows 8.1.

When you run the mediacreationtool.exe file below it will permanently delete any folder named Download and it's contents that's in the same folder as the mediacreationtool.exe file.

If you have a folder named Download in the same folder (ex: on desktop), then you will need to rename it before running the mediacreationtool.exe file to avoid it and it's contents from being permanently deleted.


1. Click/tap on the Download button below to download and run the mediacreationtool.exe file for the Windows Installation Media Creation Tool.

Source: Create installation media for Windows 8.1 - Windows Help

download

2. If prompted by UAC, click/tap on Yes.

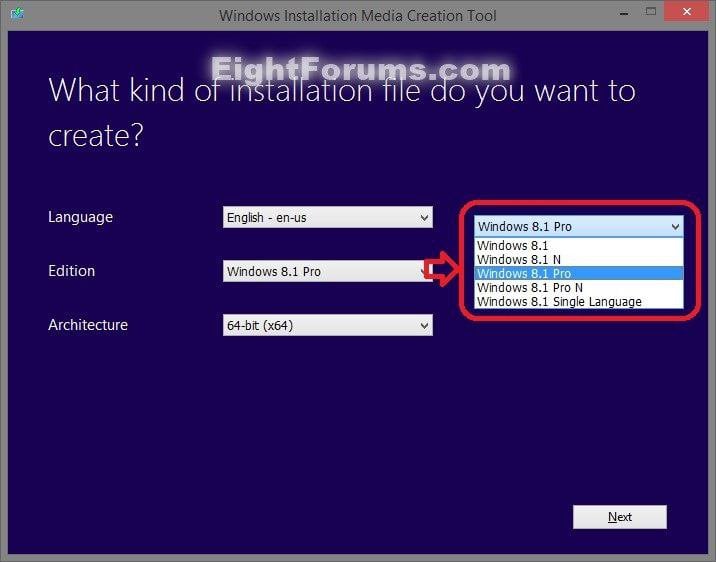
3. Select the Language, Edition, and 32-bit (x86) or 64-bit (x64) Architecture you want for the ISO file, and click/tap on Next. (see screenshot below)
Windows_Installations_Media_Creation_Tool-1.jpg

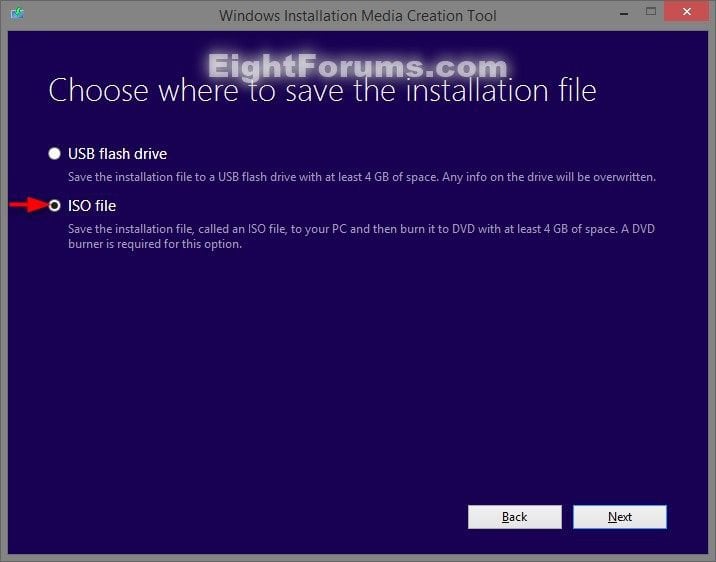
4. Select (dot) ISO file, and click/tap on Next. (see screenshot below)
Windows_Installations_Media_Creation_Tool-2.jpg

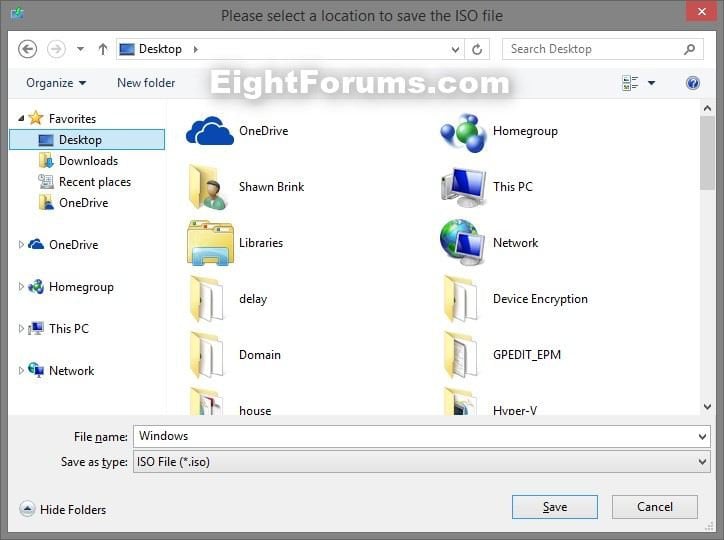
5. Select where you would like to save the ISO file to, type in a name you want for the ISO file, and click/tap on Save. (see screenshot below)
Windows_Installations_Media_Creation_Tool-3.jpg

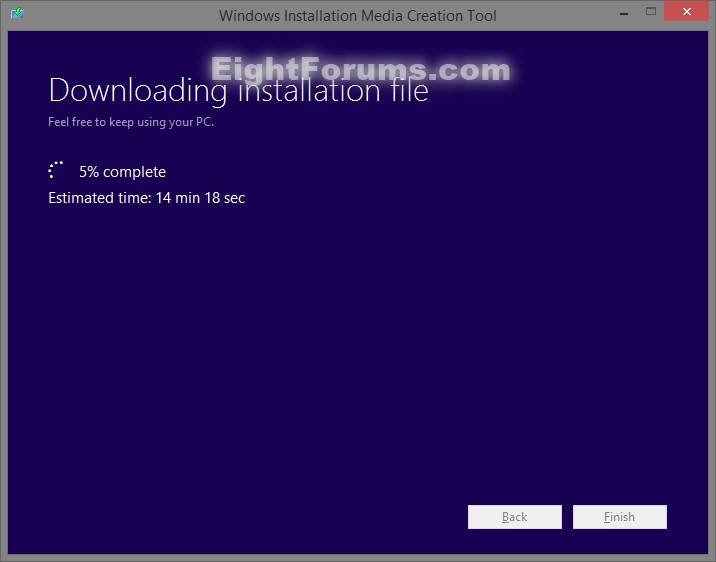
6. The Windows 8.1 ISO file will now begin to download. (see screenshot below)
Windows_Installations_Media_Creation_Tool-4.jpg

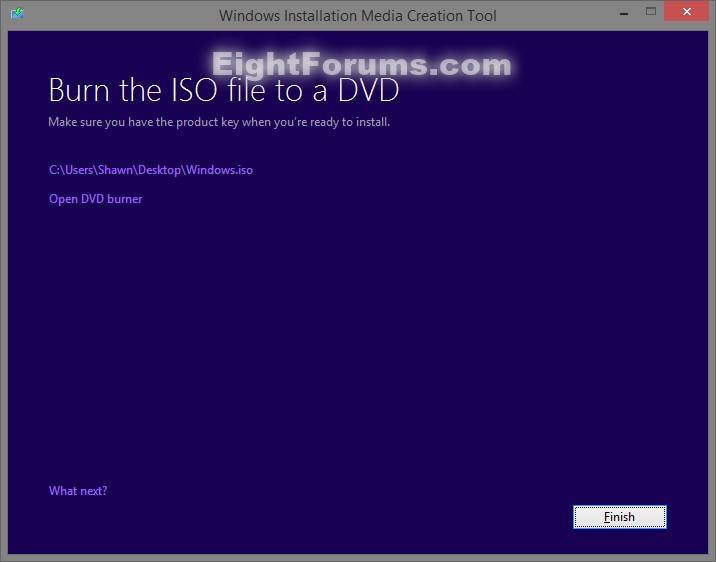
7. When the download has finished, you can click/tap on Finish. (see screenshot below)
Windows_Installations_Media_Creation_Tool-5.jpg


You could now create a bootable DVD/USB or UEFI USB with this ISO file when you like to do a clean or upgrade install of Windows 8.1 with.


OPTION TWO

Download Windows 8.1 Update ISO File with Retail Windows 8 or 8.1 Key


This option will not work with an OEM product key number.

This option will only work with a retail product key number.


1. Click/tap on the Microsoft site link below for your location, only click/tap on the Install Windows 8.1 button at the site like below to only download the Windows8-Setup.exe file, and save it to your desktop.

US: Upgrade Windows with only a product key - Microsoft Windows Help

UK: Upgrading Windows with only a product key - Microsoft Windows Help
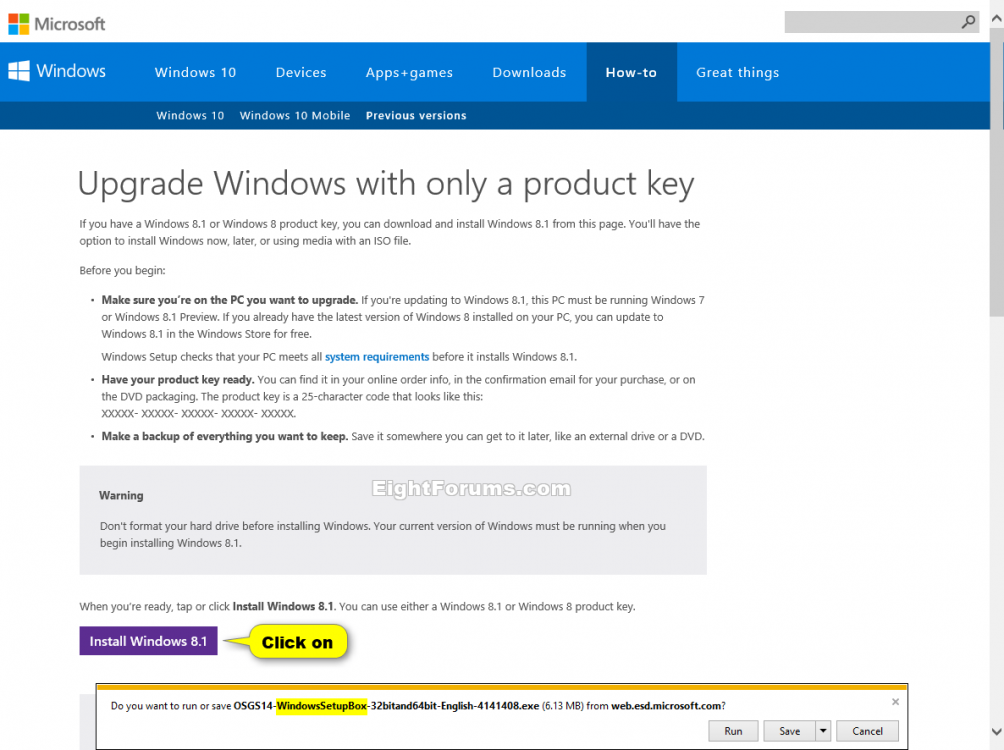
Install_Windows_8.png


2. Click/tap on the Download button below to download the WindowsSetupBox.zip file for Windows 8.1 Update. Open the ZIP file, and extract (drag and drop) the WindowsSetupBox.exe file to your desktop.

This is the official older 6.3.9600.16415 version of the WindowsSetupBox.exe file that is no longer available for download at Microsoft.

download

3. Run the Windows8-Setup.exe file (step 1), enter your RETAIL Windows 8 product key, and click/tap on Next. (see screenshot below)


This will not work if you use an OEM or system builders product key.

If you enter a generic key, then you will get a We can't connect right now message since they have been blocked.

If you still have the hidden folders below on your computer from the Windows 8/8.1 Upgrade Assistant, then you will see step 7 in OPTION THREE below instead.

You can delete these two hidden folders below to be able to enter your product key and download a new ISO file.

%UserProfile%\AppData\Local\Microsoft\WebSetup

AND

C:\ESD\Windows

To get a 32-bit Windows 8.1 Update ISO, you must run the .exe on a 32-bit Windows computer.

To get a 64-bit Windows 8.1 Update ISO, you must run the .exe on a 64-bit Windows computer.
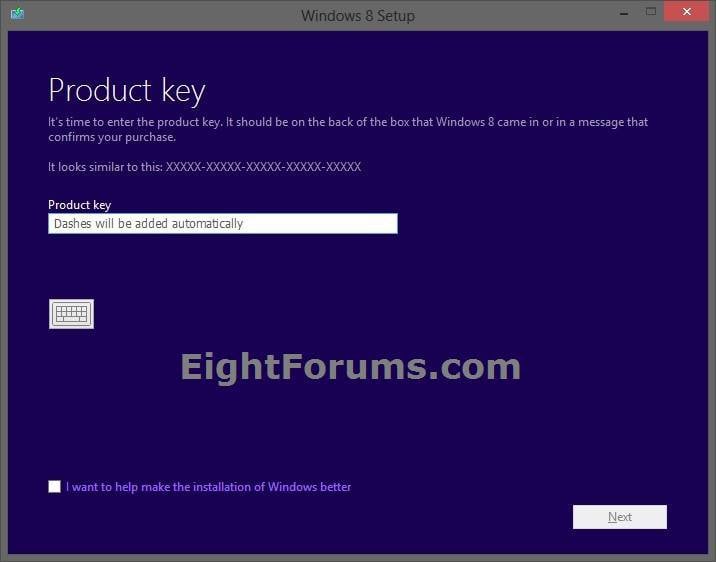


Download-1.jpg

4. Click/tap on Next. (see screenshot below)
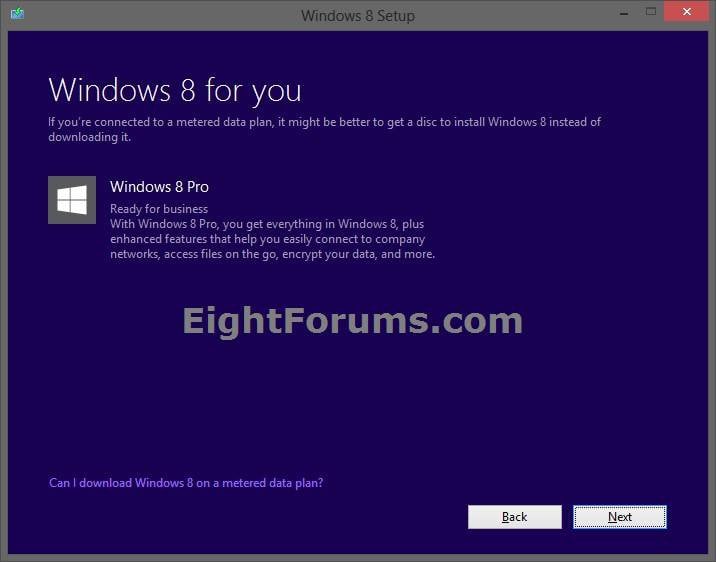
Download-2.jpg

5. Once downloading starts and still at 0%, CLOSE Close.jpg the Windows 8 Setup window. (see screenshot below)
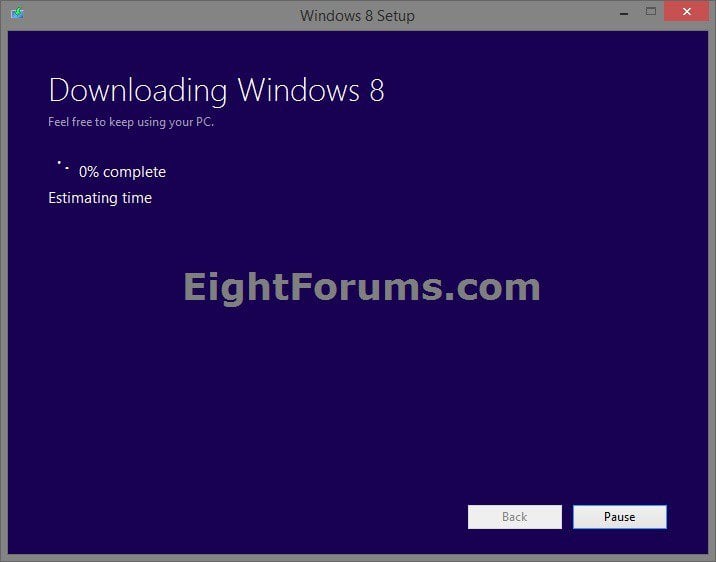
Stop.jpg

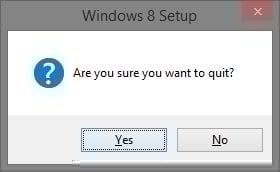
6. Quickly click/tap on Yes to approve closing "Windows 8 Setup". (see screenshot below)
Quit.jpg

7. Run the WindowsSetupBox.exe file (step 2) for Windows 8.1 Update.

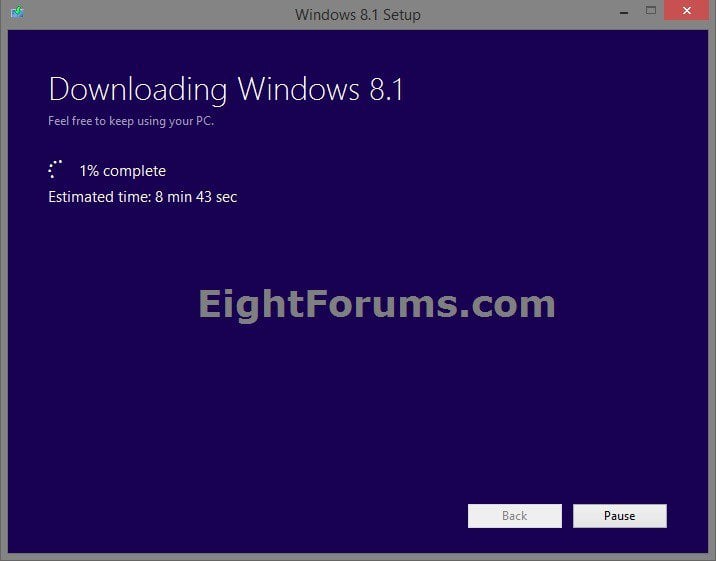
8. Windows 8.1 Setup should now start downloading Windows 8.1 Update. Go to step 6 in OPTION THREE below to continue for the Windows 8.1 Update ISO file. (see screenshot below)


If it fails to start downloading Windows 8.1 or you get an error, then delete the two hidden folders below, and start over at step 3 above.

%UserProfile%\AppData\Local\Microsoft\WebSetup

AND

C:\ESD\Windows
8.1_Download.jpg


OPTION THREE

Download Windows 8 or Windows 8.1 Update ISO File with a Retail Key


This option is for how to only download a Windows 8 ISO file using a Windows 8 product key, or to download a Windows 8.1 Update ISO file using a Windows 8.1 product key.

This option will not work with an OEM product key number.

This option will only work with a retail product key number.


1. Click/tap on the Microsoft site link below for your location, click/tap on the Install Windows 8 or Install Windows 8.1 button at the site to download and run the Windows8-Setup.exe (Windows 8) or OSGS14-WindowsSetupBox-32bitand64bit-English-4141408.exe (Windows 8.1 Update) file.

US: Upgrade Windows with only a product key - Microsoft Windows Help

UK: Upgrading Windows with only a product key - Microsoft Windows Help

To get a 32-bit Windows 8 or 8.1 ISO, you must run the .exe on a 32-bit Windows computer.

To get a 64-bit Windows 8 or 8.1 ISO, you must run the .exe on a 64-bit Windows computer.


2. If prompted by UAC, then click/tap on Yes (Windows 7/8) or Continue (Vista).

3. Type in either your RETAIL Windows 8 or Windows 8.1 product key for the one you want to get an ISO for, and click/tap on Next. (see screenshot below)


This will not work if you use an OEM or system builders product key

If you enter a generic key, then you will get a We can't connect right now message since they have been blocked.

If you still have the hidden folders below on your computer from the Windows 8/8.1 Upgrade Assistant, then you will see step 7 instead.

You can delete the two folders below to be able to enter your product key and download a new ISO file.

%UserProfile%\AppData\Local\Microsoft\WebSetup

AND

C:\ESD\Windows

You will only be able to enter a Windows 8 or Windows 8.1 product key.

A Windows 8 product key will only get you a Windows 8 ISO file.

A Windows 8.1 product key will only get you a Windows 8.1 Update ISO file.

You will not be able to enter a Window Media Center Pack or Windows 8 Pro Pack product key. These are considered to be an upgrade key and can't be used to install Windows 8/8.1 with. You could use Add Features to add the Window Media Center Pack or Windows 8 Pro Pack again after Windows 8/8.1 is finished installing.

Download-1.jpg

4. You will now see that Windows 8 or 8.1 will be downloaded. Click/tap on Next. (see screenshot below)

Download-2.jpg

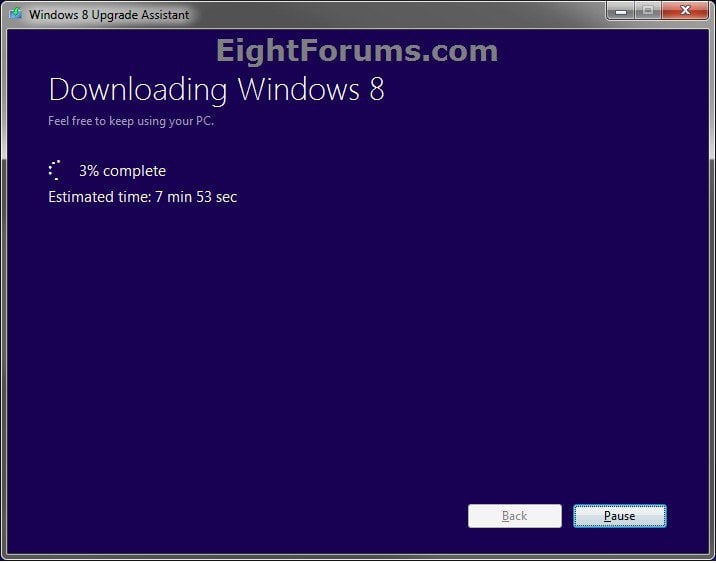
5. Windows 8 or 8.1 will now begin to download. (see screenshot below)
Download-3.jpg

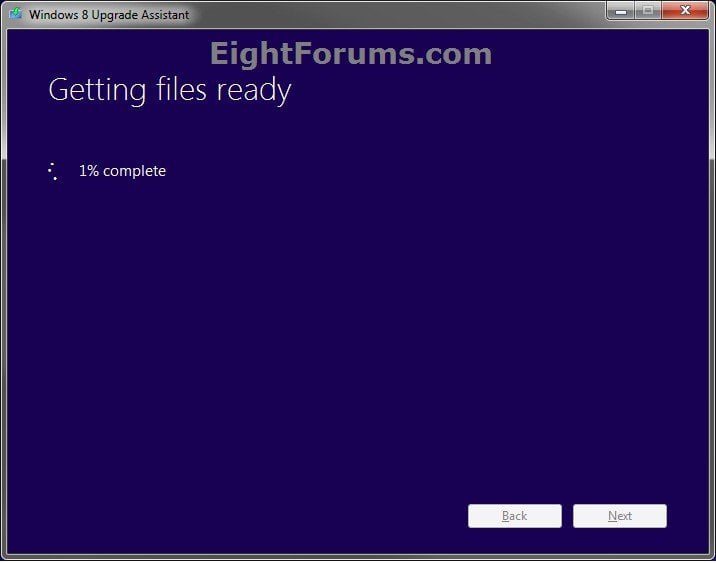
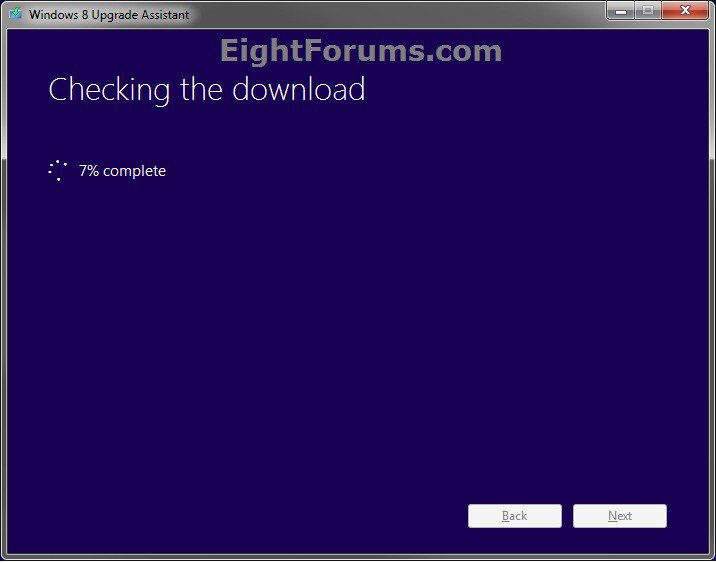
6. When it's finished downloading, it will check and verify the download, then start to getting files ready. (see screenshots below)

The Window 8 or 8.1 installation files will be saved in the hidden C:\ESD\Windows folder.
Download-4.jpg

Download-5.jpg

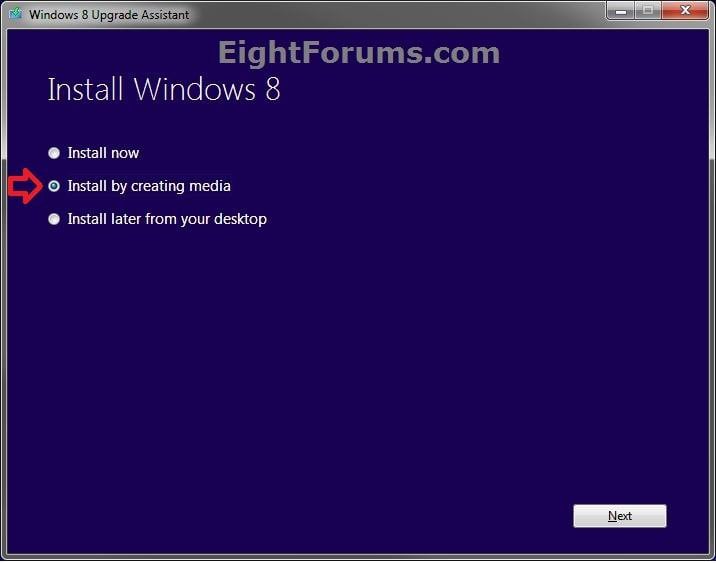
7. Select (dot) Install by creating media, and click/tap on Next. (see screenshot below)
Download-6.jpg

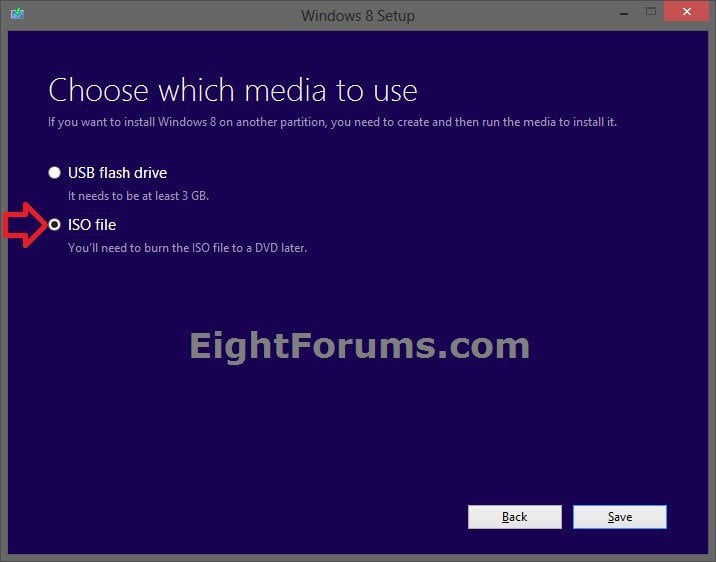
8. Select (dot) ISO file, and click/tap on Save. (see screenshot below)
Download-7.jpg

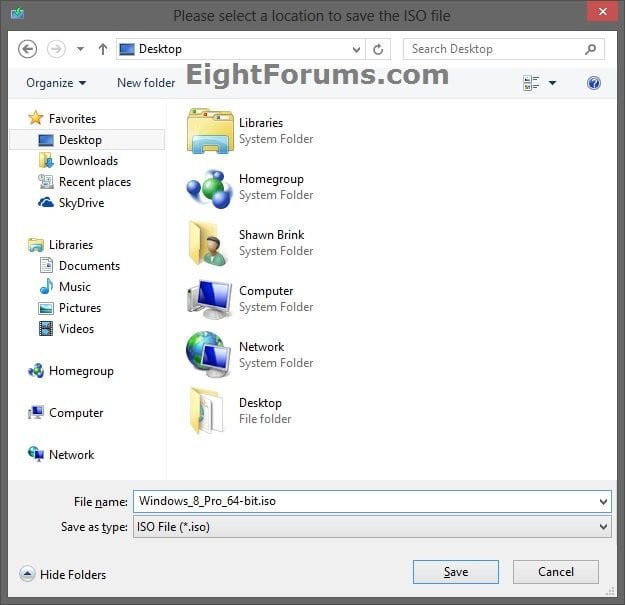
9. Navigate to a location where (ex: Desktop) you want to save the .iso file at, type in a name for the .iso file, and click/tap on Save. (see screenshot below)
Download-8.jpg

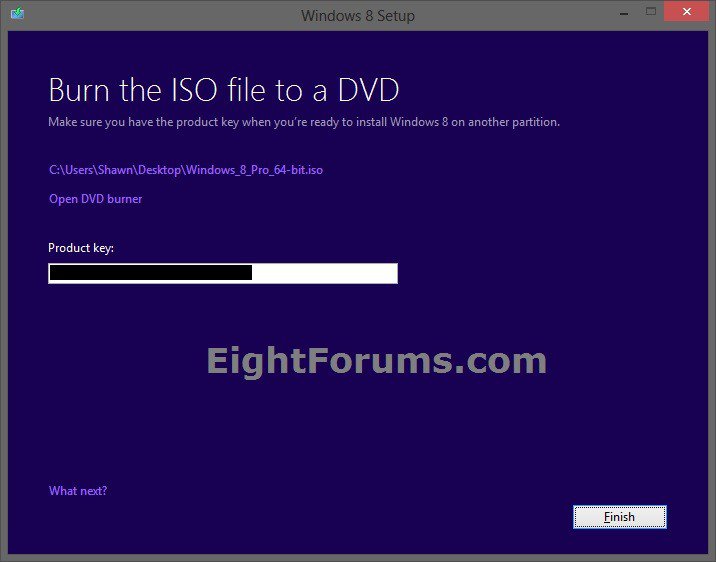
10. Click/tap on Finish. (see screenshot below)
Download-9.jpg

11. You will now have your upgrade Windows 8 ISO or full Windows 8.1 Update ISO file.

You could now create a bootable DVD/USB or UEFI USB with this ISO file to do a clean (8.1), clean for upgrade (8), or upgrade (8/8.1) install of Windows 8 with.


OPTION FOUR

To Create a Windows 8 or 8.1 ISO File from "C:\ESD\Windows" Folder


You will only be able to do this option if you still have the hidden "C:\ESD\Windows" folder from previously using OPTION TWO or OPTION THREE above, or from the Windows 8/8.1 Upgrade Assistant on this PC.


1. Click/tap on the Download button below to download the ESD-TO-ISO.zip file created by our member SIW2 (Simon).

If you use the ESD-TO-ISO.exe to create a 64-bit ISO, then it will also have UEFI support.

download

2. Save the ZIP file to your desktop, then extract (drag and drop) the contents to your desktop.

3. Unblock the ESD-TO-ISO.EXE, then right click on the ESD-TO-ISO.EXE file, and click on Run as administrator.

4. If prompted by UAC, then click/tap on Yes (Windows 7/8) or Continue (Vista).

5. Click/tap on GO. (see screenshot below)
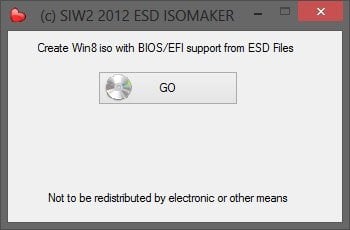
ESD-1.jpg

6. Click/tap on Yes. (see screenshot below)
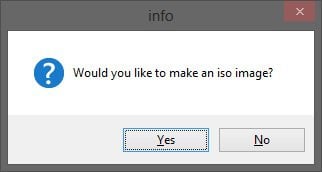
ESD-2.jpg

7. It will now create the ISO file. (see screenshot below)

If you get an error saying the ISO file cannot be created, then delete the C:\ESD folder, and do OPTION TWO above instead.

ESD-3.jpg

8. Click/tap on Cancel unless you wanted to create (burn) a bootable DVD with ISO file. (see screenshot below)

Burning a DVD with a 64-bit ISO created using this option will also have UEFI support.
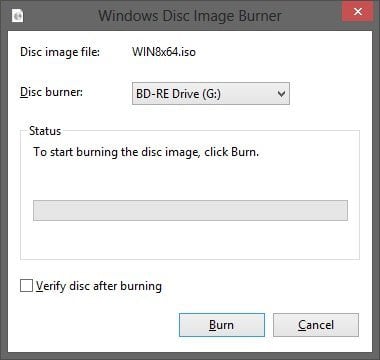
ESD-4.jpg

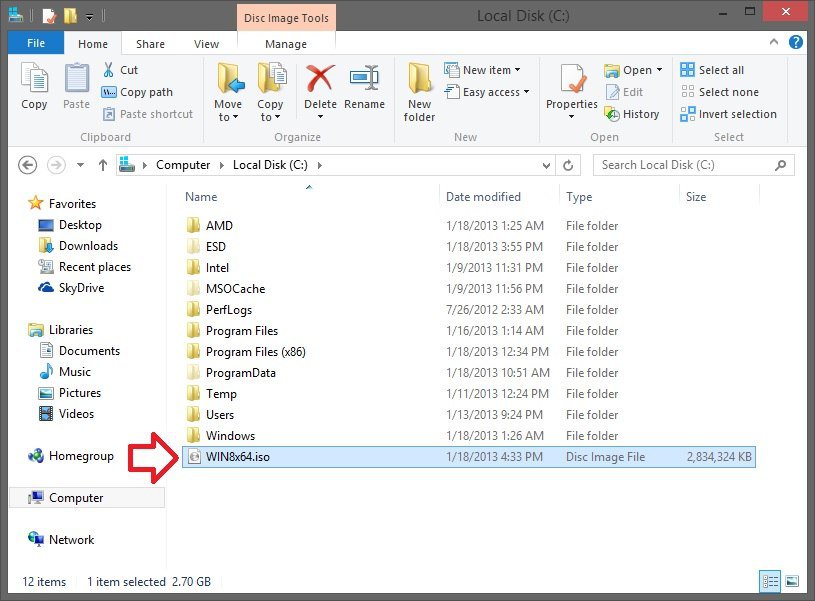
9. The upgrade Windows 8 ISO or full Windows 8.1 Update ISO file will be at the root of your C: drive. For example, C:\WIN8x64.iso. (see screenshot below)

You could now create a bootable DVD/USB or UEFI USB with this ISO file to do a clean (8.1), clean for upgrade (8), or upgrade (8/8.1) install of Windows 8/8.1 with.

ESD-5.jpg


That's it,
Shawn


Attachments

  • ESD-TO-ISO.zip
    341.8 KB · Views: 33,766
  • WindowsSetupBox.zip
    4.5 MB · Views: 45,876
Last edited by a moderator:
hi

I've read in an italian forum that the new Tool (OPTION ONE of this tutorial) has a sort of bug: it seems to delete any Download folder in which the tool is placed..

Try to translate for you:

Microsoft's tool deletes any folder named "Downloads" and located in the same location of the executable (but not in other directories, thanks God)

Note that changing permissions on the folder makes it not to be deleted, and the same way the setup does not return any kind of error, so it does not use it, and so I can't explain myself why it deletes it.

It should be adviced, in the meantime, that it is absolutely necessary to NOT save and run the tool from a folder that contains a directory with that name.
It is better to run it directly from the root of the C: \ drive to avoid any incompatibility.

I tested this by running the new tool in Option One on my desktop with a new "Downloads" folder on the desktop. When the tool was finished downloading the ISO and I clicked on Finish to close the tool, it did not delete the "Downloads" folder or it's contents.

Confirmed not true.

Did you check your Recycle Bin to see if it may be in there?
 
Last edited:

My Computer

System One

  • OS
    64-bit Windows 10
    Computer type
    PC/Desktop
    System Manufacturer/Model
    Custom self built
    CPU
    Intel i7-8700K OC'd to 5 GHz
    Motherboard
    ASUS ROG Maximus XI Formula Z390
    Memory
    64 GB (4x16GB) G.SKILL TridentZ RGB DDR4 3600 MHz (F4-3600C18D-32GTZR)
    Graphics Card(s)
    ASUS ROG-STRIX-GTX1080TI-O11G-GAMING
    Sound Card
    Integrated Digital Audio (S/PDIF)
    Monitor(s) Displays
    2 x Samsung Odyssey G7 27"
    Screen Resolution
    2560x1440
    Hard Drives
    1TB Samsung 990 PRO M.2,
    4TB Samsung 990 PRO PRO M.2,
    8TB WD MyCloudEX2Ultra NAS
    PSU
    OCZ Series Gold OCZZ1000M 1000W
    Case
    Thermaltake Core P3
    Cooling
    Corsair Hydro H115i
    Keyboard
    Logitech wireless K800
    Mouse
    Logitech MX Master 3
    Internet Speed
    1 Gb/s Download and 35 Mb/s Upload
    Browser
    Internet Explorer 11
    Antivirus
    Malwarebyte Anti-Malware Premium
    Other Info
    Logitech Z625 speaker system,
    Logitech BRIO 4K Pro webcam,
    HP Color LaserJet Pro MFP M477fdn,
    APC SMART-UPS RT 1000 XL - SURT1000XLI,
    Galaxy S23 Plus phone
I will try to contact one of them that is an experienced user and ask him to post here.

I guess till then, it's confirmed this behaviour is not reproducible. Hope someone from there would prove otherwise and explain it here.
 

My Computer

System One

  • OS
    Win 8.1 Update x64
    Computer type
    Laptop
    System Manufacturer/Model
    HP Pavilion 15
    CPU
    Haswell Core i5 4200U
    Memory
    8GB Dual-Channel DDR3L @1600
    Graphics Card(s)
    Intel HD 4400 Integrated; 2GB Dedicated NVIDIA GT 740M
    Hard Drives
    500GB Samsung 840 EVO Internal SSD ;
    2TB WD MyPassport Ultra EHDD ;
    1TB TOSHIBA HDD
    Cooling
    Deepcool X6
    Mouse
    Logitech B175 Wireless Mouse
    Internet Speed
    10 Mbps
    Browser
    Opera v25.0
    Antivirus
    KIS 2014
    Other Info
    Microsoft Wired Xbox 360 Controller
No worries bubblebobble. I just wanted to test it to see and report back with my findings since that could be an issue for some if it was a common issue.

Agreed. It may be something under specific conditions, or from some other unrelated issue that just happened to take place at the same time.

I hope they post here to see. :)
 

My Computer

System One

  • OS
    64-bit Windows 10
    Computer type
    PC/Desktop
    System Manufacturer/Model
    Custom self built
    CPU
    Intel i7-8700K OC'd to 5 GHz
    Motherboard
    ASUS ROG Maximus XI Formula Z390
    Memory
    64 GB (4x16GB) G.SKILL TridentZ RGB DDR4 3600 MHz (F4-3600C18D-32GTZR)
    Graphics Card(s)
    ASUS ROG-STRIX-GTX1080TI-O11G-GAMING
    Sound Card
    Integrated Digital Audio (S/PDIF)
    Monitor(s) Displays
    2 x Samsung Odyssey G7 27"
    Screen Resolution
    2560x1440
    Hard Drives
    1TB Samsung 990 PRO M.2,
    4TB Samsung 990 PRO PRO M.2,
    8TB WD MyCloudEX2Ultra NAS
    PSU
    OCZ Series Gold OCZZ1000M 1000W
    Case
    Thermaltake Core P3
    Cooling
    Corsair Hydro H115i
    Keyboard
    Logitech wireless K800
    Mouse
    Logitech MX Master 3
    Internet Speed
    1 Gb/s Download and 35 Mb/s Upload
    Browser
    Internet Explorer 11
    Antivirus
    Malwarebyte Anti-Malware Premium
    Other Info
    Logitech Z625 speaker system,
    Logitech BRIO 4K Pro webcam,
    HP Color LaserJet Pro MFP M477fdn,
    APC SMART-UPS RT 1000 XL - SURT1000XLI,
    Galaxy S23 Plus phone
I have asked him to post here... waiting for reply.

In the meantime I've read the post of one of the user that experienced the problem, and he says that the folder being deleted was named "Download" and was NOT the system folder normally placed in "C:\Users\AlexKidd\Downloads" (someone reported that folder not to being deleted by the tool), but was just a common folder named download by the user and placed in the same directory of the MS tool.

Eg: D:\Download and put the tool in D:\, then launch the tool. At the end of the process, the "D:\Download" folder will be deleted.
 

My Computer

System One

  • OS
    Windows 8
I created a Test folder that I downloaded the tool to. In that folder I created a Downloads folder. I then ran the tool. That Downloads folder did not get deleted.
 

My Computer

System One

  • OS
    Windows 10 Education 64 Bit
    Computer type
    PC/Desktop
    System Manufacturer/Model
    Asus
    CPU
    AMD Phenom II X4 980 Black Edition Deneb 3.7GHz
    Motherboard
    ASUS M4N68T-M V2 µATX Motherboard
    Memory
    8GB 4GBx2 Kingston PC10600 DDR3 1333 Memory
    Graphics Card(s)
    NVIDIA Geforce GT640 2 Gig DDR3 PCIe
    Sound Card
    VIA VT1708s High Definition Audio 8-channel Onboard
    Monitor(s) Displays
    22" LG E2242 1080p and 2 19" I-INC AG191D
    Screen Resolution
    1280x1024 - 1920x1080 - 1280x1024
    Hard Drives
    Crucial MX100 256 GB SSD and 500 GB WD Blue SATA
    PSU
    Thermaltake TR 620
    Case
    Power Up Black ATX Mid-Tower Case
    Cooling
    Stock heatsink fan
    Keyboard
    Logitech Wireless K350 Wave
    Mouse
    Logitech M570 Trackball and T650 TouchPad
    Internet Speed
    80 Mbps Down 30 Mbps Up
    Browser
    Internet Explorer 11
    Antivirus
    Windows Defender
    Other Info
    HP DVD1040e Lightscribe - External USB2
hi

I've read in an italian forum that the new Tool (OPTION ONE of this tutorial) has a sort of bug: it seems to delete any Download folder in which the tool is placed..

Try to translate for you:

Microsoft's tool deletes any folder named "Downloads" and located in the same location of the executable (but not in other directories, thanks God)

Note that changing permissions on the folder makes it not to be deleted, and the same way the setup does not return any kind of error, so it does not use it, and so I can't explain myself why it deletes it.

It should be adviced, in the meantime, that it is absolutely necessary to NOT save and run the tool from a folder that contains a directory with that name.
It is better to run it directly from the root of the C: \ drive to avoid any incompatibility.

I created a Test folder that I downloaded the tool to. In that folder I created a Downloads folder. I then ran the tool. That Downloads folder did not get deleted.

"download" not downloads ! :)

Well, you did originally say "Downloads", so is suppose to be "Download" instead?
 

My Computer

System One

  • OS
    64-bit Windows 10
    Computer type
    PC/Desktop
    System Manufacturer/Model
    Custom self built
    CPU
    Intel i7-8700K OC'd to 5 GHz
    Motherboard
    ASUS ROG Maximus XI Formula Z390
    Memory
    64 GB (4x16GB) G.SKILL TridentZ RGB DDR4 3600 MHz (F4-3600C18D-32GTZR)
    Graphics Card(s)
    ASUS ROG-STRIX-GTX1080TI-O11G-GAMING
    Sound Card
    Integrated Digital Audio (S/PDIF)
    Monitor(s) Displays
    2 x Samsung Odyssey G7 27"
    Screen Resolution
    2560x1440
    Hard Drives
    1TB Samsung 990 PRO M.2,
    4TB Samsung 990 PRO PRO M.2,
    8TB WD MyCloudEX2Ultra NAS
    PSU
    OCZ Series Gold OCZZ1000M 1000W
    Case
    Thermaltake Core P3
    Cooling
    Corsair Hydro H115i
    Keyboard
    Logitech wireless K800
    Mouse
    Logitech MX Master 3
    Internet Speed
    1 Gb/s Download and 35 Mb/s Upload
    Browser
    Internet Explorer 11
    Antivirus
    Malwarebyte Anti-Malware Premium
    Other Info
    Logitech Z625 speaker system,
    Logitech BRIO 4K Pro webcam,
    HP Color LaserJet Pro MFP M477fdn,
    APC SMART-UPS RT 1000 XL - SURT1000XLI,
    Galaxy S23 Plus phone
Experienced user says that he was successfull in replicating the error.
So now I will try to do the test myself, when finished I will report here.

Just to be sure I will create 2 folders, one named Download and one named Downloads :D

EDIT: MS server seems very busy.. can't download the tool. I will try tomorrow.

If anyone wants to try, just do this:
Microsoft's tool deletes any folder named "Downloads" (or "Download" I'm confused about this, sorry) and located in the same location of the executable.
-> so just create both folders and see if any of the 2 is deleted by the tool.
 
Last edited:

My Computer

System One

  • OS
    Windows 8
ok I'm not doing the test due to slow download speed, but short story here (pics from the italian user):

BEFORE:
fw0r3a.jpg


AFTER:
f1a26r.png


---> RESULT: the "Download" folder is deleted when you open the tool
 

My Computer

System One

  • OS
    Windows 8
I just updated my Lenovo G505s laptop with a Crucial MX100 256GB SSD and used the Windows 8.1 Core downloaded per Option One.

I burned the ISO to a SanDisk 8GB stick and added a folder with all the driver install files from my laptop.

My laptop came with Windows 8.1 Core and it found my SSD and away it went. It found my embedded OEM key and activated just fine.

It auto setup my disk as GPT with three partitions. 1) Recovery 300MB 2) EFI System 99 MB 3) C: Windows 8.1

During setup I turned off Auto Updates because I like control. After tweaking I checked Installed Updates and it showed 39 installed on 9/24/2014 and KB2919355 (Windows 8.1 Update 1) was listed. I assumed they took an 8.1 ISO and updated it and then built this ISO.

I then ran Windows Update and it had 42 more updates.

Only 2 items needed drivers as the rest were included with Windows, although I have some newer ones I can use in place of the default Windows driver.

Laptop is really nice now with a clean install and a SSD.

Jim :dinesh:
 

My Computer

System One

  • OS
    Windows 7 HP 64bit, Windows 8.1 Pro w/Media Center 64BIT
    Computer type
    PC/Desktop
    System Manufacturer/Model
    ASUS - Home Built
    CPU
    AMD Phenom II X6 1100T
    Motherboard
    ASUS M5A99X EVO
    Memory
    Crucial Balistic DDR-3 1866 CL 9 (8 GB)
    Graphics Card(s)
    MSI R6850 Cyclone IGD5 PE
    Sound Card
    On Chip
    Monitor(s) Displays
    ASUS VE258Q 25" LED with DVI-HDMI-DisplayPort
    Screen Resolution
    1920 x 1080
    Hard Drives
    Two WD Cavier Black 2TB Sata 6gbs
    WD My Book Essential 2TB USB 3.0
    PSU
    Seasonic X650 80 Plus GOLD Modular
    Case
    Corsair 400R
    Cooling
    Antec Kuhler H2O 620, Two 120mm and four 140mm
    Keyboard
    AVS Gear Blue LED Backlight
    Mouse
    Logitech Marble Mouse USB, Logitech Precision Game Pad
    Internet Speed
    15MB
    Antivirus
    NIS, Malwarebytes Premium 2
    Other Info
    APC UPS ES 750, Netgear WNR3500L Gigabit & Wireless N Router with SamKnows Test Program,
    Motorola SB6120 Gigabit Cable Modem.
    Brother HL-2170W Laser Printer,
    Epson V300 Scanner
I can confirm that it will delete any folder named "Download" when you run it.

I added a warning at the top of Option One to help make sure folks don't lose any Download folder by mistake.

Thank you bubblebobble for bringing this to our attention. :)
 

My Computer

System One

  • OS
    64-bit Windows 10
    Computer type
    PC/Desktop
    System Manufacturer/Model
    Custom self built
    CPU
    Intel i7-8700K OC'd to 5 GHz
    Motherboard
    ASUS ROG Maximus XI Formula Z390
    Memory
    64 GB (4x16GB) G.SKILL TridentZ RGB DDR4 3600 MHz (F4-3600C18D-32GTZR)
    Graphics Card(s)
    ASUS ROG-STRIX-GTX1080TI-O11G-GAMING
    Sound Card
    Integrated Digital Audio (S/PDIF)
    Monitor(s) Displays
    2 x Samsung Odyssey G7 27"
    Screen Resolution
    2560x1440
    Hard Drives
    1TB Samsung 990 PRO M.2,
    4TB Samsung 990 PRO PRO M.2,
    8TB WD MyCloudEX2Ultra NAS
    PSU
    OCZ Series Gold OCZZ1000M 1000W
    Case
    Thermaltake Core P3
    Cooling
    Corsair Hydro H115i
    Keyboard
    Logitech wireless K800
    Mouse
    Logitech MX Master 3
    Internet Speed
    1 Gb/s Download and 35 Mb/s Upload
    Browser
    Internet Explorer 11
    Antivirus
    Malwarebyte Anti-Malware Premium
    Other Info
    Logitech Z625 speaker system,
    Logitech BRIO 4K Pro webcam,
    HP Color LaserJet Pro MFP M477fdn,
    APC SMART-UPS RT 1000 XL - SURT1000XLI,
    Galaxy S23 Plus phone
I just updated my Lenovo G505s laptop with a Crucial MX100 256GB SSD and used the Windows 8.1 Core downloaded per Option One.

I burned the ISO to a SanDisk 8GB stick and added a folder with all the driver install files from my laptop.

My laptop came with Windows 8.1 Core and it found my SSD and away it went. It found my embedded OEM key and activated just fine.

It auto setup my disk as GPT with three partitions. 1) Recovery 300MB 2) EFI System 99 MB 3) C: Windows 8.1

During setup I turned off Auto Updates because I like control. After tweaking I checked Installed Updates and it showed 39 installed on 9/24/2014 and KB2919355 (Windows 8.1 Update 1) was listed. I assumed they took an 8.1 ISO and updated it and then built this ISO.

I then ran Windows Update and it had 42 more updates.

Only 2 items needed drivers as the rest were included with Windows, although I have some newer ones I can use in place of the default Windows driver.

Laptop is really nice now with a clean install and a SSD.

Jim :dinesh:


It didn't use any of the drivers you had in the folder ? I take it all the partitions Lenovo had installed from the factory are now gone ?
Everything work OK with out them ?

I want to do a clean install to my Lenovo lappy also, including adding a SSD.
I did d/l a copy of 8.1 single lang. and burned it to a DVD last night.
 

My Computer

System One

  • OS
    Win 8.1.1 64 bit
    Computer type
    Laptop
    System Manufacturer/Model
    Lenovo Z710 #59400485
    CPU
    i7-4700MQ
    Motherboard
    LENOVO Durian 7A1
    Memory
    8.0GB PC3-12800 DDR3L SDRAM 1600 MHz
    Graphics Card(s)
    Intel® HD Graphics 4600
    Monitor(s) Displays
    17.3" FHD LED Glossy Wedge
    Screen Resolution
    1920x1080
    Hard Drives
    1TB 5400 RPM

    WDC WD10JPCX-24UE4T0
    PSU
    4 Cell 41 Watt Hour Lithium-Ion
    Case
    Lenovo
    Cooling
    Air in, Air out.
    Keyboard
    Logitech usb
    Mouse
    M$ Arc
    Internet Speed
    60 down- 25 up
    Browser
    Firefox - newest
    Antivirus
    Defender
    Other Info
    MBAM Pro, SAS Pro, Revo Pro.
I just updated my Lenovo G505s laptop with a Crucial MX100 256GB SSD and used the Windows 8.1 Core downloaded per Option One.

I burned the ISO to a SanDisk 8GB stick and added a folder with all the driver install files from my laptop.

My laptop came with Windows 8.1 Core and it found my SSD and away it went. It found my embedded OEM key and activated just fine.

It auto setup my disk as GPT with three partitions. 1) Recovery 300MB 2) EFI System 99 MB 3) C: Windows 8.1

During setup I turned off Auto Updates because I like control. After tweaking I checked Installed Updates and it showed 39 installed on 9/24/2014 and KB2919355 (Windows 8.1 Update 1) was listed. I assumed they took an 8.1 ISO and updated it and then built this ISO.

I then ran Windows Update and it had 42 more updates.

Only 2 items needed drivers as the rest were included with Windows, although I have some newer ones I can use in place of the default Windows driver.

Laptop is really nice now with a clean install and a SSD.

Jim :dinesh:


It didn't use any of the drivers you had in the folder ? I take it all the partitions Lenovo had installed from the factory are now gone ?
Everything work OK with out them ?

I want to do a clean install to my Lenovo lappy also, including adding a SSD.
I did d/l a copy of 8.1 single lang. and burned it to a DVD last night.

The driver folder was just an extra folder that came with the Laptop and not part of Windows so my new install did not know it was there.
I used 2 of the files to install missing drivers that Windows did not have. (card reader and ELAN touch pad)

I pulled the HDD from the laptop so it is still factory so I can always go back. I also have a full image of it in case I ever need it.

If you want to update your existing HDD then a clean install will wipe it. Or you can migrate you existing HDD to a SSD and retain all the extra stuff that comes with the laptop. I didn't use all those extras so I went with a clean install.

Jim :cool:
 

My Computer

System One

  • OS
    Windows 7 HP 64bit, Windows 8.1 Pro w/Media Center 64BIT
    Computer type
    PC/Desktop
    System Manufacturer/Model
    ASUS - Home Built
    CPU
    AMD Phenom II X6 1100T
    Motherboard
    ASUS M5A99X EVO
    Memory
    Crucial Balistic DDR-3 1866 CL 9 (8 GB)
    Graphics Card(s)
    MSI R6850 Cyclone IGD5 PE
    Sound Card
    On Chip
    Monitor(s) Displays
    ASUS VE258Q 25" LED with DVI-HDMI-DisplayPort
    Screen Resolution
    1920 x 1080
    Hard Drives
    Two WD Cavier Black 2TB Sata 6gbs
    WD My Book Essential 2TB USB 3.0
    PSU
    Seasonic X650 80 Plus GOLD Modular
    Case
    Corsair 400R
    Cooling
    Antec Kuhler H2O 620, Two 120mm and four 140mm
    Keyboard
    AVS Gear Blue LED Backlight
    Mouse
    Logitech Marble Mouse USB, Logitech Precision Game Pad
    Internet Speed
    15MB
    Antivirus
    NIS, Malwarebytes Premium 2
    Other Info
    APC UPS ES 750, Netgear WNR3500L Gigabit & Wireless N Router with SamKnows Test Program,
    Motorola SB6120 Gigabit Cable Modem.
    Brother HL-2170W Laser Printer,
    Epson V300 Scanner
Thanks for the reply. My plan is to get a SSD and clean install 8.1 on it.
Leaving the HDD which came with it intact is a good idea, but only until the warranty runs out. After that, I can use it in a caddy where the DVD drive is now, for extra storage.
The HDD in the lappy is 1TB but is has six partitions on it. I use Acronis as a backup plan to a external drive, so I have no use for the Lenovo button backup thing working.
 

My Computer

System One

  • OS
    Win 8.1.1 64 bit
    Computer type
    Laptop
    System Manufacturer/Model
    Lenovo Z710 #59400485
    CPU
    i7-4700MQ
    Motherboard
    LENOVO Durian 7A1
    Memory
    8.0GB PC3-12800 DDR3L SDRAM 1600 MHz
    Graphics Card(s)
    Intel® HD Graphics 4600
    Monitor(s) Displays
    17.3" FHD LED Glossy Wedge
    Screen Resolution
    1920x1080
    Hard Drives
    1TB 5400 RPM

    WDC WD10JPCX-24UE4T0
    PSU
    4 Cell 41 Watt Hour Lithium-Ion
    Case
    Lenovo
    Cooling
    Air in, Air out.
    Keyboard
    Logitech usb
    Mouse
    M$ Arc
    Internet Speed
    60 down- 25 up
    Browser
    Firefox - newest
    Antivirus
    Defender
    Other Info
    MBAM Pro, SAS Pro, Revo Pro.
Thanks for the reply. My plan is to get a SSD and clean install 8.1 on it.
Leaving the HDD which came with it intact is a good idea, but only until the warranty runs out. After that, I can use it in a caddy where the DVD drive is now, for extra storage.
The HDD in the lappy is 1TB but is has six partitions on it. I use Acronis as a backup plan to a external drive, so I have no use for the Lenovo button backup thing working.

That is exactly what I did. I am saving my 1TB drive until my warranty is up also. When I burned my stick with the ISO I made it UFEI and when I booted, the new SSD showed as unallocated. I selected it and it was auto formatted as GPT and the three partitions were created. Very simple and took about 15 min to finish.

Look on your laptop and see if you have a D: drive and look for a Drivers folder. It should have Lenovo drivers. If not they can be downloaded from the Lenovo site.

Jim :cool:
 

My Computer

System One

  • OS
    Windows 7 HP 64bit, Windows 8.1 Pro w/Media Center 64BIT
    Computer type
    PC/Desktop
    System Manufacturer/Model
    ASUS - Home Built
    CPU
    AMD Phenom II X6 1100T
    Motherboard
    ASUS M5A99X EVO
    Memory
    Crucial Balistic DDR-3 1866 CL 9 (8 GB)
    Graphics Card(s)
    MSI R6850 Cyclone IGD5 PE
    Sound Card
    On Chip
    Monitor(s) Displays
    ASUS VE258Q 25" LED with DVI-HDMI-DisplayPort
    Screen Resolution
    1920 x 1080
    Hard Drives
    Two WD Cavier Black 2TB Sata 6gbs
    WD My Book Essential 2TB USB 3.0
    PSU
    Seasonic X650 80 Plus GOLD Modular
    Case
    Corsair 400R
    Cooling
    Antec Kuhler H2O 620, Two 120mm and four 140mm
    Keyboard
    AVS Gear Blue LED Backlight
    Mouse
    Logitech Marble Mouse USB, Logitech Precision Game Pad
    Internet Speed
    15MB
    Antivirus
    NIS, Malwarebytes Premium 2
    Other Info
    APC UPS ES 750, Netgear WNR3500L Gigabit & Wireless N Router with SamKnows Test Program,
    Motorola SB6120 Gigabit Cable Modem.
    Brother HL-2170W Laser Printer,
    Epson V300 Scanner
How did you make the ISO UFEI and why ? I didn't see an option to make it UFEI during the d/l.
 

My Computer

System One

  • OS
    Win 8.1.1 64 bit
    Computer type
    Laptop
    System Manufacturer/Model
    Lenovo Z710 #59400485
    CPU
    i7-4700MQ
    Motherboard
    LENOVO Durian 7A1
    Memory
    8.0GB PC3-12800 DDR3L SDRAM 1600 MHz
    Graphics Card(s)
    Intel® HD Graphics 4600
    Monitor(s) Displays
    17.3" FHD LED Glossy Wedge
    Screen Resolution
    1920x1080
    Hard Drives
    1TB 5400 RPM

    WDC WD10JPCX-24UE4T0
    PSU
    4 Cell 41 Watt Hour Lithium-Ion
    Case
    Lenovo
    Cooling
    Air in, Air out.
    Keyboard
    Logitech usb
    Mouse
    M$ Arc
    Internet Speed
    60 down- 25 up
    Browser
    Firefox - newest
    Antivirus
    Defender
    Other Info
    MBAM Pro, SAS Pro, Revo Pro.
How did you make the ISO UFEI and why ? I didn't see an option to make it UFEI during the d/l.

Installing using UEFI boot mode or Legacy BIOS boot mode. -> link

How to create a bootable USB flash drive.

Note: You don't need this step if you download the Windows 8.1 installation media from Microsoft's web site and select the "USB flash drive" option (see this link for help).
 

My Computer

System One

  • OS
    Windows 10
    Computer type
    Laptop
    System Manufacturer/Model
    Lenovo G580
    CPU
    Intel Core i5-3230M
    Memory
    8 GB
    Graphics Card(s)
    Intel HD Graphics 4000
    Browser
    Microsoft Edge
    Antivirus
    Windows Defender, standard user account
    Other Info
    UEFI firmware (BIOS) embedded Windows 8 product key.

Attachments

  • Rufus.PNG
    Rufus.PNG
    12.5 KB · Views: 69

My Computer

System One

  • OS
    Windows 7 HP 64bit, Windows 8.1 Pro w/Media Center 64BIT
    Computer type
    PC/Desktop
    System Manufacturer/Model
    ASUS - Home Built
    CPU
    AMD Phenom II X6 1100T
    Motherboard
    ASUS M5A99X EVO
    Memory
    Crucial Balistic DDR-3 1866 CL 9 (8 GB)
    Graphics Card(s)
    MSI R6850 Cyclone IGD5 PE
    Sound Card
    On Chip
    Monitor(s) Displays
    ASUS VE258Q 25" LED with DVI-HDMI-DisplayPort
    Screen Resolution
    1920 x 1080
    Hard Drives
    Two WD Cavier Black 2TB Sata 6gbs
    WD My Book Essential 2TB USB 3.0
    PSU
    Seasonic X650 80 Plus GOLD Modular
    Case
    Corsair 400R
    Cooling
    Antec Kuhler H2O 620, Two 120mm and four 140mm
    Keyboard
    AVS Gear Blue LED Backlight
    Mouse
    Logitech Marble Mouse USB, Logitech Precision Game Pad
    Internet Speed
    15MB
    Antivirus
    NIS, Malwarebytes Premium 2
    Other Info
    APC UPS ES 750, Netgear WNR3500L Gigabit & Wireless N Router with SamKnows Test Program,
    Motorola SB6120 Gigabit Cable Modem.
    Brother HL-2170W Laser Printer,
    Epson V300 Scanner
How did you make the ISO UFEI and why ? I didn't see an option to make it UFEI during the d/l.

During the download I selected to make as ISO so I have it for the future.
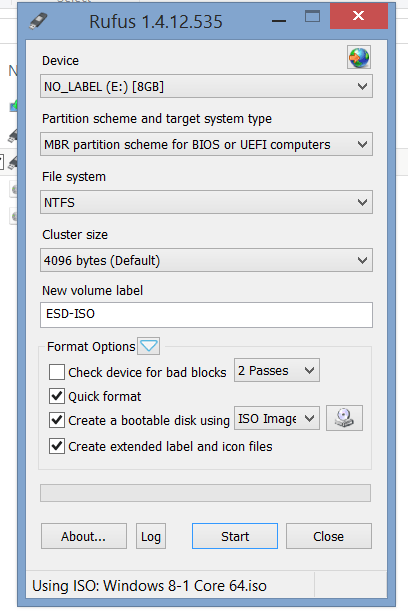
I then used Rufus to make the bootable USB stick and that is where you choose UFEI of MBR.
UFEI and GPT is the newest format and since my Laptop supports it I went in that direction.

http://www.eightforums.com/tutorials/15458-uefi-bootable-usb-flash-drive-create-windows.html


Jim :cool:

I burned the ISO to a DVD, will I get a good clean install on a SSD with it ?
 

My Computer

System One

  • OS
    Win 8.1.1 64 bit
    Computer type
    Laptop
    System Manufacturer/Model
    Lenovo Z710 #59400485
    CPU
    i7-4700MQ
    Motherboard
    LENOVO Durian 7A1
    Memory
    8.0GB PC3-12800 DDR3L SDRAM 1600 MHz
    Graphics Card(s)
    Intel® HD Graphics 4600
    Monitor(s) Displays
    17.3" FHD LED Glossy Wedge
    Screen Resolution
    1920x1080
    Hard Drives
    1TB 5400 RPM

    WDC WD10JPCX-24UE4T0
    PSU
    4 Cell 41 Watt Hour Lithium-Ion
    Case
    Lenovo
    Cooling
    Air in, Air out.
    Keyboard
    Logitech usb
    Mouse
    M$ Arc
    Internet Speed
    60 down- 25 up
    Browser
    Firefox - newest
    Antivirus
    Defender
    Other Info
    MBAM Pro, SAS Pro, Revo Pro.
Back
Top