How to Uninstall Drivers in Windows 7 and Windows 8
After a device is installed, it might be necessary to uninstall a device or a driver package. For example, you might decide to replace the associated device, or the driver package might have to be uninstalled when a driver is updated.
The driver store is a protected area of the computer that contains device driver packages that have been approved for installation on the computer. After the driver package has been removed from the driver store, it is no longer available to be installed on a device.
This tutorial will show you how to uninstall a driver for a device in Windows 7 and Windows 8.
You must be signed in to Windows as an administrator to be able to uninstall drivers.
OPTION ONE
To Use Programs and Features to Uninstall a Driver
If a driver package was installed using an installation app, then it's recommended to uninstall the driver in Programs and Features to properly uninstall and remove all files for it.
This will not uninstall the device the driver is for.
This will not uninstall the device the driver is for.
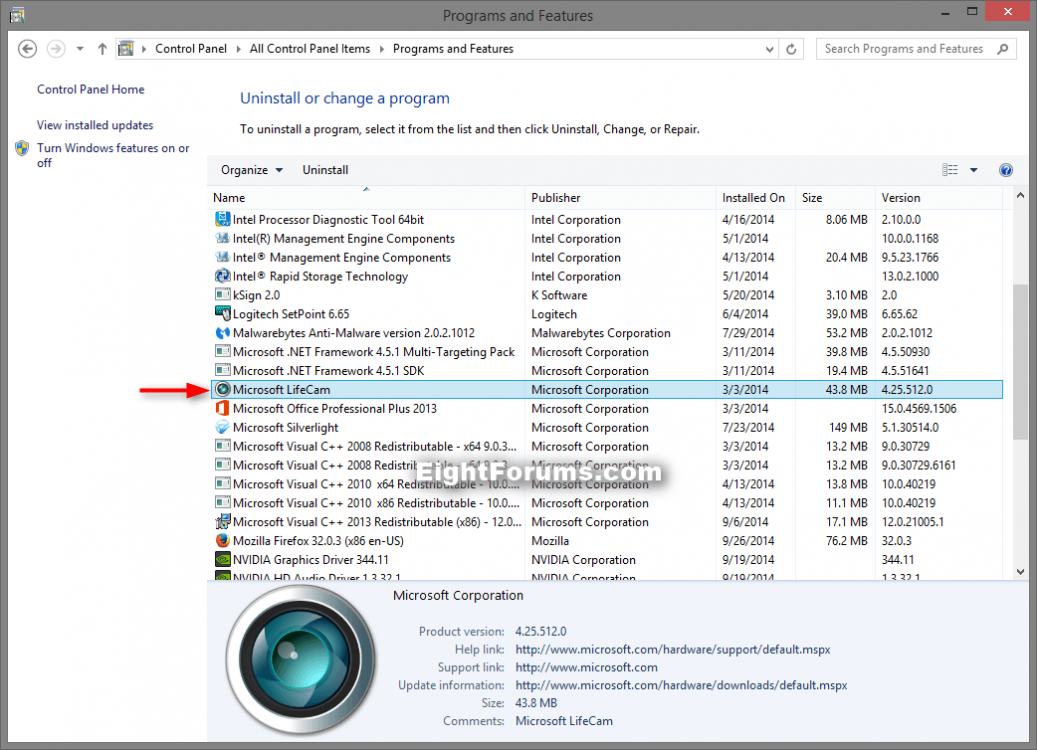
2. Double click/tap on the name of the driver (ex: Microsoft LifeCam) you want to uninstall. (see screenshot below)
3. If prompted, click/tap on Yes to confirm. (see screenshot below)
4. You will now see the driver's uninstaller to use to finish uninstalling it. Some drivers may require restarting the computer to finish.
5. When finished, you can close Programs and Features if you like.
OPTION TWO
To Use Device Manager to Uninstall Device and Driver
1. Open the Control Panel (icons view), and click/tap on the Device Manager icon.
2. Do step 3 or 4 below for what you would like to do.
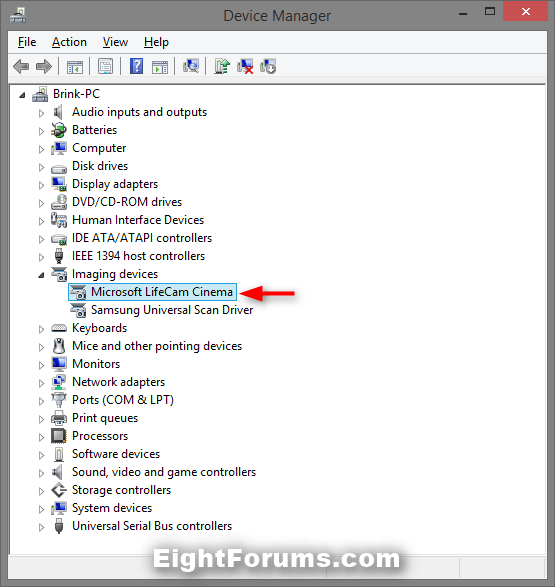
3. Expand the node that represents the type of device (ex: Imaging devices) that you want to uninstall, right click on the device entry (ex: Microsoft LifeCam Cinema), click on Uninstall, and go to step 5 below.
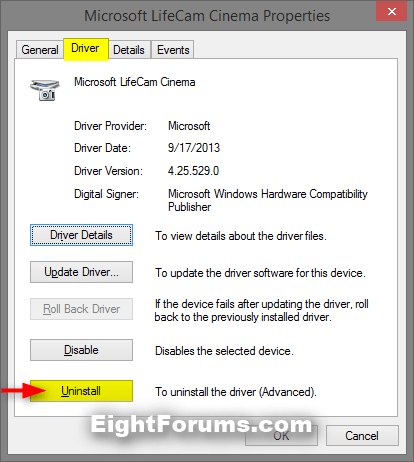
4. Expand the node that represents the type of device (ex: Imaging devices) that you want to uninstall, and double click/tap on the device entry (ex: Microsoft LifeCam Cinema). Click/tap on the Driver tab, click/tap on Uninstall, and go to step 5 below. (see screenshots above and below)
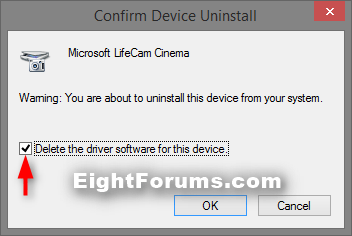
5. In the Confirm Device Removal dialog box, check the Delete the driver software for this device box, and click/tap on OK. (see screenshot below)
If you do not have the Delete the driver software for this device check box, then it means that the driver for this device has already been uninstalled.
6. When the uninstall process is complete, remove the device.
With some devices, you might have to restart the computer to complete the uninstall process. The device may continue to function until the computer has been restarted.
7. You can now close Device Manager if you like.
OPTION THREE
To Use a Command Prompt to Uninstall a Driver
This option will remove a driver package from the driver store, and will not uninstall the device.
1. Open an elevated command prompt.
2. In the elevated command prompt, copy and paste the command below, and press Enter to get a list of all installed drivers on the computer outputted to a drivers.txt file on your desktop. (see screenshot below)
pnputil -e >"%UserProfile%\Desktop\drivers.txt"
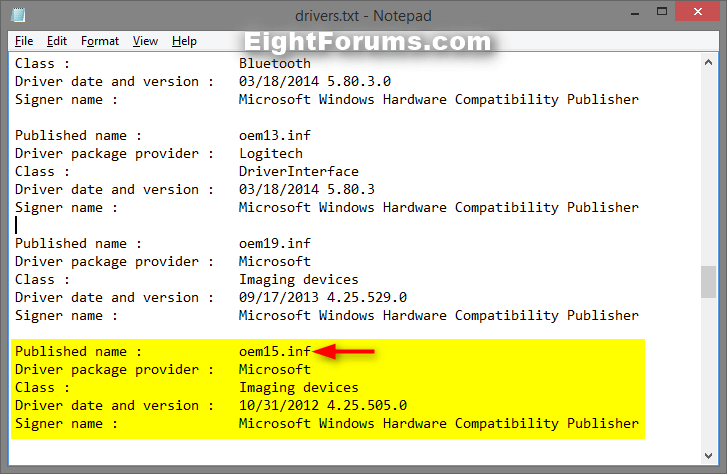
3. Open the drivers.txt file on your desktop, and look for the Published name (ex: oem15.inf) of the driver (Microsoft LifeCam Cinema) you want to uninstall. (see screenshot below)
While it's not as easy to spot the driver like this, if you know some of the details (ex: class, driver date and version, etc...) about the driver, it will help to find it.
4. In the elevated command prompt, type the command below, and press Enter. (see screenshot below)
pnputil -f -d oem##.inf
Substitute ## in the command with the actual number of the .inf file for the driver.
For example: pnputil -f -d oem15.inf
For example: pnputil -f -d oem15.inf
5. When finished, you can close the command prompt if you like.
That's it,
Shawn
Related Tutorials
- How to Uninstall a Device in Windows 7 and Windows 8
- How to Install a Driver in Device Manager in Windows 8
- How to Find and Update Outdated Drivers in Windows
- How to Roll Back a Device Driver in Device Manager
- How to Start Windows 7 in Safe Mode
- How to Start Windows 8 in Safe Mode
- How to Troubleshoot a Problem by Performing a Clean Boot in Windows 8
Attachments
Last edited:

