How to Add "Switch User" to Desktop Context Menu in Windows 8 and 8.1
Switch User (Fast User Switching) is a feature in Windows that allows you to be able to switch from the current user account that you are signed in to be signed in to another user account instead without having to close any programs and files or sign out of the current user account, and then be able to switch back right where you left off at.
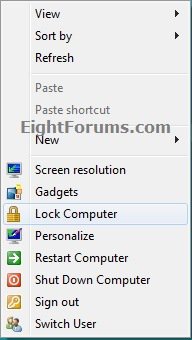
This will show you how to add or remove Switch User to the desktop context menu of all users in Windows 8.
You must be logged in as an administrator to be able to do the steps in this tutorial.
This will show you how to add or remove Switch User to the desktop context menu of all users in Windows 8.
You must be logged in as an administrator to be able to do the steps in this tutorial.
EXAMPLE: Switch User in Desktop Context Menu
Here's How:
1. To Add "Switch User" to the Desktop Context Menu
A) Click/tap on the Download button below to download the file below.
Add_Switch_User_to_Desktop_Context_Menu.reg
B) Go to step 3.
2. To Remove "Switch User" from the Desktop Context Menu
A) Click/tap on the Download button below to download the file below.
Remove_Switch_User_from_Desktop_Context_Menu.reg
B) Go to step 3.
3. Save the REG file to the desktop.
4. Double click/tap on the REG file to merge it, and click on Run, Yes (UAC), Yes, and OK when prompted to approve the merge.
5. When finished, you can delete the downloaded .reg file if you like.
6. Right click or press and hold on your desktop to see the change.
NOTE: You can press the Windows + D key to go to the desktop.
The Switch User option will only work in the Windows 8 Pro and Windows 8 Enterprise editions by default.
If you have the Windows 8 edition, then you will need to also do this below for the Switch User option to work.

If you have the Windows 8 edition, then you will need to also do this below for the Switch User option to work.
- Click on the Download button below to download the tsdiscon.zip file.
- Save the tsdiscon.zip file to your desktop.
- Open the tsdiscon.zip file, and extract (drag and drop) the tsdiscon.exe file to your desktop.
- Unblock the extracted tsdiscon.exe file.
- Move the tsdiscon.exe file into the C:\Windows\System32 folder.
- If prompted, click/tap on Continue and Yes (UAC) to approve.

That's it,
Shawn
Related Tutorials
- How to Add or Remove "Switch User" in Windows 8
- How to Lock, Log off, Restart, Shut Down, and Switch User in Windows 8
- How to Add a "Power" Cascading Desktop Context Menu in Windows 8
- How to Add "Shut Down" Computer to Desktop Context Menu in Windows 8
- How to Add "Restart" Computer to Desktop Context Menu in Windows 8
- How to Add "Lock Computer" to Desktop Context Menu in Windows 8
- How to Add "Sign out" to Desktop Context Menu in Windows 8
- How to Change Default Action of Alt+F4 "Shut Down Windows" Dialog in Windows 8 and 8.1
Attachments
Last edited:


