Solved How Do I Unpark my CPU's Cores?

BeK

New Member
Member
Messages
149
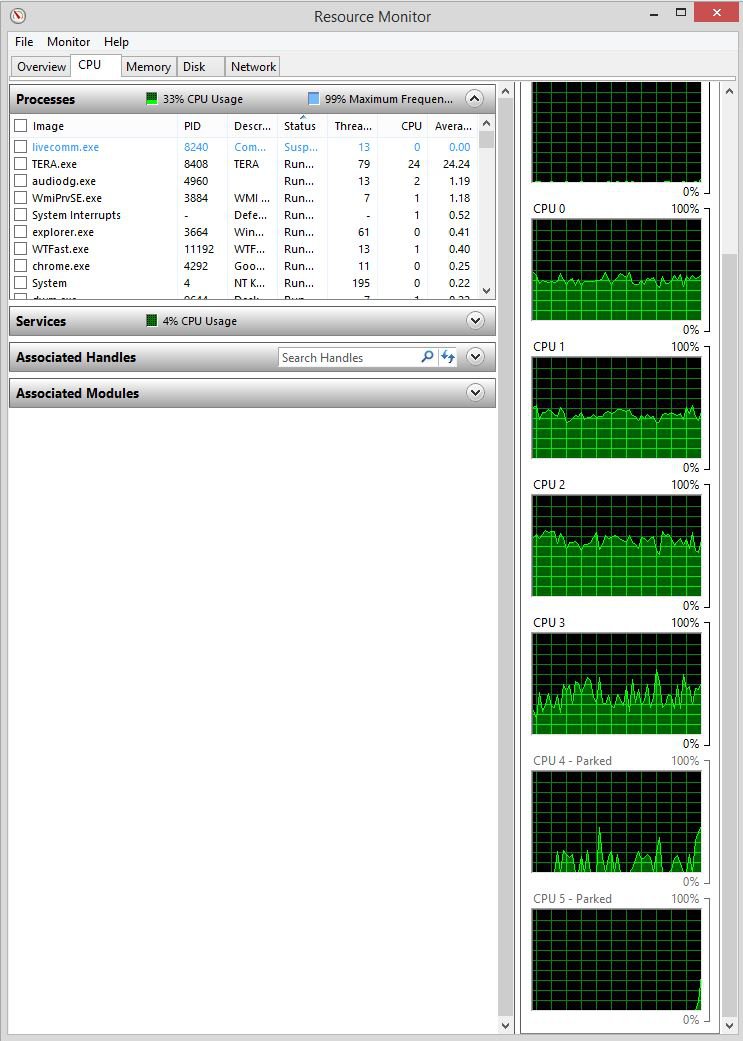
I suspect that my CPU core parking plays a part in my PC's performance especially when I'm running games. I was wondering about the best way yo go about Unparking them. Should I try to do it in the bios or through the registry somehow? I tried using a piece of software that supposedly unparked the cores in my CPU but it turns out, that it really didnt do anything at all.
Any help would be appreciated. Thanks in advance.
 

Attachments

  • Parked Cores.JPG
    Parked Cores.JPG
    102.9 KB · Views: 626
[h=2]How To Disable CPU Core Parking[/h]1. Copy the following registry key entry between the brackets [ 0cc5b647-c1df-4637-891a-dec35c318583 ].
2. Select your start button.
3. In the search box, type ‘regedit’ and press enter.
4. Once your registry editor is open, select ‘Edit’ and ‘Find…’.
5. Paste the above registry key in the box and select ‘Find’.
6. Once it has located it, look for the keys on the right hand side labeled MinValue and MaxValue.
7. Double click on each value and make sure they are both set to ’0′.
8. Select ‘Edit’ and ‘Find Next…’.
9. Continue to replace MinValue and MaxValue for each entry until you have replaced them all.
10. Close the registry editor and shut down your computer.
11. Power the computer back up.
12. Core Parking should now be disabled.
 
That seemed to work. I dont see certain cores randomly parking any longer. Thank you for the help.
 
I do that tweak on every PC I set up, from XP to 8.1.
It's billed as a tweak to speed up boot times, but it seems to do more.

Here's the entire text of that tweak:

Shorten the Boot Time in XP, Vista & Windows 7 & 8 & 8.1

Go to the start button, choose run, then type msconfig and press Ok.
On the system configuration window, choose the "Boot.INI" tab.

Check “No Gui Boot”, then lower the timeout to a more manageable time.
I choose 3 seconds in stead of 30. (windows won’t accept a lower number than 3)

Next choose advanced options.
This is where you can choose how many processors you have.
Most modern PC's are duo core (2 processors) with some quad core (4 processors) or more,
then choose OK. The Windows default is only 1 core. *

* In windows there are many SAFE Defaults, that usually do no more than slow Windows down.

Now choose apply and OK, reboot and you should see a marked decrease in boot time,
And an Increase in Run-Time efficiency.


Good Luck!
TechnoMage :cool:
 
That cpu boot trick is widely suggested, but does nothing. When the number of cpu boxes is unchecked, regardless of what number is displayed, the system will use all of your processor cores.

Disabling the gui boot, will reduce boot times by around 1 second.

Most people exaggerate their improvements, but rarely test it with a stopwatch and test against a baseline established before their change. They just "feel" it's improved, but they cannot actually quantify it.
 
I run maximum number of cores from boot and none are parked at any time that I know of.
View attachment 40680View attachment 40681


That tweak is debunked:

[h=3]Enable CPU Cores in MSConfig[/h] Some websites claim that Windows may not be using all of your CPU cores or that you can speed up your boot time by increasing the amount of cores used during boot. They direct you to the MSConfig application, where you can indeed select an option that appears to increase the amount of cores used.
In reality, Windows always uses the maximum amount of processor cores your CPU has. (Technically, only one core is used at the beginning of the boot process, but the additional cores are quickly activated.) Leave this option unchecked. It’s just a debugging option that allows you to set a maximum number of cores, so it would be useful if you wanted to force Windows to only use a single core on a multi-core system — but all it can do is restrict the amount of cores used.
msconfig-number-of-processors.png


Source: 10 Windows Tweaking Myths Debunked
 
That tweak is debunked:

Yeah... maybe, perhaps the Registry method is the better way to go. Nevertheless, whatever it takes to prevent Windows from having to make extra 'calls' down to the 'engine room'! :)
 
I run maximum number of cores from boot and none are parked at any time that I know of.
View attachment 40680View attachment 40681


That tweak is debunked:

Enable CPU Cores in MSConfig

Some websites claim that Windows may not be using all of your CPU cores or that you can speed up your boot time by increasing the amount of cores used during boot. They direct you to the MSConfig application, where you can indeed select an option that appears to increase the amount of cores used.
In reality, Windows always uses the maximum amount of processor cores your CPU has. (Technically, only one core is used at the beginning of the boot process, but the additional cores are quickly activated.) Leave this option unchecked. It’s just a debugging option that allows you to set a maximum number of cores, so it would be useful if you wanted to force Windows to only use a single core on a multi-core system — but all it can do is restrict the amount of cores used.
msconfig-number-of-processors.png


Source: 10 Windows Tweaking Myths Debunked
Not in my case it wasn't like that, First time I installed Win8 "clean", I noticed computer running slower than before, checked with couple of programs and found out that only one core was active, only after setting number of cores with msconfig I got all 4 to run all the time. BTW my processor does not have that core parking feature, can only be set to wary frequency and with it the voltage according to demand.
 
How To Disable CPU Core Parking

1. Copy the following registry key entry between the brackets [ 0cc5b647-c1df-4637-891a-dec35c318583 ].
2. Select your start button.
3. In the search box, type ‘regedit’ and press enter.
4. Once your registry editor is open, select ‘Edit’ and ‘Find…’.
5. Paste the above registry key in the box and select ‘Find’.
6. Once it has located it, look for the keys on the right hand side labeled MinValue and MaxValue.
7. Double click on each value and make sure they are both set to ’0′.
8. Select ‘Edit’ and ‘Find Next…’.
9. Continue to replace MinValue and MaxValue for each entry until you have replaced them all.
10. Close the registry editor and shut down your computer.
11. Power the computer back up.
12. Core Parking should now be disabled.

That's a bad way of doing it.

disabling core parking at all times will fux0r up with your cache because everything will be run on the same core.
 
Last edited:
Isn't "core parking" feature that all the cores are not used all the time ? When core is "parked" it means it is not used and switched off at the moment. So, when you "Unpark" all the cores they are all active.
 
It is my understanding that if you use the "High Performance" setting on your Power Options, your Cores will never get parked no matter what.
 
How To Disable CPU Core Parking

1. Copy the following registry key entry between the brackets [ 0cc5b647-c1df-4637-891a-dec35c318583 ].
2. Select your start button.
3. In the search box, type ‘regedit’ and press enter.
4. Once your registry editor is open, select ‘Edit’ and ‘Find…’.
5. Paste the above registry key in the box and select ‘Find’.
6. Once it has located it, look for the keys on the right hand side labeled MinValue and MaxValue.
7. Double click on each value and make sure they are both set to ’0′.
8. Select ‘Edit’ and ‘Find Next…’.
9. Continue to replace MinValue and MaxValue for each entry until you have replaced them all.
10. Close the registry editor and shut down your computer.
11. Power the computer back up.
12. Core Parking should now be disabled.

I've found this to be very helpful. I haven't had any issues so far been using unpark cpu for over a year. I follow this unpark cpu tutorial to be very helpful it basically show the step that edwin described but with screenshots.
 
Back
Top