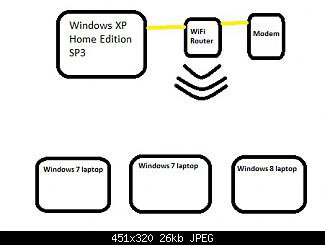
My HOME network setup is seen in the attached jpg.
I have a windows xp sp3 with wired internet.
I have 3 wifi laptops all able to connect to the internet.
1 laptop is windows 8
the other two are windows 7
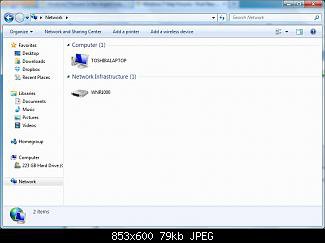
When i open up my network and sharing center all i see is the one
latop as seen in the other attached photo.
How do i get all computers on one
wifi network so i can see all of them and share files between them?
Setup your network like in the tutorial: Setting up a home network
And make sure that all Firewalls are configured to Tcp and Ip settings.
Then if any problems try us again.
Also welcome to eightforums micahgill85.
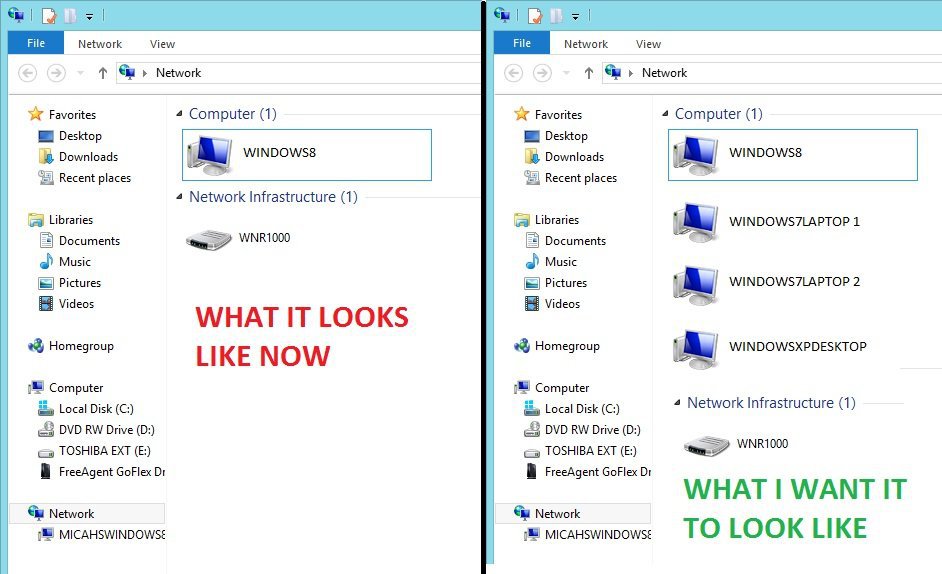
I'm no expert but I have noted a windows 8 computer sets up a homegroup. If you have your network named something else the 8 unit might be confused. Runs in my mind you can delete or at least leave the homegroup on the 8 unit, maybe that would help.
I had fits running windows xp and 7 in a network then I added two 8's and had to start over.
Homegroup only supports Windows 7 & Windows 8. But not Windows Vista, XP so we are going to setup a regular Home Networking.
Let us turn the Homegroup off. In each Win 7 & Win 8:
Control Panel -> Homegroup, Click on Leave Homegroup
Control Panel->Administrative Tools->Services. DisableHomegroup Listener and Homegroup Provider.
[FONT=&]Make sure the following services are running In all PC’s:
Control Panel->Administrative Tools->Services
[/FONT][FONT=&]COM+ Event System
Computer Browser
DHCP Client
DNS Client
Network Connections
Network Location Awareness
Remote Procedure Call (RPC)
Server
TCP/IP Netbios helper
Wireless Zero Configuration ( XP [/FONT][FONT=&][FONT=&]wireless configurations[/FONT][/FONT][FONT=&] only[/FONT][FONT=&])
WLAN AutoConfig
Workstation[/FONT]
In each PC, make sure they have the same Workgroup Name [FONT=&]For example: WORKGROUP
[/FONT]
[FONT=&]Control Panel->Network and Sharing Center->Change Advanced Sharing Settings
and set as shown in screenshot below:[/FONT]
[FONT=&][FONT=&]Right click on Drives/Folders[/FONT] in each PC -> Advanced Sharing. Click on Advanced Sharing again, tick on share this folder, assign a share name then click on permissions.[/FONT][FONT=&] add a user: Everyone if not already existed then set permission to Full for now.[/FONT]
Again, [FONT=&]Right click on Drives/Folders -> Propert[/FONT]ies->Security. If Everyone is not on the user names list then click on Edit and add Everyone to the list and set permission to Full control
[FONT=&]Now open a browser and login into your Netgear router: http://routerlogin.com
click on LAN Setup and assign a local static(Fixed) IP for each of your PC’s starting with 192.168.1.2 since 192.168.1.1 is the IP of your router. NOTE: any other router brands will also have this option
The reason for doing this so that each time you boot up your PC, each will have the same local static IP otherwise the router will randomly assigns to an available IP and that might mess up the router DNS Cache.
[/FONT]
Power cycle your Netgear router so that it will refresh DNS Cache.
Boot up each PC and open the elevated command prompt and type:
ipconfig /flushdns hit <Enter>
then type: ipconfig hit <Enter>
You should see the local static IP assigned in step 6.
[FONT=&]Click on Network Icon, you should see all the shares[/FONT]
Happy Networking !!!
Please report back if it's working.
[FONT=&][FONT=&]Right click on Drives/Folders[/FONT] in each PC -> Advanced Sharing. Click on Advanced Sharing again, tick on share this folder, assign a share name then click on permissions.[/FONT][FONT=&] add a user: Everyone if not already existed then set permission to Full for now.[/FONT]
Again, [FONT=&]Right click on Drives/Folders -> Propert[/FONT]ies->Security. If Everyone is not on the user names list then click on Edit and add Everyone to the list and set permission to Full control
[FONT=&]Now open a browser and login into your Netgear router: http://routerlogin.com
click on LAN Setup and assign a local static(Fixed) IP for each of your PC’s starting with 102.168.1.2 since 192.168.1.1 is the IP of your router.
The reason for doing this so that each time you boot up your PC, each will have the same local static IP otherwise the router will randomly assigns to an available IP and that might mess up the router DNS Cache.
Power cycle your Netgear router so that it will refresh DNS Cache.
Boot up each PC and open the elevated command prompt and type:
ipconfig /flushdns hit <Enter>
then type: ipconfig hit <Enter>
You should see the local static IP assigned in step 6.
[FONT=&]Click on Network Icon, you should see all the shares[/FONT]
I did all the steps and it worked until i tried assigning the last laptop a static ip, so i just set them all to dynamic. I think what did it was the power down of the router and the ipconig /flushdns
thanks again!
@Tarka Dal
Good catch. You know the '0' and the '9' keys are next to each other. LOL.
Change was made. Thank You. Another mistake I made and corrected: Homegroup only supports Windows 7 & Windows 8. But not Windows Vista, XP
I did all the steps and it worked until i tried assigning the last laptop a static ip, so i just set them all to dynamic. I think what did it was the power down of the router and the ipconig /flushdns