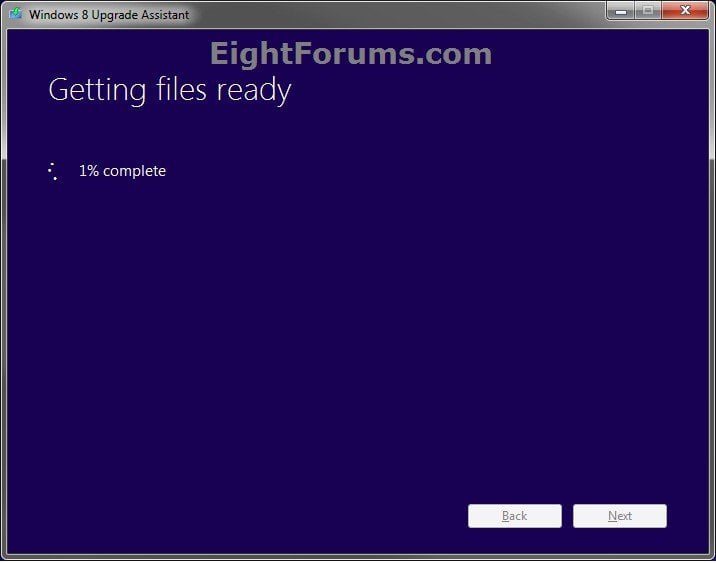
Windows 8 and Windows 8.1 ISO - Download or Create

ISO_file.png
How to Create or Download a Windows 8 and 8.1 ISO


If you purchased Windows 8/8.1 and have a "retail" Windows 8/8.1 product key, then this tutorial will show you how to create or download an upgrade Windows 8 ISO or full Windows 8.1 Update ISO file directly from Microsoft.

You must be signed in as an administrator to be able to do the steps in this tutorial.

You will need to have your Windows 8 or 8.1 product key number from your retail box package OR online order information in the confirmation email for your purchase.

For example, if you purchased Windows 8 or 8.1 online using the "Windows 8/8.1 Upgrade Assistant".


A Windows 8 product key will not directly activate Windows 8.1 Update. To be able to clean install Windows 8.1 Update and activate it with a Windows 8 product key, see:Clean Install - Windows 8


CONTENTS:
  • Option One: (recommended) Download Windows 8.1 Update ISO File with "Windows Installation Media Creation Tool"
  • Option Two: Download Windows 8.1 Update ISO File with Retail Windows 8 or 8.1 Key
  • Option Three: Download Windows 8 or Windows 8.1 Update ISO File with a Retail Key
  • Option Four: To Create a Windows 8 or 8.1 ISO File from "C:\ESD\Windows" Folder


OPTION ONE

Download Windows 8.1 Update ISO File with "Windows Installation Media Creation Tool"


This option allows you to download the latest Windows 8.1 ISO file without needing a product key.

If you have a retail Windows 8 or 8.1 PC, then you will still need to have a valid Windows 8 or 8.1 product key to be able to install and activate Windows 8.1.

If you have an OEM Windows 8 or 8.1 PC, then you will also be able to use this ISO to install and activate Windows 8.1 if you are installing the same edition of Windows the key is for. The Windows 8 or 8.1 product key embedded in the UEFI firmware of the OEM PC will be automatically detected and used during installation to activate Windows 8.1.

When you run the mediacreationtool.exe file below it will permanently delete any folder named Download and it's contents that's in the same folder as the mediacreationtool.exe file.

If you have a folder named Download in the same folder (ex: on desktop), then you will need to rename it before running the mediacreationtool.exe file to avoid it and it's contents from being permanently deleted.


1. Click/tap on the Download button below to download and run the mediacreationtool.exe file for the Windows Installation Media Creation Tool.

Source: Create installation media for Windows 8.1 - Windows Help

download

2. If prompted by UAC, click/tap on Yes.

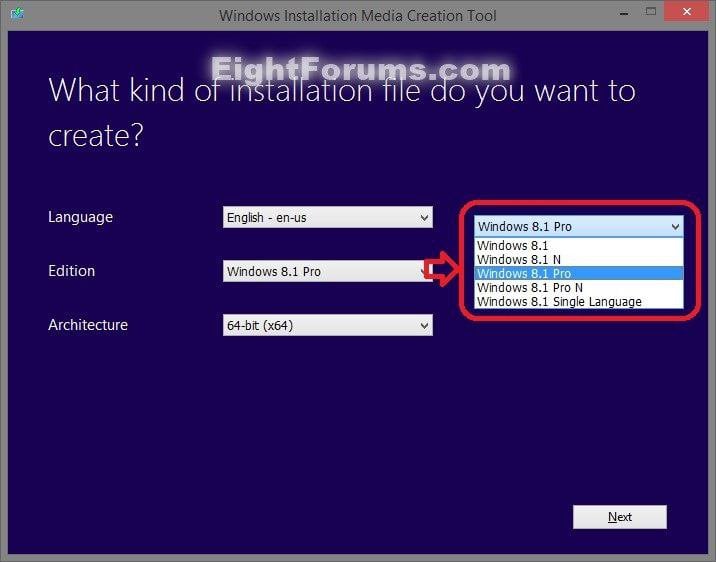
3. Select the Language, Edition, and 32-bit (x86) or 64-bit (x64) Architecture you want for the ISO file, and click/tap on Next. (see screenshot below)
Windows_Installations_Media_Creation_Tool-1.jpg

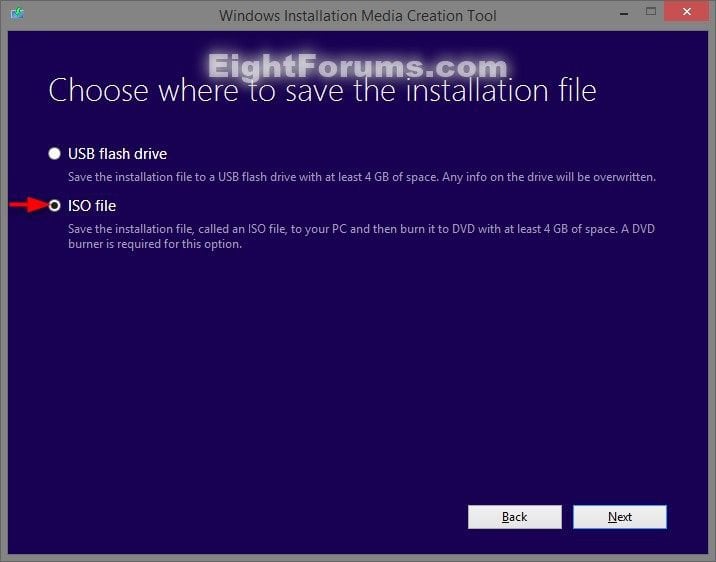
4. Select (dot) ISO file, and click/tap on Next. (see screenshot below)
Windows_Installations_Media_Creation_Tool-2.jpg

5. Select where you would like to save the ISO file to, type in a name you want for the ISO file, and click/tap on Save. (see screenshot below)
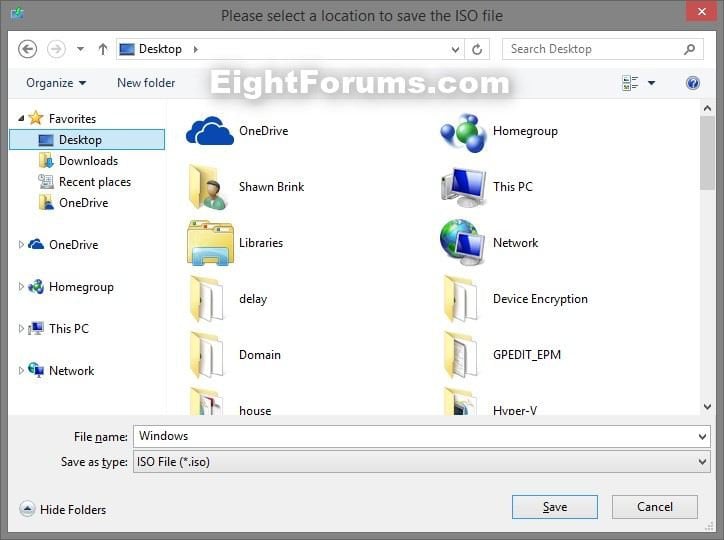
Windows_Installations_Media_Creation_Tool-3.jpg

6. The Windows 8.1 ISO file will now begin to download. (see screenshot below)
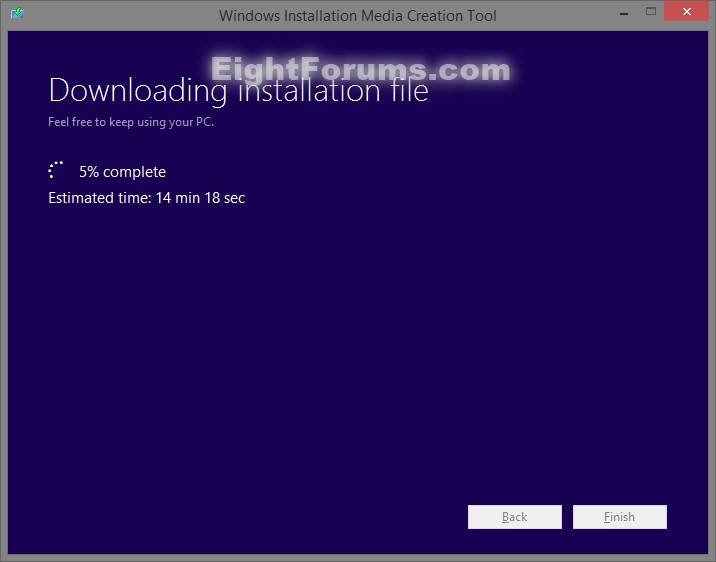
Windows_Installations_Media_Creation_Tool-4.jpg

7. When the download has finished, you can click/tap on Finish. (see screenshot below)
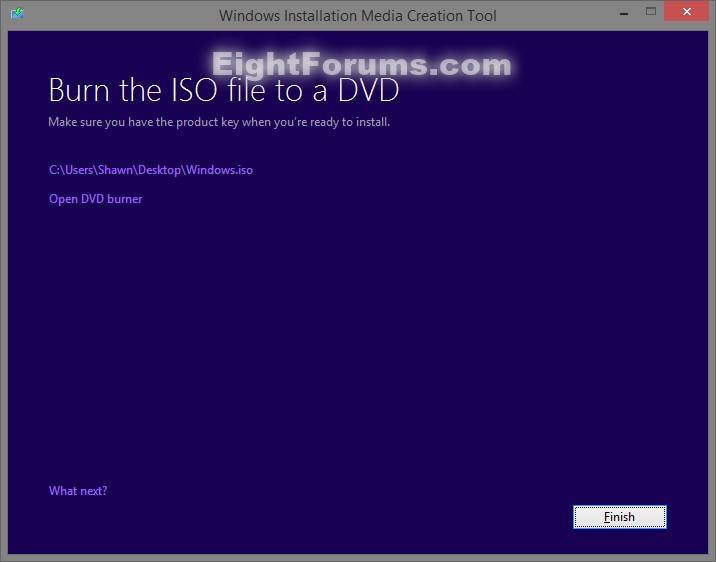
Windows_Installations_Media_Creation_Tool-5.jpg


You could now create a bootable DVD/USB or UEFI USB with this ISO file when you like to do a clean or upgrade install of Windows 8.1 with.


OPTION TWO

Download Windows 8.1 Update ISO File with Retail Windows 8 or 8.1 Key


This option will not work with an OEM product key number.

This option will only work with a retail product key number.


1. Click/tap on the Microsoft site link below for your location, only click/tap on the Install Windows 8.1 button at the site like below to only download the Windows8-Setup.exe file, and save it to your desktop.

US: Upgrade Windows with only a product key - Microsoft Windows Help

UK: Upgrading Windows with only a product key - Microsoft Windows Help
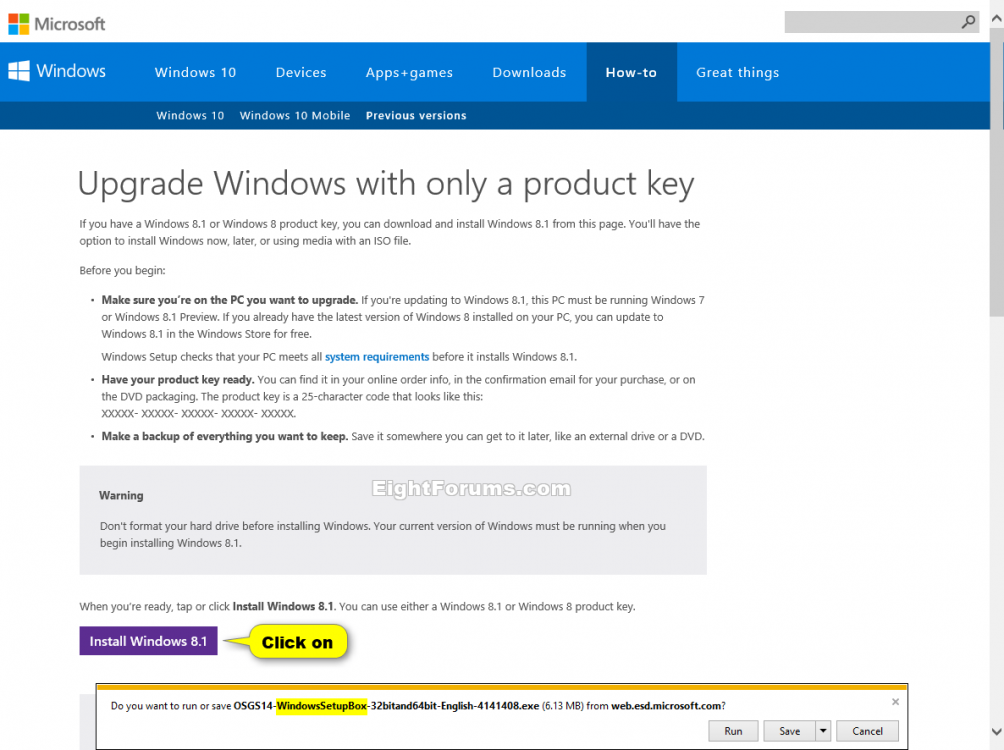
Install_Windows_8.png


2. Click/tap on the Download button below to download the WindowsSetupBox.zip file for Windows 8.1 Update. Open the ZIP file, and extract (drag and drop) the WindowsSetupBox.exe file to your desktop.

This is the official older 6.3.9600.16415 version of the WindowsSetupBox.exe file that is no longer available for download at Microsoft.

download

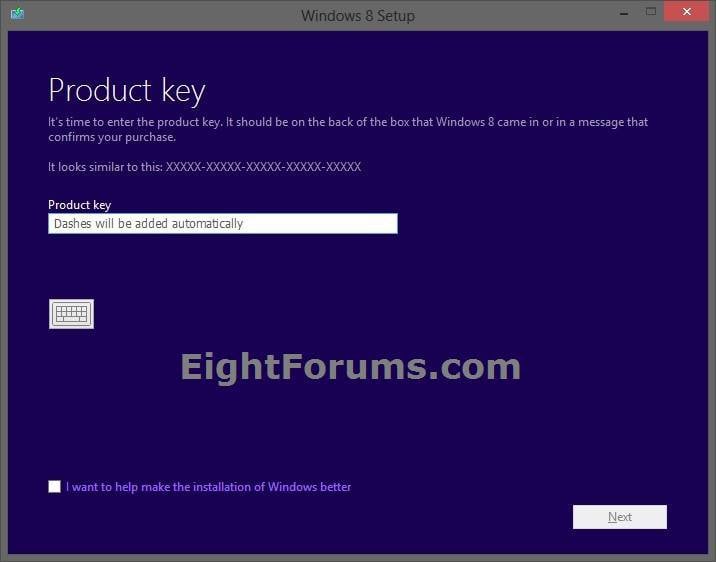
3. Run the Windows8-Setup.exe file (step 1), enter your RETAIL Windows 8 product key, and click/tap on Next. (see screenshot below)


This will not work if you use an OEM or system builders product key.

If you enter a generic key, then you will get a We can't connect right now message since they have been blocked.

If you still have the hidden folders below on your computer from the Windows 8/8.1 Upgrade Assistant, then you will see step 7 in OPTION THREE below instead.

You can delete these two hidden folders below to be able to enter your product key and download a new ISO file.

%UserProfile%\AppData\Local\Microsoft\WebSetup

AND

C:\ESD\Windows

To get a 32-bit Windows 8.1 Update ISO, you must run the .exe on a 32-bit Windows computer.

To get a 64-bit Windows 8.1 Update ISO, you must run the .exe on a 64-bit Windows computer.


Download-1.jpg

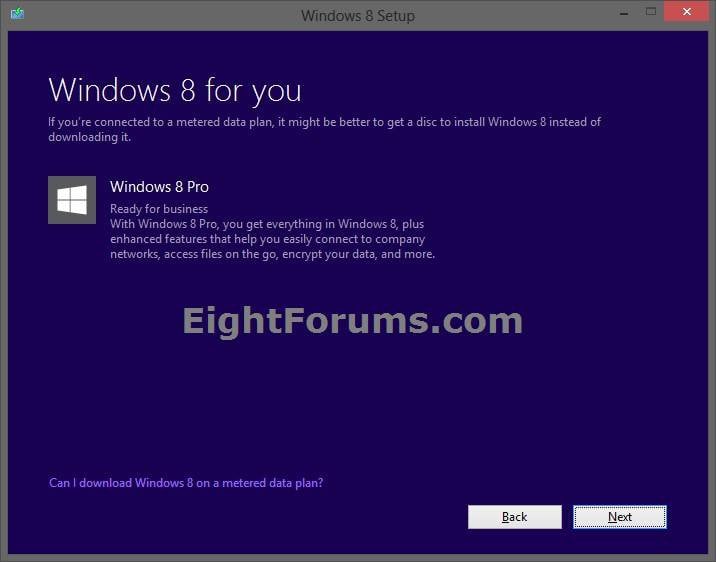
4. Click/tap on Next. (see screenshot below)
Download-2.jpg

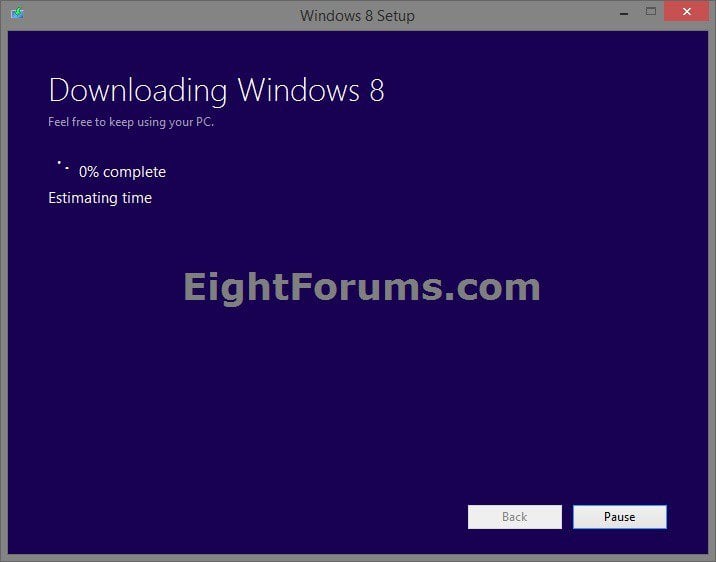
5. Once downloading starts and still at 0%, CLOSE Close.jpg the Windows 8 Setup window. (see screenshot below)
Stop.jpg

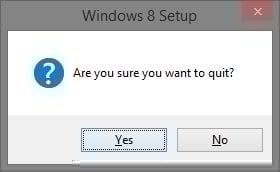
6. Quickly click/tap on Yes to approve closing "Windows 8 Setup". (see screenshot below)
Quit.jpg

7. Run the WindowsSetupBox.exe file (step 2) for Windows 8.1 Update.

8. Windows 8.1 Setup should now start downloading Windows 8.1 Update. Go to step 6 in OPTION THREE below to continue for the Windows 8.1 Update ISO file. (see screenshot below)


If it fails to start downloading Windows 8.1 or you get an error, then delete the two hidden folders below, and start over at step 3 above.

%UserProfile%\AppData\Local\Microsoft\WebSetup

AND

C:\ESD\Windows
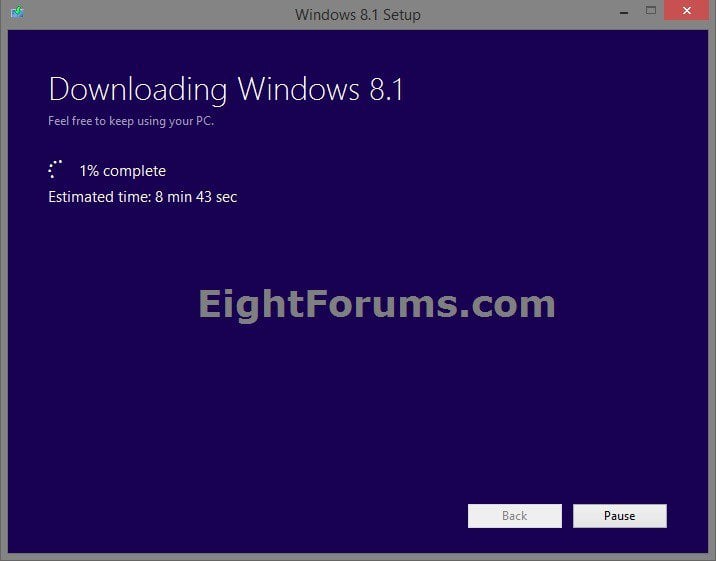
8.1_Download.jpg


OPTION THREE

Download Windows 8 or Windows 8.1 Update ISO File with a Retail Key


This option is for how to only download a Windows 8 ISO file using a Windows 8 product key, or to download a Windows 8.1 Update ISO file using a Windows 8.1 product key.

This option will not work with an OEM product key number.

This option will only work with a retail product key number.


1. Click/tap on the Microsoft site link below for your location, click/tap on the Install Windows 8 or Install Windows 8.1 button at the site to download and run the Windows8-Setup.exe (Windows 8) or OSGS14-WindowsSetupBox-32bitand64bit-English-4141408.exe (Windows 8.1 Update) file.

US: Upgrade Windows with only a product key - Microsoft Windows Help

UK: Upgrading Windows with only a product key - Microsoft Windows Help

To get a 32-bit Windows 8 or 8.1 ISO, you must run the .exe on a 32-bit Windows computer.

To get a 64-bit Windows 8 or 8.1 ISO, you must run the .exe on a 64-bit Windows computer.


2. If prompted by UAC, then click/tap on Yes (Windows 7/8) or Continue (Vista).

3. Type in either your RETAIL Windows 8 or Windows 8.1 product key for the one you want to get an ISO for, and click/tap on Next. (see screenshot below)


This will not work if you use an OEM or system builders product key

If you enter a generic key, then you will get a We can't connect right now message since they have been blocked.

If you still have the hidden folders below on your computer from the Windows 8/8.1 Upgrade Assistant, then you will see step 7 instead.

You can delete the two folders below to be able to enter your product key and download a new ISO file.

%UserProfile%\AppData\Local\Microsoft\WebSetup

AND

C:\ESD\Windows

You will only be able to enter a Windows 8 or Windows 8.1 product key.

A Windows 8 product key will only get you a Windows 8 ISO file.

A Windows 8.1 product key will only get you a Windows 8.1 Update ISO file.

You will not be able to enter a Window Media Center Pack or Windows 8 Pro Pack product key. These are considered to be an upgrade key and can't be used to install Windows 8/8.1 with. You could use Add Features to add the Window Media Center Pack or Windows 8 Pro Pack again after Windows 8/8.1 is finished installing.

Download-1.jpg

4. You will now see that Windows 8 or 8.1 will be downloaded. Click/tap on Next. (see screenshot below)

Download-2.jpg

5. Windows 8 or 8.1 will now begin to download. (see screenshot below)
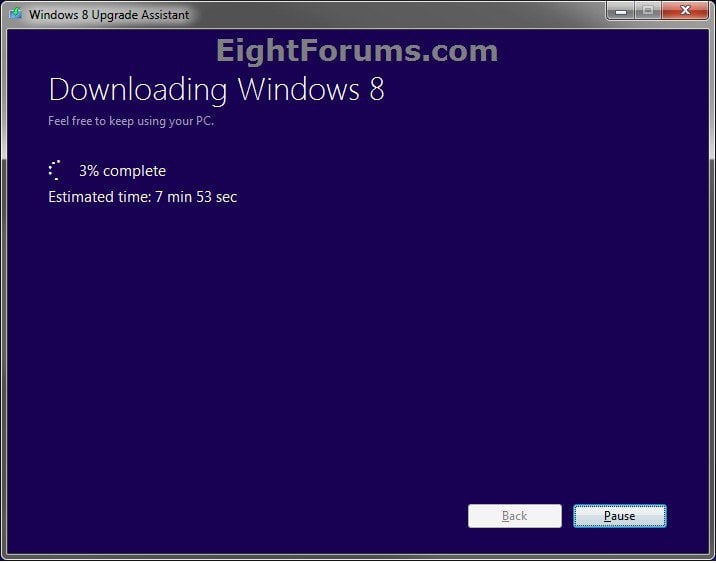
Download-3.jpg

6. When it's finished downloading, it will check and verify the download, then start to getting files ready. (see screenshots below)

The Window 8 or 8.1 installation files will be saved in the hidden C:\ESD\Windows folder.
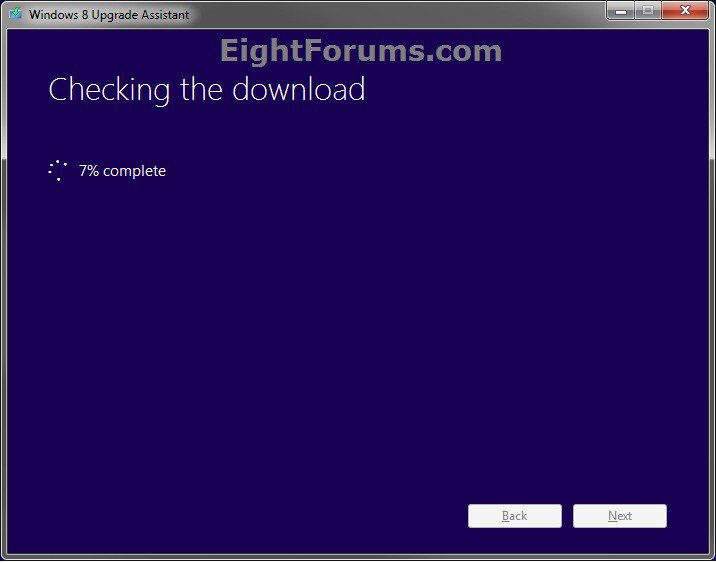
Download-4.jpg

Download-5.jpg

7. Select (dot) Install by creating media, and click/tap on Next. (see screenshot below)
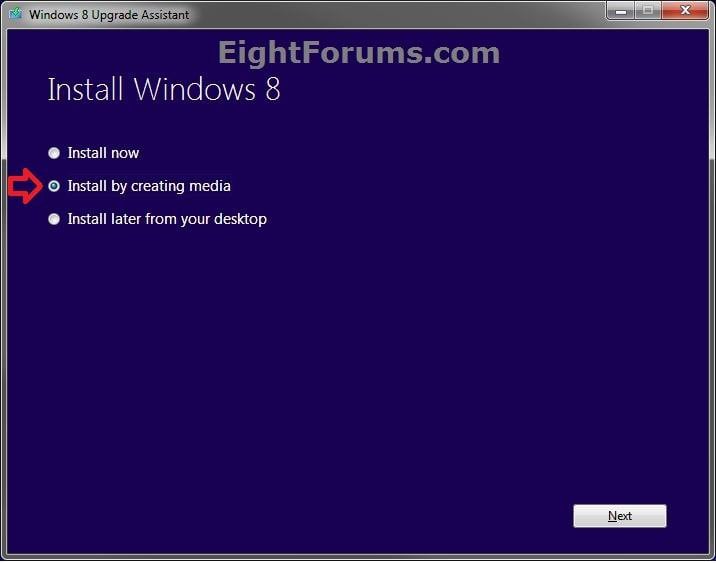
Download-6.jpg

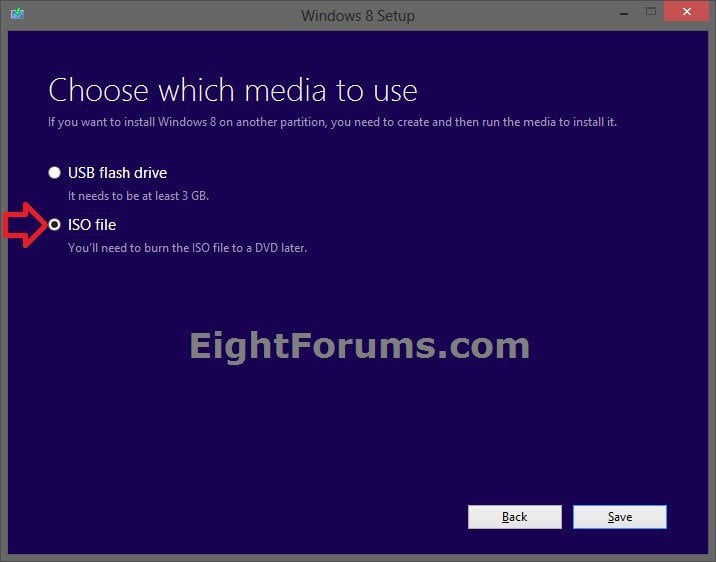
8. Select (dot) ISO file, and click/tap on Save. (see screenshot below)
Download-7.jpg

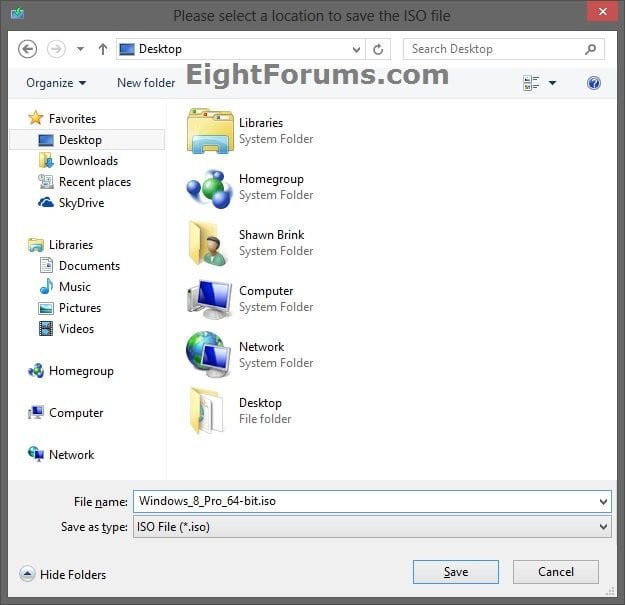
9. Navigate to a location where (ex: Desktop) you want to save the .iso file at, type in a name for the .iso file, and click/tap on Save. (see screenshot below)
Download-8.jpg

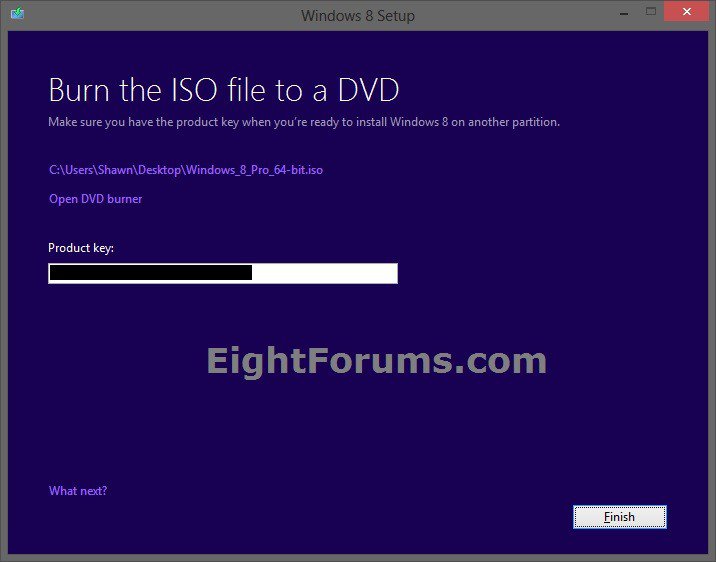
10. Click/tap on Finish. (see screenshot below)
Download-9.jpg

11. You will now have your upgrade Windows 8 ISO or full Windows 8.1 Update ISO file.

You could now create a bootable DVD/USB or UEFI USB with this ISO file to do a clean (8.1), clean for upgrade (8), or upgrade (8/8.1) install of Windows 8 with.


OPTION FOUR

To Create a Windows 8 or 8.1 ISO File from "C:\ESD\Windows" Folder


You will only be able to do this option if you still have the hidden "C:\ESD\Windows" folder from previously using OPTION TWO or OPTION THREE above, or from the Windows 8/8.1 Upgrade Assistant on this PC.


1. Click/tap on the Download button below to download the ESD-TO-ISO.zip file created by our member SIW2 (Simon).

If you use the ESD-TO-ISO.exe to create a 64-bit ISO, then it will also have UEFI support.

download

2. Save the ZIP file to your desktop, then extract (drag and drop) the contents to your desktop.

3. Unblock the ESD-TO-ISO.EXE, then right click on the ESD-TO-ISO.EXE file, and click on Run as administrator.

4. If prompted by UAC, then click/tap on Yes (Windows 7/8) or Continue (Vista).

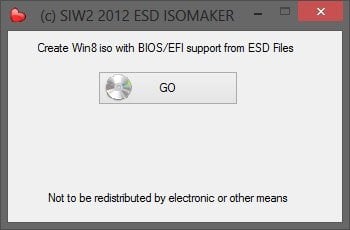
5. Click/tap on GO. (see screenshot below)
ESD-1.jpg

6. Click/tap on Yes. (see screenshot below)
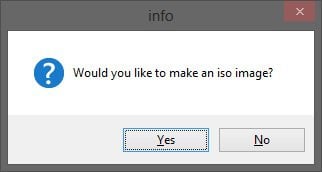
ESD-2.jpg

7. It will now create the ISO file. (see screenshot below)

If you get an error saying the ISO file cannot be created, then delete the C:\ESD folder, and do OPTION TWO above instead.

ESD-3.jpg

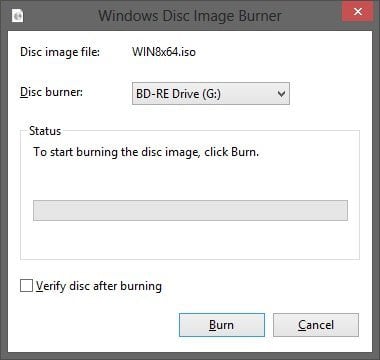
8. Click/tap on Cancel unless you wanted to create (burn) a bootable DVD with ISO file. (see screenshot below)

Burning a DVD with a 64-bit ISO created using this option will also have UEFI support.
ESD-4.jpg

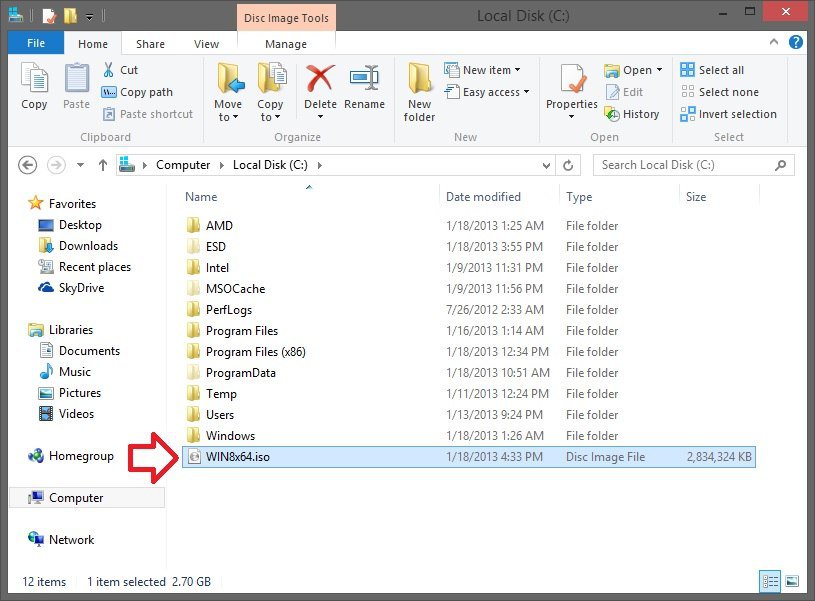
9. The upgrade Windows 8 ISO or full Windows 8.1 Update ISO file will be at the root of your C: drive. For example, C:\WIN8x64.iso. (see screenshot below)

You could now create a bootable DVD/USB or UEFI USB with this ISO file to do a clean (8.1), clean for upgrade (8), or upgrade (8/8.1) install of Windows 8/8.1 with.

ESD-5.jpg


That's it,
Shawn


Attachments

  • ESD-TO-ISO.zip
    341.8 KB · Views: 33,768
  • WindowsSetupBox.zip
    4.5 MB · Views: 45,880
Last edited by a moderator:
:thumbsup:

Thank you for such a clear and concise explanation. Just what I needed.

I've just run through the tutorial - there's a lot there! Fortunately I will be able to have it on one laptop to refer to while I'm working on the other.

I plan to try and replicate my current system as regards the User accounts and computer name. Am I correct in assuming I will be able to use the same names and passwords again on the new hard drive, or am I going to have to come up with some new ones?

Yes, you can setup your user accounts with the same names and such if you like. :)
 

My Computer

System One

  • OS
    64-bit Windows 10
    Computer type
    PC/Desktop
    System Manufacturer/Model
    Custom self built
    CPU
    Intel i7-8700K OC'd to 5 GHz
    Motherboard
    ASUS ROG Maximus XI Formula Z390
    Memory
    64 GB (4x16GB) G.SKILL TridentZ RGB DDR4 3600 MHz (F4-3600C18D-32GTZR)
    Graphics Card(s)
    ASUS ROG-STRIX-GTX1080TI-O11G-GAMING
    Sound Card
    Integrated Digital Audio (S/PDIF)
    Monitor(s) Displays
    2 x Samsung Odyssey G7 27"
    Screen Resolution
    2560x1440
    Hard Drives
    1TB Samsung 990 PRO M.2,
    4TB Samsung 990 PRO PRO M.2,
    8TB WD MyCloudEX2Ultra NAS
    PSU
    OCZ Series Gold OCZZ1000M 1000W
    Case
    Thermaltake Core P3
    Cooling
    Corsair Hydro H115i
    Keyboard
    Logitech wireless K800
    Mouse
    Logitech MX Master 3
    Internet Speed
    1 Gb/s Download and 35 Mb/s Upload
    Browser
    Internet Explorer 11
    Antivirus
    Malwarebyte Anti-Malware Premium
    Other Info
    Logitech Z625 speaker system,
    Logitech BRIO 4K Pro webcam,
    HP Color LaserJet Pro MFP M477fdn,
    APC SMART-UPS RT 1000 XL - SURT1000XLI,
    Galaxy S23 Plus phone
:thumbsup:

Thank you for such a clear and concise explanation. Just what I needed.

I've just run through the tutorial - there's a lot there! Fortunately I will be able to have it on one laptop to refer to while I'm working on the other.

I plan to try and replicate my current system as regards the User accounts and computer name. Am I correct in assuming I will be able to use the same names and passwords again on the new hard drive, or am I going to have to come up with some new ones?

Yes, you can setup your user accounts with the same names and such if you like. :)

:ditto: I use the same Live ID on 4 different PC's. It may actually make things simpler for you. Depending on how your One Drive sync settings are configured. Your personalization settings can be synced from one PC to another and backed up online. Stuff like your Account Picture, Lock screen, your current theme and colors, IE favorites and web site login info. It will set it all back up the way you have it now. Assuming the appropriate sync settings are enabled. Charms Bar > Settings > Change PC Settings > OneDrive > Sync.

EDIT: Even if you don't use a live ID, you can use the same username and password again and again.
 

My Computer

System One

  • OS
    Windows 10 Education 64 Bit
    Computer type
    PC/Desktop
    System Manufacturer/Model
    Asus
    CPU
    AMD Phenom II X4 980 Black Edition Deneb 3.7GHz
    Motherboard
    ASUS M4N68T-M V2 µATX Motherboard
    Memory
    8GB 4GBx2 Kingston PC10600 DDR3 1333 Memory
    Graphics Card(s)
    NVIDIA Geforce GT640 2 Gig DDR3 PCIe
    Sound Card
    VIA VT1708s High Definition Audio 8-channel Onboard
    Monitor(s) Displays
    22" LG E2242 1080p and 2 19" I-INC AG191D
    Screen Resolution
    1280x1024 - 1920x1080 - 1280x1024
    Hard Drives
    Crucial MX100 256 GB SSD and 500 GB WD Blue SATA
    PSU
    Thermaltake TR 620
    Case
    Power Up Black ATX Mid-Tower Case
    Cooling
    Stock heatsink fan
    Keyboard
    Logitech Wireless K350 Wave
    Mouse
    Logitech M570 Trackball and T650 TouchPad
    Internet Speed
    80 Mbps Down 30 Mbps Up
    Browser
    Internet Explorer 11
    Antivirus
    Windows Defender
    Other Info
    HP DVD1040e Lightscribe - External USB2
Yes, you can setup your user accounts with the same names and such if you like. :)

EDIT: Even if you don't use a live ID, you can use the same username and password again and again.

Thanks to both of you. I don't use a live ID so there will be a bit of work involved in setting things up but I don't mind that. I can try and get things 'right first time' this time.

I'm just downloading a new copy of the iso, and actually starting to get impatient to get going :D. Fortunately it will be a few days until the HDD arrives (ordered from Amazon UK and has to get to Greece) so I will have time to make sure I have done all the necessary prep and got in enough bottles of red wine to calm my nerves!
 

My Computer

System One

  • OS
    Win8.1 64bit, Windows 10 TP on VMWare Player
    Computer type
    Laptop
    System Manufacturer/Model
    Dell Inspiron 15 3521
    CPU
    1.80 gigahertz Intel Core i5-3337U
    Motherboard
    Dell Inc. 0010T1 A00
    Memory
    8gb
    Graphics Card(s)
    Intel HD Graphics 4000
    Sound Card
    Realtek HD Audio & Intel Display Audio
    Hard Drives
    TOSHIBA MQ01ABD050 [Hard drive] (500.11 GB)
    Cooling
    Additional fan
    Mouse
    Kensington Trackball
    Browser
    IE
    Antivirus
    Emsisoft Internet Security, Malwarebytes free & antiexploit
Having the second PC will be a bonus. If you get stuck or unsure you can go online and sort it out. I keep my user folders a separate drive/partition. Then when I do clean install I delete all the partitions except the one with my Data on it. Windows recreates all the needed system partitions and the windows partition and then installs. Once that's done I just change the location of my user folders from the default to where I have stored. I don't lose anything or have to copy to external and copy back again. saves a lot of time and effort. In my desktop I use an SSD for Windows and a conventional hard drive for Data. You could likely do the same thing if you wanted. I think a lot of forum members went this route.
 

My Computer

System One

  • OS
    Windows 10 Education 64 Bit
    Computer type
    PC/Desktop
    System Manufacturer/Model
    Asus
    CPU
    AMD Phenom II X4 980 Black Edition Deneb 3.7GHz
    Motherboard
    ASUS M4N68T-M V2 µATX Motherboard
    Memory
    8GB 4GBx2 Kingston PC10600 DDR3 1333 Memory
    Graphics Card(s)
    NVIDIA Geforce GT640 2 Gig DDR3 PCIe
    Sound Card
    VIA VT1708s High Definition Audio 8-channel Onboard
    Monitor(s) Displays
    22" LG E2242 1080p and 2 19" I-INC AG191D
    Screen Resolution
    1280x1024 - 1920x1080 - 1280x1024
    Hard Drives
    Crucial MX100 256 GB SSD and 500 GB WD Blue SATA
    PSU
    Thermaltake TR 620
    Case
    Power Up Black ATX Mid-Tower Case
    Cooling
    Stock heatsink fan
    Keyboard
    Logitech Wireless K350 Wave
    Mouse
    Logitech M570 Trackball and T650 TouchPad
    Internet Speed
    80 Mbps Down 30 Mbps Up
    Browser
    Internet Explorer 11
    Antivirus
    Windows Defender
    Other Info
    HP DVD1040e Lightscribe - External USB2
I keep my user folders a separate drive/partition. Then when I do clean install I delete all the partitions except the one with my Data on it. Windows recreates all the needed system partitions and the windows partition and then installs. Once that's done I just change the location of my user folders from the default to where I have stored. I don't lose anything or have to copy to external and copy back again. saves a lot of time and effort. In my desktop I use an SSD for Windows and a conventional hard drive for Data. You could likely do the same thing if you wanted. I think a lot of forum members went this route.

Some things to think about, thank you.

Right now I have everything together on C, but once I get the new drive installed I'm considering splitting the OS and data into different partitions. I've been browsing threads where people talk about backing up their OS and their data separately and, though it's taken a while to filter through my brain, I can see the benefits in this.

For now I have all my data on a System Image on an external HDD and plan to move things over once I have the new drive up and running. Well that's the theory, and everything I've read here suggests it should work smoothly in practice :D.
 

My Computer

System One

  • OS
    Win8.1 64bit, Windows 10 TP on VMWare Player
    Computer type
    Laptop
    System Manufacturer/Model
    Dell Inspiron 15 3521
    CPU
    1.80 gigahertz Intel Core i5-3337U
    Motherboard
    Dell Inc. 0010T1 A00
    Memory
    8gb
    Graphics Card(s)
    Intel HD Graphics 4000
    Sound Card
    Realtek HD Audio & Intel Display Audio
    Hard Drives
    TOSHIBA MQ01ABD050 [Hard drive] (500.11 GB)
    Cooling
    Additional fan
    Mouse
    Kensington Trackball
    Browser
    IE
    Antivirus
    Emsisoft Internet Security, Malwarebytes free & antiexploit
For me, and I'm sure a lot of other people too, its a required space issue. I have about 300 GB worth of files on my DATA drive. That means I would need a 500 GB SSD to get it all on the one drive. When I bought my SSD a 500 GB SSD would have been very expensive. They still aren't cheap at that size. The easy solution was to buy a smaller drive for the OS and then use the hard drive it's replacing for my DATA. I got lucky with my laptop, it has two drive bays. I put a 128 GB SSD in for the OS and a 256 GB SSD in for my DATA. That was what my budget could afford at the time. Then I put the original 750 GB spinner drive that came in it in an external enclosure for further file storage and backup. I keep that drive in my laptop bag. The benefit to having your Data on a separate partition of drive is when you have a crash and Windows won't boot up. Reinstalls are easier to do without worrying about losing your files. You can erase the Windows partition without losing anything other than installed programs. And no having to copy it all back from an external drive to your internal hard drive. It's a win win in my books.
 

My Computer

System One

  • OS
    Windows 10 Education 64 Bit
    Computer type
    PC/Desktop
    System Manufacturer/Model
    Asus
    CPU
    AMD Phenom II X4 980 Black Edition Deneb 3.7GHz
    Motherboard
    ASUS M4N68T-M V2 µATX Motherboard
    Memory
    8GB 4GBx2 Kingston PC10600 DDR3 1333 Memory
    Graphics Card(s)
    NVIDIA Geforce GT640 2 Gig DDR3 PCIe
    Sound Card
    VIA VT1708s High Definition Audio 8-channel Onboard
    Monitor(s) Displays
    22" LG E2242 1080p and 2 19" I-INC AG191D
    Screen Resolution
    1280x1024 - 1920x1080 - 1280x1024
    Hard Drives
    Crucial MX100 256 GB SSD and 500 GB WD Blue SATA
    PSU
    Thermaltake TR 620
    Case
    Power Up Black ATX Mid-Tower Case
    Cooling
    Stock heatsink fan
    Keyboard
    Logitech Wireless K350 Wave
    Mouse
    Logitech M570 Trackball and T650 TouchPad
    Internet Speed
    80 Mbps Down 30 Mbps Up
    Browser
    Internet Explorer 11
    Antivirus
    Windows Defender
    Other Info
    HP DVD1040e Lightscribe - External USB2
The benefit to having your Data on a separate partition of drive is when you have a crash and Windows won't boot up. Reinstalls are easier to do without worrying about losing your files. You can erase the Windows partition without losing anything other than installed programs. And no having to copy it all back from an external drive to your internal hard drive. It's a win win in my books.

:thumbsup:Win win sounds good to me, especially as I've been learning the hard way up till now.
 

My Computer

System One

  • OS
    Win8.1 64bit, Windows 10 TP on VMWare Player
    Computer type
    Laptop
    System Manufacturer/Model
    Dell Inspiron 15 3521
    CPU
    1.80 gigahertz Intel Core i5-3337U
    Motherboard
    Dell Inc. 0010T1 A00
    Memory
    8gb
    Graphics Card(s)
    Intel HD Graphics 4000
    Sound Card
    Realtek HD Audio & Intel Display Audio
    Hard Drives
    TOSHIBA MQ01ABD050 [Hard drive] (500.11 GB)
    Cooling
    Additional fan
    Mouse
    Kensington Trackball
    Browser
    IE
    Antivirus
    Emsisoft Internet Security, Malwarebytes free & antiexploit
Hi Shawn,

I thought I'd try Option 1 with my new tablet, which is advertised as coming with Windows 8.1 with Bing, having taken a full backup image. Doing "slmgr.vbs /dlv" it says it is a CoreConnected edition, and a couple of other product key readers say it is "Windows 8.1 Connected".

I tried downloading the 'Windows 8.1' (32 bit) edition using the Media Creation tool, but when I run it, it asks for a Product Key (not a good sign as I was hoping it would read the key in the BIOS) and when I typed the key in, got the error :
"The product key entered does not match any of the Windows images available for installation. Enter a different product key."

Any idea if I can get past this? Would downloading the Pro edition help? Or is my edition simply not available via the Media Creation tool, do you think?

Thanks,
David
 

My Computer

System One

  • OS
    Windows 8.1, 10
Hey David,

I'm not sure unless the OEM used some other version What does it say for "Description" when using "slmgr.vbs /dlv"?
 

My Computer

System One

  • OS
    64-bit Windows 10
    Computer type
    PC/Desktop
    System Manufacturer/Model
    Custom self built
    CPU
    Intel i7-8700K OC'd to 5 GHz
    Motherboard
    ASUS ROG Maximus XI Formula Z390
    Memory
    64 GB (4x16GB) G.SKILL TridentZ RGB DDR4 3600 MHz (F4-3600C18D-32GTZR)
    Graphics Card(s)
    ASUS ROG-STRIX-GTX1080TI-O11G-GAMING
    Sound Card
    Integrated Digital Audio (S/PDIF)
    Monitor(s) Displays
    2 x Samsung Odyssey G7 27"
    Screen Resolution
    2560x1440
    Hard Drives
    1TB Samsung 990 PRO M.2,
    4TB Samsung 990 PRO PRO M.2,
    8TB WD MyCloudEX2Ultra NAS
    PSU
    OCZ Series Gold OCZZ1000M 1000W
    Case
    Thermaltake Core P3
    Cooling
    Corsair Hydro H115i
    Keyboard
    Logitech wireless K800
    Mouse
    Logitech MX Master 3
    Internet Speed
    1 Gb/s Download and 35 Mb/s Upload
    Browser
    Internet Explorer 11
    Antivirus
    Malwarebyte Anti-Malware Premium
    Other Info
    Logitech Z625 speaker system,
    Logitech BRIO 4K Pro webcam,
    HP Color LaserJet Pro MFP M477fdn,
    APC SMART-UPS RT 1000 XL - SURT1000XLI,
    Galaxy S23 Plus phone
Hey David,

I'm not sure unless the OEM used some other version What does it say for "Description" when using "slmgr.vbs /dlv"?
Hello Shawn,

Thanks for replying. It says:
"Description: Windows(R) Operating System, OEM_DM channel"
 

My Computer

System One

  • OS
    Windows 8.1, 10

My Computer

System One

  • OS
    64-bit Windows 10
    Computer type
    PC/Desktop
    System Manufacturer/Model
    Custom self built
    CPU
    Intel i7-8700K OC'd to 5 GHz
    Motherboard
    ASUS ROG Maximus XI Formula Z390
    Memory
    64 GB (4x16GB) G.SKILL TridentZ RGB DDR4 3600 MHz (F4-3600C18D-32GTZR)
    Graphics Card(s)
    ASUS ROG-STRIX-GTX1080TI-O11G-GAMING
    Sound Card
    Integrated Digital Audio (S/PDIF)
    Monitor(s) Displays
    2 x Samsung Odyssey G7 27"
    Screen Resolution
    2560x1440
    Hard Drives
    1TB Samsung 990 PRO M.2,
    4TB Samsung 990 PRO PRO M.2,
    8TB WD MyCloudEX2Ultra NAS
    PSU
    OCZ Series Gold OCZZ1000M 1000W
    Case
    Thermaltake Core P3
    Cooling
    Corsair Hydro H115i
    Keyboard
    Logitech wireless K800
    Mouse
    Logitech MX Master 3
    Internet Speed
    1 Gb/s Download and 35 Mb/s Upload
    Browser
    Internet Explorer 11
    Antivirus
    Malwarebyte Anti-Malware Premium
    Other Info
    Logitech Z625 speaker system,
    Logitech BRIO 4K Pro webcam,
    HP Color LaserJet Pro MFP M477fdn,
    APC SMART-UPS RT 1000 XL - SURT1000XLI,
    Galaxy S23 Plus phone
Windows 8.1 with Bing is a separate edition with its own keys. It's akin to Windows 7 Starter. It's a low cost version that ships with small screen low cost devices. That ISO may be hard to find, it looks like only the OEM's get it. It's not listed on MSDN or TechNet, not for me anyway.
 

My Computer

System One

  • OS
    Windows 10 Education 64 Bit
    Computer type
    PC/Desktop
    System Manufacturer/Model
    Asus
    CPU
    AMD Phenom II X4 980 Black Edition Deneb 3.7GHz
    Motherboard
    ASUS M4N68T-M V2 µATX Motherboard
    Memory
    8GB 4GBx2 Kingston PC10600 DDR3 1333 Memory
    Graphics Card(s)
    NVIDIA Geforce GT640 2 Gig DDR3 PCIe
    Sound Card
    VIA VT1708s High Definition Audio 8-channel Onboard
    Monitor(s) Displays
    22" LG E2242 1080p and 2 19" I-INC AG191D
    Screen Resolution
    1280x1024 - 1920x1080 - 1280x1024
    Hard Drives
    Crucial MX100 256 GB SSD and 500 GB WD Blue SATA
    PSU
    Thermaltake TR 620
    Case
    Power Up Black ATX Mid-Tower Case
    Cooling
    Stock heatsink fan
    Keyboard
    Logitech Wireless K350 Wave
    Mouse
    Logitech M570 Trackball and T650 TouchPad
    Internet Speed
    80 Mbps Down 30 Mbps Up
    Browser
    Internet Explorer 11
    Antivirus
    Windows Defender
    Other Info
    HP DVD1040e Lightscribe - External USB2
Windows 8.1 with Bing is a separate edition with its own keys. It's akin to Windows 7 Starter. It's a low cost version that ships with small screen low cost devices. That ISO may be hard to find, it looks like only the OEM's get it. It's not listed on MSDN or TechNet, not for me anyway.
Thanks for that. I think I've seen 'with Bing' on larger screens, and even on some desktops, but as you say it's at the cheap end of the market.

I wonder what Windows 10 upgrade options I'll have when it gets released... (Another factor is that my tablet seems to be using WIMBoot technology to save space, which a normal clean install from an ISO probably wouldn't put back in place.)
 

My Computer

System One

  • OS
    Windows 8.1, 10
Windows 8.1 with Bing is a separate edition with its own keys. It's akin to Windows 7 Starter. It's a low cost version that ships with small screen low cost devices. That ISO may be hard to find, it looks like only the OEM's get it. It's not listed on MSDN or TechNet, not for me anyway.
Thanks for that. I think I've seen 'with Bing' on larger screens, and even on some desktops, but as you say it's at the cheap end of the market.

I wonder what Windows 10 upgrade options I'll have when it gets released... (Another factor is that my tablet seems to be using WIMBoot technology to save space, which a normal clean install from an ISO probably wouldn't put back in place.)

I only had a quick look at what Google had to say about it. It's basically for low cost devices. The OEM's can get ti for next to nothing as long as they only install it on inexpensive devices. As near as I can tell it hasn't been out there as long as your normal versions of Windows 8 have. I know as much about it as I do about WIMBoot. I've seen one or two posts on WIMBoot. I think there was a post on it in the News section a while ago too. Basically you boot from an image file. It saves hard drive space when its at a premium. You've likely researched it more than I have. There must be way to update the image? That PC does Windows updates doesn't it?
 

My Computer

System One

  • OS
    Windows 10 Education 64 Bit
    Computer type
    PC/Desktop
    System Manufacturer/Model
    Asus
    CPU
    AMD Phenom II X4 980 Black Edition Deneb 3.7GHz
    Motherboard
    ASUS M4N68T-M V2 µATX Motherboard
    Memory
    8GB 4GBx2 Kingston PC10600 DDR3 1333 Memory
    Graphics Card(s)
    NVIDIA Geforce GT640 2 Gig DDR3 PCIe
    Sound Card
    VIA VT1708s High Definition Audio 8-channel Onboard
    Monitor(s) Displays
    22" LG E2242 1080p and 2 19" I-INC AG191D
    Screen Resolution
    1280x1024 - 1920x1080 - 1280x1024
    Hard Drives
    Crucial MX100 256 GB SSD and 500 GB WD Blue SATA
    PSU
    Thermaltake TR 620
    Case
    Power Up Black ATX Mid-Tower Case
    Cooling
    Stock heatsink fan
    Keyboard
    Logitech Wireless K350 Wave
    Mouse
    Logitech M570 Trackball and T650 TouchPad
    Internet Speed
    80 Mbps Down 30 Mbps Up
    Browser
    Internet Explorer 11
    Antivirus
    Windows Defender
    Other Info
    HP DVD1040e Lightscribe - External USB2
I know as much about it as I do about WIMBoot. I've seen one or two posts on WIMBoot. I think there was a post on it in the News section a while ago too. Basically you boot from an image file. It saves hard drive space when its at a premium. You've likely researched it more than I have. There must be way to update the image? That PC does Windows updates doesn't it?
Thanks for that - I don't want to clutter up this tutorial thread any more, but have put an image of Disk Management over on another thread here.
 

My Computer

System One

  • OS
    Windows 8.1, 10
I finally took delivery of my new hard drive and was able to do a fresh install of W 8.1 using the ISO created by following this tutorial.

It went so easily I was stunned :what:

The only glitch was when I got a message telling me to remove the external drive C: and it took me a little while to realize this meant the usb. Oh, and as the laptop was originally from the US I chose the US time and date option, and then had to find a way to make the date non-US. And until I get round to downloading an English-UK pack, I'm writing American (lots of z's :)).

I've just spent a few hours installing drivers, reinstalling programs, and smiling at the absence of bloatware and unnecessary start-up programs etc. Now I just need to work out how to restore all those little customizing things I'd done.

In fact the hardest part about the whole process (so far) was getting the cover back on the base of the laptop.

So thank you Shawn, another extremely satisfied User.

And fired up by the experience, I'm looking at partitioning the hard drive and installing Win 10 on a VM next. There's just no stopping me now :D
 

My Computer

System One

  • OS
    Win8.1 64bit, Windows 10 TP on VMWare Player
    Computer type
    Laptop
    System Manufacturer/Model
    Dell Inspiron 15 3521
    CPU
    1.80 gigahertz Intel Core i5-3337U
    Motherboard
    Dell Inc. 0010T1 A00
    Memory
    8gb
    Graphics Card(s)
    Intel HD Graphics 4000
    Sound Card
    Realtek HD Audio & Intel Display Audio
    Hard Drives
    TOSHIBA MQ01ABD050 [Hard drive] (500.11 GB)
    Cooling
    Additional fan
    Mouse
    Kensington Trackball
    Browser
    IE
    Antivirus
    Emsisoft Internet Security, Malwarebytes free & antiexploit
That's great news Maggi. :party:

Please feel free to create new threads for anything else that you may need help with. :)
 

My Computer

System One

  • OS
    64-bit Windows 10
    Computer type
    PC/Desktop
    System Manufacturer/Model
    Custom self built
    CPU
    Intel i7-8700K OC'd to 5 GHz
    Motherboard
    ASUS ROG Maximus XI Formula Z390
    Memory
    64 GB (4x16GB) G.SKILL TridentZ RGB DDR4 3600 MHz (F4-3600C18D-32GTZR)
    Graphics Card(s)
    ASUS ROG-STRIX-GTX1080TI-O11G-GAMING
    Sound Card
    Integrated Digital Audio (S/PDIF)
    Monitor(s) Displays
    2 x Samsung Odyssey G7 27"
    Screen Resolution
    2560x1440
    Hard Drives
    1TB Samsung 990 PRO M.2,
    4TB Samsung 990 PRO PRO M.2,
    8TB WD MyCloudEX2Ultra NAS
    PSU
    OCZ Series Gold OCZZ1000M 1000W
    Case
    Thermaltake Core P3
    Cooling
    Corsair Hydro H115i
    Keyboard
    Logitech wireless K800
    Mouse
    Logitech MX Master 3
    Internet Speed
    1 Gb/s Download and 35 Mb/s Upload
    Browser
    Internet Explorer 11
    Antivirus
    Malwarebyte Anti-Malware Premium
    Other Info
    Logitech Z625 speaker system,
    Logitech BRIO 4K Pro webcam,
    HP Color LaserJet Pro MFP M477fdn,
    APC SMART-UPS RT 1000 XL - SURT1000XLI,
    Galaxy S23 Plus phone
Thanks Shawn,

Can you tell me what's in the 300mb Recovery Partition that got created when I did the fresh install? Is it a copy of the OS to use for a Refresh or Reset? (I plan to create a Custom Recovery Image now but it would be good to know what I've got already :)).
 

My Computer

System One

  • OS
    Win8.1 64bit, Windows 10 TP on VMWare Player
    Computer type
    Laptop
    System Manufacturer/Model
    Dell Inspiron 15 3521
    CPU
    1.80 gigahertz Intel Core i5-3337U
    Motherboard
    Dell Inc. 0010T1 A00
    Memory
    8gb
    Graphics Card(s)
    Intel HD Graphics 4000
    Sound Card
    Realtek HD Audio & Intel Display Audio
    Hard Drives
    TOSHIBA MQ01ABD050 [Hard drive] (500.11 GB)
    Cooling
    Additional fan
    Mouse
    Kensington Trackball
    Browser
    IE
    Antivirus
    Emsisoft Internet Security, Malwarebytes free & antiexploit

My Computer

System One

  • OS
    64-bit Windows 10
    Computer type
    PC/Desktop
    System Manufacturer/Model
    Custom self built
    CPU
    Intel i7-8700K OC'd to 5 GHz
    Motherboard
    ASUS ROG Maximus XI Formula Z390
    Memory
    64 GB (4x16GB) G.SKILL TridentZ RGB DDR4 3600 MHz (F4-3600C18D-32GTZR)
    Graphics Card(s)
    ASUS ROG-STRIX-GTX1080TI-O11G-GAMING
    Sound Card
    Integrated Digital Audio (S/PDIF)
    Monitor(s) Displays
    2 x Samsung Odyssey G7 27"
    Screen Resolution
    2560x1440
    Hard Drives
    1TB Samsung 990 PRO M.2,
    4TB Samsung 990 PRO PRO M.2,
    8TB WD MyCloudEX2Ultra NAS
    PSU
    OCZ Series Gold OCZZ1000M 1000W
    Case
    Thermaltake Core P3
    Cooling
    Corsair Hydro H115i
    Keyboard
    Logitech wireless K800
    Mouse
    Logitech MX Master 3
    Internet Speed
    1 Gb/s Download and 35 Mb/s Upload
    Browser
    Internet Explorer 11
    Antivirus
    Malwarebyte Anti-Malware Premium
    Other Info
    Logitech Z625 speaker system,
    Logitech BRIO 4K Pro webcam,
    HP Color LaserJet Pro MFP M477fdn,
    APC SMART-UPS RT 1000 XL - SURT1000XLI,
    Galaxy S23 Plus phone
Thanks Shawn,

Can you tell me what's in the 300mb Recovery Partition that got created when I did the fresh install? Is it a copy of the OS to use for a Refresh or Reset? (I plan to create a Custom Recovery Image now but it would be good to know what I've got already :)).

It's not a full copy of the OS, that partition is too small for that. It's recovery tools to help you diagnose and fix boot issues etc. I would say it launches Windows PE (Preinstallation Environment). If you try to do a Refresh or Reset you'll be prompted to insert your original install media.
 

My Computer

System One

  • OS
    Windows 10 Education 64 Bit
    Computer type
    PC/Desktop
    System Manufacturer/Model
    Asus
    CPU
    AMD Phenom II X4 980 Black Edition Deneb 3.7GHz
    Motherboard
    ASUS M4N68T-M V2 µATX Motherboard
    Memory
    8GB 4GBx2 Kingston PC10600 DDR3 1333 Memory
    Graphics Card(s)
    NVIDIA Geforce GT640 2 Gig DDR3 PCIe
    Sound Card
    VIA VT1708s High Definition Audio 8-channel Onboard
    Monitor(s) Displays
    22" LG E2242 1080p and 2 19" I-INC AG191D
    Screen Resolution
    1280x1024 - 1920x1080 - 1280x1024
    Hard Drives
    Crucial MX100 256 GB SSD and 500 GB WD Blue SATA
    PSU
    Thermaltake TR 620
    Case
    Power Up Black ATX Mid-Tower Case
    Cooling
    Stock heatsink fan
    Keyboard
    Logitech Wireless K350 Wave
    Mouse
    Logitech M570 Trackball and T650 TouchPad
    Internet Speed
    80 Mbps Down 30 Mbps Up
    Browser
    Internet Explorer 11
    Antivirus
    Windows Defender
    Other Info
    HP DVD1040e Lightscribe - External USB2
Back
Top