How to Add or Remove "Switch User" in Windows 8
Switch User (Fast User Switching) is a feature in Windows that allows you to be able to switch from the current user account that you are signed in to be signed in to another user account instead without having to close any programs and files or sign out of the current user account, and then be able to switch back right where you left off at.
This tutorial will help show you how to add or remove the Switch User option from the Start screen, CTRL+ALT+DEL screen, Shut Down Windows dialog, and Task Manager for all users in Windows 8.
You must be logged in as an administrator to be able to do the steps in this tutorial.
This tutorial will help show you how to add or remove the Switch User option from the Start screen, CTRL+ALT+DEL screen, Shut Down Windows dialog, and Task Manager for all users in Windows 8.
You must be logged in as an administrator to be able to do the steps in this tutorial.
This will only add or remove Switch User from the default locations in Windows 8 above, and will not prevent users from using other methods to invoke Switch User.
Such as this: Switch User - Add to Desktop Context Menu in Windows 8
Such as this: Switch User - Add to Desktop Context Menu in Windows 8
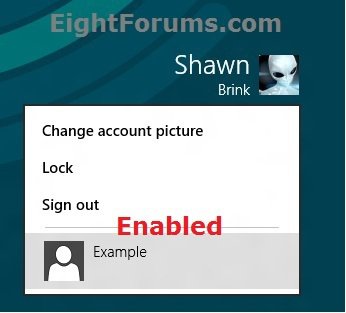
EXAMPLE: Add or Remove "Switch User" from "Start" Screen
NOTE: This is when you click/tap on your user name or picture.
OPTION ONE
To Add or Remove "Switch User" using a BAT File Download
1. Do step 2 or 3 below for what you would like to do.
2. To Add "Switch User" for All Users
NOTE: This is the default setting.
A) Click/tap on the Download button below to download the file below.
Add_Switch_User.bat
B) Go to step 4 below.
3. To Remove "Switch User" for All Users
A) Click/tap on the Download button below to download the file below.
Remove_Switch_User.bat
B) Go to step 4 below.
4. Save the .bat file to the desktop.
5. Right click or press and hold on the downloaded .bat file, and click/tap on Run as administrator.
6. If prompted, click/tap on Run, Yes (UAC).
NOTE: If you like, you can stop getting the Run prompt by unblocking the downloaded .bat file.
7. You will now notice a command prompt and your screen flash quickly as explorer is restarted to apply the registry changes.
8. When finished, you can delete the downloaded .bat file if you like.
OPTION TWO
To Add or Remove "Switch User" in Local Group Policy Editor
NOTE: This option for using group policy is only available in the Windows 8 Pro and Windows 8 Enterprise editions.
1. From the Start screen, start typing gpedit.msc and press Enter when finished.
NOTE: You could also press Windows+R to open the Run dialog, type gpedit.msc, and click/tap on OK.
2. If prompted by UAC, then click on Yes.
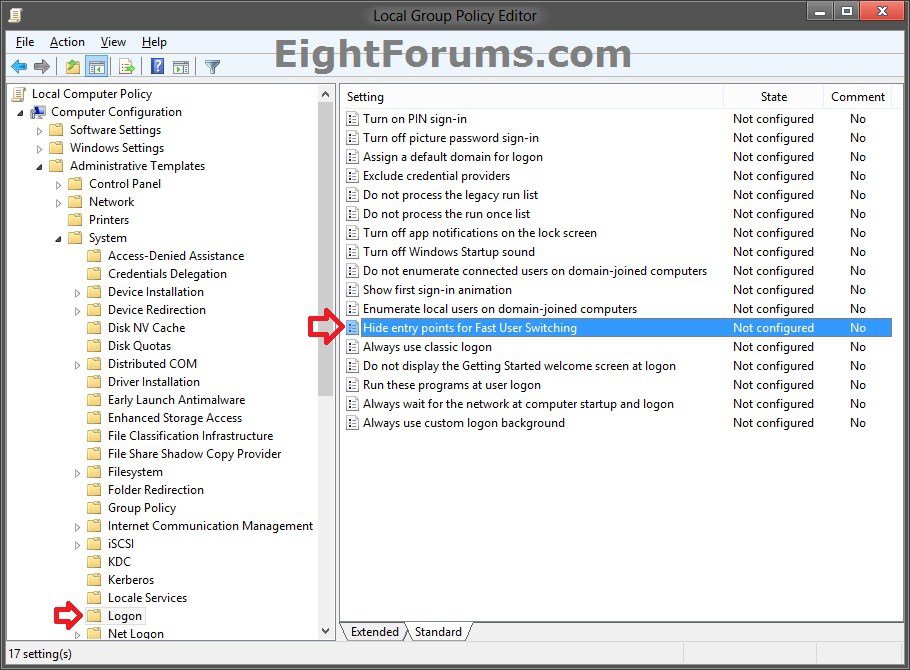
3. In the left pane, click/tap on to expand Computer Configuration, Administrative Templates, System, and open Logon. (see screenshot below)
4. In the right pane of Logon, double click/tap on Hide entry points for Fast User Switching. (see screenshot above)
5. Do step 6 or 7 below for what you would like to do.
6. To Add "Switch User" for All Users
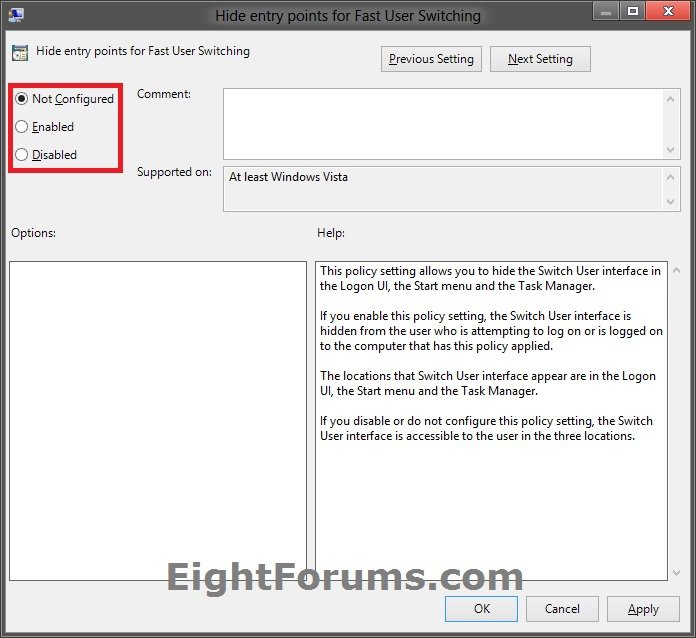
A) Select (dot) Disabled or Not Configured, click/tap on OK, and go to step 8 below. (see screenshot below step 7A)
NOTE: Not Configured is the default setting.
7. To Remove "Switch User" for All Users
A) Select (dot) Enabled, click/tap on OK, and go to step 8 below. (see screenshot below)
8. You can now close the Local Group Policy Editor window if you like.
That's it,
Shawn
Attachments
Last edited:


