How to Create a "Windows To Go" Workspace on a USB Flash Drive in Windows 8 Enterprise
Windows To Go is an enterprise feature of Windows 8 that enables the creation of a Windows To Go workspace that can be booted from a USB-connected external drive on PCs that meet the Windows 7 or Windows 8 certification requirements, regardless of the operating system running on the PC. Windows To Go workspaces can use the same image enterprises use for their desktops and laptops and can be managed the same way. Windows To Go is not intended to replace desktops, laptops or supplant other mobility offerings. Rather, it provides support for efficient use of resources for alternative workplace scenarios.
For more information and details about Windows To Go workspaces, see:
This tutorial will show you how to create a "Windows To Go" workspace on a USB flash drive in Windows 8 Enterprise that can be booted from any Windows 7 and Windows 8 (except Windows 8 RT) host PC that supports booting from a connected USB flash drive.
You must be signed in as an administrator to be able to do the steps in this tutorial.
Differences between Windows To Go and a typical installation of Windows
- Internal disks are offline. To ensure data isn’t accidentally disclosed, internal hard disks on the host computer are offline by default when booted into a Windows To Go workspace. Similarly if a Windows To Go drive is inserted into a running system the Windows To Go drive will not be listed in Windows Explorer.
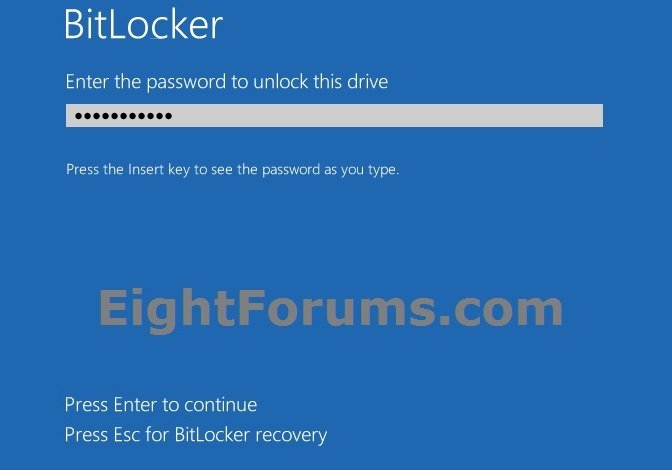
- Trusted Platform Module (TPM) isn’t used. When using BitLocker Drive Encryption a pre-operating system boot password will be used for security rather than the TPM since the TPM is tied to a specific computer and Windows To Go drives will move between computers.
- Hibernate is disabled by default. To ensure that the Windows To Go workspace is able to move between computers easily, hibernation is disabled by default. Hibernation can be re-enabled by using Group Policy settings.
- Windows Recovery Environment isn’t available. In the rare case that you need to recover your Windows To Go drive, you should re-image it with a fresh image of Windows.
- Refreshing or resetting a Windows To Go workspace is not supported. Resetting to the manufacturer’s standard for the computer doesn’t apply when running a Windows To Go workspace, so the feature was disabled.
- Store is disabled by default. Apps licensed through the store are linked to hardware for licensing. Since Windows To Go is designed to roam to different host PCs access to the store is disabled. You can enable the store if your Windows To Go workspaces won’t be roaming to multiple PC hosts. With Windows To Go in Windows 8.1, the Windows Store is enabled by default. Windows To Go users may roam to any number of machines and access the Windows Store and use Windows Store apps.
- If host PC is 32-bit with legacy BIOS, then it will only support booting from a 32-bit Windows To Go USB flash drive.
- If host PC is 64-bit with legacy BIOS, then it will support booting from 32-bit and 64-bit Windows To Go USB flash drive.
- If host PC is 32-bit with UEFI BIOS, then it will only support booting from a 32-bit Windows To Go USB flash drive.
- If host PC is 64-bit with UEFI BIOS, then it will only support booting from a 64-bit Windows To Go USB flash drive.
- Windows To Go is fully supported on either USB 2.0 or USB 3.0 ports on PC’s certified for Windows 7 or Windows 8 (except Windows 8 RT).
- Don’t boot the Windows To Go drive from a USB hub. Always insert the Windows To Go drive directly into a port on the computer.
- Always shut down Windows and wait for shutdown to complete before removing the Windows To Go USB flash drive.
Minimum Requirements to Create a "Windows To Go" Workspace
- Your PC (host) running 32-bit or 64-bit Windows 8 Enterprise
- 32 GB USB 3.0 flash drive certified for Windows To Go
- Windows 8 Enterprise ISO or DVD
If you would like to download a free 90-day trial evaluation of Windows 8 Enterprise that you can install, see:
Download Windows 8 Enterprise Evaluation
OR
Download Windows 8.1 Enterprise Preview
Download Windows 8 Enterprise Evaluation
OR
Download Windows 8.1 Enterprise Preview
Here's How:
1. In your Windows 8 Enterprise, either insert your Windows 8 Enterprise DVD, or mount your Windows 8 Enterprise ISO file.
NOTE: This is so you can use the Sources\install.wim file from the DVD or mounted ISO file to create the Windows To Go with.
2. Connect the USB flash drive you want to use for Windows To Go, open the Control Panel (icons view), and click/tap on the Windows To Go icon.
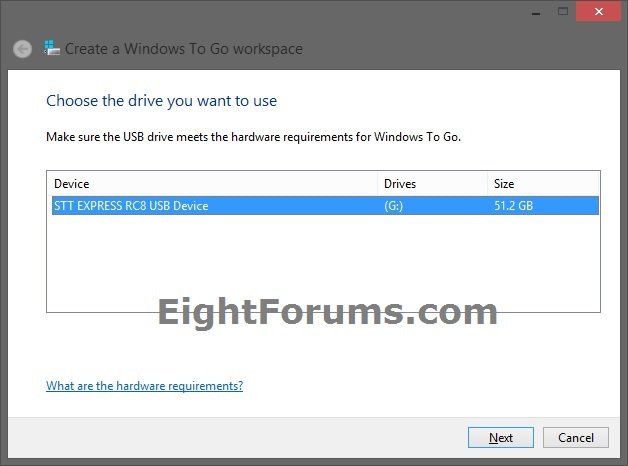
3. Select the USB flash drive, and click/tap on Next. (see screenshot below)
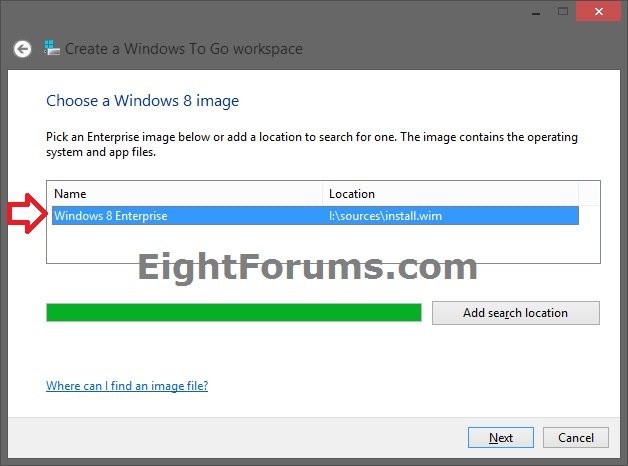
4. Select the Windows 8 Enterprise install.wim file from step 1 above, and click\tap on Next. (see screenshot below)
NOTE: If for some reason Windows didn't find the .wim file, then click/tap on the Add search location button to manually navigate to and select the DVD or mounted ISO from step 1 above.
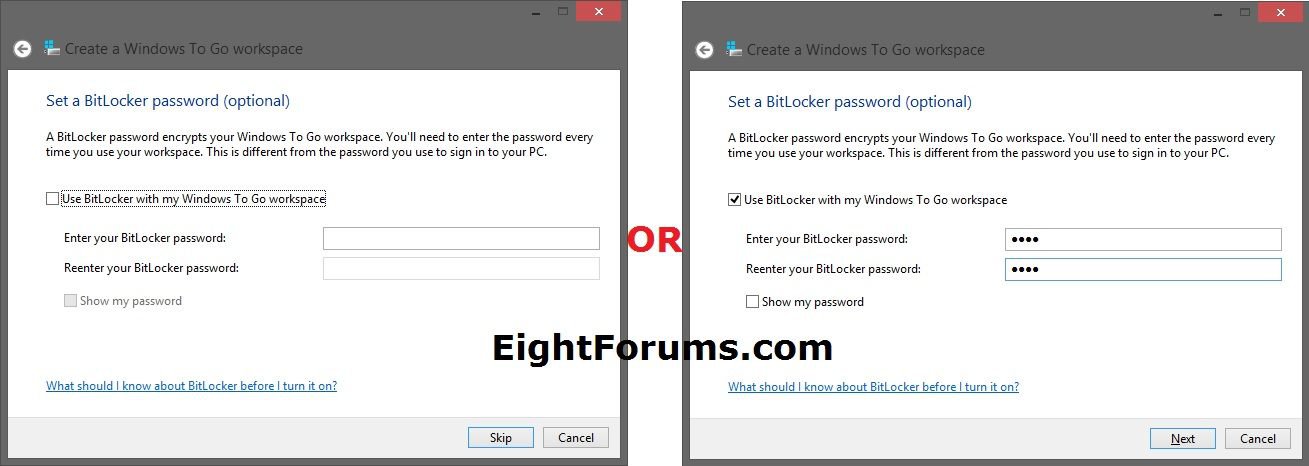
5. Do step 6 or 7 below depending on if you would like to use a BitLocker password on your Windows To GO USB flash drive.
6. To Not Use BitLocker on your Windows To Go USB Flash Drive
A) Leave the Use BitLocker with my Windows To Go workspace box unchecked, click/tap on Skip, and go to step 8 below. (see left screenshot below step 5)
7. To Use BitLocker on your Windows To Go USB Flash Drive
B) Check the Use BitLocker with my Windows To Go workspace box unchecked, type a password you want for BitLocker, and click/tap on Next. (see screenshots below step 5)
NOTE: By default, BitLocker passwords must be at least 8 characters long.
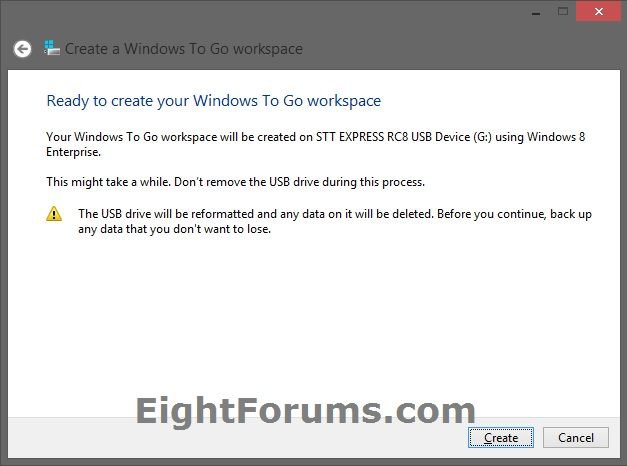
8. Click/tap on Create. (see screenshot below)
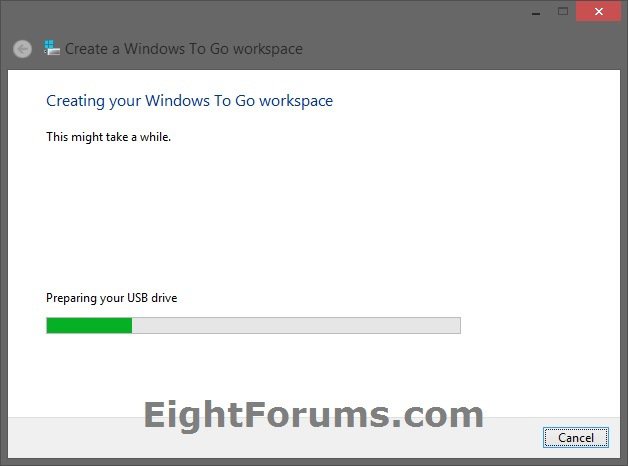
9. Your Windows To Go workspace will now start to be created on the USB flash drive. (see screenshot below)
NOTE: This can take a while to finish.
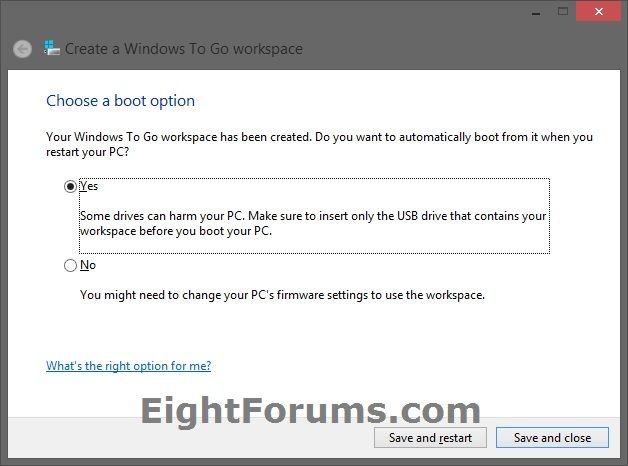
10. When finished, select (dot) what boot option you would like to use on your Windows To Go USB flash drive. (see screenshot below)
Yes = This will only set this Windows 8 Enterprise PC (host) to always automatically boot from any bootable USB flash drives when they are connected at boot. If you connect the Windows To Go USB flash drive to another host PC, then it will be the same as No below.
No = This will mean that in order to boot from you Windows To Go USB flash drive when you restart or boot your host PC, you will have to manually either select to boot from the USB flash drive from the boot menu, or to set your BIOS or UEFI to have the USB flash drive listed first in the boot priority list.
See also: Enable or Disable Always Automatically Boot PC from USB Drive in Windows To Go Startup Options
A) To boot from Windows To Go and finish setting up now, click/tap on Save and restart, and go to step 11 below.
B) To finish setting up Windows To Go later, click/tap on Save and close. Whenever you boot from this Windows To Go USB flash drive next, go to step 11 below to finished setting up.
11. When you have booted from the Windows To Go USB flash drive for the first time, check the I accept the license terms box, and click/tap on Next.
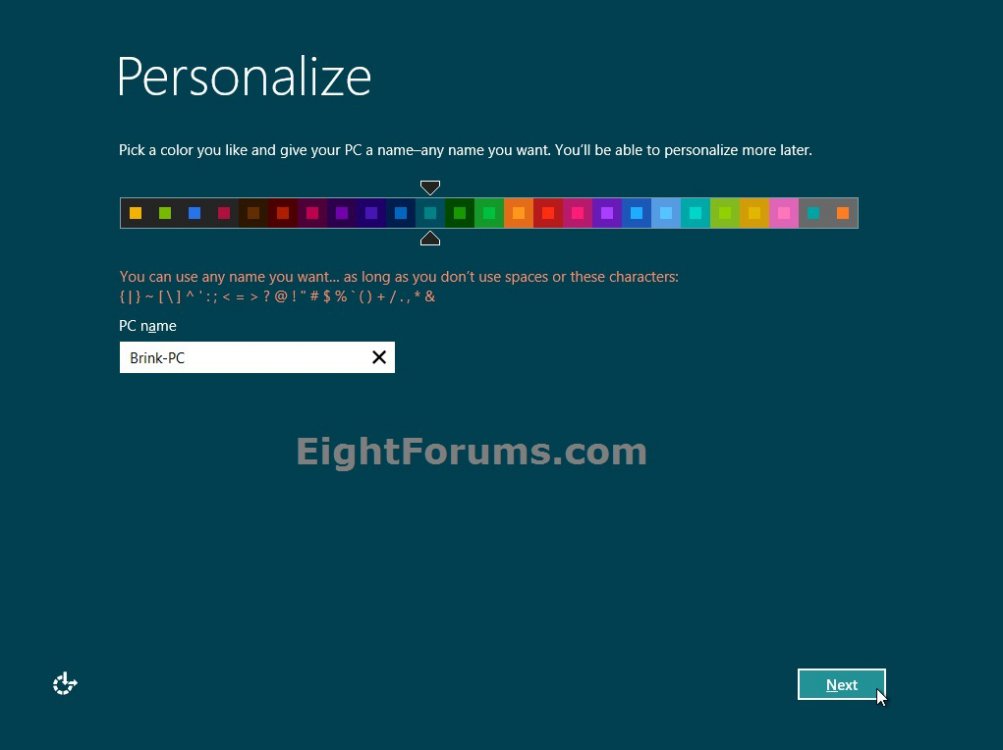
12. You can now do steps 10 to 19 in the tutorial here to finish setting up Windows 8 Enterprise on the Windows To Go workspace. (see screenshot below)
13. When finished, check to make sure that you have internet access. Sometimes you may need to setup the wireless or ethernet network from the host PC for your Windows To Go workspace before you will have internet access.
14. Use the tutorial below to enter your Windows 8 Enterprise product key to activate your Windows To Go workspace.
While Booted in Windows To Go Workspace
- It is recommended to disable the first sign-in animation to avoid not seeing it every time you connect this Windows To Go USB flash drive to a different Windows 7 or Windows 8 PC.
- When you are booted to the Windows To Go USB flash drive, the host PC drives will be offline by default to be hidden and unaccessible by the Windows To Go workspace. The only exception is that the host PC that you created Windows To Go on will let you see only it's data drives and never it's OS drive by default. To make these drives accessible to the Windows To Go workspace, you can use this tutorial.
- By default, the Windows Store isn't available on Windows To Go workspaces. If you like, you can use this tutorial to allow installing Store apps on the Windows To Go workspace.
That's it,
Shawn
Related Tutorials
- How to Setup "Windows 8 To Go" on a USB Flash Drive or USB Disk in any Windows 7 and Windows 8
- How to Enable or Disable Store on Windows To Go Workspaces
- How to Hide or Unhide Drives from Host Computer on "Windows To Go" Workspace
- How to Enable or Disable Hibernate in "Windows To Go" Workspace
- How to Enable or Disable Sleep in "Windows To Go" Workspace
- Enable or Disable Always Automatically Boot PC from USB Drive in Windows To Go Startup Options
- How to Create a Windows To Go Startup Options Shortcut in Windows 8 and 8.1
Attachments
Last edited by a moderator:

