User Profiles - Relocate to another Partition or Disk

How to Relocate User Profiles to another Partition or Disk in Windows 8

information   Information
The method described in this tutorial allows relocating user profiles and folders already while installing Windows 8, before any user accounts are created, as well as after installation on an already installed system.

The advantage of this method is that it changes some internal Windows 8 environment variables, being a “Do it once and forget” procedure. Changing the variables takes care of all existing and future user profiles, locating them when created to selected drive or partition. The method is fail proof and reversible.

When Windows 8 is installed, 5 or 6 system folders are created depending on chosen bit-version:
  • PerfLogs (Performance Logs), where Windows stores performance and reliability logs
  • Program Files, where applications and software are installed. Windows x86 (32-bit) stores all applications here, Windows x64 (64-bit) only native 64-bit applications
  • Program Files (x86), exists only in Windows x64. All non-x64 applications are stored here
  • Windows, which contains core operating system files and drivers
  • ProgramData, where some applications store application and user specific settings and configuration files.
  • Users. This is the “home” of all user profiles. When a new user account is created and this new user logs in first time, Windows creates a set of user specific folders (Users\Username)

Microsoft does not recommend relocating, moving ProgramData, Program Files, Program Files (x86) and Windows folders. Too much is depending on information and data stored on these folders. However, there's simply nothing preventing us to move the Users folder. In this tutorial we show how to move (relocate) the Users folder by changing an internal Windows Environment Variable.

Moving Users folder can save a lot of space on system disk. Pictures, mp3’s videos, documents and so on, a user folder with its subfolders can be tens, sometimes hundreds of gigabytes.

Personally, when installing Windows 8 I always use Audit Mode to relocate Users folder, leaving system drive only for Windows and applications.


Note   Note
Screenshots from pre-release version Windows 8 Consumer Preview. Actual Windows 8 has different colors but the functions are the same, tutorial can be used as it is.


warning   Warning

An upgraded Windows cannot be sysprepped. As this method is based in sysprepping, this tutorial is valid only for Windows setups which have not been upgraded.

This means that if you have for instance in-place upgraded Vista or Seven to Eight you cannot sysprep and this tutorial cannot be used in your case. The same applies if you have upgraded Windows 8 to Windows 8 Pro or Windows 8 to 8.1.

Notice that a repair install is also an upgrade install, so if you have ever done a repair install (= in-place upgrade to same edition), you cannot sysprep.

When sysprepping an existing Windows setup, it only works if the Windows 8 was installed clean and has never been upgraded or repaired using repair install, or if it is the original pre-installed Windows 8

Although I have repeatedly told that relocating ProgramData will cause Windows Store and Apps as well as PC Settings not to function, people keep doing it using the method described in this tutorial.

DO NOT RELOCATE PROGRAMDATA! YOUR WINDOWS STORE AND APPS WILL NOT WORK IF PROGRAMDATA IS MOVED FROM ITS DEFAULT LOCATION.


1.Audit Mode

1.1. Boot to Audit Mode when installing Windows 8


(If you have already installed Windows 8, continue from step 1.2.)

Start Windows 8 installation normally.

When installation after a reboot or two is completed and Windows 8 comes to Personalize page (see screenshot below) press CTRL + SHIFT + F3 (press and hold down CTRL and SHIFT, press F3 still holding CTRL and SHIFT down, release all three keys).


Win8_RelocateUsers_012.png

DO NOT ENTER PC NAME HERE OR CLICK NEXT! Just press CTRL + SHIFT + F3.

Your computer reboots now. Don’t panic, it’s just doing what it really should do. Windows 8 starts now in so called Audit Mode, using built-in administrator account to let you to modify Windows before any user profiles and user specific folders are created.

Continue from step 2.


1.2. Boot to Audit Mode from existing Windows 8 installation

First you need to open Command Prompt using built-in administrative account: hover pointer over bottom left corner of the desktop, right click to open Start Menu , select Command Prompt (Admin):

Win8_RelocateUsers_005.png Win8_RelocateUsers_006.png

Command Prompt window opens. Type this to command prompt:
Code:
[B]C:\Windows\System32\Sysprep\Sysprep.exe /audit /reboot[/B]

Win8_RelocateUsers_015.png

Hit Enter.Windows reboots now to Audit Mode, "thinking" it's been started first time. Text Preparing can be seen on screen.

If you are interested to know more about Audit Mode, here are some links for you to read:


2. Audit Mode

Windows has now booted in Audit Mode using built-in administrator account, and you should see Metro interface. Click Desktop to enter classic Windows desktop:

Win8_RelocateUsers_003.png

To start, click Cancel to close System Preparation Tool:

Win8_RelocateUsers_004.png


If you don’t have a second internal hard disk or you have not created and formatted an extra partition on your system disk, you need first to create one. Notice that the drive or partition don't have to be empty, but especially if relocating on an existing installation it must be big enough to allow Users folder to be moved there. When we sysprep with answer file on next step these two folders are physically moved to new location.

If you already have a formatted second HD or partition, you are ready to go.


2.1. Creating an answer file (script) for System Preparation Tool

Audit Mode lets us to start Windows without creating any user accounts. At the moment we are using the built-in administrator account. Your own accounts are created later.

We are going to use System Preparation Tool (sysprep) to run an XML-script (so called Answer file) which modifies the Windows registry and settings as we want to, relocating Users folder to another partition, E: in this example, by changing a so called Windows Environment Variable. You can of course use any internal drive you want to.

Extensible Markup Language (XML) is a set of rules for encoding documents in machine readable form.
To make changes to Windows registry, we will now create a script in XML and run it with sysprep.

Open Windows Notepad text editor (press Win + R, type Notepad, hit Enter). Type the following script, or copy it from here and paste to Notepad (please do not forget to read the notes below code lines 4, 6 and 11 regarding said lines):


  1. <?xml version="1.0" encoding="utf-8"?>
  2. <unattend xmlns="urn:schemas-microsoft-com:unattend">
  3. <settings pass="oobeSystem">
  4. <component name="Microsoft-Windows-Shell-Setup" processorArchitecture="amd64" publicKeyToken="31bf3856ad364e35" language="neutral" versionScope="nonSxS" xmlns:wcm=[noparse]"http://schemas.microsoft.com/WMIConfig/2002/State" xmlns:xsi="http://www.w3.org/2001/XMLSchema-instance"[/noparse]>
    Note   Note
    (If you are installing Windows x64 (64-bit), value prosessorArchitecture should be amd64​, also on Intel processors. For x86 (32-bit) it should be x86.)

  5. <FolderLocations>
  6. <ProfilesDirectory>e:\Users</ProfilesDirectory>
    Note   Note
    In this example the new location of Users would be E:\Users. Change the drive letter according your needs.

  7. </FolderLocations>
  8. </component>
  9. </settings>
  10. [noparse]<cpi:eek:fflineImage[/noparse] cpi:source="wim:F:/sources/install.wim#Windows 8" xmlns:cpi="urn:schemas-microsoft-com:cpi" />
    Note   Note
    (Change the drive letter in wim:F: to that of your CD/DVD drive, USB stick or virtual drive containing your Windows 8 installation media (DVD/ISO). Notice that installation media has to be available to system when running sysprep. Change Windows version accordingly, Windows 8, Windows 8 Pro, Windows 8.1 or Windows 8.1 Pro.

  11. </unattend>
(Please leave the row numbers out when typing or copying the above code. Answer file generated with Windows System Image Manager).

If you are installing Windows 8 PRO x64 from CD/DVD/USB F: and relocating Users to E: you don’t have to change anything, you can use the script as it is.

Select Save As from Notepad’s File menu. Select Save as type: All Files. Name the file as you want, add .xml extension to the filename. Save the script to the root of any drive:

SaveAs.png

Alternatively you can download the answer file here: View attachment relocate.rar

2.2. Using System Preparation Tool

Open the Start Menu (Win + X), select Command Prompt (Admin).

First stop the Windows Media Player Network Sharing Service (WMPNetworkSvc) by giving the following command:
Code:
net stop WMPNetworkSvc

When the service has stopped, type the following to the command prompt and press
Enter to move to the right folder:
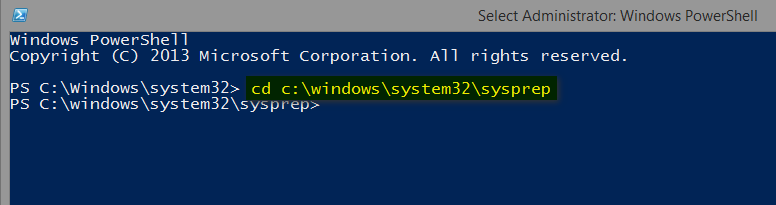
Code:
cd c:\Windows\System32\Sysprep

Win8_RelocateUsers_007.png

Now type the following and press Enter (notice the name and path of the script we created above, change it if needed. I saved answer file on E so the path is E:\relocate.xml):
Code:
Sysprep.exe /audit /reboot /unattend:E:\relocate.xml

Win8_RelocateUsers_008.png

You should now see System Preparation Tool dialog telling it is working on our script:

Win8_RelocateUsers_010.png

Let it run, don’t touch mouse or keyboard now. When System Preparation Tool is ready, Windows must and will reboot. It reboots back to Audit Mode.


2.3. Exiting Audit Mode

To continue Windows installation we have to exit Audit Mode and reboot. After reboot you’ll land back on Metro interface. Click Desktop to enter classic Windows desktop, click OK on System Preparation Tool dialog to boot normally in OOBE i.e. normal mode.

Before clicking OK, check that System Cleanup Action is set to OOBE, and Shutdown Options set to Reboot:

Win8_RelocateUsers_009.png


3. Finalizing installation

Finalize Windows installation.

If you did this from an existing Windows installation, you will notice that for your Windows this is as if it were the first time Windows was booted i.e you are back on OOBE boot, inserting product key and personalizing Windows. It also means that you have to enter so called initial user. In this case Windows does not accept any of the users created earlier, whether local or Microsoft accounts; instead you need to create a new user.

An example from this PC I am using now: I had already created two users and installed software when I decided to do sysprep to relocate Users. I had a local account for me and an Microsoft account using my email address. After finalizing sysprep, I needed to create a third user Test because system does not let me to use either Kari (local account) or Kari (Microsoft account) usernames because those accounts already existed on this PC.

So I created user Test (local), then from Welcome screen logged in as Kari (Microsoft account) and simply deleted the new Test account which I had just created. An extra step, small annoyance but there's nothing to do to avoid it.

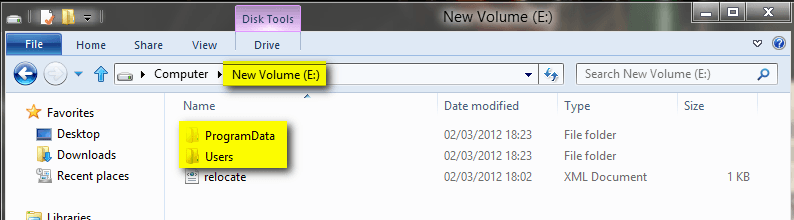
When Windows finally boots first time to Start Screen you will see that Users folder is now located on the new drive or partition with all its subfolders.

When you check your system drive [noparse](C:) still [/noparse]contains Users folder. The old, original Users on C: can contain some Windows Store information that may not be moved, so let the old Users folder stay on C:. It will no longer grow, all new user data will be stored on a new location, but it is essential it remains on C:. You can hide it if you want, you are never again going to need it.

Notice that Users folder is not created on or moved to new location when you return to Audit Mode after running sysprep. Relocation will first happen when you exit Audit Mode and boot to OOBE (Welcome) mode to continue installation. If done on an existing system the first OOBE boot after sysprepping can take quite a long time, depending on how big those folders are that sysprep is physically moving to new location.

Remember also that when you create a new user profile the user folders are not created before the new user logs in first time.

That’s it, folks! Welcome to the Windows 8:


Win8_RelocateUsers_016.png

Win8_RelocateUsers_017.png

Now create a system image and you wont have to ever again remember jumplists and links everytime you restore the system to earlier point or system image. User account folders are now permanently moved to another drive, all new user profiles are automatically created on this new location and your system drive won’t be full so soon.

Thanks for reading.

Written and published on 02[SUP]nd[/SUP] of March 2012
Edited and updated on 6[SUP]th[/SUP] of February 2013
Edited, answer file's validity checked on 14[SUP]th[/SUP] of April 2013
Added instructions for Windows 8.1 Pro preview on 29th of June 2013


Kari


Attachments

  • Win8_RelocateUsers_014.png
    Win8_RelocateUsers_014.png
    16.2 KB · Views: 1,542
  • 2013-06-29_122425.png
    2013-06-29_122425.png
    6.4 KB · Views: 2,069
  • 2013-06-29_122904.png
    2013-06-29_122904.png
    7 KB · Views: 1,857
Last edited by a moderator:
Nice, i think since beginning Windows can't remove audit mode... then you confirm this.. awesome work on this tutorial.

thx
 

My Computer

System One

  • OS
    Windows 8.1 Pro with Media Center
Hey Kari, just want to confirm this method works on Windows 8.1 as of now in 2015 for relocating the user profiles. Have done it successfully on my system in Windows 7 and I love it! Just want to make sure I can still do this in Windows 8.1 as I will be setting up a computer for a family member soon with it and he would like to have this done.
Cheers
 

My Computer

System One

  • OS
    Windows 10 Pro x64
    Computer type
    PC/Desktop
    System Manufacturer/Model
    Self build (Desktop) / Dell (Laptop)
    CPU
    Intel Core i5 4690k (Desktop) / Intel Core i7 5500u (Laptop)
    Motherboard
    Gigabyte Z97 (Desktop) / Dell (Laptop)
    Memory
    8GB DDR3 (Desktop) / 16GB DDR3L (laptop)
    Graphics Card(s)
    Nvidia GeForce GTX 970 (Desktop) / AMD R7 M270 (Laptop)
    Sound Card
    Onboard
    Monitor(s) Displays
    HP Pavilion 27bw
    Screen Resolution
    1920x1080 (Desktop) / 3840x2160 (Laptop)
    Hard Drives
    Samsung SSD 850 EVO 120GB
    WD Black 500GB
    WD Blue 1TB
    (Desktop)
    Samsung SSD 850 EVO 250GB (Laptop)
    PSU
    Corsair 750w
    Case
    Ultra atx
    Cooling
    Stock heatsink
    Keyboard
    Razer Black Widow
    Mouse
    Roccat Kone XTD
    Internet Speed
    250Mbps Down / 20Mbps Up
    Browser
    Chrome
    Antivirus
    ESET
Yes, it works. However, if you also moved the ProgramData in Windows 7 you should note that in Windows 8.1 ProgramData cannot be relocated. Only move the Users folder as told in this tutorial.
 

My Computer

System One

  • OS
    Windows 8.1 Pro with Media Center
    Computer type
    Laptop
    System Manufacturer/Model
    HP ENVY 17-1150eg
    CPU
    1.6 GHz Intel Core i7-720QM Processor
    Memory
    6 GB
    Graphics Card(s)
    ATI Mobility Radeon HD 5850 Graphics
    Sound Card
    Beats sound system with integrated subwoofer
    Monitor(s) Displays
    17" laptop display, 22" LED and 32" Full HD TV through HDMI
    Screen Resolution
    1600*900 (1), 1920*1080 (2&3)
    Hard Drives
    Internal: 2 x 500 GB SATA Hard Disk Drive 7200 rpm
    External: 2TB for backups, 3TB USB3 network drive for media
    Cooling
    As Envy runs a bit warm, I have it on a Cooler Master pad
    Keyboard
    Logitech diNovo Media Desktop Laser (bluetooth)
    Mouse
    Logitech MX1000 Laser (Bluetooth)
    Internet Speed
    50 MB VDSL
    Browser
    Maxthon 3.5.2., IE11
    Antivirus
    Windows Defender 4.3.9431.0
    Other Info
    Windows in English, additional user accounts in Finnish, German and Swedish.
Okay, thanks Kari. So using the Win7 steps should be fine just don't move ProgramData, correct?
 

My Computer

System One

  • OS
    Windows 10 Pro x64
    Computer type
    PC/Desktop
    System Manufacturer/Model
    Self build (Desktop) / Dell (Laptop)
    CPU
    Intel Core i5 4690k (Desktop) / Intel Core i7 5500u (Laptop)
    Motherboard
    Gigabyte Z97 (Desktop) / Dell (Laptop)
    Memory
    8GB DDR3 (Desktop) / 16GB DDR3L (laptop)
    Graphics Card(s)
    Nvidia GeForce GTX 970 (Desktop) / AMD R7 M270 (Laptop)
    Sound Card
    Onboard
    Monitor(s) Displays
    HP Pavilion 27bw
    Screen Resolution
    1920x1080 (Desktop) / 3840x2160 (Laptop)
    Hard Drives
    Samsung SSD 850 EVO 120GB
    WD Black 500GB
    WD Blue 1TB
    (Desktop)
    Samsung SSD 850 EVO 250GB (Laptop)
    PSU
    Corsair 750w
    Case
    Ultra atx
    Cooling
    Stock heatsink
    Keyboard
    Razer Black Widow
    Mouse
    Roccat Kone XTD
    Internet Speed
    250Mbps Down / 20Mbps Up
    Browser
    Chrome
    Antivirus
    ESET

My Computer

System One

  • OS
    Windows 8.1 Pro with Media Center
    Computer type
    Laptop
    System Manufacturer/Model
    HP ENVY 17-1150eg
    CPU
    1.6 GHz Intel Core i7-720QM Processor
    Memory
    6 GB
    Graphics Card(s)
    ATI Mobility Radeon HD 5850 Graphics
    Sound Card
    Beats sound system with integrated subwoofer
    Monitor(s) Displays
    17" laptop display, 22" LED and 32" Full HD TV through HDMI
    Screen Resolution
    1600*900 (1), 1920*1080 (2&3)
    Hard Drives
    Internal: 2 x 500 GB SATA Hard Disk Drive 7200 rpm
    External: 2TB for backups, 3TB USB3 network drive for media
    Cooling
    As Envy runs a bit warm, I have it on a Cooler Master pad
    Keyboard
    Logitech diNovo Media Desktop Laser (bluetooth)
    Mouse
    Logitech MX1000 Laser (Bluetooth)
    Internet Speed
    50 MB VDSL
    Browser
    Maxthon 3.5.2., IE11
    Antivirus
    Windows Defender 4.3.9431.0
    Other Info
    Windows in English, additional user accounts in Finnish, German and Swedish.
Hi Kari
I've done a few Windows images the past little bit, a couple on 8.1 and a couple on 7. Each have been for clients and i am customising their computers for them. But even though I use an answer file and have "copyprofile" set to true, the profile doesn't copy. Everything is installed but the customised desktop etc doesn't. Could the issue possibly be that I don't generalize the system when I sysprep? Since the image is specific to that one machine I didn't think it was necessary. I ran the commands:

cd sysprep
sysprep /oobe /shutdown /unattend:C:\MyAnswerFile.xml
Then booted with Macrium and imaged.
Then realised i was using C: as the answer file location and your tutorial said not to do that so tried from an external drive that was not the install USB. (I don't have another partition other than C: to use as I don't move user profiles etc on a 120GB SSD :D) So then changed the commands to run sysprep /oobe /shutdown /unattend:D:\MyAnswerFile.xml

I also set OEM information and computer names and product keys in these answer files and those were not copied. Its as if the answer file just doesn't work.

Also tried using an answer file with just the copyprofile thing set to true and nothing else changed, that didn't work

Am lost as to what to do, also tried downloading fresh ISO, converted ESD to WIM using winreducer wim converter, opened WIM with windows SIM, created new .clg files to use, that didn't work.
Cheers
 

My Computer

System One

  • OS
    Windows 10 Pro x64
    Computer type
    PC/Desktop
    System Manufacturer/Model
    Self build (Desktop) / Dell (Laptop)
    CPU
    Intel Core i5 4690k (Desktop) / Intel Core i7 5500u (Laptop)
    Motherboard
    Gigabyte Z97 (Desktop) / Dell (Laptop)
    Memory
    8GB DDR3 (Desktop) / 16GB DDR3L (laptop)
    Graphics Card(s)
    Nvidia GeForce GTX 970 (Desktop) / AMD R7 M270 (Laptop)
    Sound Card
    Onboard
    Monitor(s) Displays
    HP Pavilion 27bw
    Screen Resolution
    1920x1080 (Desktop) / 3840x2160 (Laptop)
    Hard Drives
    Samsung SSD 850 EVO 120GB
    WD Black 500GB
    WD Blue 1TB
    (Desktop)
    Samsung SSD 850 EVO 250GB (Laptop)
    PSU
    Corsair 750w
    Case
    Ultra atx
    Cooling
    Stock heatsink
    Keyboard
    Razer Black Widow
    Mouse
    Roccat Kone XTD
    Internet Speed
    250Mbps Down / 20Mbps Up
    Browser
    Chrome
    Antivirus
    ESET
The CopyProfile=True setting can only be used together with the /GENERALIZE switch. It has none whatsoever effect if the /GENERALIZE switch is not used. It does not cause any errors, the answer file validates OK, but if the answer file has CopyProfile=True and the /GENERALIZE switch is not used when sysprepped, it will simply be ignored.

The main purpose of the /GENERALIZE is of course to prepare a hardware independent image and the fact that the CopyProfile requires it to be used is somewhat illogical, but that's the case. No desktop, theme, folder options and other customizations will be copied to default user profile without the /GENERALIZE switch.

The OEM settings do not require CopyProfile and /GENERALIZE switch. You need to add OEM info component to Pass 4 Specialize. Click to enlarge the screenshot:
2015-05-25_17h59_59.png
Complete customization walkthrough tutorial at our sister site the Seven Forums: Windows 7 Image - Customize in Audit Mode with Sysprep - Windows 7 Help Forums. The tutorial applies to Windows 8 & 8.1, too.

Kari
 
Last edited:

My Computer

System One

  • OS
    Windows 8.1 Pro with Media Center
    Computer type
    Laptop
    System Manufacturer/Model
    HP ENVY 17-1150eg
    CPU
    1.6 GHz Intel Core i7-720QM Processor
    Memory
    6 GB
    Graphics Card(s)
    ATI Mobility Radeon HD 5850 Graphics
    Sound Card
    Beats sound system with integrated subwoofer
    Monitor(s) Displays
    17" laptop display, 22" LED and 32" Full HD TV through HDMI
    Screen Resolution
    1600*900 (1), 1920*1080 (2&3)
    Hard Drives
    Internal: 2 x 500 GB SATA Hard Disk Drive 7200 rpm
    External: 2TB for backups, 3TB USB3 network drive for media
    Cooling
    As Envy runs a bit warm, I have it on a Cooler Master pad
    Keyboard
    Logitech diNovo Media Desktop Laser (bluetooth)
    Mouse
    Logitech MX1000 Laser (Bluetooth)
    Internet Speed
    50 MB VDSL
    Browser
    Maxthon 3.5.2., IE11
    Antivirus
    Windows Defender 4.3.9431.0
    Other Info
    Windows in English, additional user accounts in Finnish, German and Swedish.
Ah OK, thanks Kari. Completely illogical on MS' part but I thought that might be the case. Out of curiosity, if you install drivers while you are customising your image, those usually come with software, ex. Intel WiDi, AMD Catalyst Control Centre, AMD Gaming Evolved, etc etc. What happens to those softwares and your drivers when you generalise your image? Do the drivers 'reactivate' when you go through OOBE, or do you have to reinstall them? If the latter, can you reinstall your drivers by booting to OOBE on your image, going to audit mode, installing the drivers again, sysprepping with just a sysprep /oobe /shutdown, and the settings from the first time you sysprepped (sysprep /generalize /oobe /shutdown /unattend:C:\MyAnswerFile.xml) will still carry over? Or are you forced to go through OOBE, then install your drivers. I was hoping to be able to copy profiles and also have drivers installed on a 'virgin' no user profiles system image.

Thanks
Cheers
 

My Computer

System One

  • OS
    Windows 10 Pro x64
    Computer type
    PC/Desktop
    System Manufacturer/Model
    Self build (Desktop) / Dell (Laptop)
    CPU
    Intel Core i5 4690k (Desktop) / Intel Core i7 5500u (Laptop)
    Motherboard
    Gigabyte Z97 (Desktop) / Dell (Laptop)
    Memory
    8GB DDR3 (Desktop) / 16GB DDR3L (laptop)
    Graphics Card(s)
    Nvidia GeForce GTX 970 (Desktop) / AMD R7 M270 (Laptop)
    Sound Card
    Onboard
    Monitor(s) Displays
    HP Pavilion 27bw
    Screen Resolution
    1920x1080 (Desktop) / 3840x2160 (Laptop)
    Hard Drives
    Samsung SSD 850 EVO 120GB
    WD Black 500GB
    WD Blue 1TB
    (Desktop)
    Samsung SSD 850 EVO 250GB (Laptop)
    PSU
    Corsair 750w
    Case
    Ultra atx
    Cooling
    Stock heatsink
    Keyboard
    Razer Black Widow
    Mouse
    Roccat Kone XTD
    Internet Speed
    250Mbps Down / 20Mbps Up
    Browser
    Chrome
    Antivirus
    ESET
Using Sysprep, you have to select: you can either customize the default user profile, or add drivers. You cannot have both. An additional Sysprep run after generalizing in the first run, then doing it again this time without the /generalize switch and installing drivers might, just might theoretically thinking work but I have never tested it.

The proper way is to use the /generalize switch to copy the default user profile, then capture the image with DISM and add the drivers. See this TechNet support article: https://technet.microsoft.com/en-us/library/hh825070.aspx.

Worth to remember when customizing the Windows 8 or 8.1 default user profile is that if the end user signs in with an MS Account, all MS Account sync settings override the default user profile settings. If for instance the end user has synced the theme, this MS Account theme will be used instead of the default user profile theme. Therefore, if it is quite sure that the end user will use an MS Account instead of a local account, customizing the default user profile is irrelevant and does not need to be done.
 

My Computer

System One

  • OS
    Windows 8.1 Pro with Media Center
    Computer type
    Laptop
    System Manufacturer/Model
    HP ENVY 17-1150eg
    CPU
    1.6 GHz Intel Core i7-720QM Processor
    Memory
    6 GB
    Graphics Card(s)
    ATI Mobility Radeon HD 5850 Graphics
    Sound Card
    Beats sound system with integrated subwoofer
    Monitor(s) Displays
    17" laptop display, 22" LED and 32" Full HD TV through HDMI
    Screen Resolution
    1600*900 (1), 1920*1080 (2&3)
    Hard Drives
    Internal: 2 x 500 GB SATA Hard Disk Drive 7200 rpm
    External: 2TB for backups, 3TB USB3 network drive for media
    Cooling
    As Envy runs a bit warm, I have it on a Cooler Master pad
    Keyboard
    Logitech diNovo Media Desktop Laser (bluetooth)
    Mouse
    Logitech MX1000 Laser (Bluetooth)
    Internet Speed
    50 MB VDSL
    Browser
    Maxthon 3.5.2., IE11
    Antivirus
    Windows Defender 4.3.9431.0
    Other Info
    Windows in English, additional user accounts in Finnish, German and Swedish.
OK, I read again your posts and realized you might not want to create an hardware independent image, which I for some odd reason assumed was the case.

If the image does not have to be hardware independent, you have a way to both use CopyProfile=True and /GENERALIZE switch, and keep the drivers installed in Audit Mode. The setting you need to use in that case in the answer file is called PersistAllDeviceInstalls and it must be set to TRUE. See this TechNet support article: https://technet.microsoft.com/en-us/library/ff716298.aspx

Notice that you should only use PersistAllDeviceInstalls if the reference computer (its hardware) you are using to create the image is completely identical than the computer this image will be deployed to. If there are any whatsoever differences in the hardware, use the DISM method to add drivers as told in my previous post.
PersistAllDeviceInstalls component can be found in WIndows System Image Manager under the Microsoft-Windows-PnpSysprep and must be added to Pass 3 Generalize.
2015-05-25_23h15_05.png
Click the screenshot twice to enlarge it.
 
Last edited:

My Computer

System One

  • OS
    Windows 8.1 Pro with Media Center
    Computer type
    Laptop
    System Manufacturer/Model
    HP ENVY 17-1150eg
    CPU
    1.6 GHz Intel Core i7-720QM Processor
    Memory
    6 GB
    Graphics Card(s)
    ATI Mobility Radeon HD 5850 Graphics
    Sound Card
    Beats sound system with integrated subwoofer
    Monitor(s) Displays
    17" laptop display, 22" LED and 32" Full HD TV through HDMI
    Screen Resolution
    1600*900 (1), 1920*1080 (2&3)
    Hard Drives
    Internal: 2 x 500 GB SATA Hard Disk Drive 7200 rpm
    External: 2TB for backups, 3TB USB3 network drive for media
    Cooling
    As Envy runs a bit warm, I have it on a Cooler Master pad
    Keyboard
    Logitech diNovo Media Desktop Laser (bluetooth)
    Mouse
    Logitech MX1000 Laser (Bluetooth)
    Internet Speed
    50 MB VDSL
    Browser
    Maxthon 3.5.2., IE11
    Antivirus
    Windows Defender 4.3.9431.0
    Other Info
    Windows in English, additional user accounts in Finnish, German and Swedish.
OK, I read again your posts and realized you might not want to create an hardware independent image, which I for some odd reason assumed was the case.

If the image does not have to be hardware independent, you have a way to both use CopyProfile=True and /GENERALIZE switch, and keep the drivers installed in Audit Mode. The setting you need to use in that case in the answer file is called PersistAllDeviceInstalls and it must be set to TRUE. See this TechNet support article: https://technet.microsoft.com/en-us/library/ff716298.aspx

Notice that you should only use PersistAllDeviceInstalls if the reference computer (its hardware) you are using to create the image is completely identical than the computer this image will be deployed to. If there are any whatsoever differences in the hardware, use the DISM method to add drivers as told in my previous post.
PersistAllDeviceInstalls component can be found in WIndows System Image Manager under the Microsoft-Windows-PnpSysprep and must be added to Pass 3 Generalize.Click the screenshot twice to enlarge it.
Yes! This is it. Thank you Kari! Yes it is a customised image for only one computer. I have clients that come to me with computers that need setting up and they need specific software and default settings, so I start with a base image that i've created (a normal generalized image) with basic software on it and updates and such, then image it onto their machines, add their dedicated settings and hardware drivers and I like to keep that image hardware specific in case they ever need to restore it with macrium all their drivers are there.
Cheers
 

My Computer

System One

  • OS
    Windows 10 Pro x64
    Computer type
    PC/Desktop
    System Manufacturer/Model
    Self build (Desktop) / Dell (Laptop)
    CPU
    Intel Core i5 4690k (Desktop) / Intel Core i7 5500u (Laptop)
    Motherboard
    Gigabyte Z97 (Desktop) / Dell (Laptop)
    Memory
    8GB DDR3 (Desktop) / 16GB DDR3L (laptop)
    Graphics Card(s)
    Nvidia GeForce GTX 970 (Desktop) / AMD R7 M270 (Laptop)
    Sound Card
    Onboard
    Monitor(s) Displays
    HP Pavilion 27bw
    Screen Resolution
    1920x1080 (Desktop) / 3840x2160 (Laptop)
    Hard Drives
    Samsung SSD 850 EVO 120GB
    WD Black 500GB
    WD Blue 1TB
    (Desktop)
    Samsung SSD 850 EVO 250GB (Laptop)
    PSU
    Corsair 750w
    Case
    Ultra atx
    Cooling
    Stock heatsink
    Keyboard
    Razer Black Widow
    Mouse
    Roccat Kone XTD
    Internet Speed
    250Mbps Down / 20Mbps Up
    Browser
    Chrome
    Antivirus
    ESET
Yes! This is it. Thank you Kari!

Just be careful here; using PersistAllDeviceInstalls requires that both the reference computer (the one you are creating the image with) and the production computer (the one you will deploy the image to) are exactly identical.
 

My Computer

System One

  • OS
    Windows 8.1 Pro with Media Center
    Computer type
    Laptop
    System Manufacturer/Model
    HP ENVY 17-1150eg
    CPU
    1.6 GHz Intel Core i7-720QM Processor
    Memory
    6 GB
    Graphics Card(s)
    ATI Mobility Radeon HD 5850 Graphics
    Sound Card
    Beats sound system with integrated subwoofer
    Monitor(s) Displays
    17" laptop display, 22" LED and 32" Full HD TV through HDMI
    Screen Resolution
    1600*900 (1), 1920*1080 (2&3)
    Hard Drives
    Internal: 2 x 500 GB SATA Hard Disk Drive 7200 rpm
    External: 2TB for backups, 3TB USB3 network drive for media
    Cooling
    As Envy runs a bit warm, I have it on a Cooler Master pad
    Keyboard
    Logitech diNovo Media Desktop Laser (bluetooth)
    Mouse
    Logitech MX1000 Laser (Bluetooth)
    Internet Speed
    50 MB VDSL
    Browser
    Maxthon 3.5.2., IE11
    Antivirus
    Windows Defender 4.3.9431.0
    Other Info
    Windows in English, additional user accounts in Finnish, German and Swedish.
I sit possible to share the same %USERPROFILE% directory, with its contained HKCU registry hive files, with more than one Windows partition/installation?
 

My Computer

System One

  • OS
    Windows 8
I sit possible to share the same %USERPROFILE% directory, with its contained HKCU registry hive files, with more than one Windows partition/installation?
Check this post at our sister site the Ten Forums: Users Folder - Move Location in Windows 10 - Page 4 - Windows 10 Forums

Scroll down a bit until you find a new paragraph starting with "
What happens if Sysprep finds an existing Users folder", and read from there to the end of that post.

That should answer your question.

Kari
 

My Computer

System One

  • OS
    Windows 8.1 Pro with Media Center
    Computer type
    Laptop
    System Manufacturer/Model
    HP ENVY 17-1150eg
    CPU
    1.6 GHz Intel Core i7-720QM Processor
    Memory
    6 GB
    Graphics Card(s)
    ATI Mobility Radeon HD 5850 Graphics
    Sound Card
    Beats sound system with integrated subwoofer
    Monitor(s) Displays
    17" laptop display, 22" LED and 32" Full HD TV through HDMI
    Screen Resolution
    1600*900 (1), 1920*1080 (2&3)
    Hard Drives
    Internal: 2 x 500 GB SATA Hard Disk Drive 7200 rpm
    External: 2TB for backups, 3TB USB3 network drive for media
    Cooling
    As Envy runs a bit warm, I have it on a Cooler Master pad
    Keyboard
    Logitech diNovo Media Desktop Laser (bluetooth)
    Mouse
    Logitech MX1000 Laser (Bluetooth)
    Internet Speed
    50 MB VDSL
    Browser
    Maxthon 3.5.2., IE11
    Antivirus
    Windows Defender 4.3.9431.0
    Other Info
    Windows in English, additional user accounts in Finnish, German and Swedish.
I sit possible to share the same %USERPROFILE% directory, with its contained HKCU registry hive files, with more than one Windows partition/installation?
Check this post at our sister site the Ten Forums: Users Folder - Move Location in Windows 10 - Page 4 - Windows 10 Forums

Scroll down a bit until you find a new paragraph starting with "
What happens if Sysprep finds an existing Users folder", and read from there to the end of that post.

That should answer your question.

Kari

Thanks for your help!
 

My Computer

System One

  • OS
    Windows 8
You are welcome :).
 

My Computer

System One

  • OS
    Windows 8.1 Pro with Media Center
    Computer type
    Laptop
    System Manufacturer/Model
    HP ENVY 17-1150eg
    CPU
    1.6 GHz Intel Core i7-720QM Processor
    Memory
    6 GB
    Graphics Card(s)
    ATI Mobility Radeon HD 5850 Graphics
    Sound Card
    Beats sound system with integrated subwoofer
    Monitor(s) Displays
    17" laptop display, 22" LED and 32" Full HD TV through HDMI
    Screen Resolution
    1600*900 (1), 1920*1080 (2&3)
    Hard Drives
    Internal: 2 x 500 GB SATA Hard Disk Drive 7200 rpm
    External: 2TB for backups, 3TB USB3 network drive for media
    Cooling
    As Envy runs a bit warm, I have it on a Cooler Master pad
    Keyboard
    Logitech diNovo Media Desktop Laser (bluetooth)
    Mouse
    Logitech MX1000 Laser (Bluetooth)
    Internet Speed
    50 MB VDSL
    Browser
    Maxthon 3.5.2., IE11
    Antivirus
    Windows Defender 4.3.9431.0
    Other Info
    Windows in English, additional user accounts in Finnish, German and Swedish.
Hi All
I followed Kari tutorials and step for relocate User folders during new installation Windows 8.1 Enterprise 64bit (profiles to a different Drive) but These error appears on the screen in audit mode.
OS is Windows 8.1 Enterprise 64bit PC Dell Optiplex 9020.
System Preparation Tool 3.14
A fatal error occurred while trying to sysprep the machine.

Tried all the steps which was posted by Kari and others from different sites. But still stuck at the beginning itself from past 1 week.
Please help me in solving this problem.........
 

My Computer

System One

  • OS
    Windows 8.1 Enterprise 32bit and 64 bit
Hi Potency, welcome to the Eight Forums.

After the Sysprep fails, open the Explorer, browse to folder C:\Windows\System32\Sysprep\Panther to find a file called setupact.log, and upload & attach it in a post here. It is a log file containing information which might help us to find the cause for your error.

Here's a tutorial to show how to upload files here at the Eight Forums: http://www.eightforums.com/tutorials/2598-screenshots-files-upload-post-eight-forums.html
 

My Computer

System One

  • OS
    Windows 8.1 Pro with Media Center
    Computer type
    Laptop
    System Manufacturer/Model
    HP ENVY 17-1150eg
    CPU
    1.6 GHz Intel Core i7-720QM Processor
    Memory
    6 GB
    Graphics Card(s)
    ATI Mobility Radeon HD 5850 Graphics
    Sound Card
    Beats sound system with integrated subwoofer
    Monitor(s) Displays
    17" laptop display, 22" LED and 32" Full HD TV through HDMI
    Screen Resolution
    1600*900 (1), 1920*1080 (2&3)
    Hard Drives
    Internal: 2 x 500 GB SATA Hard Disk Drive 7200 rpm
    External: 2TB for backups, 3TB USB3 network drive for media
    Cooling
    As Envy runs a bit warm, I have it on a Cooler Master pad
    Keyboard
    Logitech diNovo Media Desktop Laser (bluetooth)
    Mouse
    Logitech MX1000 Laser (Bluetooth)
    Internet Speed
    50 MB VDSL
    Browser
    Maxthon 3.5.2., IE11
    Antivirus
    Windows Defender 4.3.9431.0
    Other Info
    Windows in English, additional user accounts in Finnish, German and Swedish.
Hi Kari

I will upload the file setupact.log from my office. Before sending also I will try once again and send you.

Once again thank you for your help.
 

My Computer

System One

  • OS
    Windows 8.1 Enterprise 32bit and 64 bit
A fatal error occurred while trying to sysprep the machine

Hi Kari

Now I tried again by changing the location of relocate.xml file to D drive also but found the same error. Kindly find the uploaded the log file setupact.log
 

Attachments

  • setupact.log
    14 KB · Views: 131

My Computer

System One

  • OS
    Windows 8.1 Enterprise 32bit and 64 bit
Back
Top