UEFI Bootable USB Flash Drive - Create in Windows

How to Create a Bootable UEFI USB Flash Drive for Installing Windows 7, Windows 8, or Windows 8.1

This tutorial will show you how to create a Windows 7 or Windows 8 or 8.1 installation bootable USB flash drive for UEFIfrom either a Windows 7 or Windows 8/8.1 installation ISO or DVD.

Requirements:
  • At least a 4GB USB flash drive
  • 64-bit Windows 7 ISO or DVD (If you want to install Windows 7)
  • 64-bit Windows 8 ISO or DVD (If you want to install Windows 8)
  • 64-bit Windows 8.1 ISO or DVD (If you want to install Windows 8.1)
  • 32-bit is not supported.
  • Set the boot mode to use UEFI and not CSM (Compatibility Support Module) in your UEFI firmware settings.
  • Temporarily disable Secure Boot in your UEFI firmware settings. Some motherboards will not boot from a USB unless you do this first. When the Windows installation is finished, you can enable secure boot if you like.
  • If you have fast boot or ultra-fast boot enabled in your UEFI firmware (if supported), then you may need to temporarily disable it until Windows has finished installing to be able to boot from a USB flash drive at boot.

EXAMPLE: UEFI Bootable USB Flash Drive
NOTE: This is it listed in the motherboard's boot menu.
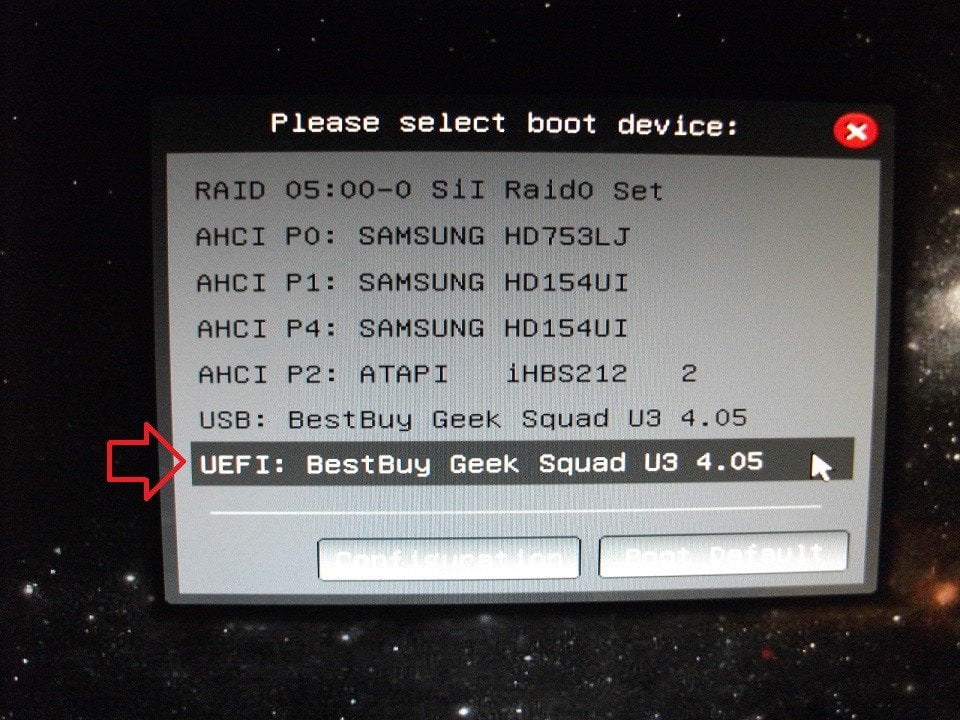
UEFI_USB_Boot_Menu.jpg


OPTION ONE

To Create a Bootable UEFI USB Flash Drive using Free Program "Rufus"


1. Download the latest version of Rufus at the link below, and save it's .exe file to your desktop.

Note   Note
This is a standalone exe file that doesn't install anything to your PC
For Rufus FAQs, see: FAQ · pbatard/rufus Wiki · GitHub


Rufus - Create bootable USB drives the easy way


2. Connect your USB flash drive if you have not already.

3. Run the rufus_v###.exe file, and click/tap on Yes if prompted by UAC.
NOTE: ### = latest version number.

4. Set Rufus with the settings below: (see screenshot below step 5)


  • Under Device, select the USB flash drive you want to format and use.
  • Under Format Options, check Create a bootable disk using, click/tap on the browse icon icon.jpg to navigate to and select your 64-bit Windows 7 or Windows 8 or Windows 8.1 ISO file, and then make sure that Standard Windows installation is selected (dotted).
  • Under Partition scheme and target system type, select GPT partition scheme for UEFI computer.
  • Under File system, select FAT32.
  • Under Cluster size, select the (Default) (ex: 16 kilobytes or 4096 bytes) it has listed.
  • Under Format Options, check Quick format.
  • Under Format Options, check Create extended label and icon files.
  • Under New volume label, you can enter any name you like for the USB flash drive, or leave the default name.

5. When ready, click/tap on Start. (see screenshot below)
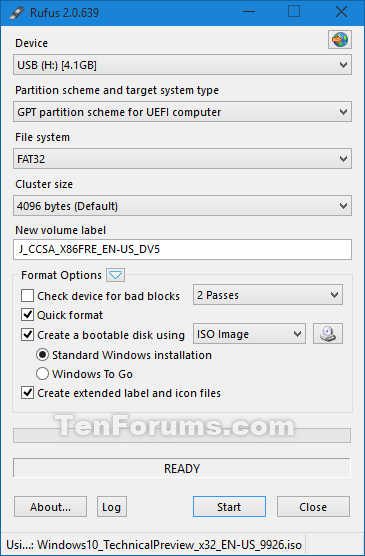

Rufus_UEFI.png


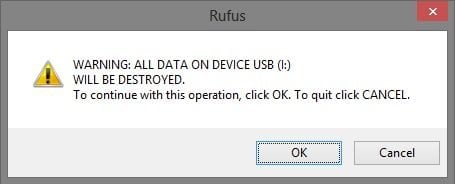
6. Click/tap on OK to confirm. (see screenshot below)
Rufus-confirm.jpg


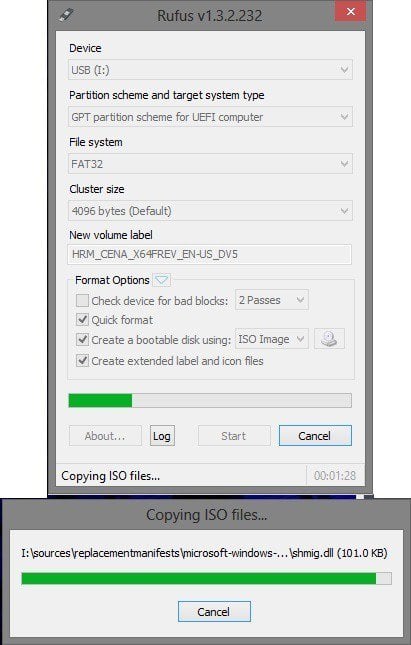
7. Rufus will now start creating the bootable UEFI USB flash drive. (see screenshot below)
Rufus_working.jpg


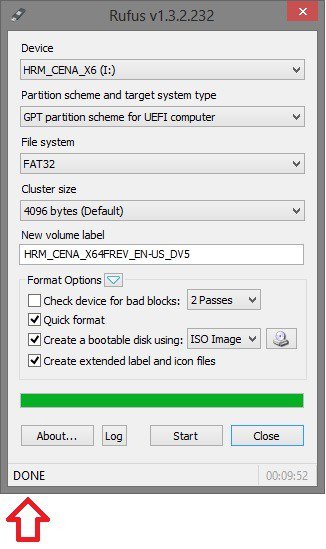
8. When Rufus is "DONE", you can close Rufus. (see screenshot below)
NOTE: It could take a little while to finish.
Rufus_Done.jpg


9. You are now ready to do a clean install of Windows 7 or Windows 8/8.1 using UEFI with your bootable UEFI USB flash drive.


OPTION TWO

To Manually Create a Bootable UEFI USB Flash Drive


1. Connect the USB flash drive.

2. Open an elevated command prompt in Windows 7 or Windows 8/8.1.

3. In the elevated command prompt, type the commands below one at a time and press Enter after each one. (see screenshot below step 5)

  • diskpart
  • list disk

4. Make note of the Disk # (ex: Disk 4) for the USB flash drive. (see screenshot below step 5)

It is critical that you use the correct disk #. If you do not, then you could delete the wrong drive below and lose everything on it


5. In the elevated command prompt, type the commands below one at a time and press Enter after each one. (see screenshot below)
NOTE: Substitute # in the first command with the actual disk # from step 4 above. For example: select disk 4
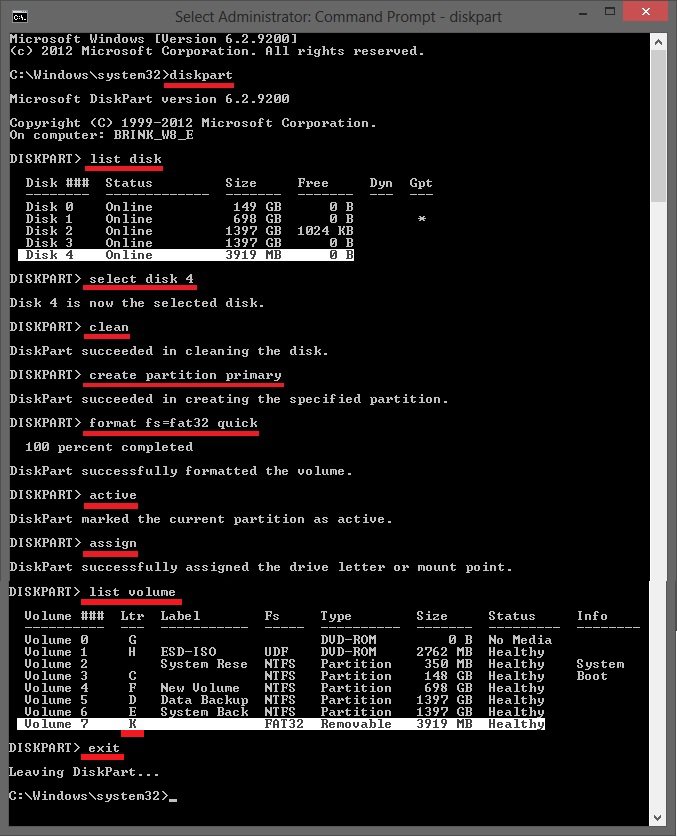

  • select disk #
  • detail disk (this is to verify that you selected the correct disk before using "clean" below)
  • clean
  • create partition primary
  • format fs=fat32 quick
  • active
  • assign
  • list volume
  • exit

Create_UEFI_USB-1.jpg


6. Make note of the volume letter (ex: K) for the USB flash drive in the command prompt. (see screenshot above)

7. Do step 8, step 9, or step 10 below depending on if you are using a Windows 7/8/8.1 ISO or DVD.

warning   Warning
It has been reported that using the downloaded Windows 8 upgrade ISO does not always give you an UEFI bootable USB option in the boot menu.

If this happens to you, then use the ESD-TO-ISO.exe program created by our member Simon (SIW2) below to create an ISO that will work with UEFI. Afterwards, start this tutorial over using this new ISO instead.

See OPTION TWO here: Windows 8 and Windows 8.1 ISO - Download or Create

download


8. If Using a Windows 7 or Windows 8/8.1 ISO File in Windows 8
NOTE: For a Windows 7 ISO or Windows 8/8.1 ISO file.


A) Open File Explorer, navigate to the .iso file, right click or press and hold on the .iso file, then click/tap on Mount. (see screenshot below)
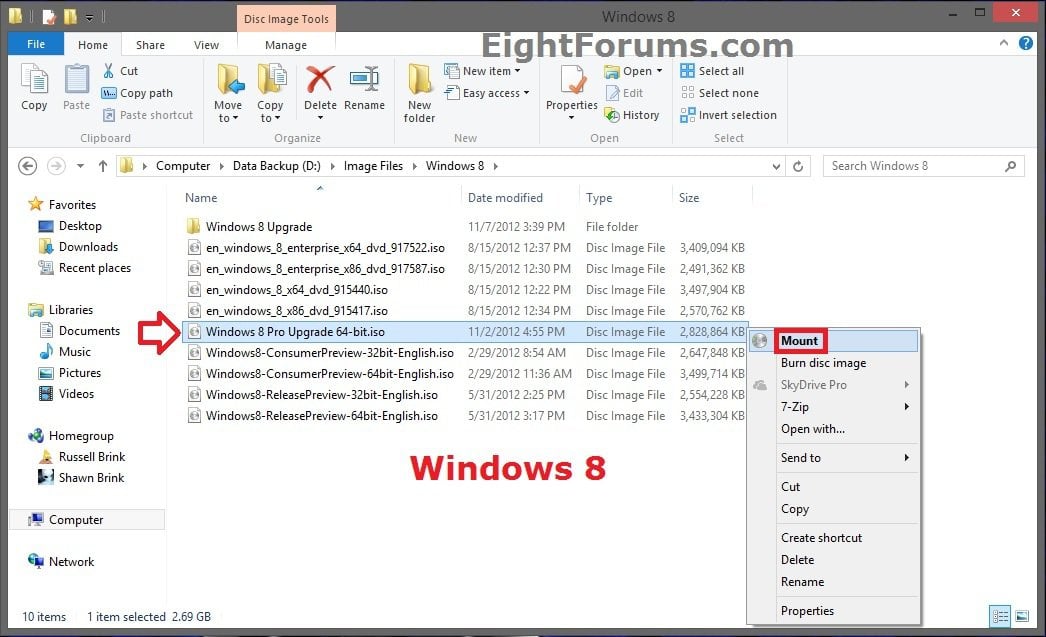


W8_ISO.jpg


B) The mounted .iso file will now automatically open. Select all files in it, right click or press and hold on the selected files, click/tap on Send to and the Removable Disk for your USB flash drive letter (ex: K) from step 6 above. (see screenshot below)
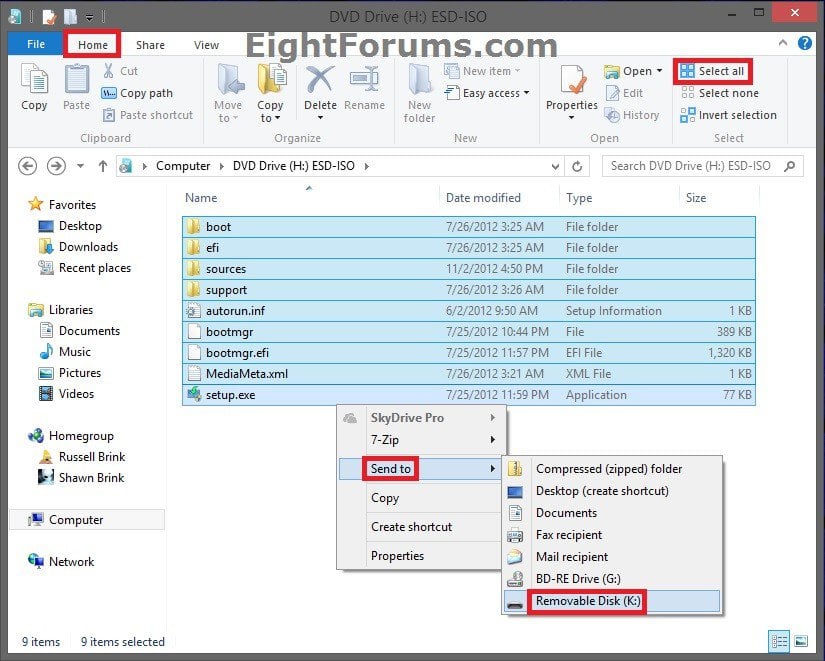


Copy.jpg


C) This could take a bit to copy the ISO contents to the USB.

D) When finished, go to step 11 below.

9. If Using a Windows 7 or Windows 8/8.1 ISO File in Windows 7
NOTE: For a Windows 7 ISO or Windows 8/8.1 ISO file.


A) If you have not already, you will need to download and install the latest alpha version of the free program 7-Zip.
NOTE: You can use any program that performs the same function to extract or mount an ISO, but I just find 7-Zip easier to use.

B) Open Windows Explorer, navigate to the .iso file, right click on the .iso file, then click on 7-Zip and Extract files. (see screenshot below)
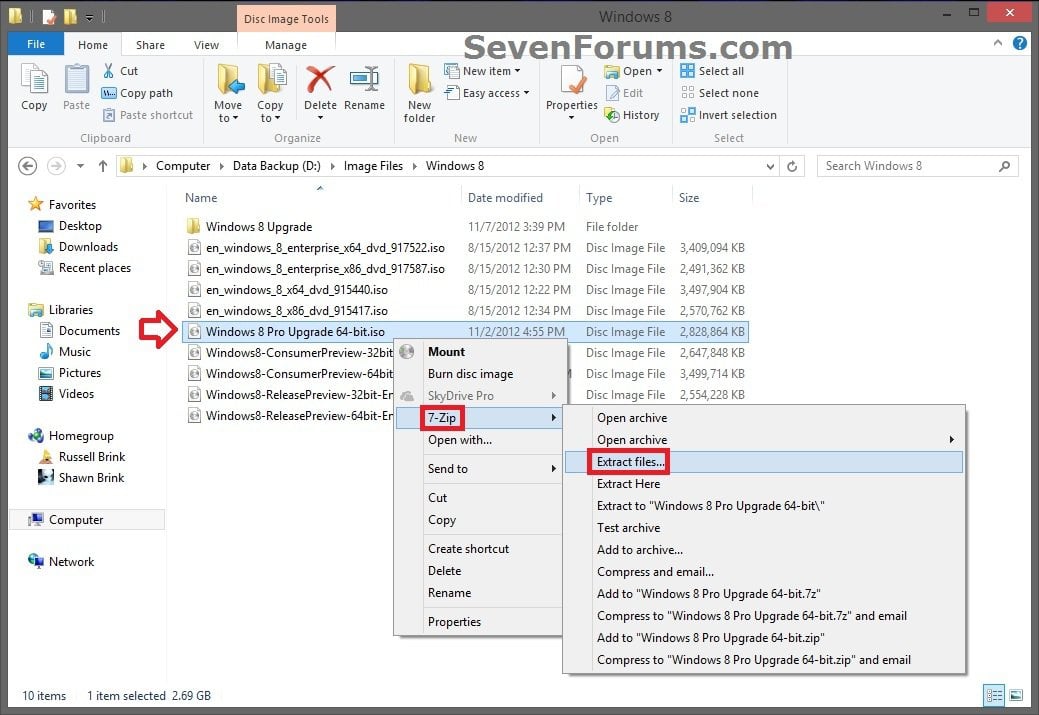


W7_ISO-1.jpg


C) In the Extract dialog, click on the browse button, select the Removable Disk for your USB flash drive letter (ex: K) from step 6 above, and click on OK, and OK. (see screenshots below)
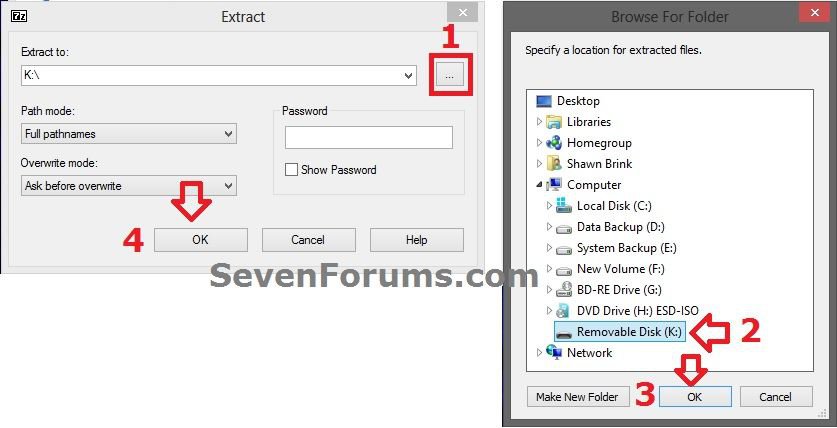


W7_ISO-2.jpg


D) This could take a bit to copy the ISO contents to the USB.

E) When finished, go to step 11 below.

10. If Using a Windows 7 or Windows 8/8.1 Installation DVD


A) Insert the Windows 7 or Windows 8 installation DVD into the CD/DVD drive.

B) In the Computer window, open the DVD. (see screenshot below)
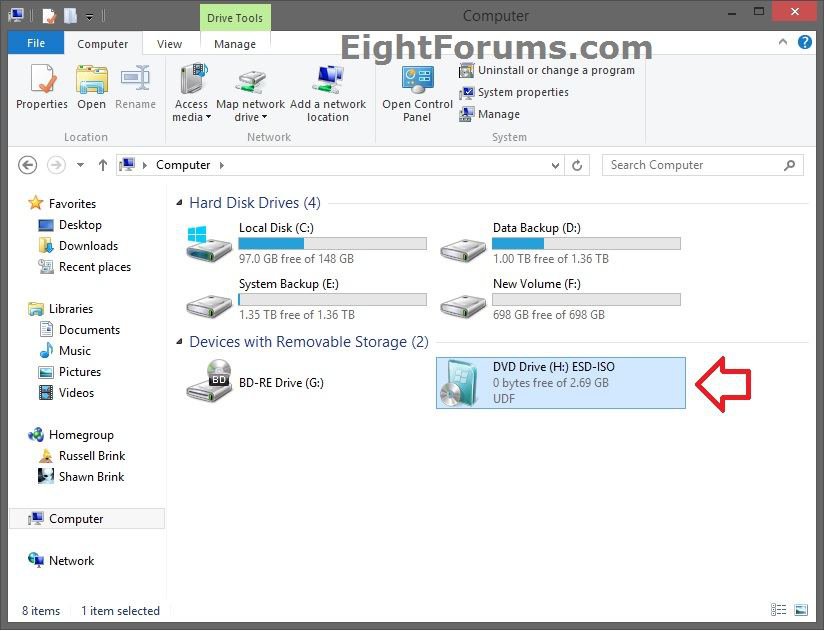


DVD.jpg


C) Select all files in it, right click or press and hold on the selected files, click/tap on Send to and the Removable Disk for your USB flash drive letter (ex: K) from step 6 above. (see screenshot below)


Copy.jpg


D) This could take a bit to copy the DVD contents to the USB.

E) When finished, go to step 11 below.


11. If Using 64-bit Windows 7

Note   Note
Thanks to theog for this step

You do not need to do this step unless you are creating a 64-bit Windows 7 UEFI USB flash drive.

If you are not, then go to step 12 below instead.


A) On the USB flash drive, "copy" the efi\microsoft\boot folder up one level into the efi folder as efi\boot. (see screenshot below)
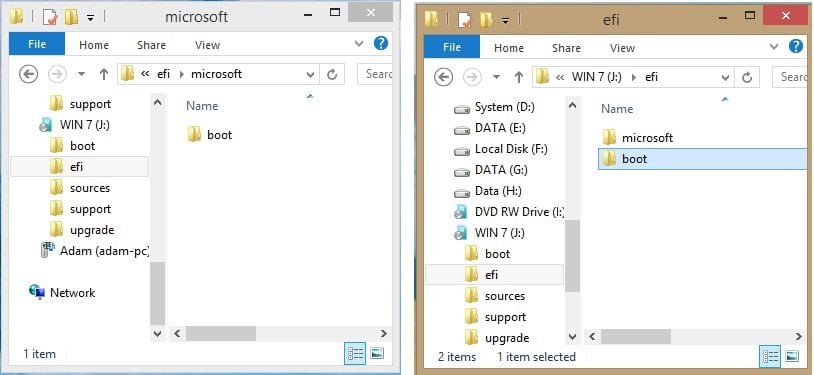


11A.jpg


B) If you have not already, download and install the latest alpha version of the free program 7-Zip, then run 7-Zip.

C) In 7-Zip, navigate to the sources\install.wim\1\Windows\Boot\EFI\bootmgfw.efi on the USB flash drive, select the bootmgfw.efi file, copy it to your desktop, click/tap on OK, and close 7-Zip. (see screenshot below)
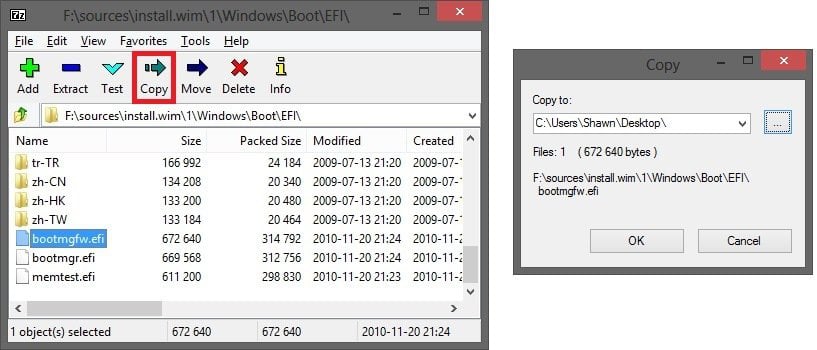


7-Zip.jpg


D) Rename the bootmgfw.efi file on your desktop to bootx64.efi.


E) Copy/Move the renamed bootx64.efi file into the efi/boot folder (step 11A) on the USB flash drive.
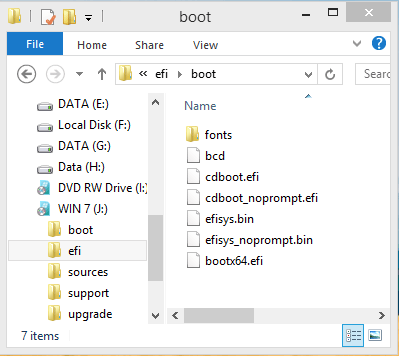


efi-boot.PNG


F) Go to step 12 below.

12. You are now ready to do a clean install of Windows 7 or Windows 8/8.1 using UEFI with your bootable UEFI USB flash drive.


That's it,
Shawn


Attachments

  • ESD-TO-ISO.zip
    341.8 KB · Views: 34,433
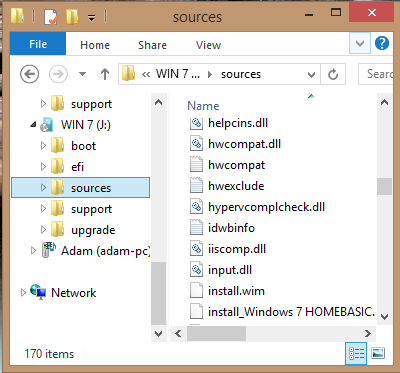
  • install.wim.png
    install.wim.png
    10.2 KB · Views: 103,124
  • USB_Drive.png
    USB_Drive.png
    10.2 KB · Views: 835
Last edited by a moderator:

My Computer

System One

  • OS
    Windows 7 Ultimate x64
    Computer type
    PC/Desktop
    System Manufacturer/Model
    Dell XPS Studio 8900
    CPU
    Intel Core i7-6700
    Memory
    16Gb 2133MHz DDR4
    Graphics Card(s)
    NVIDIA GeForce GTX 745 4GB GDDR3
    Browser
    Internet Explorer 11
    Antivirus
    Kaspersky Total Secure
If you are using a flash drive, no. All this does is fill all sectors of the drive with zeroes, which is a very slow operation that will also reduce the life of your drive, as flash memory (especially the one in cheap flash drives) has a much more limited number of write cycles before failure compared to regular HDDs.

Unless you have a need to erase any trace of your old data (which isn't something that this method will guarantee as flash drives are known to reorganize sectors around, and could remap existing sectors as spares that won't be erased), unchecking the option is pointless, which is why it is selected in Rufus by default.
 

My Computer

System One

  • OS
    Windows 7 x64
    Computer type
    PC/Desktop
    System Manufacturer/Model
    Home built
    CPU
    Intel Core 2 Duo
    Motherboard
    ASUS P5B Deluxe
    Memory
    Corsair 4 GB DDR2 :(
    Graphics Card(s)
    Geforce GT610 1 GB
    Sound Card
    Embedded HD Audio
    Monitor(s) Displays
    Dell 2005FPW
    Screen Resolution
    1680x1050
    Hard Drives
    1x Intel SSD 330 180 GB
    2x Samsung HD103UJ in RAID1
    PSU
    Corsair 400W
I'm trying to install Windows 10 64bit on my UEFI motherboard.

I created my Win 10 installation USB drive using Rufus and created the drive using the GPT partition scheme with 32bit file system.

I configured my internal HDD with the GUID partition scheme.

When I boot from the USB drive everything seems to be going fine until I get to the point of choosing the HDD to install to, then the installation stopw with the error message that the HDD has the MBR partition scheme even though I partitioned it with GUID.

Why is the installation not seeing the correct partition scheme?
 

My Computer

System One

  • OS
    OS X
Please realize that the GPT partition scheme you select in Rufus applies only to the USB you boot from, not the internal HDD you install Windows to.

Whatever you select in Rufus becomes completely irrelevant once the Windows installer has booted (though it may help to ensure that Windows boots in UEFI mode and not in BIOS mode). Especially, it's not because you selected GPT in Rufus that the Windows installer will automatically use GPT for the partition scheme.

You probably need to clear/repartition your HDD (which seems to be MBR - and Rufus cannot change that on its own) from the Windows installer so that it will be converted to GPT. But this is a Windows installer issue, not a Rufus issue.
 

My Computer

System One

  • OS
    Windows 7 x64
    Computer type
    PC/Desktop
    System Manufacturer/Model
    Home built
    CPU
    Intel Core 2 Duo
    Motherboard
    ASUS P5B Deluxe
    Memory
    Corsair 4 GB DDR2 :(
    Graphics Card(s)
    Geforce GT610 1 GB
    Sound Card
    Embedded HD Audio
    Monitor(s) Displays
    Dell 2005FPW
    Screen Resolution
    1680x1050
    Hard Drives
    1x Intel SSD 330 180 GB
    2x Samsung HD103UJ in RAID1
    PSU
    Corsair 400W
I'm trying to install Windows 10 64bit on my UEFI motherboard.

I created my Win 10 installation USB drive using Rufus and created the drive using the GPT partition scheme with 32bit file system.

I configured my internal HDD with the GUID partition scheme.

When I boot from the USB drive everything seems to be going fine until I get to the point of choosing the HDD to install to, then the installation stopw with the error message that the HDD has the MBR partition scheme even though I partitioned it with GUID.

Why is the installation not seeing the correct partition scheme?

Your trying to use a 32 but OS in UEFI that's not going to work UEFI requires 64bit OS After making your 64bit install USB with Rufus or Windows tool use diskpart to clean your hard drive then let the Windows install create the needed partitions to run UEFI GPT
 

My Computer

System One

  • OS
    Windows 8.1 Pro MC
    Computer type
    Laptop
    System Manufacturer/Model
    Asus G75VW / Z97 Pro
    CPU
    Intel Core i7-3610QM / I7-4790K
    Motherboard
    Z97 Pro
    Memory
    16 GB Hyundai HTM315156CFR8C-PB PC3-12800
    Graphics Card(s)
    nVIDIA GeForce GTX 670M (GF114M)
    Sound Card
    VIA 6.0.10.1600
    Screen Resolution
    1080
    Hard Drives
    Samsung 850 Pro 256, Samsung 850 Pro 1TB
    Internet Speed
    30 down 3 up
    Browser
    Explorer 11
    Antivirus
    NIS and Malwarebytes
I'm trying to install Windows 10 64bit on my UEFI motherboard.

I created my Win 10 installation USB drive using Rufus and created the drive using the GPT partition scheme with 32bit file system.

I configured my internal HDD with the GUID partition scheme.

When I boot from the USB drive everything seems to be going fine until I get to the point of choosing the HDD to install to, then the installation stopw with the error message that the HDD has the MBR partition scheme even though I partitioned it with GUID.

Why is the installation not seeing the correct partition scheme?

Your trying to use a 32 but OS in UEFI that's not going to work UEFI requires 64bit OS After making your 64bit install USB with Rufus or Windows tool use diskpart to clean your hard drive then let the Windows install create the needed partitions to run UEFI GPT

I was installing the 64bit version.

I had made the mistake of formatting and partitioning the drive to FAT/GPT before I started the Win 10 installation which in my case did not work.

So, during the installation I started a command prompt and ran 'diskpart', identified my drive and used the 'clean' command to prepare the drive. This time the partition was recognised and the installation proceeded without a hitch.

I still don't know how a previously prepared drive created with the GPT partition scheme was recognised by the Win 10 installer as MBR?
 

My Computer

System One

  • OS
    OS X
The problem when you talk about "drive" is we don't know if you're talking about your USB drive or the internal HDD drive that you are installing Windows onto. These are 2 completely separate disks, and the only one that matters for Windows, in terms of partition scheme, is the HDD.

So when you say "a previously prepared drive created with the GPT partition scheme" I have to assume that you are talking about the USB drive, which, as far as Windows is concerned, and as I previously explained, is completely irrelevant to the Windows installer process, since it is NOT the disk you're installing Windows onto. It could be using a wild file system and your own custom partition scheme, and the Windows installer would be just fine as long as it can boot and read the installation files from it. So the fact that that drive is GPT is completely irrelevant to the whole installation process.

The only thing that matters to Windows is the target drive, i.e. the internal HDD. When Windows complains that it's unhappy with that drive because it's using the MBR partition scheme, I believe it, because if the only thing you did was create an USB installation drive in Rufus, you certainly did not change the partition scheme from that drive, which was probably MBR. And this is further corroborated by the fact that after you applied the 'clean' command to your installation HDD (which does remove the partition scheme), the installer was fine, since it could now create the partition scheme it wanted on that drive.

So really, everything you are stating above makes sense, unless you are indicating that you did attempt to manually change your target HDD to GPT partition scheme. But if that's the case, then you clearly did something wrong, since that's not what the Windows installer saw as being used by your target drive until you used diskpart.
 

My Computer

System One

  • OS
    Windows 7 x64
    Computer type
    PC/Desktop
    System Manufacturer/Model
    Home built
    CPU
    Intel Core 2 Duo
    Motherboard
    ASUS P5B Deluxe
    Memory
    Corsair 4 GB DDR2 :(
    Graphics Card(s)
    Geforce GT610 1 GB
    Sound Card
    Embedded HD Audio
    Monitor(s) Displays
    Dell 2005FPW
    Screen Resolution
    1680x1050
    Hard Drives
    1x Intel SSD 330 180 GB
    2x Samsung HD103UJ in RAID1
    PSU
    Corsair 400W
I'm trying to install Windows 10 64bit on my UEFI motherboard.

I created my Win 10 installation USB drive using Rufus and created the drive using the GPT partition scheme with 32bit file system.

32 bit and GPT are incompatible Your USB should have been formatted Fat 32 your Target hard drive should have been cleaned and converted GPT or just left clean.

I configured my internal HDD with the GUID partition scheme.

Again Target HD should be Clean or Clean and converted to GPT

When I boot from the USB drive everything seems to be going fine until I get to the point of choosing the HDD to install to, then the installation stopw with the error message that the HDD has the MBR partition scheme even though I partitioned it with GUID.

Why is the installation not seeing the correct partition scheme?

Your trying to use a 32 but OS in UEFI that's not going to work UEFI requires 64bit OS After making your 64bit install USB with Rufus or Windows tool use diskpart to clean your hard drive then let the Windows install create the needed partitions to run UEFI GPT

I was installing the 64bit version.

I had made the mistake of formatting and partitioning the drive to FAT/GPT before I started the Win 10 installation which in my case did not work.

Yes FAT is for BIOS and GPT is for UEFI, both Systems you either have one or the other for OS HD/SSD . In you case your HD remained FAT

So, during the installation I started a command prompt and ran 'diskpart', identified my drive and used the 'clean' command to prepare the drive. This time the partition was recognised and the installation proceeded without a hitch.

You solved the problem By entering Diskpart and Cleaning your HD which allowed the windows install to create the UEFI needed partitions

I still don't know how a previously prepared drive created with the GPT partition scheme was recognised by the Win 10 installer as MBR?

Yes were all either just learned or are learning this new UEFI system it is a much better system than BIOS/MBR but a little tricky to install to until you understand the way of it. https://en.wikipedia.org/wiki/Unified_Extensible_Firmware_Interface explains the system technically.
 

My Computer

System One

  • OS
    Windows 8.1 Pro MC
    Computer type
    Laptop
    System Manufacturer/Model
    Asus G75VW / Z97 Pro
    CPU
    Intel Core i7-3610QM / I7-4790K
    Motherboard
    Z97 Pro
    Memory
    16 GB Hyundai HTM315156CFR8C-PB PC3-12800
    Graphics Card(s)
    nVIDIA GeForce GTX 670M (GF114M)
    Sound Card
    VIA 6.0.10.1600
    Screen Resolution
    1080
    Hard Drives
    Samsung 850 Pro 256, Samsung 850 Pro 1TB
    Internet Speed
    30 down 3 up
    Browser
    Explorer 11
    Antivirus
    NIS and Malwarebytes
[SOLVED]

Your trying to use a 32 but OS in UEFI that's not going to work UEFI requires 64bit OS After making your 64bit install USB with Rufus or Windows tool use diskpart to clean your hard drive then let the Windows install create the needed partitions to run UEFI GPT

I was installing the 64bit version.

I had made the mistake of formatting and partitioning the drive to FAT/GPT before I started the Win 10 installation which in my case did not work.

Yes FAT is for BIOS and GPT is for UEFI, both Systems you either have one or the other for OS HD/SSD . In you case your HD remained FAT

So, during the installation I started a command prompt and ran 'diskpart', identified my drive and used the 'clean' command to prepare the drive. This time the partition was recognised and the installation proceeded without a hitch.

You solved the problem By entering Diskpart and Cleaning your HD which allowed the windows install to create the UEFI needed partitions

I still don't know how a previously prepared drive created with the GPT partition scheme was recognised by the Win 10 installer as MBR?

Yes were all either just learned or are learning this new UEFI system it is a much better system than BIOS/MBR but a little tricky to install to until you understand the way of it. https://en.wikipedia.org/wiki/Unified_Extensible_Firmware_Interface explains the system technically.

Hi

Thanks for the reply.

My system is UEFI. When I created the USB Win 10 installer (drive, stick, device ,medium I never know what to call it) I created it on a Windows machine using Rufus, this creates a (I'll call it a USB stick) with the GPT partition scheme and the FAT filing system. This is fully recognised by the machine and installation proceeds as normal.

When I choose a HDD for the installation of Win 10 I first installed the drive in a Hackintosh machine and used OS X El Capitan 'disk utility' to partition the new HDD with the GUID (GPT) partition scheme with the FAT file system The same as the USB stick, I then removed the newly created HDD and installed it in the new machine and ran the Win 10 installer which told me the HDD had a MBR partition scheme.

When I re-installed the HDD in the Hackintosh disk utility reports the HDD as having the GUID partition scheme??

Next time I will leave the target HDD alone and let the Windows 10 installer sort the drive out.
 

My Computer

System One

  • OS
    OS X
and used OS X El Capitan 'disk utility' to partition the new HDD with the GUID (GPT) partition scheme with the FAT file system The same as the USB stick

Why? Windows can NOT be installed on a FAT filesystem. It should be NTFS. But then again, Windows does NOT need you to format the file system beforehand (it would be a pretty lousy installer if it couldn't create the file system it wants to install the OS).

Once again, the way you partitioned and formatted the USB is irrelevant to how you need to partition and format the target disk. It's not because the USB was using GPT and FAT that your target drive has to use GPT and FAT, or that you actually need to format your target drive at all.

I'm pretty sure that what the installer was really complaining about, if the only available partition on your target drive was using a FAT filesystem, was that there was no partition it could use to install Windows.

If both your USB and the target HDD were indeed using the GPT partition scheme, and you had formatted the partition you wanted to use for Windows installation on the target HDD with a FAT file system, the installer will definitely complain about that.

Next time I will leave the target HDD alone and let the Windows 10 installer sort the drive out.

Good thinking. Only the OS installer knows what it really needs to install the OS, and is usually smart enough to create it. Trying to second guess, and create things beforehand is usually a recipe for issues.
 

My Computer

System One

  • OS
    Windows 7 x64
    Computer type
    PC/Desktop
    System Manufacturer/Model
    Home built
    CPU
    Intel Core 2 Duo
    Motherboard
    ASUS P5B Deluxe
    Memory
    Corsair 4 GB DDR2 :(
    Graphics Card(s)
    Geforce GT610 1 GB
    Sound Card
    Embedded HD Audio
    Monitor(s) Displays
    Dell 2005FPW
    Screen Resolution
    1680x1050
    Hard Drives
    1x Intel SSD 330 180 GB
    2x Samsung HD103UJ in RAID1
    PSU
    Corsair 400W
hello, i got problem n still unresolve..

trying to install win 7 64 bit for my sony vaio E series.. but got stack and cant do anything.

when im using legacy mode, it can go through booting to enter instalation proccess but got error on partitioning menu, it says "windows cannot be installed on this disk, this computer hardware blablablabla. ensure that the disk blablabla".

so i think i should use uefi mode, but no progress at all,it stuck at logo screen booting no matter how many times i've tried.

then i tried using bootable usb efi (in this thread tutorial). again, it got stuck with error at booting "\EFI\Microsoft\BOOT\BCD. Status 0xc0000000d" no matter how many times i've tried, either using rufus or manually.

my goal is to be able to install win 7 64 bit.

btw SV's bios is somewhat simple, it's just provide boot mode and priority change, no advance boot for like CSM n stuff i've been reading.

pls help..:huh:
 
Last edited:

My Computer

System One

  • OS
    windows 7

My Computer

System One

  • OS
    64-bit Windows 10
    Computer type
    PC/Desktop
    System Manufacturer/Model
    Custom self built
    CPU
    Intel i7-8700K OC'd to 5 GHz
    Motherboard
    ASUS ROG Maximus XI Formula Z390
    Memory
    64 GB (4x16GB) G.SKILL TridentZ RGB DDR4 3600 MHz (F4-3600C18D-32GTZR)
    Graphics Card(s)
    ASUS ROG-STRIX-GTX1080TI-O11G-GAMING
    Sound Card
    Integrated Digital Audio (S/PDIF)
    Monitor(s) Displays
    2 x Samsung Odyssey G7 27"
    Screen Resolution
    2560x1440
    Hard Drives
    1TB Samsung 990 PRO M.2,
    4TB Samsung 990 PRO PRO M.2,
    8TB WD MyCloudEX2Ultra NAS
    PSU
    OCZ Series Gold OCZZ1000M 1000W
    Case
    Thermaltake Core P3
    Cooling
    Corsair Hydro H115i
    Keyboard
    Logitech wireless K800
    Mouse
    Logitech MX Master 3
    Internet Speed
    1 Gb/s Download and 35 Mb/s Upload
    Browser
    Internet Explorer 11
    Antivirus
    Malwarebyte Anti-Malware Premium
    Other Info
    Logitech Z625 speaker system,
    Logitech BRIO 4K Pro webcam,
    HP Color LaserJet Pro MFP M477fdn,
    APC SMART-UPS RT 1000 XL - SURT1000XLI,
    Galaxy S23 Plus phone
Hi guys,

I may be missing something and I have to admit I didn't read all the 52 pages of subnotes and the rest of the forum. So if this was solved before, I apologize and would be satisfied with just a link to that thread.

Any ways this is my problem.

I'm trying to create a UEFI USB flash drive to install Win 7 Pro x64 with SP1. I tried twice using Rukus and then becouse it didn't work once with "Diskpart", both times using instructions on this forum.

When I select it from the boot options it hangs on the black screen, before the Win logo starts to esemble or what ever MS called that. :D

My current configuration is: Win 10 Ent, installed with GPT and UEFI, secure and fast boot disabled.
I have cretated a vsdx. on dirve D:\
My only goal is to get the working Win 7 Pro intallation and then officaly upgrade it to Win 10 before 29.7. :D

Tnx for any inside.

Regards,
SteelCat
 

My Computer

System One

  • OS
    Windows 10 Pro
Hello SteelCat, and welcome to Eight Forums. :)

Where did you get the Windows 7 ISO from? If not from an official source (ex: Microsoft), then that could be the issue.
 

My Computer

System One

  • OS
    64-bit Windows 10
    Computer type
    PC/Desktop
    System Manufacturer/Model
    Custom self built
    CPU
    Intel i7-8700K OC'd to 5 GHz
    Motherboard
    ASUS ROG Maximus XI Formula Z390
    Memory
    64 GB (4x16GB) G.SKILL TridentZ RGB DDR4 3600 MHz (F4-3600C18D-32GTZR)
    Graphics Card(s)
    ASUS ROG-STRIX-GTX1080TI-O11G-GAMING
    Sound Card
    Integrated Digital Audio (S/PDIF)
    Monitor(s) Displays
    2 x Samsung Odyssey G7 27"
    Screen Resolution
    2560x1440
    Hard Drives
    1TB Samsung 990 PRO M.2,
    4TB Samsung 990 PRO PRO M.2,
    8TB WD MyCloudEX2Ultra NAS
    PSU
    OCZ Series Gold OCZZ1000M 1000W
    Case
    Thermaltake Core P3
    Cooling
    Corsair Hydro H115i
    Keyboard
    Logitech wireless K800
    Mouse
    Logitech MX Master 3
    Internet Speed
    1 Gb/s Download and 35 Mb/s Upload
    Browser
    Internet Explorer 11
    Antivirus
    Malwarebyte Anti-Malware Premium
    Other Info
    Logitech Z625 speaker system,
    Logitech BRIO 4K Pro webcam,
    HP Color LaserJet Pro MFP M477fdn,
    APC SMART-UPS RT 1000 XL - SURT1000XLI,
    Galaxy S23 Plus phone
Hello Brink,

tnx for a quick reply. The image is from an officiall source, but it was modifed so it doesn't ask you for a key, in the first part of setup. Insted it displays a list of Windows images on the drive (similar that it was with Win Vista, if you choose to imput your key later).

But I installed with that image before in non UEFI mode and It was fine.

I have an RTM version also somewhere, I will try with that later.

Regards,
SteelCat

P.S.: One more question does the actvation of a free genuine windows 10 differentiate between boot modes when it makes your harware fingerprint. As I said my goal is to get a working win10 licence so I might be able to use it later. It would be a shame to vaste a working win7 key. :D
 

My Computer

System One

  • OS
    Windows 10 Pro
It's possible that whatever you did to modify it will cause it not to work with UEFI, and only Legacy BIOS.

Activation isn't affected by installing in UEFI or Legacy BIOS. :)
 

My Computer

System One

  • OS
    64-bit Windows 10
    Computer type
    PC/Desktop
    System Manufacturer/Model
    Custom self built
    CPU
    Intel i7-8700K OC'd to 5 GHz
    Motherboard
    ASUS ROG Maximus XI Formula Z390
    Memory
    64 GB (4x16GB) G.SKILL TridentZ RGB DDR4 3600 MHz (F4-3600C18D-32GTZR)
    Graphics Card(s)
    ASUS ROG-STRIX-GTX1080TI-O11G-GAMING
    Sound Card
    Integrated Digital Audio (S/PDIF)
    Monitor(s) Displays
    2 x Samsung Odyssey G7 27"
    Screen Resolution
    2560x1440
    Hard Drives
    1TB Samsung 990 PRO M.2,
    4TB Samsung 990 PRO PRO M.2,
    8TB WD MyCloudEX2Ultra NAS
    PSU
    OCZ Series Gold OCZZ1000M 1000W
    Case
    Thermaltake Core P3
    Cooling
    Corsair Hydro H115i
    Keyboard
    Logitech wireless K800
    Mouse
    Logitech MX Master 3
    Internet Speed
    1 Gb/s Download and 35 Mb/s Upload
    Browser
    Internet Explorer 11
    Antivirus
    Malwarebyte Anti-Malware Premium
    Other Info
    Logitech Z625 speaker system,
    Logitech BRIO 4K Pro webcam,
    HP Color LaserJet Pro MFP M477fdn,
    APC SMART-UPS RT 1000 XL - SURT1000XLI,
    Galaxy S23 Plus phone
I was attempting to install Windows 7 x64 on a GPT disk and was getting the "Windows cannot be installed to this disk. The selected disk is of the GPT partition style." error because my USB would not boot in UEFI mode.

Step 11 was a lifesaver, it was exactly what I needed to make it work. Thank you so much for this tutorial!
 

My Computer

System One

  • OS
    Windows 7 Professional x64
    Computer type
    PC/Desktop

My Computer

System One

  • OS
    64-bit Windows 10
    Computer type
    PC/Desktop
    System Manufacturer/Model
    Custom self built
    CPU
    Intel i7-8700K OC'd to 5 GHz
    Motherboard
    ASUS ROG Maximus XI Formula Z390
    Memory
    64 GB (4x16GB) G.SKILL TridentZ RGB DDR4 3600 MHz (F4-3600C18D-32GTZR)
    Graphics Card(s)
    ASUS ROG-STRIX-GTX1080TI-O11G-GAMING
    Sound Card
    Integrated Digital Audio (S/PDIF)
    Monitor(s) Displays
    2 x Samsung Odyssey G7 27"
    Screen Resolution
    2560x1440
    Hard Drives
    1TB Samsung 990 PRO M.2,
    4TB Samsung 990 PRO PRO M.2,
    8TB WD MyCloudEX2Ultra NAS
    PSU
    OCZ Series Gold OCZZ1000M 1000W
    Case
    Thermaltake Core P3
    Cooling
    Corsair Hydro H115i
    Keyboard
    Logitech wireless K800
    Mouse
    Logitech MX Master 3
    Internet Speed
    1 Gb/s Download and 35 Mb/s Upload
    Browser
    Internet Explorer 11
    Antivirus
    Malwarebyte Anti-Malware Premium
    Other Info
    Logitech Z625 speaker system,
    Logitech BRIO 4K Pro webcam,
    HP Color LaserJet Pro MFP M477fdn,
    APC SMART-UPS RT 1000 XL - SURT1000XLI,
    Galaxy S23 Plus phone
thxx
 
Last edited by a moderator:

My Computer

System One

  • OS
    10
    Computer type
    PC/Desktop
    System Manufacturer/Model
    msi
    CPU
    i5 8400
    Motherboard
    z370 a pro
    Memory
    kingston
    Graphics Card(s)
    1050ti
    Browser
    chrome
    Antivirus
    nod32
Back
Top