How to Create a Bootable UEFI USB Flash Drive for Installing Windows 7, Windows 8, or Windows 8.1
This tutorial will show you how to create a Windows 7 or Windows 8 or 8.1 installation bootable USB flash drive for UEFIfrom either a Windows 7 or Windows 8/8.1 installation ISO or DVD.
Requirements:
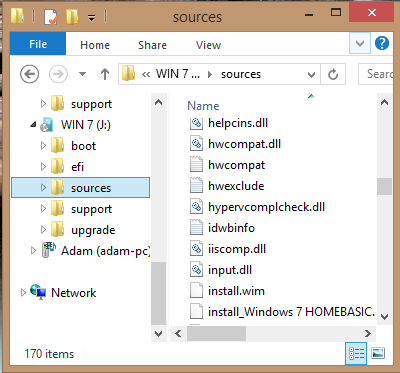
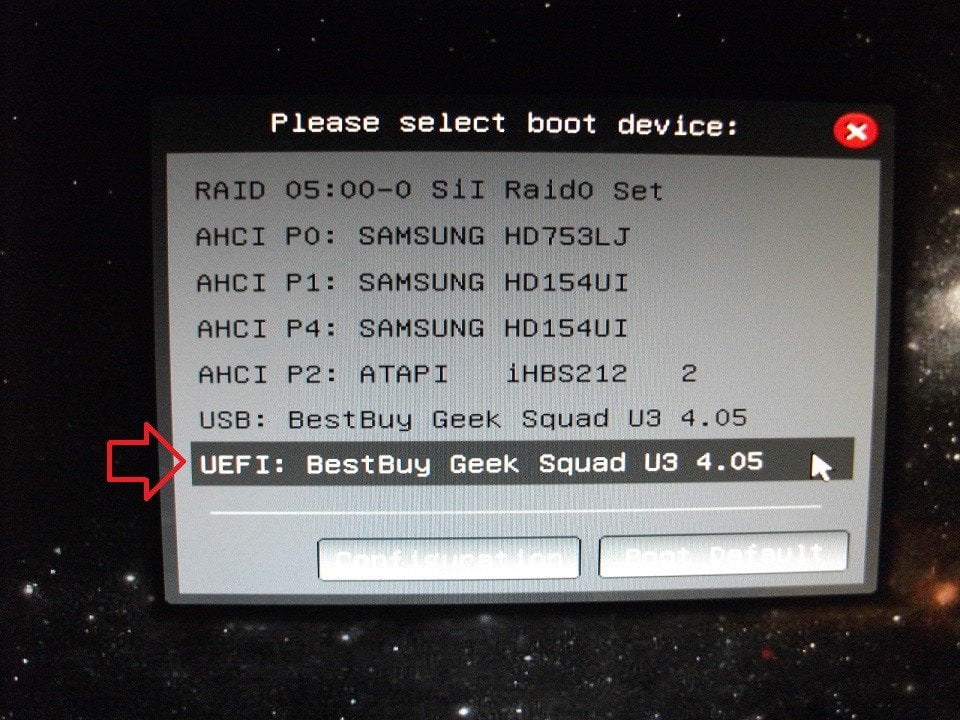
EXAMPLE: UEFI Bootable USB Flash Drive
NOTE: This is it listed in the motherboard's boot menu.
1. Download the latest version of Rufus at the link below, and save it's .exe file to your desktop.
 Note
Note
Rufus - Create bootable USB drives the easy way
2. Connect your USB flash drive if you have not already.
3. Run the rufus_v###.exe file, and click/tap on Yes if prompted by UAC.
NOTE: ### = latest version number.
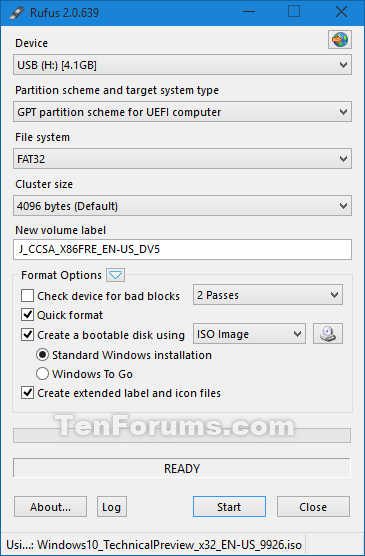
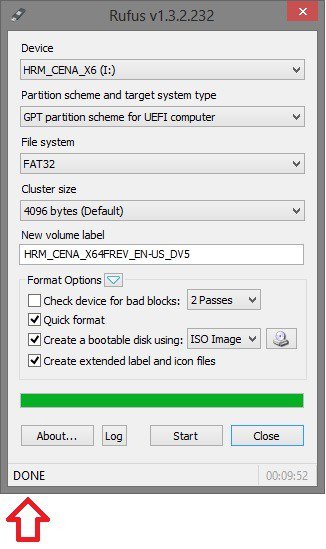
4. Set Rufus with the settings below: (see screenshot below step 5)
5. When ready, click/tap on Start. (see screenshot below)
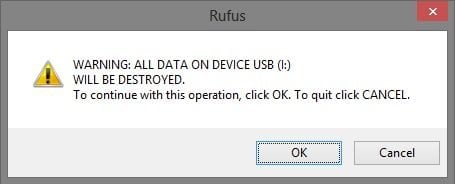
6. Click/tap on OK to confirm. (see screenshot below)
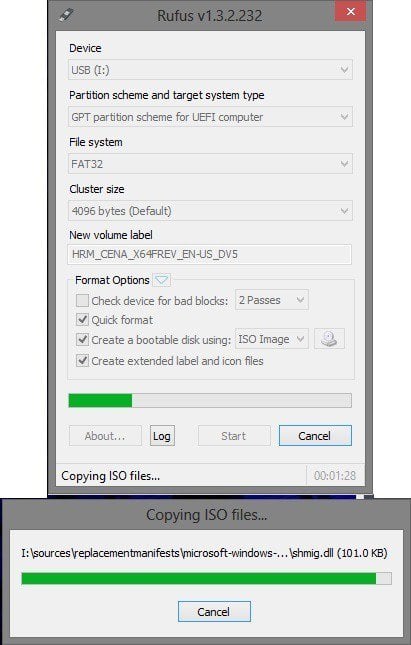
7. Rufus will now start creating the bootable UEFI USB flash drive. (see screenshot below)
8. When Rufus is "DONE", you can close Rufus. (see screenshot below)
NOTE: It could take a little while to finish.
9. You are now ready to do a clean install of Windows 7 or Windows 8/8.1 using UEFI with your bootable UEFI USB flash drive.
1. Connect the USB flash drive.
2. Open an elevated command prompt in Windows 7 or Windows 8/8.1.
3. In the elevated command prompt, type the commands below one at a time and press Enter after each one. (see screenshot below step 5)
4. Make note of the Disk # (ex: Disk 4) for the USB flash drive. (see screenshot below step 5)
It is critical that you use the correct disk #. If you do not, then you could delete the wrong drive below and lose everything on it
5. In the elevated command prompt, type the commands below one at a time and press Enter after each one. (see screenshot below)
NOTE: Substitute # in the first command with the actual disk # from step 4 above. For example: select disk 4
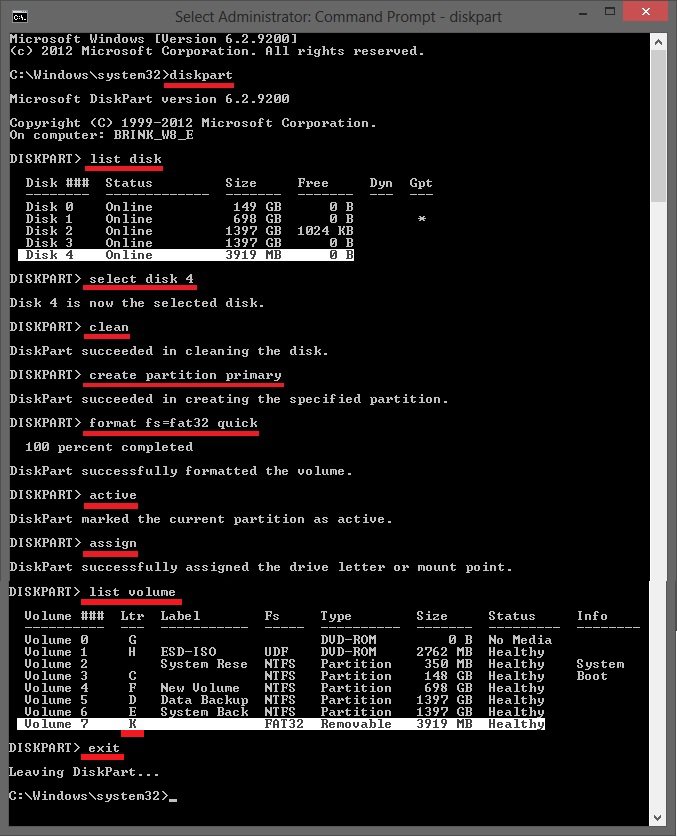
6. Make note of the volume letter (ex: K) for the USB flash drive in the command prompt. (see screenshot above)
7. Do step 8, step 9, or step 10 below depending on if you are using a Windows 7/8/8.1 ISO or DVD.
 Warning
8. If Using a Windows 7 or Windows 8/8.1 ISO File in Windows 8
NOTE: For a Windows 7 ISO or Windows 8/8.1 ISO file.
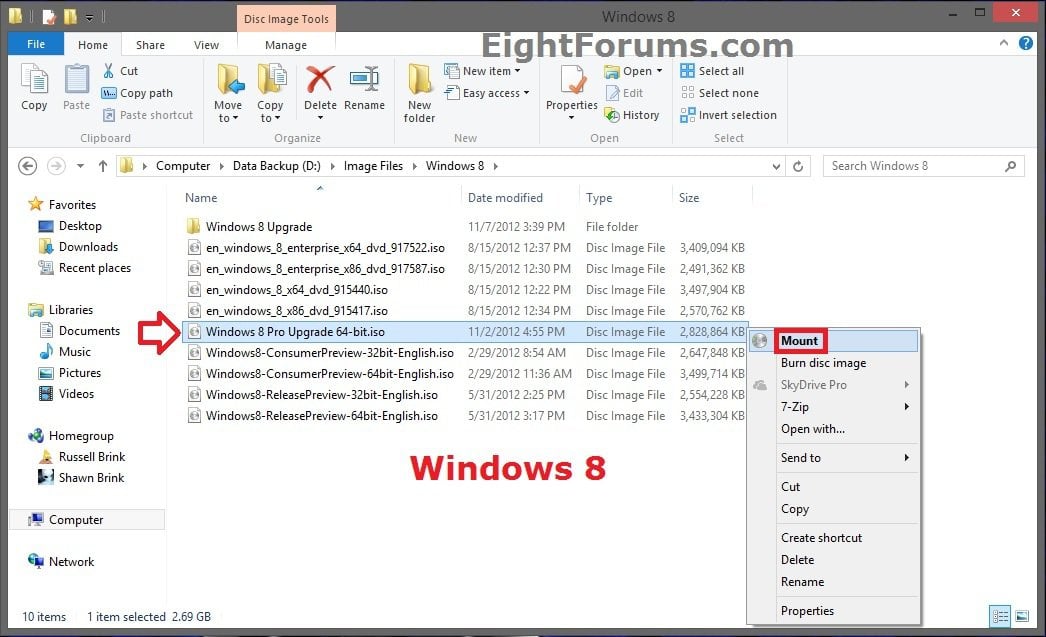
A) Open File Explorer, navigate to the .iso file, right click or press and hold on the .iso file, then click/tap on Mount. (see screenshot below)
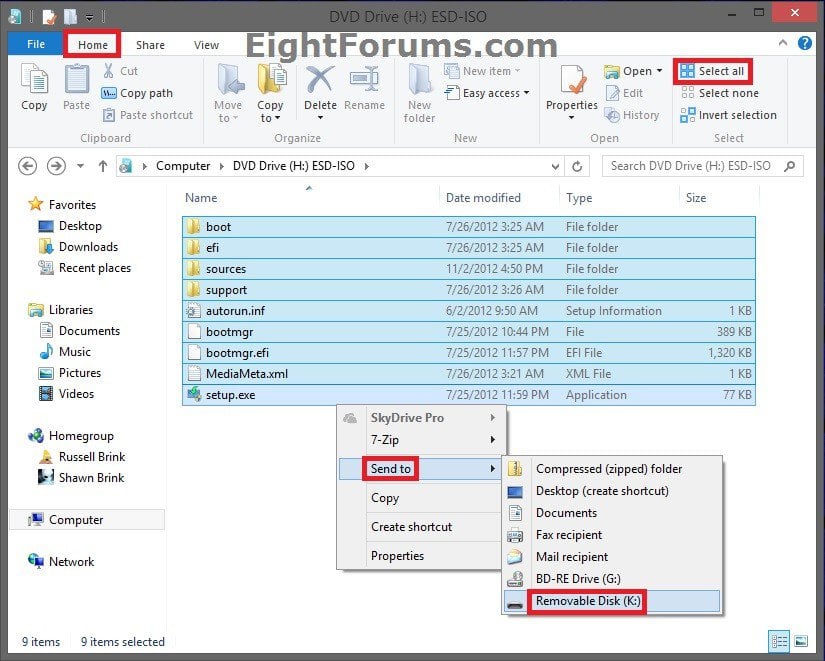
B) The mounted .iso file will now automatically open. Select all files in it, right click or press and hold on the selected files, click/tap on Send to and the Removable Disk for your USB flash drive letter (ex: K) from step 6 above. (see screenshot below)
C) This could take a bit to copy the ISO contents to the USB.
D) When finished, go to step 11 below.
9. If Using a Windows 7 or Windows 8/8.1 ISO File in Windows 7
NOTE: For a Windows 7 ISO or Windows 8/8.1 ISO file.
A) If you have not already, you will need to download and install the latest alpha version of the free program 7-Zip.
NOTE: You can use any program that performs the same function to extract or mount an ISO, but I just find 7-Zip easier to use.
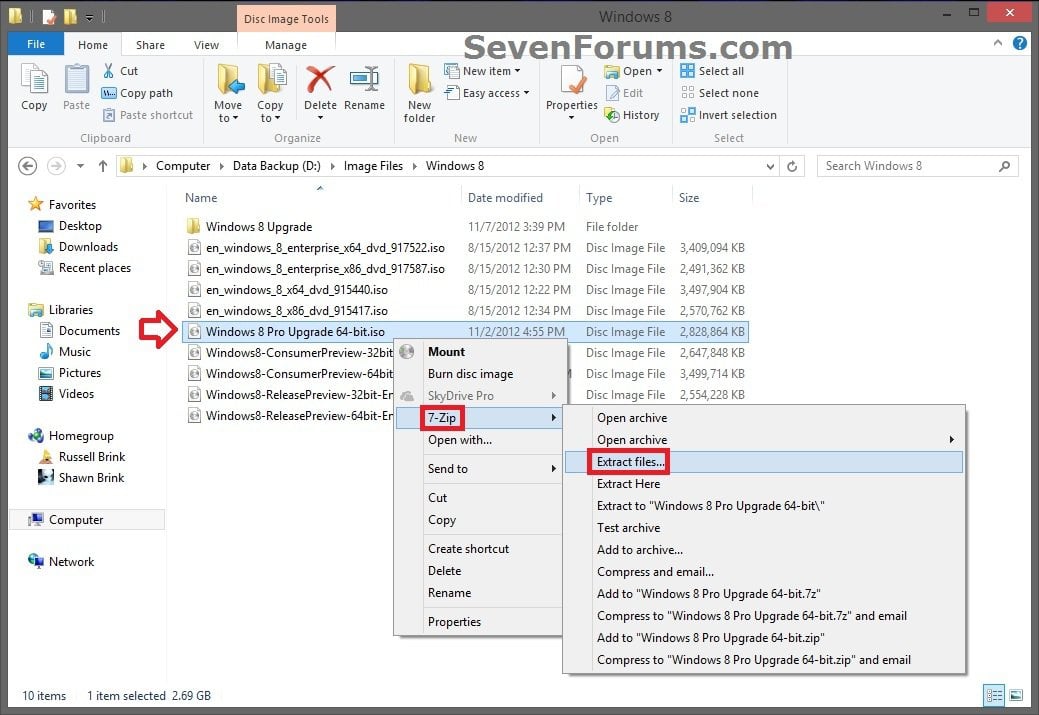
B) Open Windows Explorer, navigate to the .iso file, right click on the .iso file, then click on 7-Zip and Extract files. (see screenshot below)
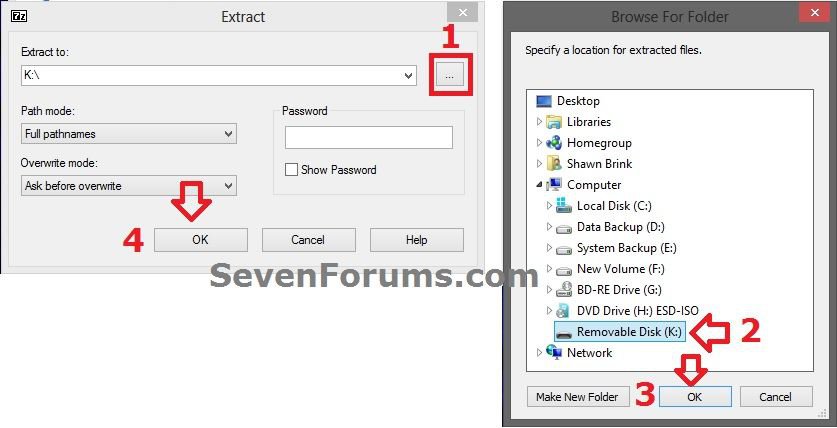
C) In the Extract dialog, click on the browse button, select the Removable Disk for your USB flash drive letter (ex: K) from step 6 above, and click on OK, and OK. (see screenshots below)
D) This could take a bit to copy the ISO contents to the USB.
E) When finished, go to step 11 below.
10. If Using a Windows 7 or Windows 8/8.1 Installation DVD
A) Insert the Windows 7 or Windows 8 installation DVD into the CD/DVD drive.
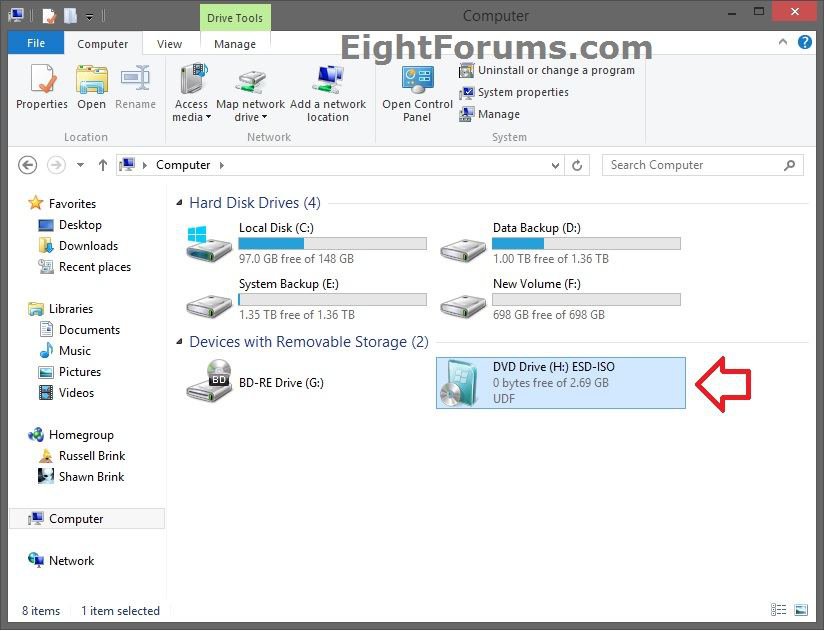
B) In the Computer window, open the DVD. (see screenshot below)
C) Select all files in it, right click or press and hold on the selected files, click/tap on Send to and the Removable Disk for your USB flash drive letter (ex: K) from step 6 above. (see screenshot below)

D) This could take a bit to copy the DVD contents to the USB.
E) When finished, go to step 11 below.
11. If Using 64-bit Windows 7
 Note
Note
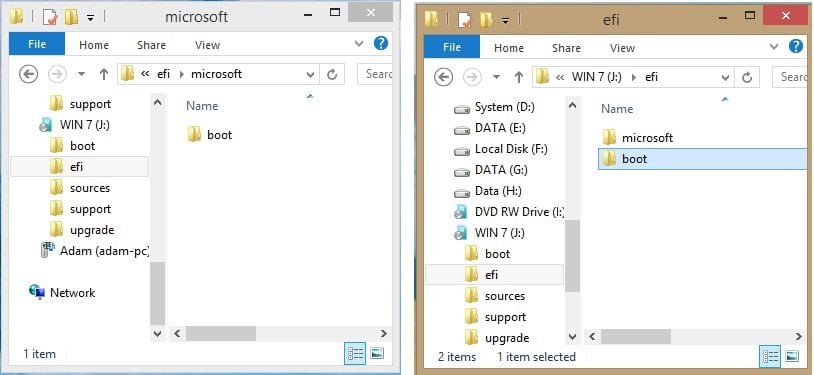
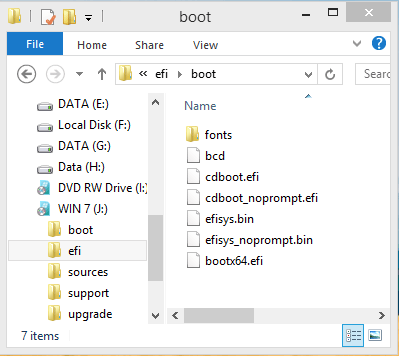
A) On the USB flash drive, "copy" the efi\microsoft\boot folder up one level into the efi folder as efi\boot. (see screenshot below)
B) If you have not already, download and install the latest alpha version of the free program 7-Zip, then run 7-Zip.
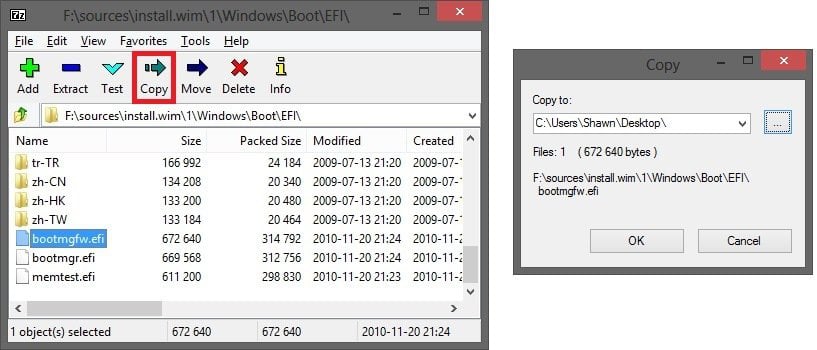
C) In 7-Zip, navigate to the sources\install.wim\1\Windows\Boot\EFI\bootmgfw.efi on the USB flash drive, select the bootmgfw.efi file, copy it to your desktop, click/tap on OK, and close 7-Zip. (see screenshot below)
D) Rename the bootmgfw.efi file on your desktop to bootx64.efi.
E) Copy/Move the renamed bootx64.efi file into the efi/boot folder (step 11A) on the USB flash drive.
F) Go to step 12 below.
12. You are now ready to do a clean install of Windows 7 or Windows 8/8.1 using UEFI with your bootable UEFI USB flash drive.
That's it,
Shawn
This tutorial will show you how to create a Windows 7 or Windows 8 or 8.1 installation bootable USB flash drive for UEFIfrom either a Windows 7 or Windows 8/8.1 installation ISO or DVD.
Requirements:
- At least a 4GB USB flash drive
- 64-bit Windows 7 ISO or DVD (If you want to install Windows 7)
- 64-bit Windows 8 ISO or DVD (If you want to install Windows 8)
- 64-bit Windows 8.1 ISO or DVD (If you want to install Windows 8.1)
- 32-bit is not supported.
- Set the boot mode to use UEFI and not CSM (Compatibility Support Module) in your UEFI firmware settings.
- Temporarily disable Secure Boot in your UEFI firmware settings. Some motherboards will not boot from a USB unless you do this first. When the Windows installation is finished, you can enable secure boot if you like.
- If you have fast boot or ultra-fast boot enabled in your UEFI firmware (if supported), then you may need to temporarily disable it until Windows has finished installing to be able to boot from a USB flash drive at boot.
EXAMPLE: UEFI Bootable USB Flash Drive
NOTE: This is it listed in the motherboard's boot menu.

OPTION ONE
To Create a Bootable UEFI USB Flash Drive using Free Program "Rufus"
1. Download the latest version of Rufus at the link below, and save it's .exe file to your desktop.
This is a standalone exe file that doesn't install anything to your PC
For Rufus FAQs, see: FAQ · pbatard/rufus Wiki · GitHub
For Rufus FAQs, see: FAQ · pbatard/rufus Wiki · GitHub
Rufus - Create bootable USB drives the easy way
2. Connect your USB flash drive if you have not already.
3. Run the rufus_v###.exe file, and click/tap on Yes if prompted by UAC.
NOTE: ### = latest version number.
4. Set Rufus with the settings below: (see screenshot below step 5)
- Under Device, select the USB flash drive you want to format and use.
- Under Format Options, check Create a bootable disk using, click/tap on the browse icon
 to navigate to and select your 64-bit Windows 7 or Windows 8 or Windows 8.1 ISO file, and then make sure that Standard Windows installation is selected (dotted).
 - Under Partition scheme and target system type, select GPT partition scheme for UEFI computer.
- Under File system, select FAT32.
- Under Cluster size, select the (Default) (ex: 16 kilobytes or 4096 bytes) it has listed.
- Under Format Options, check Quick format.
- Under Format Options, check Create extended label and icon files.
- Under New volume label, you can enter any name you like for the USB flash drive, or leave the default name.
5. When ready, click/tap on Start. (see screenshot below)

6. Click/tap on OK to confirm. (see screenshot below)

7. Rufus will now start creating the bootable UEFI USB flash drive. (see screenshot below)

8. When Rufus is "DONE", you can close Rufus. (see screenshot below)
NOTE: It could take a little while to finish.

9. You are now ready to do a clean install of Windows 7 or Windows 8/8.1 using UEFI with your bootable UEFI USB flash drive.
- How to Install Windows 8/8.1 Using "Unified Extensible Firmware Interface" (UEFI)
- How to Install Windows 7 Using "Unified Extensible Firmware Interface" (UEFI)
OPTION TWO
To Manually Create a Bootable UEFI USB Flash Drive
1. Connect the USB flash drive.
2. Open an elevated command prompt in Windows 7 or Windows 8/8.1.
3. In the elevated command prompt, type the commands below one at a time and press Enter after each one. (see screenshot below step 5)
- diskpart
- list disk
4. Make note of the Disk # (ex: Disk 4) for the USB flash drive. (see screenshot below step 5)
It is critical that you use the correct disk #. If you do not, then you could delete the wrong drive below and lose everything on it
5. In the elevated command prompt, type the commands below one at a time and press Enter after each one. (see screenshot below)
NOTE: Substitute # in the first command with the actual disk # from step 4 above. For example: select disk 4
- select disk #
- detail disk (this is to verify that you selected the correct disk before using "clean" below)
- clean
- create partition primary
- format fs=fat32 quick
- active
- assign
- list volume
- exit

6. Make note of the volume letter (ex: K) for the USB flash drive in the command prompt. (see screenshot above)
7. Do step 8, step 9, or step 10 below depending on if you are using a Windows 7/8/8.1 ISO or DVD.
It has been reported that using the downloaded Windows 8 upgrade ISO does not always give you an UEFI bootable USB option in the boot menu.
If this happens to you, then use the ESD-TO-ISO.exe program created by our member Simon (SIW2) below to create an ISO that will work with UEFI. Afterwards, start this tutorial over using this new ISO instead.
See OPTION TWO here: Windows 8 and Windows 8.1 ISO - Download or Create

If this happens to you, then use the ESD-TO-ISO.exe program created by our member Simon (SIW2) below to create an ISO that will work with UEFI. Afterwards, start this tutorial over using this new ISO instead.
See OPTION TWO here: Windows 8 and Windows 8.1 ISO - Download or Create

8. If Using a Windows 7 or Windows 8/8.1 ISO File in Windows 8
NOTE: For a Windows 7 ISO or Windows 8/8.1 ISO file.
A) Open File Explorer, navigate to the .iso file, right click or press and hold on the .iso file, then click/tap on Mount. (see screenshot below)

B) The mounted .iso file will now automatically open. Select all files in it, right click or press and hold on the selected files, click/tap on Send to and the Removable Disk for your USB flash drive letter (ex: K) from step 6 above. (see screenshot below)

C) This could take a bit to copy the ISO contents to the USB.
D) When finished, go to step 11 below.
9. If Using a Windows 7 or Windows 8/8.1 ISO File in Windows 7
NOTE: For a Windows 7 ISO or Windows 8/8.1 ISO file.
A) If you have not already, you will need to download and install the latest alpha version of the free program 7-Zip.
NOTE: You can use any program that performs the same function to extract or mount an ISO, but I just find 7-Zip easier to use.
B) Open Windows Explorer, navigate to the .iso file, right click on the .iso file, then click on 7-Zip and Extract files. (see screenshot below)

C) In the Extract dialog, click on the browse button, select the Removable Disk for your USB flash drive letter (ex: K) from step 6 above, and click on OK, and OK. (see screenshots below)

D) This could take a bit to copy the ISO contents to the USB.
E) When finished, go to step 11 below.
10. If Using a Windows 7 or Windows 8/8.1 Installation DVD
A) Insert the Windows 7 or Windows 8 installation DVD into the CD/DVD drive.
B) In the Computer window, open the DVD. (see screenshot below)

C) Select all files in it, right click or press and hold on the selected files, click/tap on Send to and the Removable Disk for your USB flash drive letter (ex: K) from step 6 above. (see screenshot below)

D) This could take a bit to copy the DVD contents to the USB.
E) When finished, go to step 11 below.
11. If Using 64-bit Windows 7
A) On the USB flash drive, "copy" the efi\microsoft\boot folder up one level into the efi folder as efi\boot. (see screenshot below)

B) If you have not already, download and install the latest alpha version of the free program 7-Zip, then run 7-Zip.
C) In 7-Zip, navigate to the sources\install.wim\1\Windows\Boot\EFI\bootmgfw.efi on the USB flash drive, select the bootmgfw.efi file, copy it to your desktop, click/tap on OK, and close 7-Zip. (see screenshot below)

D) Rename the bootmgfw.efi file on your desktop to bootx64.efi.
E) Copy/Move the renamed bootx64.efi file into the efi/boot folder (step 11A) on the USB flash drive.

F) Go to step 12 below.
12. You are now ready to do a clean install of Windows 7 or Windows 8/8.1 using UEFI with your bootable UEFI USB flash drive.
- How to Install Windows 8/8.1 Using "Unified Extensible Firmware Interface" (UEFI)
- How to Install Windows 7 Using "Unified Extensible Firmware Interface" (UEFI)
That's it,
Shawn
Related Tutorials
- How to Boot from a USB Drive within Windows 8 and 8.1
- How to Boot from a USB Drive on Surface
- Enable or Disable Always Automatically Boot PC from USB Drive in Windows To Go Startup Options
- How to Create a Windows To Go Startup Options Shortcut in Windows 8 and 8.1
- Create Bootable USB or DVD with Windows 8 and 8.1 ISO
- How to Create a Bootable Windows 7 Installation USB Flash Drive
- How to Download and Run the "Windows 8 Upgrade Assistant"
- How to Create or Download a Windows 8 and Windows 8.1 ISO
- How to Install Windows 8 or Windows 8.1 using "Unified Extensible Firmware Interface" (UEFI)
- How to Install Windows 7 Using "Unified Extensible Firmware Interface" (UEFI)
- How to Enable or Disable Secure Boot in UEFI
- How to Create a Recovery USB Flash Drive in Windows 8
Attachments
Last edited by a moderator:

