Secure Boot - Enable or Disable in UEFI

How to Enable or Disable Secure Boot in UEFI

UEFI (replaces BIOS) has a firmware validation process, called secure boot, which is defined in Chapter 27 of the UEFI 2.3.1 specification. Secure boot defines how platform firmware manages security certificates, validation of firmware, and a definition of the interface (protocol) between firmware and the operating system. Secure boot prevents “unauthorized” operating systems and software from loading during the startup process.

Quick summary

  • UEFI allows firmware to implement a security policy
  • Secure boot is a UEFI protocol not a Windows 8 feature
  • UEFI secure boot is part of Windows 8 secured boot architecture
  • Windows 8 utilizes secure boot to ensure that the pre-OS environment is secure
  • Secure boot doesn’t “lock out” operating system loaders, but is a policy that allows firmware to validate authenticity of components
  • OEMs have the ability to customize their firmware to meet the needs of their customers by customizing the level of certificate and policy management on their platform
  • Microsoft does not mandate or control the settings on PC firmware that control or enable secured boot from any operating system other than Windows

For more information about secure boot, see:


This tutorial will show you how to enable or disable secure boot in your PC's UEFI settings.

Any PC with a Windows 8 logo sticker has secure boot enabled by default. Secure boot can make Windows 8 very resistant to low-level malware such as rootkits.

If you have secure boot enabled, you may sometimes need to disable secure boot first before being able to boot from a USB flash drive depending on your UEFI firmware settings.


If you would like to post screenshots of your motherboard's secure boot settings, then please do. Here are some others posted so far:


warning   Warning
Arm based Windows RT PCs and devices will have a locked boot loader, so you will not be able to disabled secure boot on them.

If you have a Windows 8.1 device that has the device encryption feature turned on and disable secure boot, then you may not be able to access the data on the disk until you enable secure boot again.

Do not enable secure boot with Windows 7, Vista, or XP installed. If you do, these OSs will not boot until secure boot is disabled.


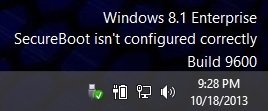
EXAMPLE: "SecureBoot isn't configured correctly" watermark in Windows 8.1
SecureBoot_isn't_configured_correctly_watermark.jpg

You will see this watermark on the bottom right corner of your desktop if you have Windows 8.1 installed with UEFI and secure boot is not configured correctly even when enabled. To remove this watermark, you will just need to enable and configure secure boot correctly.

Sometimes the watermark doesn't go away even if you correct the settings in UEFI/BIOS or your BIOS doesn't support this feature at all.

Microsoft has acknowledged this issue and released a hotfix KB2902864 to solve this problem. Once you install this hotfix, it'll remove the annoying watermark from your Windows 8.1 desktop.

Windows 8.1 users who have the "SecureBoot isn't configured correctly" watermark on the desktop, can download this hotfix from the following links:

Update removes the "Windows 8.1 SecureBoot isn't configured correctly" watermark in Windows 8.1 and Windows Server 2012 R2


OPTION ONE

Enable or Disable Secure Boot on ASRock Motherboards


This steps below are for how to enable or disable secure boot on an ASRock X79 Extreme11 UEFI motherboard.

These steps will vary depending on what brand and model number your PC or UEFI motherboard is, so please read it's manual to compare with the steps below for how to do so with your specific PC and motherboard.


1. Do step 2 or 3 below depending on how you would like to boot to the UEFI firmware settings.

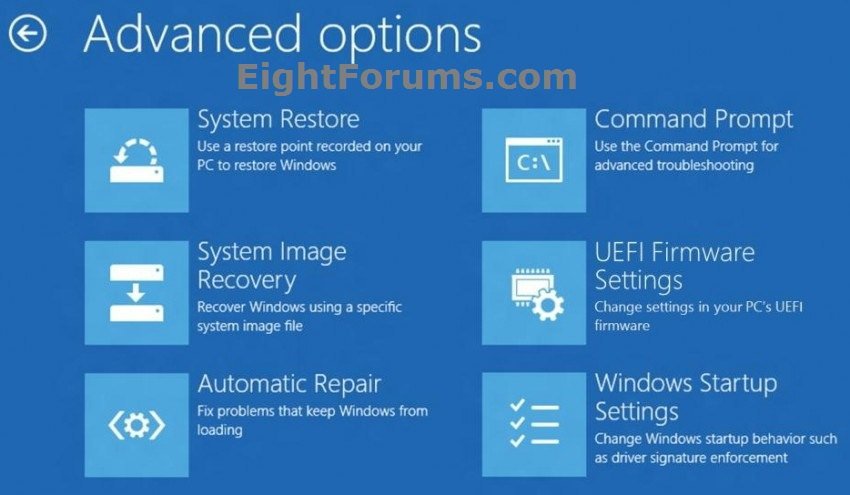
2. Boot to UEFI Firmware Settings in Windows 8/8.1 "Advanced Options" UI

A) Boot to the UEFI Firmware Settings, then go to step 4 below. (see screenshot below)
Advanced-options.jpg

3. Boot to UEFI Firmware Settings at Boot
NOTE: This step can be used with any 32-bit or 64-bit Windows installed.

A) During the initial stages at boot, press the DELETE key to enter UEFI firmware settings, and go to step 4 below.
NOTE: Your PC may use another key to press instead, so be sure to read your PC's manual and/or the boot screen to see what key to press.

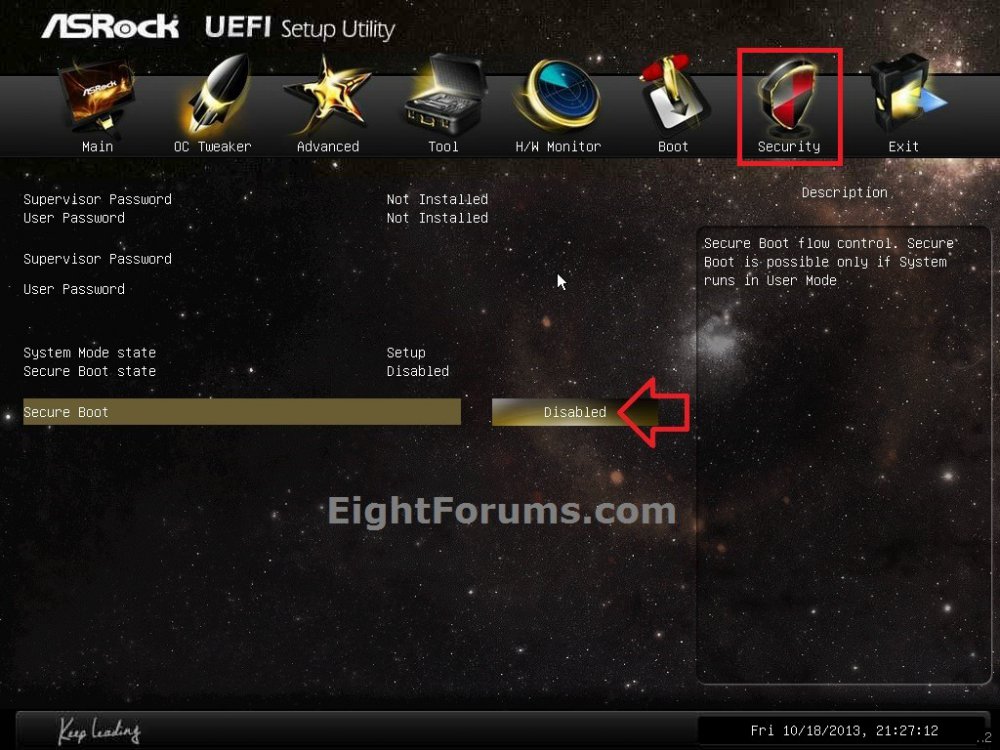
4. In the motherboard's UEFI firmware settings, click/tap on the Security menu, select the Secure Boot option, and click/tap/press Enter to enable or disable it. (see screenshots below)

Asrock_X79_Extreme_11_Secure-Boot-1.jpg


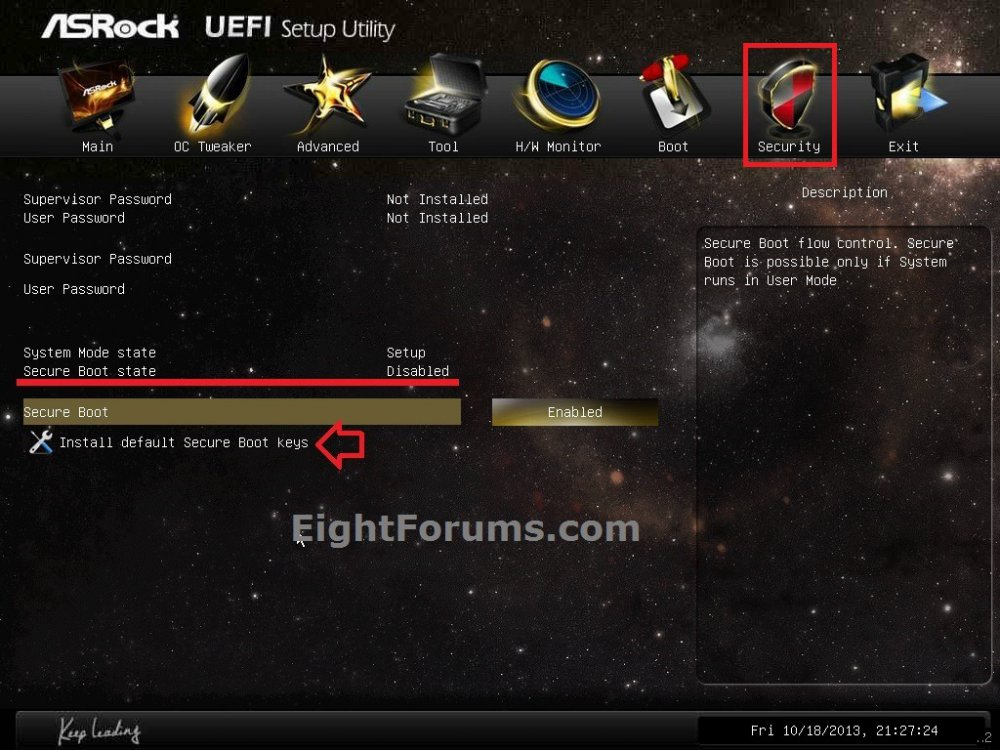
5. If you enabled secure boot, then click/tap on the "Install default Secure Boot keys" option. (see screenshot below)
NOTE: This is to configure secure boot.

Asrock_X79_Extreme_11_Secure-Boot-2.jpg


A) Click/tap on Yes to approve. (see screenshot below)
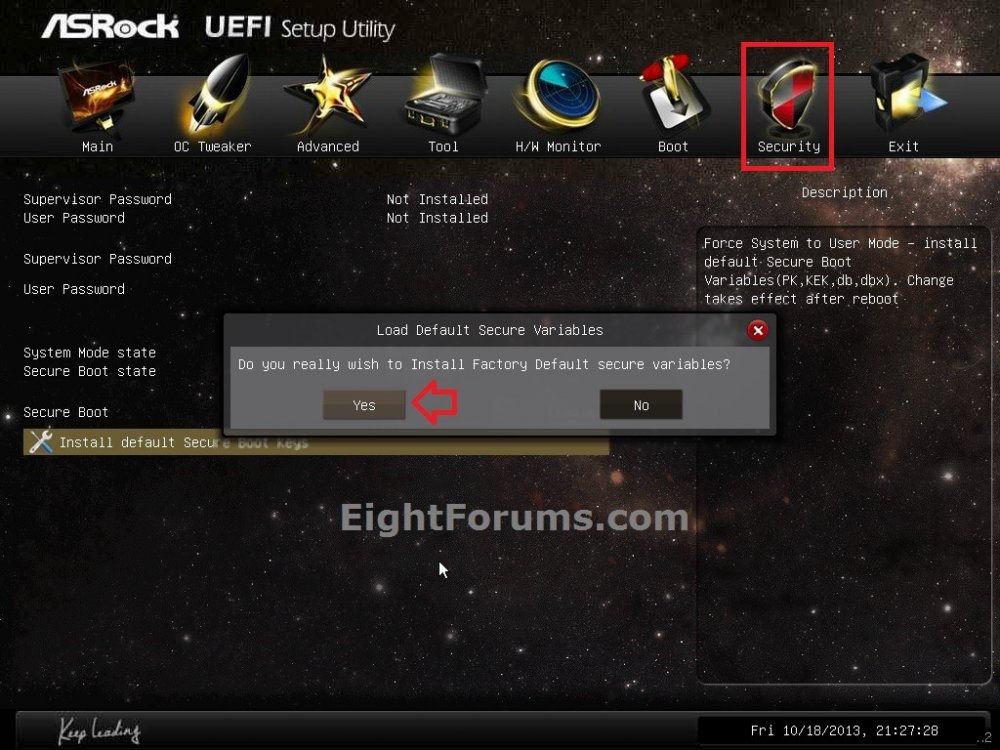

Asrock_X79_Extreme_11_Secure-Boot-3.jpg


B) Secure boot has now been enabled and configured. (see screenshot below)
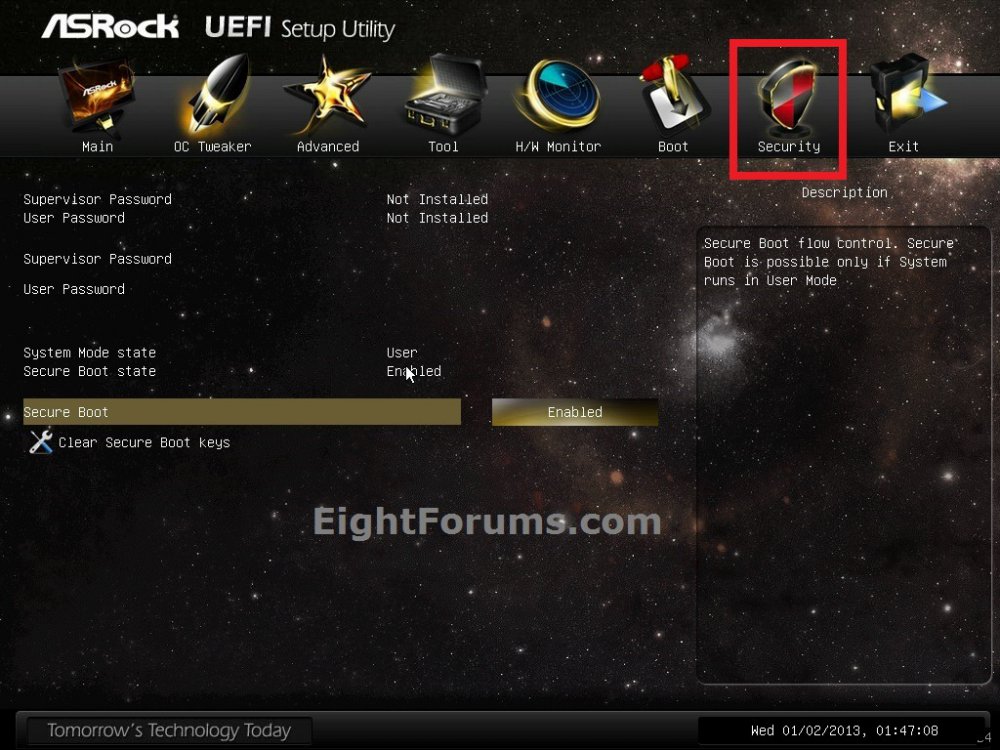
Secure_Boot-1.jpg

8. Click/tap on the Exit menu, and click/tap on Save Changes and Exit (reboot). (see screenshot below)
NOTE: You can usually also press the F10 to save changes and exit.
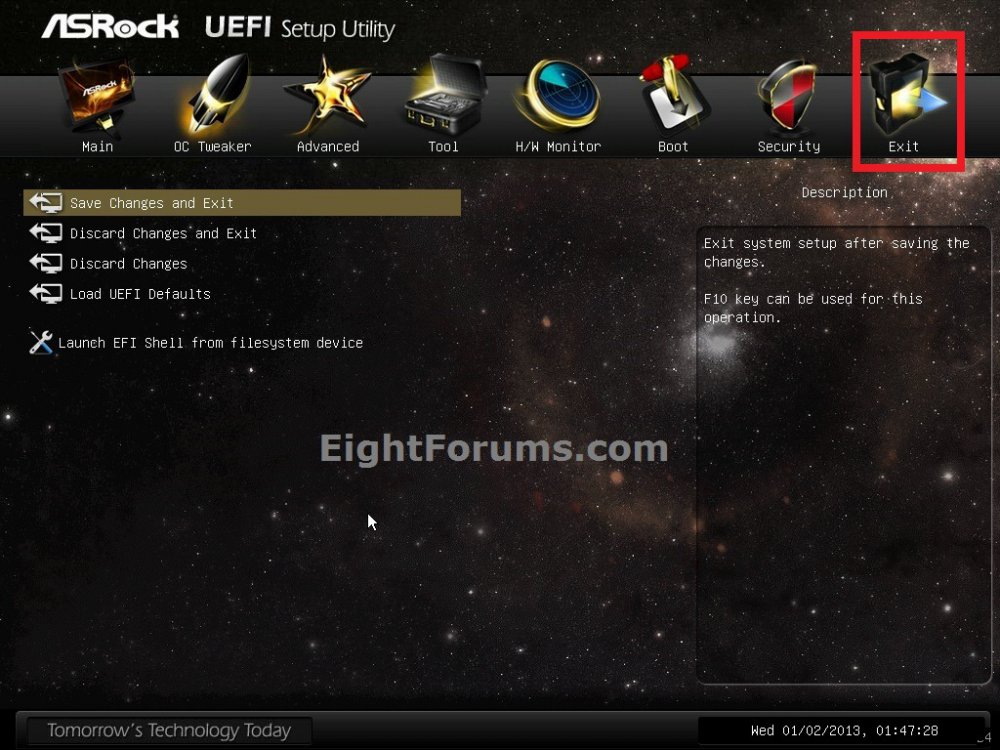

Secure_Boot-2.jpg

9. The computer will now restart to startup Windows.


OPTION TWO

Enable or Disable Secure Boot on Acer PCs


1. See: How to Enable or Disable Secure Boot

[video=youtube;5nG4zMdrHKs]


OPTION THREE

Enable or Disable Secure Boot on HP PCs


1. See: Secure Boot (Windows 8) | HP® Support
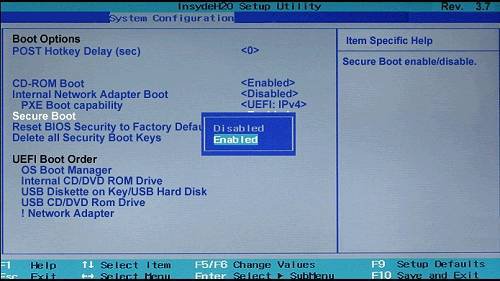

c03980379.jpg


That's it,
Shawn


Attachments

  • Uefi_logo.png
    Uefi_logo.png
    6.4 KB · Views: 500
Last edited by a moderator:
My Intel DZ77GA-70K motherboard supports SecureBoot and even though I'm booting to UEFI, I'm still not ready to try the SecureBoot option in the BIOS and I've left it unselected. Maybe one day when I'm feeling lucky?
 

My Computer

System One

  • OS
    Win 10 Pro 64bit
    Computer type
    PC/Desktop
    System Manufacturer/Model
    Home built Intel i7-3770k-based system
    CPU
    Intel i7-3770k, Overclocked to 4.6GHz (46x100) with Corsair H110i GT cooler
    Motherboard
    ASRock Z77 OC Formula 2.30 BIOS
    Memory
    32GB DDR3 2133 Corsair Vengeance Pro
    Graphics Card(s)
    GeForce GTX 980ti SC ACS 6GB DDR5 by EVGA
    Sound Card
    Creative Sound Blaster X-Fi Titanium HD, Corsair SP2500 speakers and subwoofer
    Monitor(s) Displays
    LG 27EA33 [Monitor] (27.2"vis) HDMI
    Screen Resolution
    1920x1080
    Hard Drives
    Samsung SSD 850 EVO 250GB (system drive)
    WD 6TB Red NAS hard drives x 2 in Storage Spaces (redundancy)
    PSU
    Corsair 750ax fully modular power supply with sleeved cables
    Case
    Corsair Air 540 with 7 x 140mm fans on front, rear and top panels
    Cooling
    Corsair H110i GT liquid cooled CPU with 4 x 140" Corsair SP "push-pull" and 3 x 140mm fans
    Keyboard
    Thermaltake Poseidon Z illuminated keyboard
    Mouse
    Corsair M65 wired
    Internet Speed
    85MBps DSL
    Browser
    Chrome and Edge
    Antivirus
    Windows Defender, MalwareBytes Pro and CCleaner Pro
    Other Info
    Client of Windows Server 2012 R2 10 PC's, laptops and smartphones on the WLAN.

    1GBps Ethernet ports
Hello Art,

Secure Boot is an extra layer of protection to help protect your system from anything malicious during boot before Windows and most AV programs kick in their protection.

It'll be worth having enabled when you like. :)
 

My Computer

System One

  • OS
    64-bit Windows 10
    Computer type
    PC/Desktop
    System Manufacturer/Model
    Custom self built
    CPU
    Intel i7-8700K OC'd to 5 GHz
    Motherboard
    ASUS ROG Maximus XI Formula Z390
    Memory
    64 GB (4x16GB) G.SKILL TridentZ RGB DDR4 3600 MHz (F4-3600C18D-32GTZR)
    Graphics Card(s)
    ASUS ROG-STRIX-GTX1080TI-O11G-GAMING
    Sound Card
    Integrated Digital Audio (S/PDIF)
    Monitor(s) Displays
    2 x Samsung Odyssey G7 27"
    Screen Resolution
    2560x1440
    Hard Drives
    1TB Samsung 990 PRO M.2,
    4TB Samsung 990 PRO PRO M.2,
    8TB WD MyCloudEX2Ultra NAS
    PSU
    OCZ Series Gold OCZZ1000M 1000W
    Case
    Thermaltake Core P3
    Cooling
    Corsair Hydro H115i
    Keyboard
    Logitech wireless K800
    Mouse
    Logitech MX Master 3
    Internet Speed
    1 Gb/s Download and 35 Mb/s Upload
    Browser
    Internet Explorer 11
    Antivirus
    Malwarebyte Anti-Malware Premium
    Other Info
    Logitech Z625 speaker system,
    Logitech BRIO 4K Pro webcam,
    HP Color LaserJet Pro MFP M477fdn,
    APC SMART-UPS RT 1000 XL - SURT1000XLI,
    Galaxy S23 Plus phone
New Asus K55 laptop has under BIOS Security tab>I/O Interface Security>Secure Boot state>Enabled

but the cursor will not go to it.

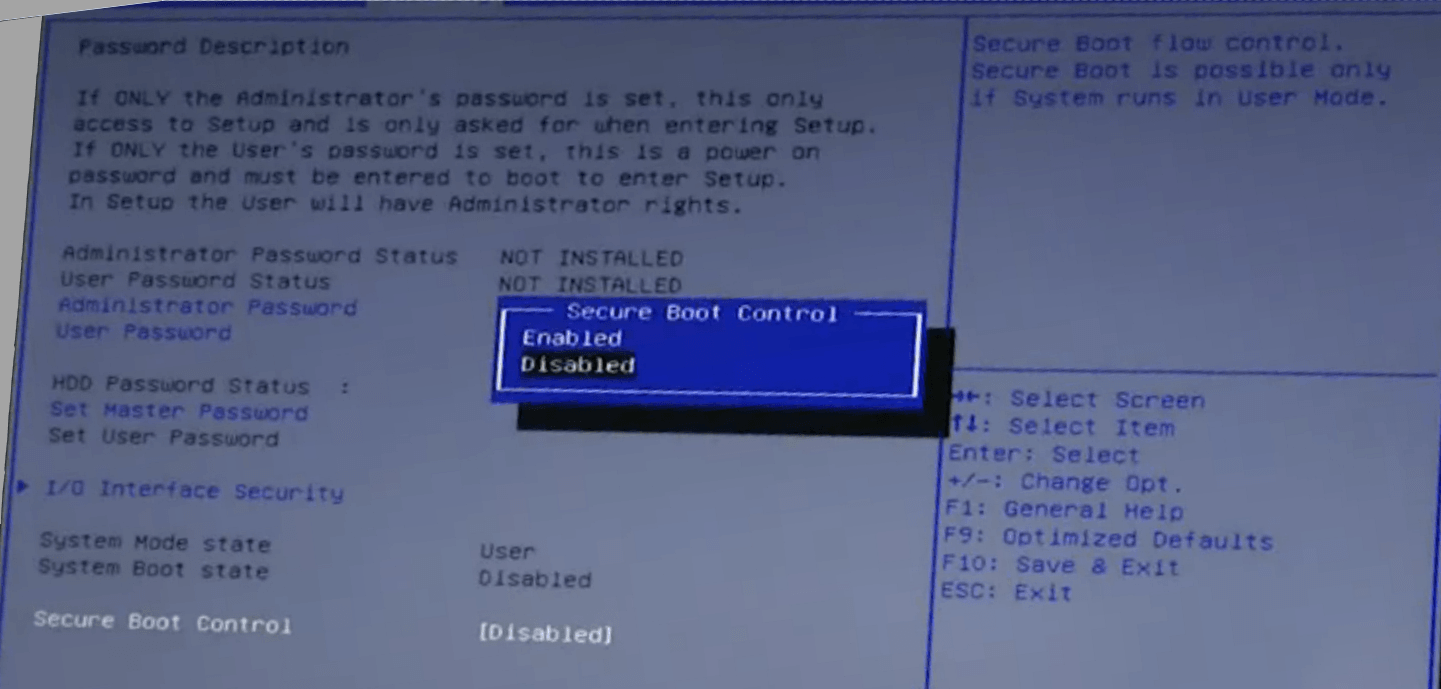
Just below that there's Secure Boot Control>Enabled which description is Secure Boot flow control and allows changing to Disabled.

How exactly do I disable Secure Boot in this case? Do I need to give it an Admin Password first?
 

My Computer

System One

  • OS
    Win7
Hello Greg,

You might see if disabling "Secure Boot Control" will then let you disable "Secure Boot state".

If not, will it let you use the arrow keys on the keyboard to navigate to the Secure Boot option, then press Enter to select it to toggle enable/disable?
 

My Computer

System One

  • OS
    64-bit Windows 10
    Computer type
    PC/Desktop
    System Manufacturer/Model
    Custom self built
    CPU
    Intel i7-8700K OC'd to 5 GHz
    Motherboard
    ASUS ROG Maximus XI Formula Z390
    Memory
    64 GB (4x16GB) G.SKILL TridentZ RGB DDR4 3600 MHz (F4-3600C18D-32GTZR)
    Graphics Card(s)
    ASUS ROG-STRIX-GTX1080TI-O11G-GAMING
    Sound Card
    Integrated Digital Audio (S/PDIF)
    Monitor(s) Displays
    2 x Samsung Odyssey G7 27"
    Screen Resolution
    2560x1440
    Hard Drives
    1TB Samsung 990 PRO M.2,
    4TB Samsung 990 PRO PRO M.2,
    8TB WD MyCloudEX2Ultra NAS
    PSU
    OCZ Series Gold OCZZ1000M 1000W
    Case
    Thermaltake Core P3
    Cooling
    Corsair Hydro H115i
    Keyboard
    Logitech wireless K800
    Mouse
    Logitech MX Master 3
    Internet Speed
    1 Gb/s Download and 35 Mb/s Upload
    Browser
    Internet Explorer 11
    Antivirus
    Malwarebyte Anti-Malware Premium
    Other Info
    Logitech Z625 speaker system,
    Logitech BRIO 4K Pro webcam,
    HP Color LaserJet Pro MFP M477fdn,
    APC SMART-UPS RT 1000 XL - SURT1000XLI,
    Galaxy S23 Plus phone
Greg

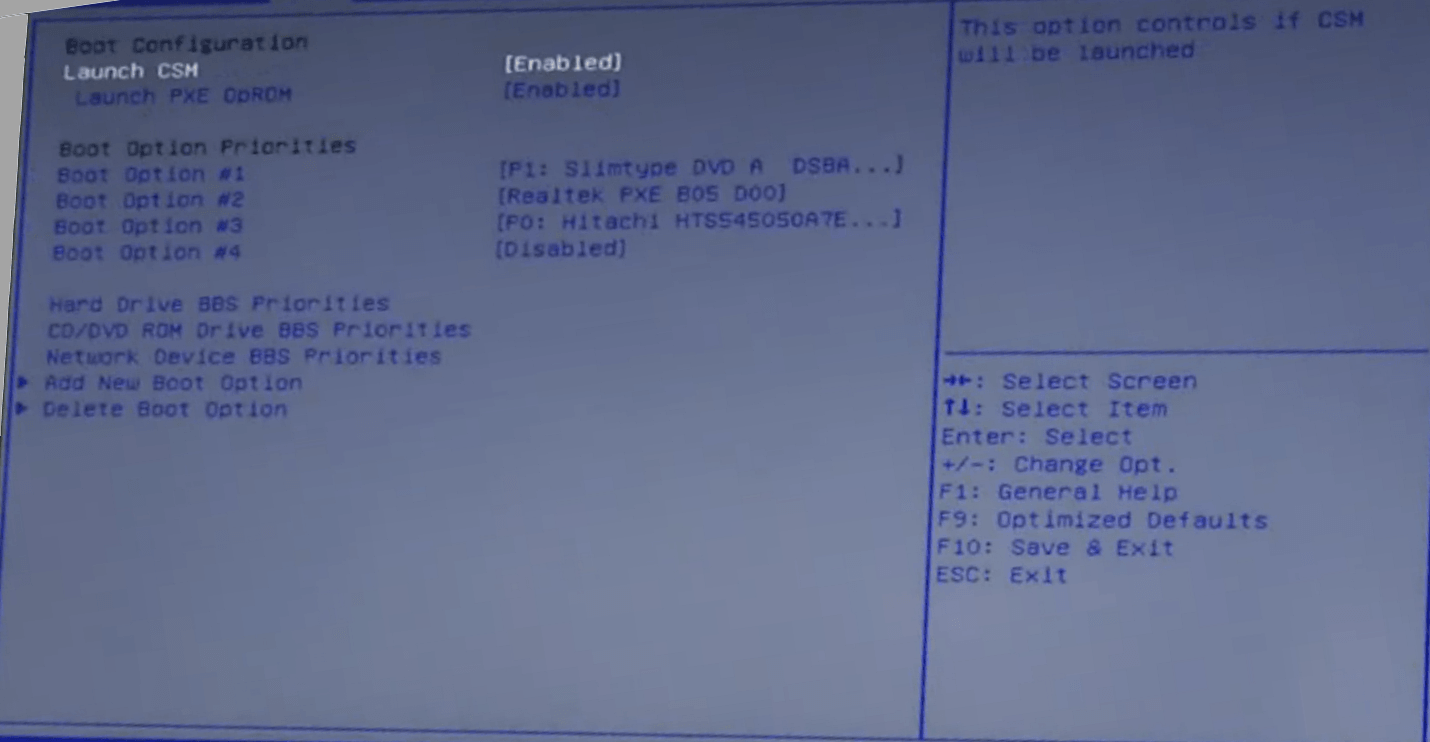
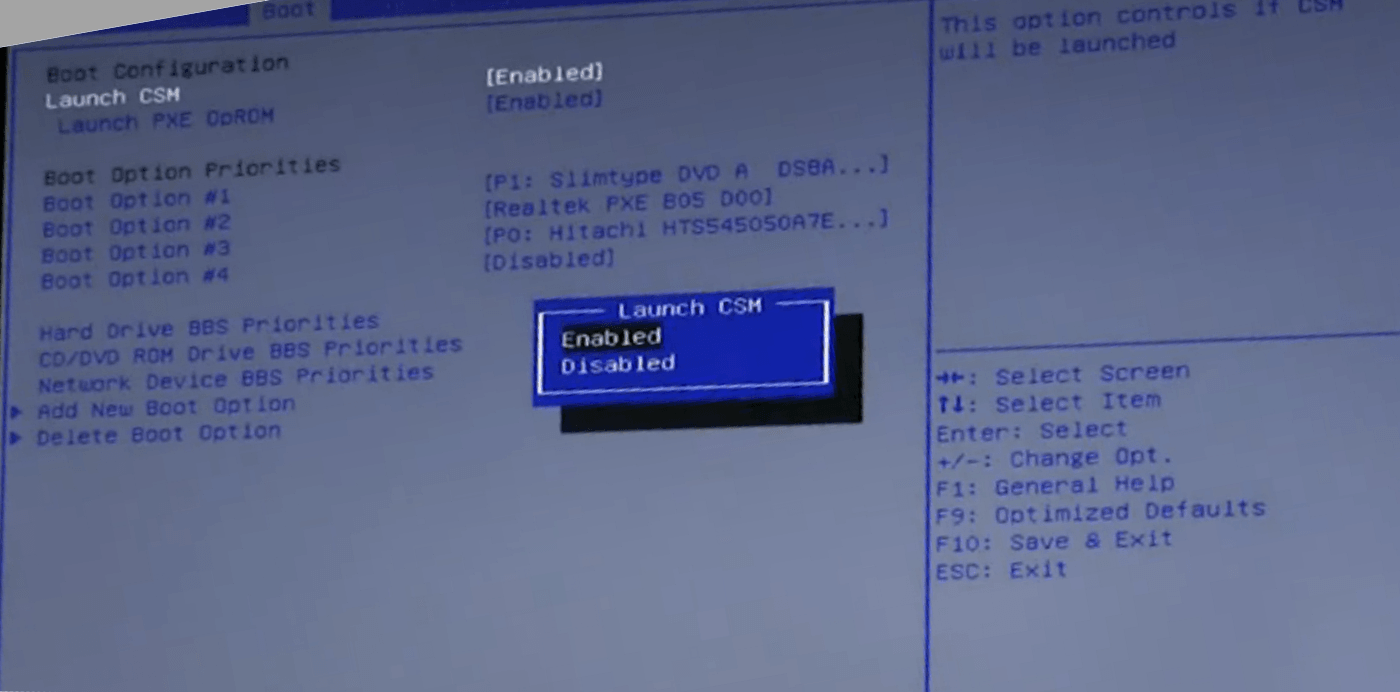
Have ENABLED CSM?

How to ENABLE CSM.

ASUSTeK Computer Inc. -Support- Windows 8 Support Information

ASUS said:
How do I boot to DOS with USB Flash drive or USB CD-ROM?
Solution

Enter the BIOS setup menu by pressing and holding F2 key when powering on.
Switch to "Boot" and set “Lunch CSM” to Enabled.
Switch to "Security" and set "Secure Boot Control" to Disabled.
Press F10 to save and exit.
Press and hold ESC key to lunch boot menu when the notebook restarts.
 

My Computer

System One

  • OS
    ME, XP,Vista,Win7,Win8,Win8.1
    Computer type
    PC/Desktop
    Other Info
    Notebooks x 3

    Desktops x 5

    Towers x 4
Greg

Is it formatted in FAT32, If YES, just do Step 11.
 

My Computer

System One

  • OS
    ME, XP,Vista,Win7,Win8,Win8.1
    Computer type
    PC/Desktop
    Other Info
    Notebooks x 3

    Desktops x 5

    Towers x 4

My Computer

System One

  • OS
    64-bit Windows 10
    Computer type
    PC/Desktop
    System Manufacturer/Model
    Custom self built
    CPU
    Intel i7-8700K OC'd to 5 GHz
    Motherboard
    ASUS ROG Maximus XI Formula Z390
    Memory
    64 GB (4x16GB) G.SKILL TridentZ RGB DDR4 3600 MHz (F4-3600C18D-32GTZR)
    Graphics Card(s)
    ASUS ROG-STRIX-GTX1080TI-O11G-GAMING
    Sound Card
    Integrated Digital Audio (S/PDIF)
    Monitor(s) Displays
    2 x Samsung Odyssey G7 27"
    Screen Resolution
    2560x1440
    Hard Drives
    1TB Samsung 990 PRO M.2,
    4TB Samsung 990 PRO PRO M.2,
    8TB WD MyCloudEX2Ultra NAS
    PSU
    OCZ Series Gold OCZZ1000M 1000W
    Case
    Thermaltake Core P3
    Cooling
    Corsair Hydro H115i
    Keyboard
    Logitech wireless K800
    Mouse
    Logitech MX Master 3
    Internet Speed
    1 Gb/s Download and 35 Mb/s Upload
    Browser
    Internet Explorer 11
    Antivirus
    Malwarebyte Anti-Malware Premium
    Other Info
    Logitech Z625 speaker system,
    Logitech BRIO 4K Pro webcam,
    HP Color LaserJet Pro MFP M477fdn,
    APC SMART-UPS RT 1000 XL - SURT1000XLI,
    Galaxy S23 Plus phone
Do I need CSM for Win7 dual boot even if I am using UEFI install method? I thought it was for Legacy BIOS only. Is this because of using a flash stick for install? It looks like it.

Man I never thought I'd need to go back to FAT32 fomatting. Are you sure this is progress? :think:

Oh well it should work on Legacy too. I can just copy all my files off and back on anyway.

I am wanting to keep the factory preinstalled 8 for the 15-day trial period on this laptop because of assurances the optimization done for 8 will compensate for the bloatware, but you know me so I'm already scheming to multi-boot an 8 Clean Install as soon as I do 7.

But I just can't handle Metro even after promising an open mind, so I've already got Win7StartforWIn8 installed.
 

My Computer

System One

  • OS
    Win7
Greg

What options do you have in CSM, UEFI or UEFI & Legacy is needed.


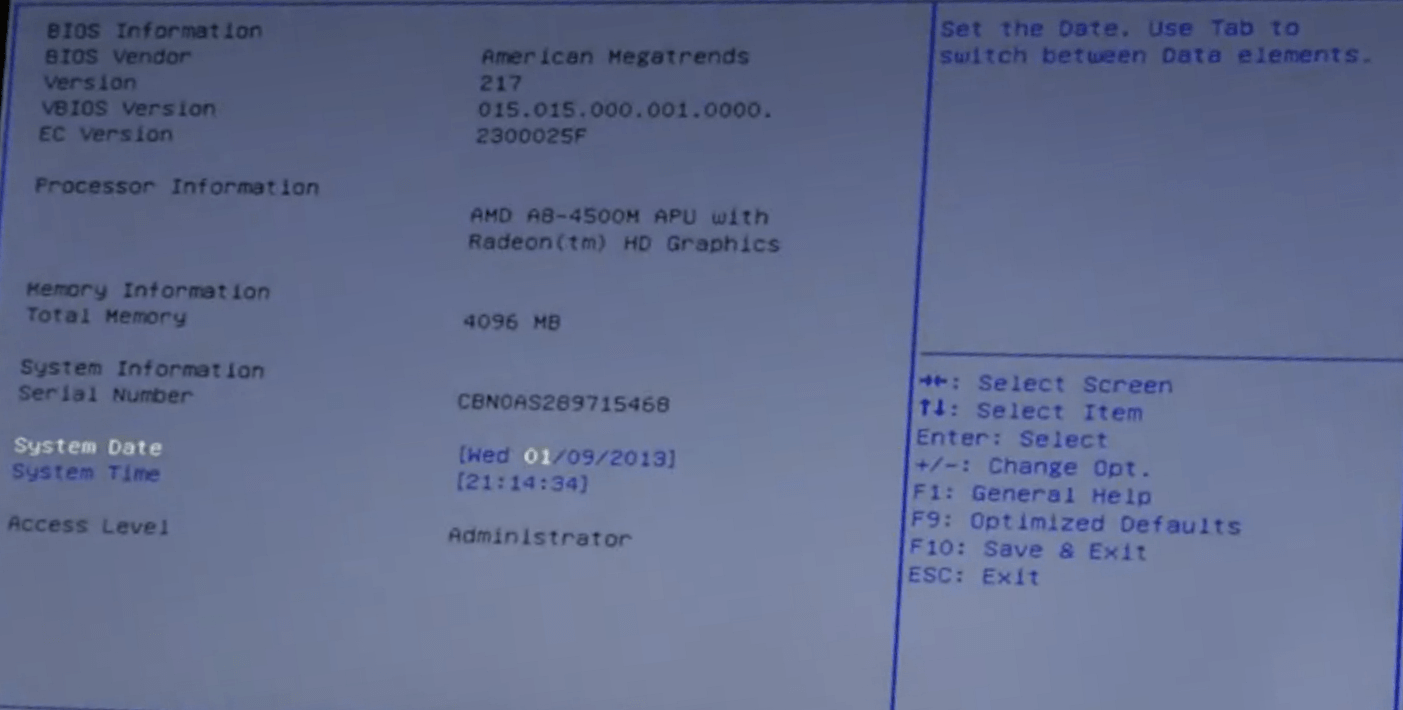
Found some Asus K55N screenshots, but not options in CSM.


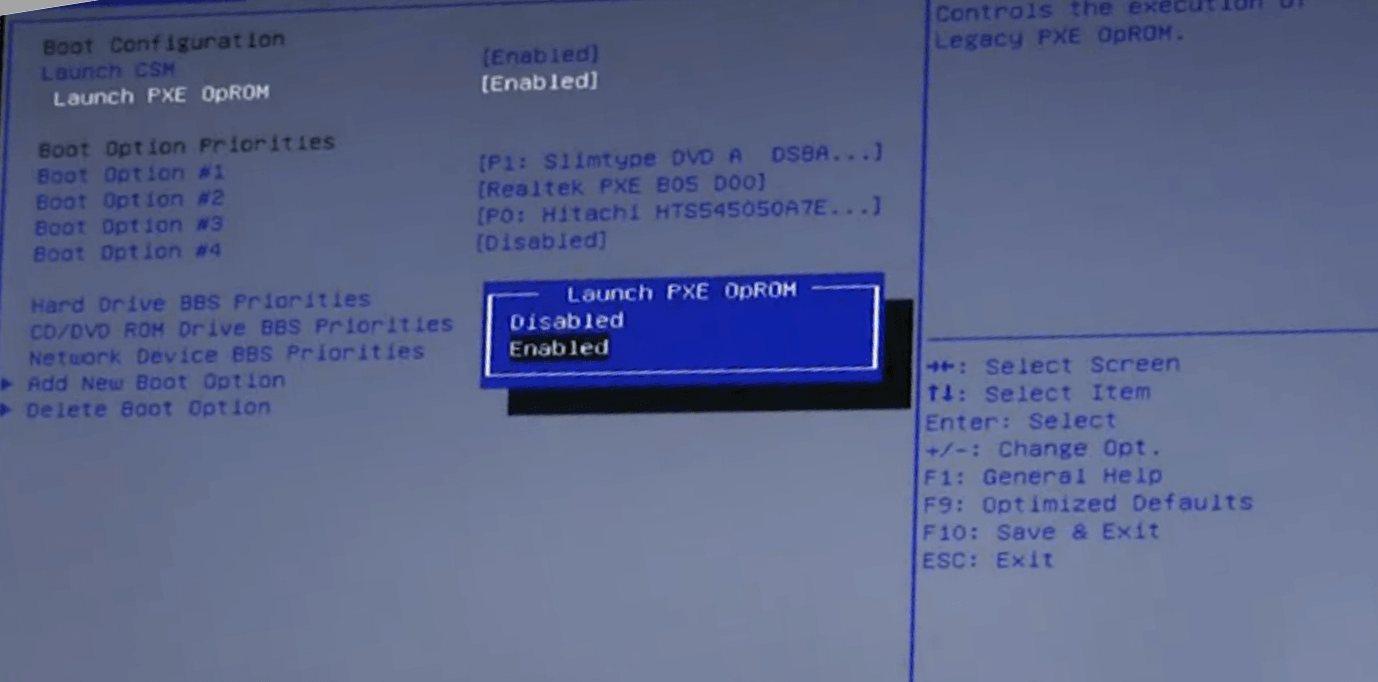
ENABLE CSM

ENABLE PXE OpROM

ENABLE Secure Boot

Asus001-1.png
Asus002-2.png
Asus003-3.png
Asus004-4.png
Asus005-5.png
 

My Computer

System One

  • OS
    ME, XP,Vista,Win7,Win8,Win8.1
    Computer type
    PC/Desktop
    Other Info
    Notebooks x 3

    Desktops x 5

    Towers x 4
Thanks Ray. What's buggin me now is that nothing in the Manuals refers to the 16gb Recovery Drive it offers to make under Recovery. I went ahead and sacrificed my installer stick for this since i have others, and it confirms it is copying the Recovery partition, but I can't find anything on the web about how this is run to recover to Factory condition.

I assume its bootable since it formats the stick wiping everything out. Anyone familar with it? I wonder why Asus keeps it such a big secret.
 

My Computer

System One

  • OS
    Win7
Greg

Reinstall is based on RESET.

This is a tutorial by Lenovo using the Windows 8 USB Drive Recovery app.

Methodology to create Recovery Media and reload a Lenovo Think system with Microsoft Windows 8 preload


Lenovo said:
NOTE: From this point forward in the recovery process, the choices for actual operating system recovery depend on the existing state of the computer hard drive.

Below are the instructions if there is an existing Microsoft Windows 8 install on the hard drive.
1.Select the target operating system of Microsoft Windows 8 to reload over existing Lenovo preload.
2.Select "Yes" to repartition the drives or "No" to keep existing partitions. For a clean install, the drives should be repartitioned.
3.Select "Fully Clean the drive".
4.Click Reset to begin the process.
5.The reset/recovery process takes approximately 90 minutes.
6.Once the reset/recovery is complete, the system will reboot into Microsoft Windows 8.

Below are the instructions if the hard drive is blank.
1.Select "Yes" to repartition the HDD or "No" to keep the existing partitions.
2.Click either choice, but these instructions follow the repartition scenario.
3.Select "Fully Clean the drive" as this will take several minutes to complete.
4.Click Reset to begin the process.
5.The reset/recovery process takes approximately 90 minutes.
6.Once the reset/recovery is complete, the system will reboot into Microsoft Windows 8.
 

My Computer

System One

  • OS
    ME, XP,Vista,Win7,Win8,Win8.1
    Computer type
    PC/Desktop
    Other Info
    Notebooks x 3

    Desktops x 5

    Towers x 4
I ran Reset to test it and it did a full Factory Recovery. What I still don't understand is how the Recovery USB drive fits in since it won't boot even under CSM or UEFI.

Also above it gives steps for if the HD is blank. But where does it get the Factory Image then if the Recov partiiton is gone from the HD? If it's still using Reset how does it tap the image on the stick?

I am rewriting the stick again to see if I can get it to boot. Will also check if Reset will pick it up.
 

My Computer

System One

  • OS
    Win7
Basically the factory recovery is a reset like in the tutorial below. A Reset can be done from within Windows or Winre at boot.

http://www.eightforums.com/tutorials/2302-reset-windows-8-a.html


When you start to do a Reset, Windows will automatically look for connected installation media. If you don't have the recovery USB connected, then Windows will prompt for you to connect it or installation media to be able to start the Reset.
 

My Computer

System One

  • OS
    64-bit Windows 10
    Computer type
    PC/Desktop
    System Manufacturer/Model
    Custom self built
    CPU
    Intel i7-8700K OC'd to 5 GHz
    Motherboard
    ASUS ROG Maximus XI Formula Z390
    Memory
    64 GB (4x16GB) G.SKILL TridentZ RGB DDR4 3600 MHz (F4-3600C18D-32GTZR)
    Graphics Card(s)
    ASUS ROG-STRIX-GTX1080TI-O11G-GAMING
    Sound Card
    Integrated Digital Audio (S/PDIF)
    Monitor(s) Displays
    2 x Samsung Odyssey G7 27"
    Screen Resolution
    2560x1440
    Hard Drives
    1TB Samsung 990 PRO M.2,
    4TB Samsung 990 PRO PRO M.2,
    8TB WD MyCloudEX2Ultra NAS
    PSU
    OCZ Series Gold OCZZ1000M 1000W
    Case
    Thermaltake Core P3
    Cooling
    Corsair Hydro H115i
    Keyboard
    Logitech wireless K800
    Mouse
    Logitech MX Master 3
    Internet Speed
    1 Gb/s Download and 35 Mb/s Upload
    Browser
    Internet Explorer 11
    Antivirus
    Malwarebyte Anti-Malware Premium
    Other Info
    Logitech Z625 speaker system,
    Logitech BRIO 4K Pro webcam,
    HP Color LaserJet Pro MFP M477fdn,
    APC SMART-UPS RT 1000 XL - SURT1000XLI,
    Galaxy S23 Plus phone
Hello Gregor, and welcome to Eight Forums.

No worries. If your motherboard doesn't have UEFI firmware, then you won't have Secure Boot either. :)
 

My Computer

System One

  • OS
    64-bit Windows 10
    Computer type
    PC/Desktop
    System Manufacturer/Model
    Custom self built
    CPU
    Intel i7-8700K OC'd to 5 GHz
    Motherboard
    ASUS ROG Maximus XI Formula Z390
    Memory
    64 GB (4x16GB) G.SKILL TridentZ RGB DDR4 3600 MHz (F4-3600C18D-32GTZR)
    Graphics Card(s)
    ASUS ROG-STRIX-GTX1080TI-O11G-GAMING
    Sound Card
    Integrated Digital Audio (S/PDIF)
    Monitor(s) Displays
    2 x Samsung Odyssey G7 27"
    Screen Resolution
    2560x1440
    Hard Drives
    1TB Samsung 990 PRO M.2,
    4TB Samsung 990 PRO PRO M.2,
    8TB WD MyCloudEX2Ultra NAS
    PSU
    OCZ Series Gold OCZZ1000M 1000W
    Case
    Thermaltake Core P3
    Cooling
    Corsair Hydro H115i
    Keyboard
    Logitech wireless K800
    Mouse
    Logitech MX Master 3
    Internet Speed
    1 Gb/s Download and 35 Mb/s Upload
    Browser
    Internet Explorer 11
    Antivirus
    Malwarebyte Anti-Malware Premium
    Other Info
    Logitech Z625 speaker system,
    Logitech BRIO 4K Pro webcam,
    HP Color LaserJet Pro MFP M477fdn,
    APC SMART-UPS RT 1000 XL - SURT1000XLI,
    Galaxy S23 Plus phone
What issue are you having?

Does it say you have secure boot enabled (true) in step 1 and 2 in that tutorial?

If true, the you would want to disable secure boot by using step 3 in that tutorial.
 

My Computer

System One

  • OS
    64-bit Windows 10
    Computer type
    PC/Desktop
    System Manufacturer/Model
    Custom self built
    CPU
    Intel i7-8700K OC'd to 5 GHz
    Motherboard
    ASUS ROG Maximus XI Formula Z390
    Memory
    64 GB (4x16GB) G.SKILL TridentZ RGB DDR4 3600 MHz (F4-3600C18D-32GTZR)
    Graphics Card(s)
    ASUS ROG-STRIX-GTX1080TI-O11G-GAMING
    Sound Card
    Integrated Digital Audio (S/PDIF)
    Monitor(s) Displays
    2 x Samsung Odyssey G7 27"
    Screen Resolution
    2560x1440
    Hard Drives
    1TB Samsung 990 PRO M.2,
    4TB Samsung 990 PRO PRO M.2,
    8TB WD MyCloudEX2Ultra NAS
    PSU
    OCZ Series Gold OCZZ1000M 1000W
    Case
    Thermaltake Core P3
    Cooling
    Corsair Hydro H115i
    Keyboard
    Logitech wireless K800
    Mouse
    Logitech MX Master 3
    Internet Speed
    1 Gb/s Download and 35 Mb/s Upload
    Browser
    Internet Explorer 11
    Antivirus
    Malwarebyte Anti-Malware Premium
    Other Info
    Logitech Z625 speaker system,
    Logitech BRIO 4K Pro webcam,
    HP Color LaserJet Pro MFP M477fdn,
    APC SMART-UPS RT 1000 XL - SURT1000XLI,
    Galaxy S23 Plus phone
So if we don't have UEFI, how does one enable Secure Boot?

Hello Gregor, and welcome to Eight Forums.

No worries. If your motherboard doesn't have UEFI firmware, then you won't have Secure Boot either. :)

Hi Brink, thanks for the quick reply,

So I am trying to downgrade Windows 8 to 7 and I'm following this guide: http://www.eightforums.com/tutorials/13326-downgrade-windows-8-windows-7-a.html

Do you have a new PC with Windows 8 Pre-installed?
 

My Computer

System One

  • OS
    ME, XP,Vista,Win7,Win8,Win8.1
    Computer type
    PC/Desktop
    Other Info
    Notebooks x 3

    Desktops x 5

    Towers x 4
Back
Top