Refresh Windows 8 - Set a Custom Recovery Image as Active

How to Set a Custom Recovery Image as Active to Use to Refresh Windows 8 and 8.1


information   Information
A custom recovery image contains the desktop apps you've installed, and the Windows system files in their current state. Recovery images do not contain your documents, personal settings, user profiles, or apps from Windows Store, because that information is preserved and included at the time you refresh your PC by default.

When you create a custom recovery image, recimg will store it in the specified directory, and set it as the active recovery image. If a custom recovery image is set as the active recovery image, Windows will use it when you refresh your PC. You can use the /setcurrent and /deregister options to select which recovery image Windows 8 will use. All recovery images have the filename CustomRefresh.wim. If no CustomRefresh.wim file is found in the active recovery image directory, Windows will fall back to the default image (or to installation media) when you refresh your PC.

This tutorial will show you how to set the active recovery image to use the CustomRefresh.wim file from any previously created custom recovery image of your choice to use when you refresh Windows 8.

You must be signed in as an administrator to be able to do the steps in this tutorial.


Here's How:


1. Open an elevated command prompt.

2. In the elevated command prompt, type the command below and press Enter. (see screenshot below)
NOTE: Substitute Full Path of Directory in the command below with the actual directory (folder) name within quotes that the CustomRefresh.wim file from where an already created custom recovery image is saved at.
recimg /setcurrent "Full Path of Directory"
For example: If I created a custom recovery image to the E:\RefreshImage directory (folder), I would type the command below exactly and press Enter.​
recimg /setcurrent "E:\RefreshImage"
Set_Active_Recovery_Image.jpg


3. When successfully completed, Windows 8 is now set and registered to use this current active custom recovery image when you refresh Windows 8.

4. You can now close the elevated command prompt if you like.


Note   Note
To unregister this custom recovery image for refresh to have Windows 8 go back to using it's default refresh, see:

How to Deregister the Current Custom Recovery Image to Refresh Windows 8


That's it,
Shawn


Attachments

  • Windows_Diagnosis_and_Recovery.png
    Windows_Diagnosis_and_Recovery.png
    12.4 KB · Views: 372
Last edited by a moderator:
No worries. Usually, programs are installed in the "Program files" folder, but the user settings for the program are often store in a folder bearing the program's name in the user's %AppData% folder.

Programs often have files scattered in various locations on the hard drive, and entries in the registry.
 

My Computer

System One

  • OS
    64-bit Windows 10
    Computer type
    PC/Desktop
    System Manufacturer/Model
    Custom self built
    CPU
    Intel i7-8700K OC'd to 5 GHz
    Motherboard
    ASUS ROG Maximus XI Formula Z390
    Memory
    64 GB (4x16GB) G.SKILL TridentZ RGB DDR4 3600 MHz (F4-3600C18D-32GTZR)
    Graphics Card(s)
    ASUS ROG-STRIX-GTX1080TI-O11G-GAMING
    Sound Card
    Integrated Digital Audio (S/PDIF)
    Monitor(s) Displays
    2 x Samsung Odyssey G7 27"
    Screen Resolution
    2560x1440
    Hard Drives
    1TB Samsung 990 PRO M.2,
    4TB Samsung 990 PRO PRO M.2,
    8TB WD MyCloudEX2Ultra NAS
    PSU
    OCZ Series Gold OCZZ1000M 1000W
    Case
    Thermaltake Core P3
    Cooling
    Corsair Hydro H115i
    Keyboard
    Logitech wireless K800
    Mouse
    Logitech MX Master 3
    Internet Speed
    1 Gb/s Download and 35 Mb/s Upload
    Browser
    Internet Explorer 11
    Antivirus
    Malwarebyte Anti-Malware Premium
    Other Info
    Logitech Z625 speaker system,
    Logitech BRIO 4K Pro webcam,
    HP Color LaserJet Pro MFP M477fdn,
    APC SMART-UPS RT 1000 XL - SURT1000XLI,
    Galaxy S23 Plus phone
Excellent article Series on this.
I have 7 Lenovo Thinkpad Yoga S2 20CD's and they were Not imaging the traditional way.
This turned out to be better, faster and has a smaller image.
I just put the refreshImage on a 16gb thumbdrive and installed everything (MS Office, Browsers, Apps and very custom settings for our network/domain)
THANKS!!!!
 

My Computer

System One

  • OS
    Win 7 - Win 8.1, Android, Chromebooks (ugh Macs)
    Computer type
    Tablet
    System Manufacturer/Model
    Lenovo Tpad Yoga S2 20CD Active Digital Pen
    Browser
    FireFox, Chrome, IE 11
    Antivirus
    Trend
Hello Phil, and welcome to Eight Forums. I'm glad it was able to help. :)
 

My Computer

System One

  • OS
    64-bit Windows 10
    Computer type
    PC/Desktop
    System Manufacturer/Model
    Custom self built
    CPU
    Intel i7-8700K OC'd to 5 GHz
    Motherboard
    ASUS ROG Maximus XI Formula Z390
    Memory
    64 GB (4x16GB) G.SKILL TridentZ RGB DDR4 3600 MHz (F4-3600C18D-32GTZR)
    Graphics Card(s)
    ASUS ROG-STRIX-GTX1080TI-O11G-GAMING
    Sound Card
    Integrated Digital Audio (S/PDIF)
    Monitor(s) Displays
    2 x Samsung Odyssey G7 27"
    Screen Resolution
    2560x1440
    Hard Drives
    1TB Samsung 990 PRO M.2,
    4TB Samsung 990 PRO PRO M.2,
    8TB WD MyCloudEX2Ultra NAS
    PSU
    OCZ Series Gold OCZZ1000M 1000W
    Case
    Thermaltake Core P3
    Cooling
    Corsair Hydro H115i
    Keyboard
    Logitech wireless K800
    Mouse
    Logitech MX Master 3
    Internet Speed
    1 Gb/s Download and 35 Mb/s Upload
    Browser
    Internet Explorer 11
    Antivirus
    Malwarebyte Anti-Malware Premium
    Other Info
    Logitech Z625 speaker system,
    Logitech BRIO 4K Pro webcam,
    HP Color LaserJet Pro MFP M477fdn,
    APC SMART-UPS RT 1000 XL - SURT1000XLI,
    Galaxy S23 Plus phone

My Computer

System One

  • OS
    Windows 8.1 Single Language
    Computer type
    Laptop
    System Manufacturer/Model
    Dell Inspiron 3521
    CPU
    Processor Intel(R) Core(TM) i3-3217U CPU @ 1.80GHz, 1801 Mhz, 2 Core(s), 4 Logical Processor(s)
    Motherboard
    Intel
    Memory
    4 Gigabytes
    Graphics Card(s)
    Intel(R) HD Graphics 4000
    Sound Card
    Realtek High Definition Audio
    Screen Resolution
    1366 x 768
    Hard Drives
    One, 500 Gigabytes
    Mouse
    Touchpad
    Internet Speed
    4 megabits per second
    Browser
    Internet Explorer (Latest) and Google Chrome (Default)
    Antivirus
    Avast! Free Antivirus
RecImg Manager provides unlimited operating system and application imaging - including all system files and installed software - in a matter of minutes with no document loss and a tiny image footprint.

Only the Windows 8 operating system and applications are imaged and refreshed: files such as video, music, & personal documents remain intact. No personal documents are erased during restore and recovery.

Store OS and Application images on primary as well as external or networked storage or devices

Looks good !


:)
 

My Computer

System One

  • OS
    Windows 10.0.10122
    Computer type
    PC/Desktop
    System Manufacturer/Model
    My Build - Vorttex Ultimate
    CPU
    Core i7 @ 4500 MHz
    Motherboard
    ASUS Z87-Plus
    Memory
    32GB DDR3 @ 1822 MHz (OC)
    Graphics Card(s)
    Radeon R9 280X 3GB @ 1180 / 6800 MHz
    Sound Card
    7.1 HDA
    Monitor(s) Displays
    LCD LG 22" + CRT LG 17"
    Screen Resolution
    1760 x 1320 / 1280 x 960
    Hard Drives
    1 x 240 GB SSD (System)
    3 x 500 GB HDD (Data/Media)
    1 x 2000 GB e-HDD (Backup)
    PSU
    ThermalTake 1000W PSU
    Case
    Corsair Carbide R300
    Cooling
    Corsair H60 (Push-Pull)
    Keyboard
    Microsoft Wireless Keyboard
    Mouse
    Microsoft Wireless Mouse
    Internet Speed
    60 Mbps (Down) 5 Mbps (Up)
    Browser
    IE, FF, Chrome
    Antivirus
    AVG Internet Security 2015
    Other Info
    Some wired stuff
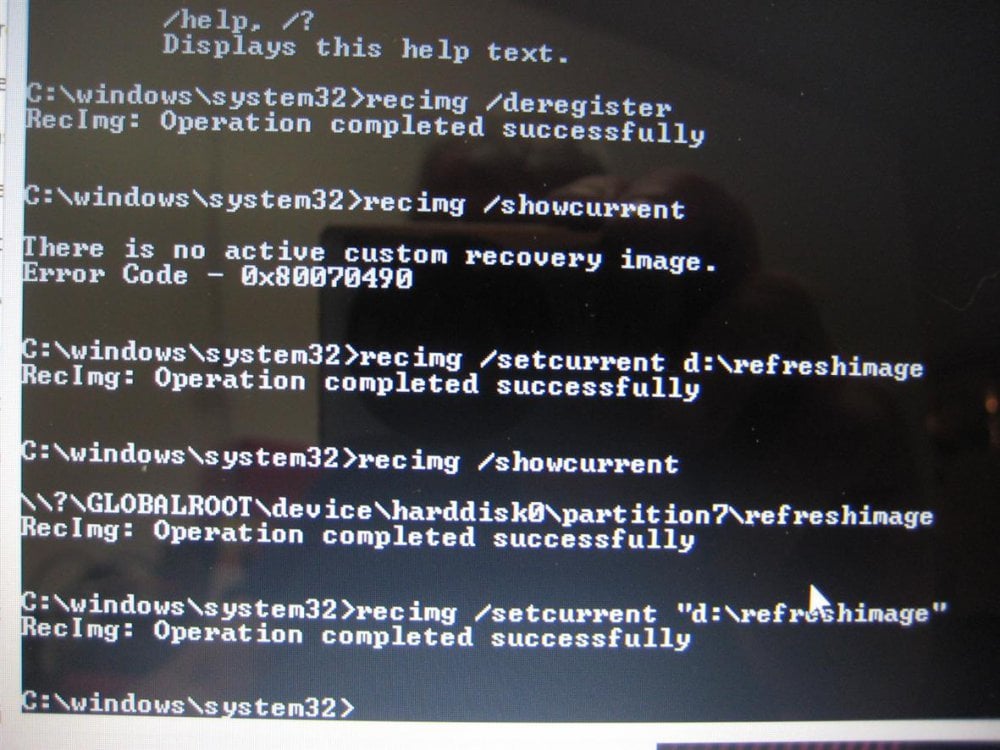
Anyone have any ideas on this? I successfully created, validated and set a custom Win8 image to the D partition. But a dry run attempt to refresh or reset from it fails. When setting the image, recimg says it's on partition7, yet I only see 6 partitions on the disk. But it wouldn't call it a success if that were a problem, right?

Stuck...

I tried to Reset after a hard Restart, and this time got an error number: 80070490

EDIT: I'm having a problem with the jpg attachment showing in preview but not on the forum. Here's an external link:


IMG_0002.JPG
 
Last edited by a moderator:

My Computer

System One

  • OS
    Linux Lite 3.2 x64
    Computer type
    PC/Desktop
    System Manufacturer/Model
    Dell T3500
    Memory
    6GB
from a command prompt(admin)

type> recimg /showcurrent

that will tell you where and what folder it is looking for the custom refresh image
 

My Computer

System One

  • OS
    Windows 3.1 > Windows 10
    Computer type
    PC/Desktop
    System Manufacturer/Model
    Dell XPS 8700
    CPU
    I7
    Memory
    24 GB
Please see my linked photo.
 

My Computer

System One

  • OS
    Linux Lite 3.2 x64
    Computer type
    PC/Desktop
    System Manufacturer/Model
    Dell T3500
    Memory
    6GB
recimg /deregister

recimg /setcurrent d:\refreshimage

which means recimg is looking for the "customrefresh" image in the refreshimage folder on drive D
 

My Computer

System One

  • OS
    Windows 3.1 > Windows 10
    Computer type
    PC/Desktop
    System Manufacturer/Model
    Dell XPS 8700
    CPU
    I7
    Memory
    24 GB
Thanks, Shawn, for attaching that image. Wondering what I did wrong.

KYHI - how does that differ from what I did?
 

My Computer

System One

  • OS
    Linux Lite 3.2 x64
    Computer type
    PC/Desktop
    System Manufacturer/Model
    Dell T3500
    Memory
    6GB
recimg /deregister

recimg /setcurrent d:\refreshimage

which means recimg is looking for the "customrefresh" image in the refreshimage folder on drive D

thank shawn - don't have to flip back
 

My Computer

System One

  • OS
    Windows 3.1 > Windows 10
    Computer type
    PC/Desktop
    System Manufacturer/Model
    Dell XPS 8700
    CPU
    I7
    Memory
    24 GB
I think the problem was SmartScreen was set to its max position.
 

My Computer

System One

  • OS
    Linux Lite 3.2 x64
    Computer type
    PC/Desktop
    System Manufacturer/Model
    Dell T3500
    Memory
    6GB
Change in Windows 8.1 from 8.0 for recimg.exe

I have been following the post and it seems as if recimg.exe in Windows 8.1 works different than Windows 8. It now doesn't backup the two hidden files pagefile.sys and swapfile.sys. Which is good because Windows creates these two files on startup. It does backup hiberfil.sys which can be deleted and windows restores this file also at startup. I use this script to turn off hiberfil.sys so it isn't included in the CustomRefresh.wim

(In elevated command Prompt box in Windows)
powercfg -h off
recimg /showcurrent
//recimg /deregister
recimg -CreateImage D:\RefreshImage\Image1
powercfg -h on
//recimg /setcurrent D:\RefreshImage\?
(In elevated command Prompt box in WinPe) (Drive letter might change in PE, Check first!!!)
Dism /Capture-Image /ImageFile:"D:\Original_Win\install.wim" /CaptureDir:C:\ /Name:"Windows8.1_x64_Pro"
(In elevated command Prompt box in Windows)
C:\Windows\System32\reagentc /setosimage /path D:\Original_Win /target C:\Windows /index 1

After installing windows for the first time and windows finishes I customize anything without adding any additional programs
except for old windows components like Windows 7 games. I then do the above steps to have a complete install.wim. I do delete
the three hidden files and do an advance clean. The install.wim is about 5 gigabits, the original install.wim is about 3.5 gig in the
64 bit windows 8.1.

One thing I am unable to figure out is how to have the different partitions named Recovery instead of Primary Partition.
I use these command to view the description of the Partitions.
Diskpart
lis dis
sel dis 0
lis par
sel par 1
det par
 

My Computer

System One

  • OS
    Windows 8.1 64 bit
    Computer type
    Laptop
SET ID
GPT ATTRIBUTES
 

My Computer

System One

  • OS
    Windows 3.1 > Windows 10
    Computer type
    PC/Desktop
    System Manufacturer/Model
    Dell XPS 8700
    CPU
    I7
    Memory
    24 GB
Commands

SET ID
GPT ATTRIBUTES

This it what it shows.
Code:
C:\WINDOWS\system32>Diskpart


Microsoft DiskPart version 6.3.9600


Copyright (C) 1999-2013 Microsoft Corporation.
On computer: ABLE_ENTERPRISE


DISKPART> sel dis 0


Disk 0 is now the selected disk.


DISKPART> lis par


  Partition ###  Type              Size     Offset
  -------------  ----------------  -------  -------
  Partition 1    Primary            350 MB  1024 KB
  Partition 2    Primary            130 GB   351 MB
  Partition 3    Primary             66 GB   130 GB
  Partition 4    Primary            734 GB   196 GB


DISKPART> sel par 1


Partition 1 is now the selected partition.


DISKPART> det par


Partition 1
Type  : 07
Hidden: No
Active: Yes
Offset in Bytes: 1048576


  Volume ###  Ltr  Label        Fs     Type        Size     Status     Info
  ----------  ---  -----------  -----  ----------  -------  ---------  --------
* Volume 1         System Rese  NTFS   Partition    350 MB  Healthy    System


DISKPART> SET ID


The arguments specified for this command are not valid.
For more information on the command type: HELP SETID


DISKPART> GPT ATTRIBUTES


The arguments specified for this command are not valid.
For more information on the command type: HELP GPT
 

My Computer

System One

  • OS
    Windows 8.1 64 bit
    Computer type
    Laptop
You have MBR partitions - your windows recovery tools and boot manager files are on partition.

Nothing wrong with your disk layout as the partition is a primary
 

My Computer

System One

  • OS
    Windows 3.1 > Windows 10
    Computer type
    PC/Desktop
    System Manufacturer/Model
    Dell XPS 8700
    CPU
    I7
    Memory
    24 GB
I have successfully created and set a recovery image following this tutorial but have some questions.

My system is a self build and I used a Windows 8.1 full install disc to install the OS, so not an 8.1 upgrade from 8.

As my system is non OEM it initially did not have any form of Recovery Image, which I have now rectified.

My system drive is C:\ & currently the Recovery Image is located in the folder C:\RefreshImage as per this tutorial.

Can I create a separate partition on my C:\ drive, for instance, giving this new partition the drive letter D and then create the Recovery Image to reside there within the RefreshImage folder?

Whenever there comes a time that I needed to use my Recovery Drive to refresh my PC, would it automatically find the Image located elsewhere other than the default C:\RefreshImage folder?

This may sound like pretty basic questions and I am fairly certain that I already know the answer but over many years of messing around with PCs, I have learnt never to take anything for granted, especially when you need to rely on it.

This bring me to another set of questions.

My wife has a laptop that came preinstalled with Windows 8 and I upgraded it OTA to 8.1 some time ago.

A couple of weeks ago the laptop developed a fault, eventually it turned out to be HDD failure but at the time I did not know this.
Because the laptop only came with the Drivers disc and no form of OS discs I had to purchase them direct from the manufacturer at a pretty penny of course :huh:

After umptine reboots I managed to get the first of the system recovery discs to run and was surprised that it informed me that the recovery would revert the laptop back to Windows 8, not surprised that it would wipe all the data off at the same time though.

After this disc failed to proceed any further and also spewed out an error, it was at this time I correctly suspected HDD failure.

Jumping ahead a bit, got a new HDD and reinstalled OS from manufacturers recovery discs all fine and dandy, reupdated to 8.1.

I want to save myself grief and hard work in the future by creating an image of the laptop as it is now & making a Recovery Drive for it.

So, if I used the procedure outlined in this tutorial to create a Recovery Image on this laptop and then created a Recovery Drive, plus I would also create a System Image, could I side step the need to revert to W8?

If there was a need in the future to replace the HDD, could I use the files created above to do a full install back to the state when the System Image was taken?

Regards..,
 

My Computer

System One

  • OS
    Windows 8.1
    Computer type
    PC/Desktop
    System Manufacturer/Model
    Self Build
    CPU
    AMD FX-8350
    Motherboard
    ASUS Crosshair V Formula-Z
    Memory
    2x Kingston KHX1866C9D3/8GX
    Graphics Card(s)
    ASUS ROG Matrix R9 290X Platinum
    Sound Card
    On Board
    Monitor(s) Displays
    ASUS MX279
    Screen Resolution
    1920x1080
    Hard Drives
    1x WD1003FZEX - System Drive
    2x WD10EZRX - Storage Pool Drives
    2x WD20EZRX - Storage Pool Drives
    1x WD10EZEX - System Image Drive
    1x WD Elements 1TB USB 3.0 - Network Attached Drive
    PSU
    Corsair CP-9020073 Professional Platinum Series HX850i
    Case
    Cooler Master HAF932 Advanced
    Cooling
    Phanteks PH-TC14PE CPU Cooler - Red + 3rd Fan
    Keyboard
    Corsair Gaming CH-9000062 CGK95 RGB MX Cherry Brown
    Mouse
    Corsair Gaming CH-9000070 M65 RGB
    Browser
    Chrome
    Antivirus
    Windows Defender
    Other Info
    Trust GXT 638 2.1 Digital Gaming Speaker
    Corsair CH-9000084-WWCGMM600 Standard Dual Sided Aluminium Gaming Surface Pad
    Hornettek Enterprise 4X II Quad-bay 20 TB Capacity
    LG BH16NS40.AUAR10B 16x SATA Internal BD-RW
    LG DVD-RW GH24NSB0 Optical Drive
    BitFenix SuperSpeed Card Reader USB 3.0
    Silverstone PCI Express Card w/ Dual Internal 19pin Connectors SST-ECU01
Hello 1CM69,

Answers inline. :)


Can I create a separate partition on my C:\ drive, for instance, giving this new partition the drive letter D and then create the Recovery Image to reside there within the RefreshImage folder?

Yes, you sure could.


Whenever there comes a time that I needed to use my Recovery Drive to refresh my PC, would it automatically find the Image located elsewhere other than the default C:\RefreshImage folder?

As long as the custom refresh image is registered and the drive it is on doesn't fail, the registered image should automatically be used whenever you do a refresh.


So, if I used the procedure outlined in this tutorial to create a Recovery Image on this laptop and then created a Recovery Drive, plus I would also create a System Image, could I side step the need to revert to W8?

If there was a need in the future to replace the HDD, could I use the files created above to do a full install back to the state when the System Image was taken?

A custom recovery image would restore Windows to exactly how it was when the image was created. You wouldn't need to install 8 and upgrade to 8.1.

Creating a system image in addition to a custom recovery image would be a good backup to have to be safe in case the custom recovery image couldn't be used for whatever reason. You wouldn't need to install 8 and upgrade to 8.1 with a system image as well since a system image would restore the hard drives to how they were when it was created.

If all else fails, you can also now download a 8.1 ISO file using OPTION ONE below, create a bootable Windows installation DVD/USB with the ISO, and do a direct clean install of 8.1. It will automatically detect and use the OEM key embedded in the UEFI firmware to activate Windows.

http://www.eightforums.com/tutorials/18309-windows-8-windows-8-1-iso-download-create.html

Hope this helps, :)
Shawn
 

My Computer

System One

  • OS
    64-bit Windows 10
    Computer type
    PC/Desktop
    System Manufacturer/Model
    Custom self built
    CPU
    Intel i7-8700K OC'd to 5 GHz
    Motherboard
    ASUS ROG Maximus XI Formula Z390
    Memory
    64 GB (4x16GB) G.SKILL TridentZ RGB DDR4 3600 MHz (F4-3600C18D-32GTZR)
    Graphics Card(s)
    ASUS ROG-STRIX-GTX1080TI-O11G-GAMING
    Sound Card
    Integrated Digital Audio (S/PDIF)
    Monitor(s) Displays
    2 x Samsung Odyssey G7 27"
    Screen Resolution
    2560x1440
    Hard Drives
    1TB Samsung 990 PRO M.2,
    4TB Samsung 990 PRO PRO M.2,
    8TB WD MyCloudEX2Ultra NAS
    PSU
    OCZ Series Gold OCZZ1000M 1000W
    Case
    Thermaltake Core P3
    Cooling
    Corsair Hydro H115i
    Keyboard
    Logitech wireless K800
    Mouse
    Logitech MX Master 3
    Internet Speed
    1 Gb/s Download and 35 Mb/s Upload
    Browser
    Internet Explorer 11
    Antivirus
    Malwarebyte Anti-Malware Premium
    Other Info
    Logitech Z625 speaker system,
    Logitech BRIO 4K Pro webcam,
    HP Color LaserJet Pro MFP M477fdn,
    APC SMART-UPS RT 1000 XL - SURT1000XLI,
    Galaxy S23 Plus phone
click on and find the size of the refresh image.. (customrefresh.wim)

Go to disk management and shrink C by the image size, plus 500MB ie 3.5GB image + .5GB = 4GB partition D

move the refresh folder to D and register the image again

recimg.exe /deregister

recimg.exe /setcurrent D:\refreshimage

If you want to hide the partition from windows - go into disk management and remove the D drive letter from D
 

My Computer

System One

  • OS
    Windows 3.1 > Windows 10
    Computer type
    PC/Desktop
    System Manufacturer/Model
    Dell XPS 8700
    CPU
    I7
    Memory
    24 GB
Hello 1CM69,

Answers inline. :)


Can I create a separate partition on my C:\ drive, for instance, giving this new partition the drive letter D and then create the Recovery Image to reside there within the RefreshImage folder?

Yes, you sure could.


Whenever there comes a time that I needed to use my Recovery Drive to refresh my PC, would it automatically find the Image located elsewhere other than the default C:\RefreshImage folder?

As long as the custom refresh image is registered and the drive it is on doesn't fail, the registered image should automatically be used whenever you do a refresh.


So, if I used the procedure outlined in this tutorial to create a Recovery Image on this laptop and then created a Recovery Drive, plus I would also create a System Image, could I side step the need to revert to W8?

If there was a need in the future to replace the HDD, could I use the files created above to do a full install back to the state when the System Image was taken?

A custom recovery image would restore Windows to exactly how it was when the image was created. You wouldn't need to install 8 and upgrade to 8.1.

Creating a system image in addition to a custom recovery image would be a good backup to have to be safe in case the custom recovery image couldn't be used for whatever reason. You wouldn't need to install 8 and upgrade to 8.1 with a system image as well since a system image would restore the hard drives to how they were when it was created.

If all else fails, you can also now download a 8.1 ISO file using OPTION ONE below, create a bootable Windows installation DVD/USB with the ISO, and do a direct clean install of 8.1. It will automatically detect and use the OEM key embedded in the UEFI firmware to activate Windows.

http://www.eightforums.com/tutorials/18309-windows-8-windows-8-1-iso-download-create.html

Hope this helps, :)
Shawn

click on and find the size of the refresh image.. (customrefresh.wim)

Go to disk management and shrink C by the image size, plus 500MB ie 3.5GB image + .5GB = 4GB partition D

move the refresh folder to D and register the image again

recimg.exe /deregister

recimg.exe /setcurrent D:\refreshimage

Perfect, thanks to you both.
 

My Computer

System One

  • OS
    Windows 8.1
    Computer type
    PC/Desktop
    System Manufacturer/Model
    Self Build
    CPU
    AMD FX-8350
    Motherboard
    ASUS Crosshair V Formula-Z
    Memory
    2x Kingston KHX1866C9D3/8GX
    Graphics Card(s)
    ASUS ROG Matrix R9 290X Platinum
    Sound Card
    On Board
    Monitor(s) Displays
    ASUS MX279
    Screen Resolution
    1920x1080
    Hard Drives
    1x WD1003FZEX - System Drive
    2x WD10EZRX - Storage Pool Drives
    2x WD20EZRX - Storage Pool Drives
    1x WD10EZEX - System Image Drive
    1x WD Elements 1TB USB 3.0 - Network Attached Drive
    PSU
    Corsair CP-9020073 Professional Platinum Series HX850i
    Case
    Cooler Master HAF932 Advanced
    Cooling
    Phanteks PH-TC14PE CPU Cooler - Red + 3rd Fan
    Keyboard
    Corsair Gaming CH-9000062 CGK95 RGB MX Cherry Brown
    Mouse
    Corsair Gaming CH-9000070 M65 RGB
    Browser
    Chrome
    Antivirus
    Windows Defender
    Other Info
    Trust GXT 638 2.1 Digital Gaming Speaker
    Corsair CH-9000084-WWCGMM600 Standard Dual Sided Aluminium Gaming Surface Pad
    Hornettek Enterprise 4X II Quad-bay 20 TB Capacity
    LG BH16NS40.AUAR10B 16x SATA Internal BD-RW
    LG DVD-RW GH24NSB0 Optical Drive
    BitFenix SuperSpeed Card Reader USB 3.0
    Silverstone PCI Express Card w/ Dual Internal 19pin Connectors SST-ECU01
Back
Top