How to Export and Import a Hyper-V Virtual Machine in Windows 8 and 8.1
The Hyper-V technology provides an environment that you can use to create and manage virtual machines and their resources. Each virtual machine is an isolated, virtualized computer system that is capable of running its own operating system. This allows you to run multiple operating systems at the same time on the same physical computer.
You can export a created Hyper-V virtual machine as a backup, and import it to register, restore, or copy to the same or another computer.
This tutorial will show you how to export and import a Hyper-V virtual machine in Windows 8 Pro, Windows 8 Enterprise, Windows 8.1 Pro, and Windows 8.1 Enterprise.
When you export a Hyper-V virtual machine, it will create a complete backup of the virtual machine files in a folder named with the same name as the virtual machine, and save it where you specified. This folder will consist of the items below. This is what would be imported for the virtual machine.
Snapshots - This folder contains any checkpoints you created for the virtual machine (VM). Checkpoints provide a way to capture the exact state of a particular virtual machine as it existed at one specific point in time. Unlike a backup or system restore snapshot, this is a complete checkpoint of the VM as it exists at the time the checkpoint was taken. This means the state of the virtual hard disk and the contents of memory are saved as well, and you can take these checkpoints at any point in time, such as partway through Windows Setup or at beginning of Windows Welcome, should you need to test or repeatedly access these interfaces.
Virtual Hard Disks - This folder contains copies of each virtual hard disk .vhdx file associated with the virtual machine.
Virtual Machines - This would contain the ID and configuration .xml files for the virtual machine.
OPTION ONE
To Export ALL Hyper-V Virtual Machines
This option exports all virtual machines to a location you specify. Each virtual machine will be exported to its own folder.
If you only want to export specific virtual machines, then see OPTION TWO below instead.
If you only want to export specific virtual machines, then see OPTION TWO below instead.
1. Open an elevated PowerShell prompt.
2. In the elevated PowerShell prompt, type the command below, and press Enter. (see screenshot below step 4)
Get-VM | Export-VM –Path "Full save to path"
Substitute Full save to path in the command above with the actual full path to where you want to export all Hyper-V virtual machines to.
For example: To export them all to the root of my E: drive, I would type this below.
Get-VM | Export-VM –Path "E:\"
3. Depending on how many virtual machines you have, this could take quite some time to finish exporting each of them.
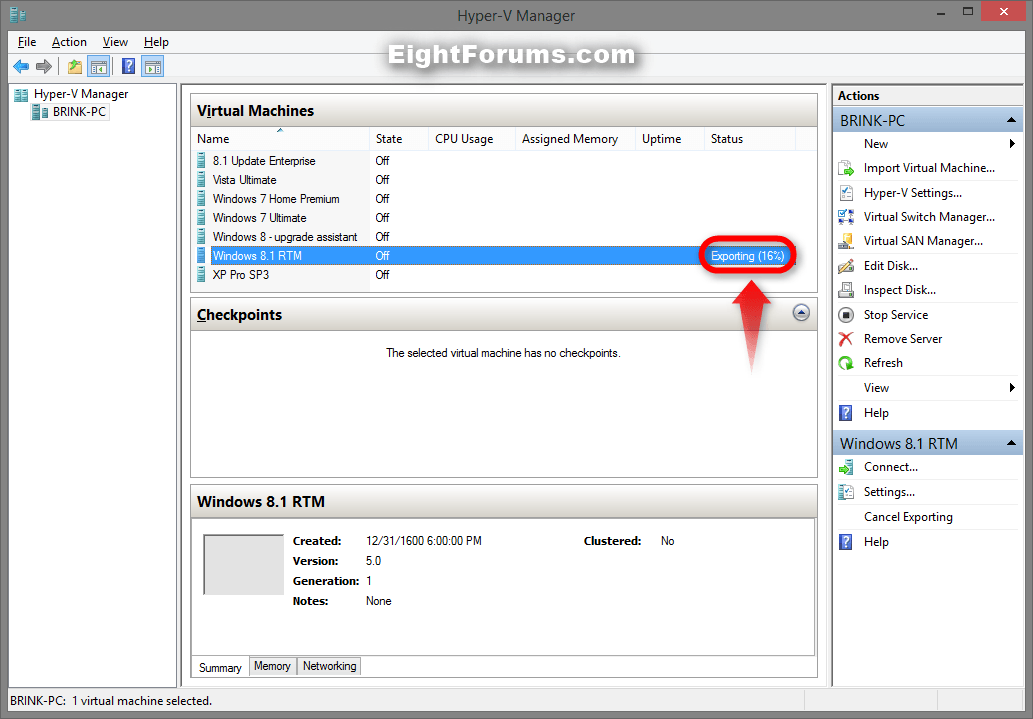
If you like, you can monitor the exporting progress or cancel exporting a VM in the Hyper-V Manager.
4. When you see the PS C:\Windows\system32> prompt return, the VMs have finished being exported. (see screenshots below)
5. When finished, you can close PowerShell if you like.
OPTION TWO
To Export a Hyper-V Virtual Machine
1. Open the Hyper-V Manager, and do step 2 or 3 below for what you would like to export.
2. Export Virtual Machine
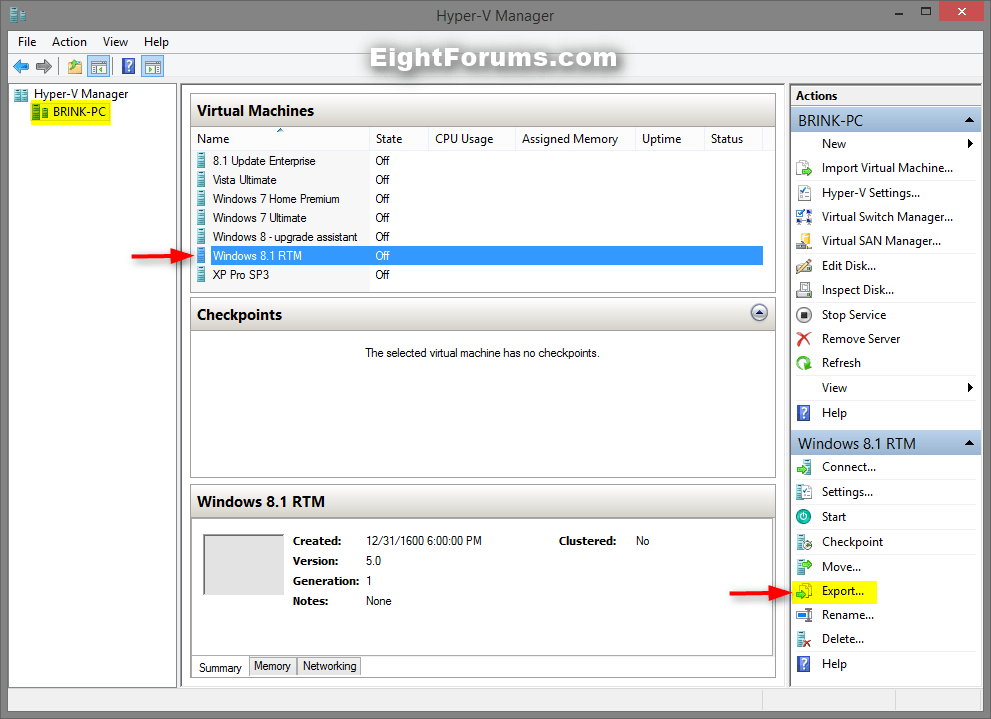
- In the left pane, select the computer name (ex: BRINK-PC) that the virtual machine is on.
- Under Virtual Machines in the middle pane, select the virtual machine (ex: Windows 8.1 RTM) you want to export.
- In the right Actions pane under the virtual machine's name (ex: Windows 8.1 RTM), click/tap on Export, and go to step 4 below. (see screenshot below)
3. Export Checkpoint of a Virtual Machine
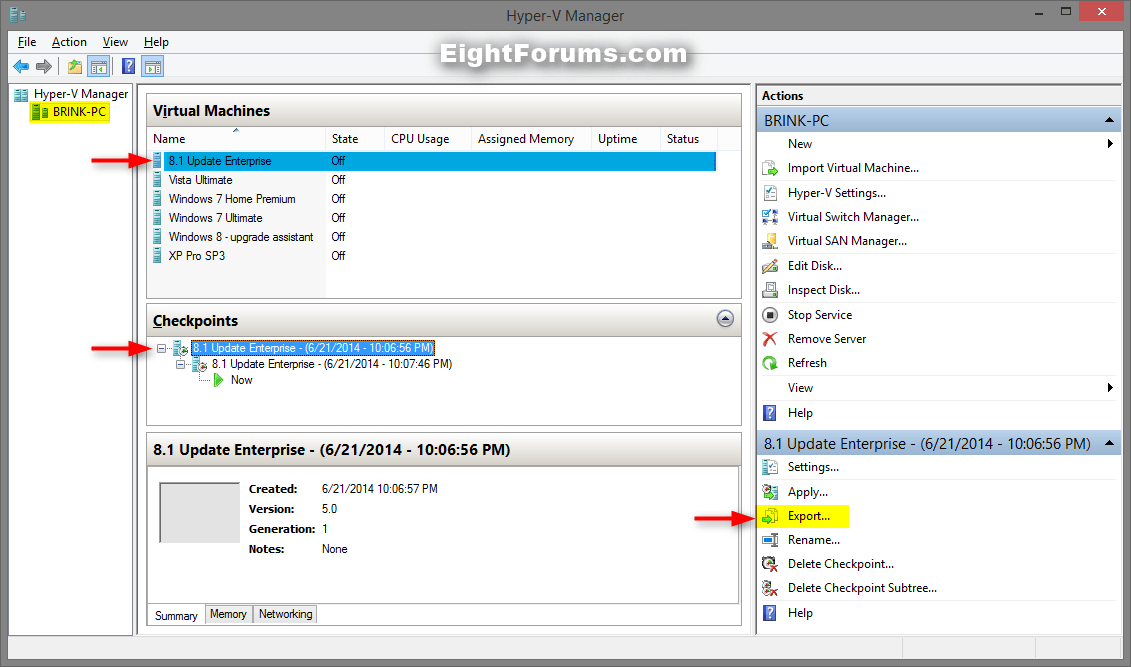
- In the left pane, select the computer name (ex: BRINK-PC) that the virtual machine is on.
- Under Virtual Machines in the middle pane, select the virtual machine (ex: 8.1 Update Enterprise) that the checkpoint was created from.
- Under Checkpoints in the middle pane, select the checkpoint (ex: 8.1 Update Enterprise - (6/21/2014 - 10:06:56 PM)) with the timestamp that you want to export.
- In the right Actions pane under the checkpoint's name (ex: 8.1 Update Enterprise - (6/21/2014 - 10:06:56 PM)), click/tap on Export, and go to step 4 below.
4. Browse to and select the location (ex: my desktop) you want to save the files of the exported virtual machine at, and click/tap on Export. (see screenshot below)
5. The selected virtual machine will now start exporting. You can monitor the exporting percentage status. This could take a few minutes or so to complete. (see screenshot below)
6. When finished, you can close the Hyper-V Manager if you like.
OPTION THREE
To Import a Hyper-V Virtual Machine
1. Open the Hyper-V Manager.
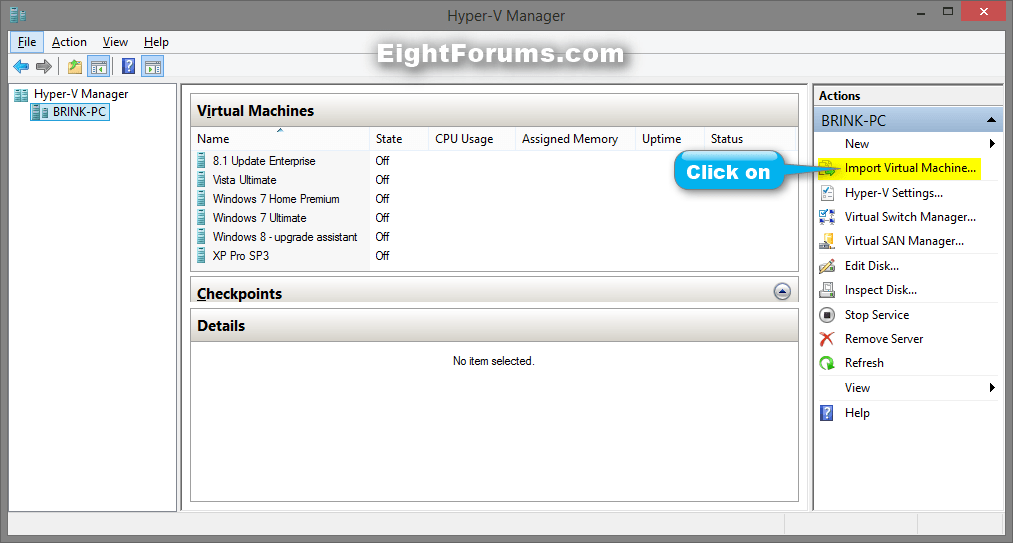
2. In the left pane, select the computer name (ex: BRINK-PC) that you want to import the virtual machine to, and click/tap on Import Virtual Machine in the right Actions pane.
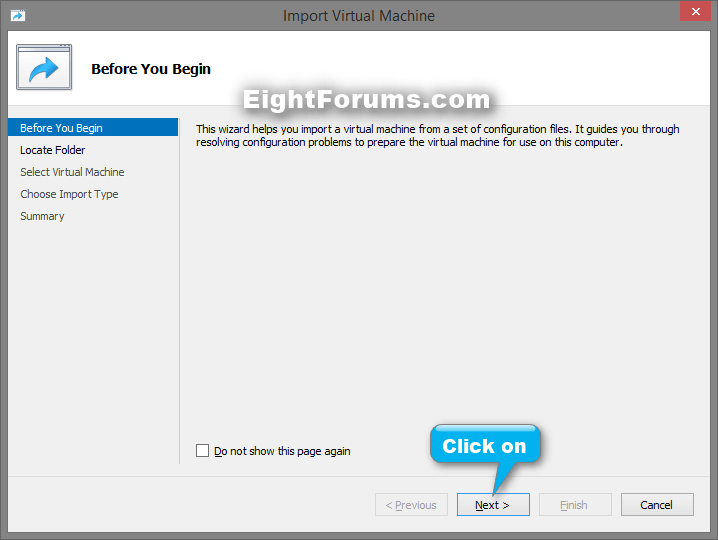
3. If the Before you Begin page shows, click/tap on Next. (see screenshot below)
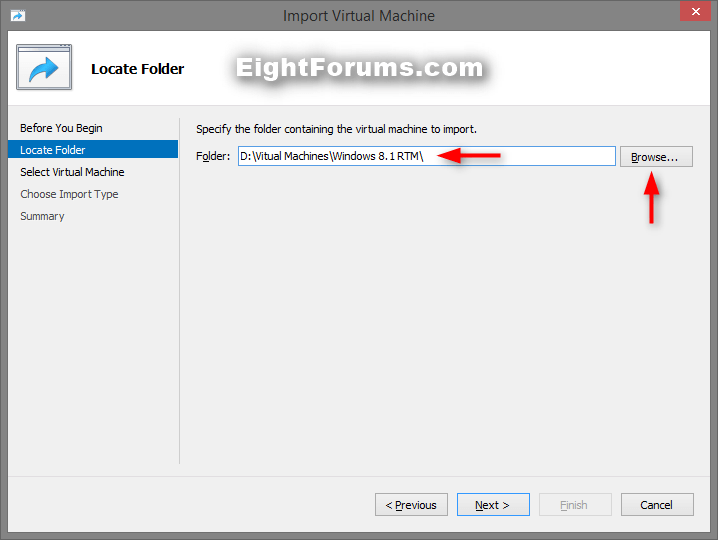
4. Browse to and select the exported folder (ex: Windows 8.1 RTM) from Option One or a folder that contains a virtual machine, and click/tap on Next. (see screenshot below)
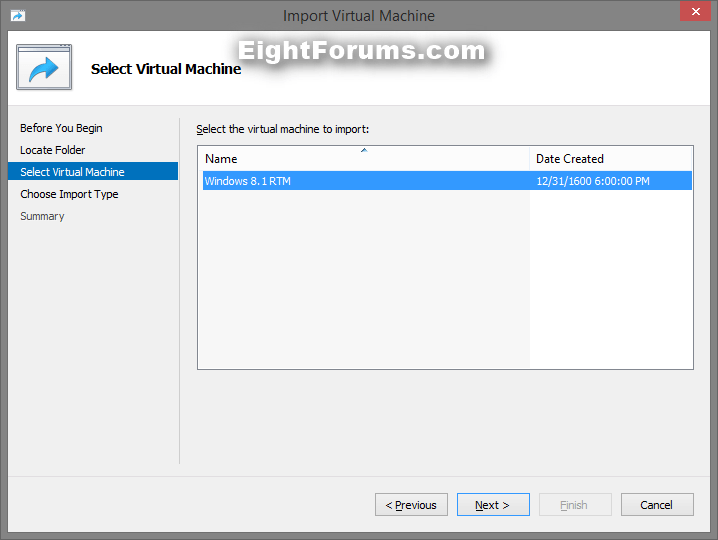
5. Select the virtual machine (ex: Windows 8.1 RTM) you want to import, and click/tap on Next. (see screenshot below)
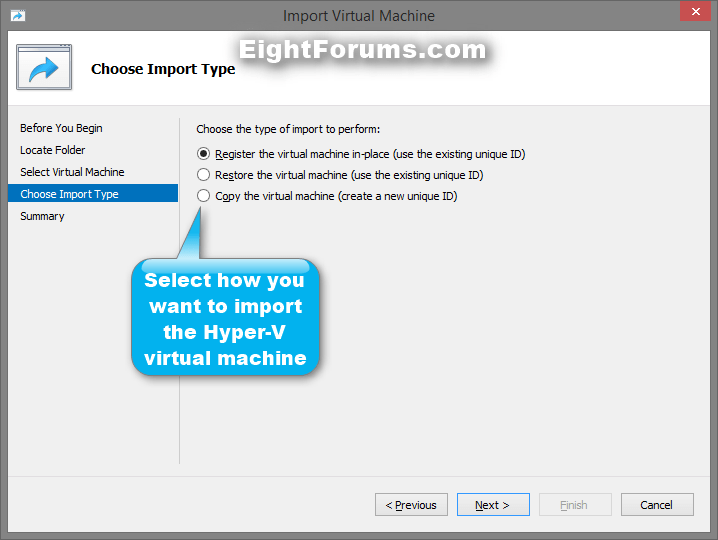
6. Do step 7, 8, or 9 below for what type of import you would like to perform. (see screenshot below)
7. To Perform a Register Import
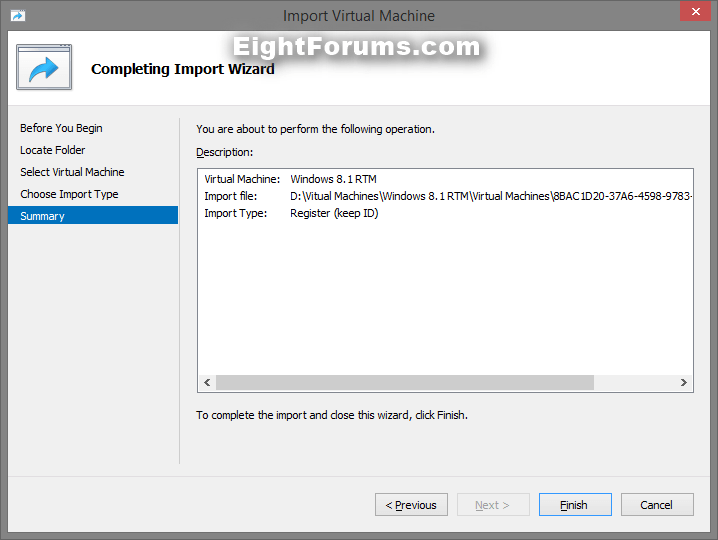
If you have a virtual machine where you have already saved all of the virtual machine files exactly where you want them, and you just need Hyper-V to start using the virtual machine where it is – this is the option you want to choose.
A) Select (dot) Register the virtual machine in-place, and click/tap on Next. (see screenshot below step 6)
B) Verify this is what you want, click/tap on Finish, and go to step 10 below. (see screenshot below)
8. To Perform a Restore Import
If your virtual machine files are stored on a file share / removable drive / etc… and you want Hyper-V to copy the files to a location you choose, and then register the virtual machine – this is the option for you.
A) Select (dot) Restore the virtual machine, and click/tap on Next. (see screenshot below step 6)
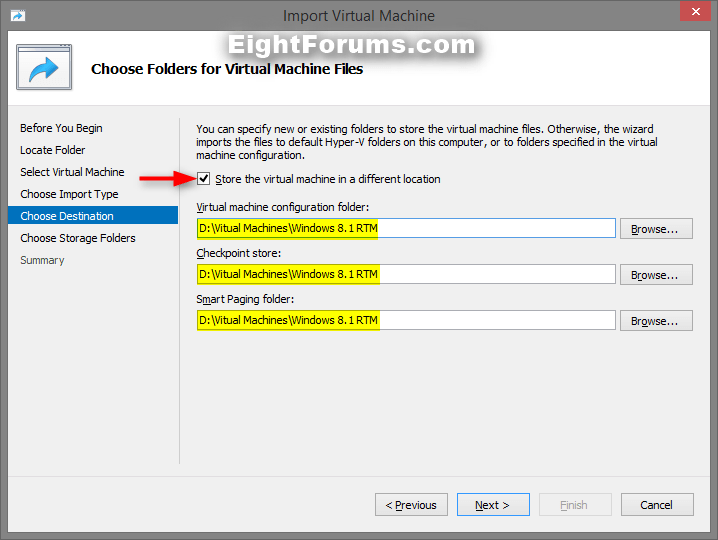
B) Check the Store the virtual machine in a different location box, browse to and select the (ex: "D:\Virtual Machine\Windows 8.1 RTM") folder(s) where you want to import the exported virtual machine files into, and click/tap on Next. (see screenshot below)
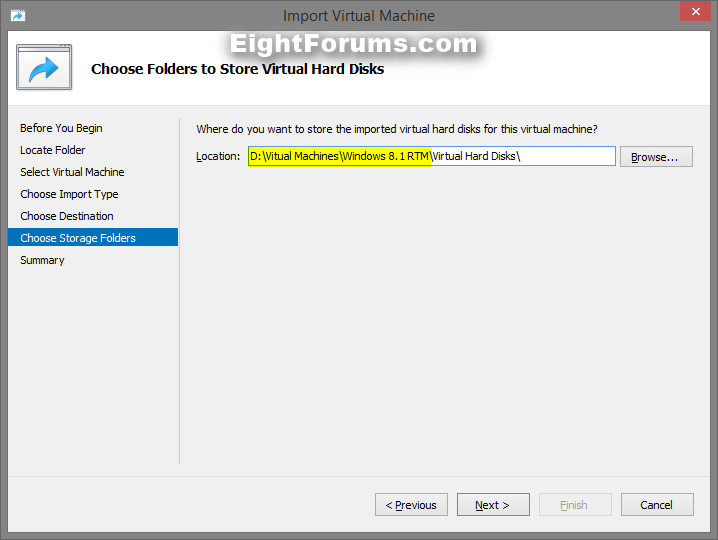
C) Browse to and select the folder (ex: "D:\Virtual Machine\Windows 8.1 RTM\Virtual Hard Disks") where you want to import the exported virtual hard disks into, and click/tap on Next. (see screenshot below)
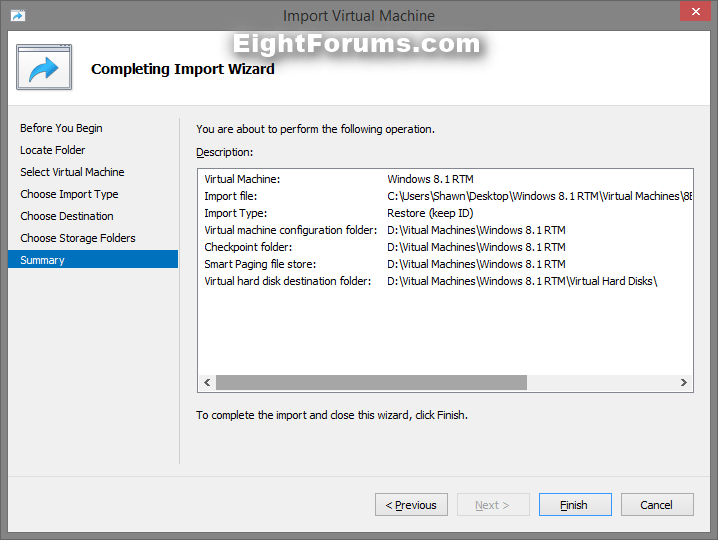
D) Verify this is what you want, click/tap on Finish, and go to step 10 below. (see screenshot below)
9. To Perform a Copy Import
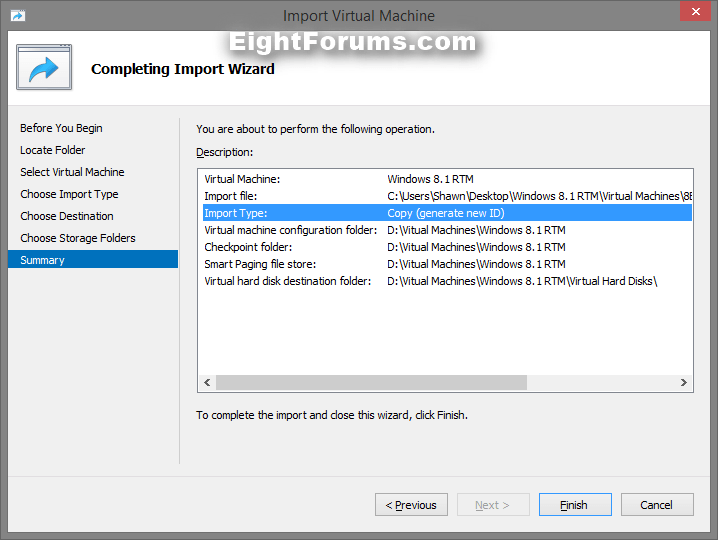
If you have a set of virtual machine files that you want to import multiple times (e.g. you are using them as a template for new virtual machines) this is what you want to choose. This will copy the files to a location you specify, give the virtual machine a new unique ID, and then register the virtual machine.
A) Select (dot) Copy the virtual machine, and click/tap on Next. (see screenshot below step 6)
B) Check the Store the virtual machine in a different location box, browse to and select the (ex: "D:\Virtual Machine\Windows 8.1 RTM") folder(s) where you want to import the exported virtual machine files into, and click/tap on Next. (see screenshot below step 8B)
C) Browse to and select the folder (ex: "D:\Virtual Machine\Windows 8.1 RTM\Virtual Hard Disks") where you want to import the exported virtual hard disks into, and click/tap on Next. (see screenshot below step 8C)
D) Verify this is what you want, click/tap on Finish, and go to step 10 below. (see screenshot below)
10. The virtual machine will now be imported. It may take a few minutes to finish. (see screenshots below)
11. When finished, you can close the Hyper-V Manager if you like.
That's it,
Shawn
Related Tutorials
- How to Create a Hyper-V Manager Shortcut in Windows 8 and 8.1
- How to Enable and Disable Hyper-V in Windows 8 and 8.1
- How to Create a Virtual Machine with Hyper-V in Windows 8 and 8.1
- How to Create a Linux Hyper-V Virtual Machine in Windows 8 and 8.1
- How to Completely Delete a Hyper-V Virtual Machine in Windows 8, 8.1, and Server 2012
- How to Create a Hyper-V "Remote File Browser" Shortcut in Windows 8 and 8.1
- How to Add or Remove "Hyper-V Manager" to Control Panel in Windows 8 and 8.1
- How to Change Default Virtual Hard Disk Location in Hyper-V
- How to Convert Hyper-V Virtual Hard Disk to VHD or VHDX
- How to Create and Use Hyper-V Virtual Switches
- How to Turn On or Off Hyper-V Enhanced Session Mode in Windows 8.1
Attachments
Last edited by a moderator:

