How to Set up and Use File History in Windows 8 and 8.1
File History is a new feature introduced in Windows 8 that automatically backs up files that are only in your libraries, contacts, favorites, and on your desktop. If the originals are lost, damaged, or deleted, you can restore all of them. You can also find different versions of your files from a specific point in time. Over time, you'll have a complete history of your files.
File History in Windows 8 is basically a new version of the Previous Versions feature in Vista and Windows 7.
It periodically (by default every hour) scans the file system for changes and copies changed files to another location. Every time any of your personal files has changed, its copy will be stored on a dedicated, external storage device selected by you. Over time, File History builds a complete history of changes made to any personal file.
Users who use BitLocker to protect the content of their personal files can also use File History as it seamlessly supports BitLocker on both source and destination drives.
For more information about File History, see also:
File History is turned off by default in Windows 8. This tutorial will show you how to set up and use the File History feature in Windows 8, Windows RT, Windows 8.1, and Windows RT 8.1.
File History in Windows 8 is basically a new version of the Previous Versions feature in Vista and Windows 7.
It periodically (by default every hour) scans the file system for changes and copies changed files to another location. Every time any of your personal files has changed, its copy will be stored on a dedicated, external storage device selected by you. Over time, File History builds a complete history of changes made to any personal file.
Users who use BitLocker to protect the content of their personal files can also use File History as it seamlessly supports BitLocker on both source and destination drives.
For more information about File History, see also:
- How-To: Configure and Use File History in Windows 8
- A New Way to Backup: File History in Windows 8
- Protecting user files with File History - Building Windows 8 - Site Home - MSDN Blogs
File History is turned off by default in Windows 8. This tutorial will show you how to set up and use the File History feature in Windows 8, Windows RT, Windows 8.1, and Windows RT 8.1.
OPTION ONE
To Configure an External Drive for File History in AutoPlay Notification
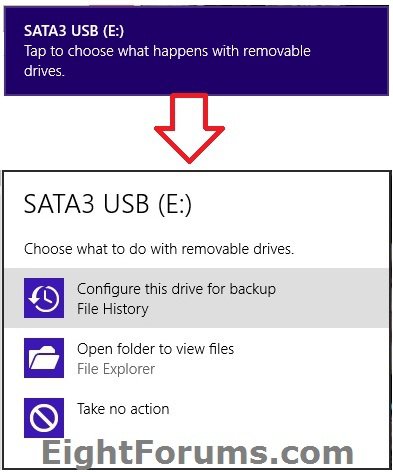
1. While connecting an external drive (ex: USB), click/tap on the AutoPlay notification if given, click/tap on Configure this drive for backup File History, and go to step 3 in OPTION THREE below. (see screenshot below)
OPTION TWO
To Set Up File History from PC settings in Windows 8.1
NOTE: This option is only available in Windows 8.1 and Windows RT 8.1, and not in Windows 8 and Windows RT.
1. If not already, make sure that the network location or drive that you want to save your file history to is connected.
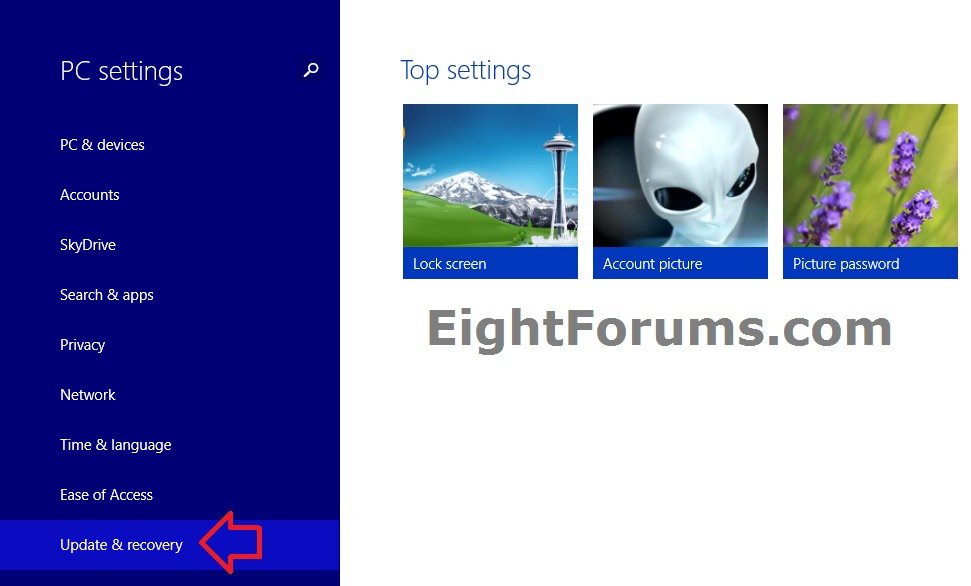
2. Open PC settings, and click/tap on Update & recovery on the left side. (see screenshot below)
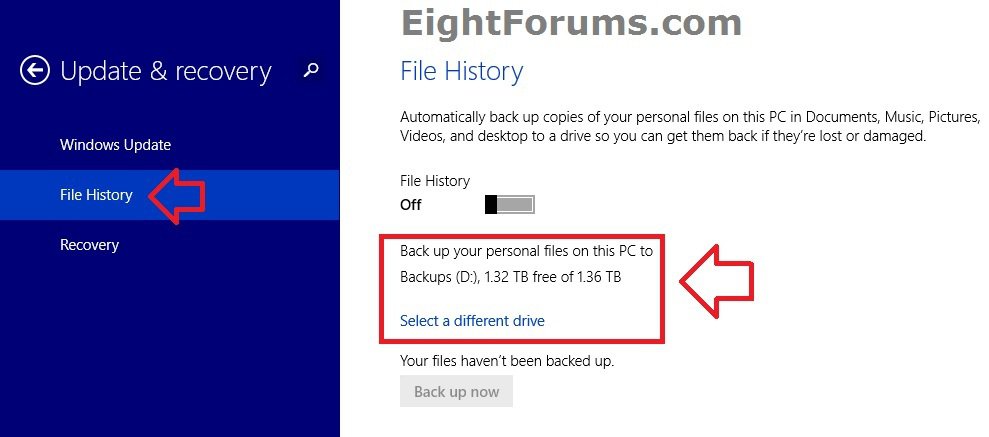
3. Click/tap on File History on the left side of Update & recovery. (see screenshot below)
4. To Select a Network or Local Drive Location to Save File History to
A) If the drive (ex: D: ) you want to use is already selected to be used by default, then go to step 4 below.
B) Click/tap on Select a different drive. (see screenshot below step 3)
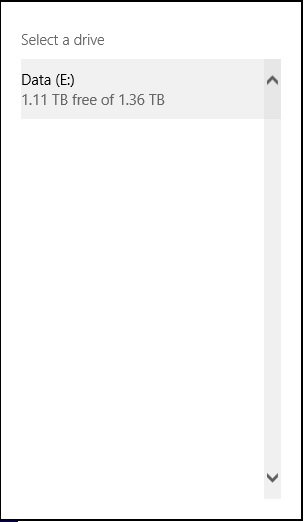
C) Click/tap on the drive you want to save File History on. (see screenshot below)
5. To Turn On or Off File History
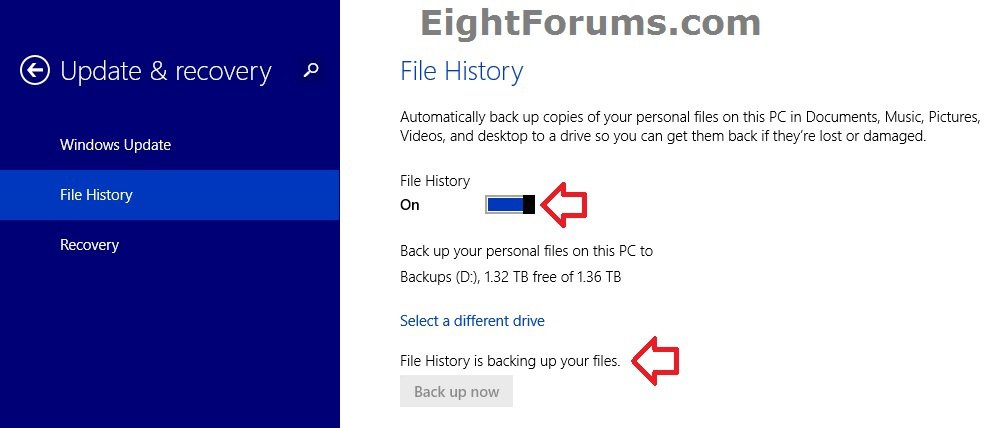
A) Under File History, move the slider to the right to turn on and use File History. (see screenshot below)
6. You will now notice File History backing up a copy of your files. (see screenshot above)
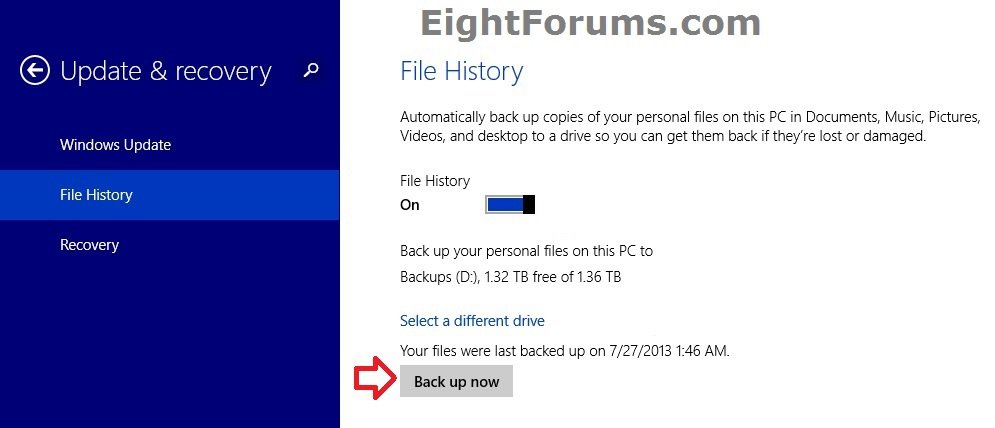
7. When the backup is finished, you can click/tap on Back up now to manually back up a copy of your files at anytime. (see screenshot below)
8. When finished, you can close PC settings if you like.
9. If you would like to change your File History settings, then you can use step 6 or 7 in OPTION THREE below to do so.
OPTION THREE
To Set Up File History from Control Panel
1. If not already, make sure that the network location or drive that you want to save your file history to is connected.
2. Open the Control Panel (icons view), and click/tap on the File History icon.
3. To Select a Network or Local Drive Location to Save File History to
A) If the drive (ex: D: ) you want to use is already selected to be used by default, then go to step 3D below.
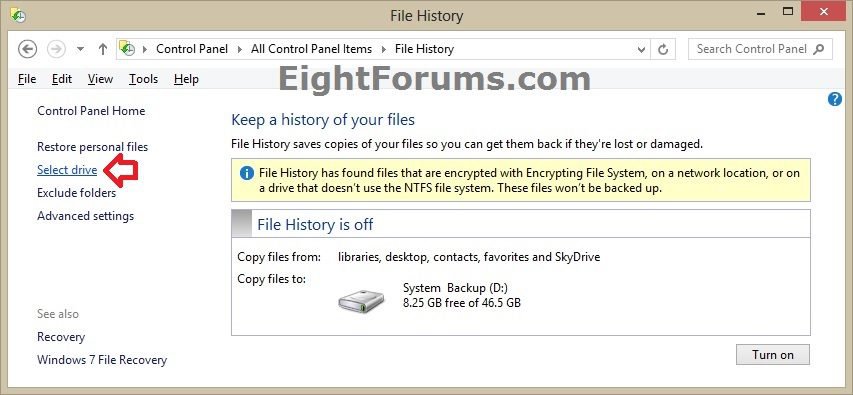
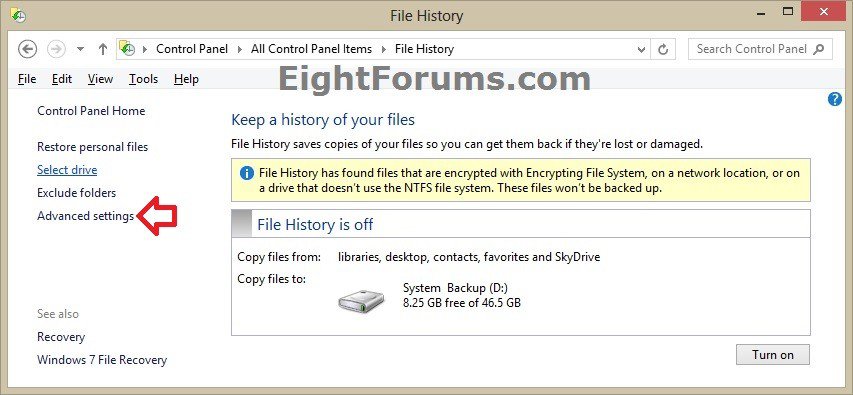
B) On the left side in File History, click/tap on Select drive. (see screenshot below)
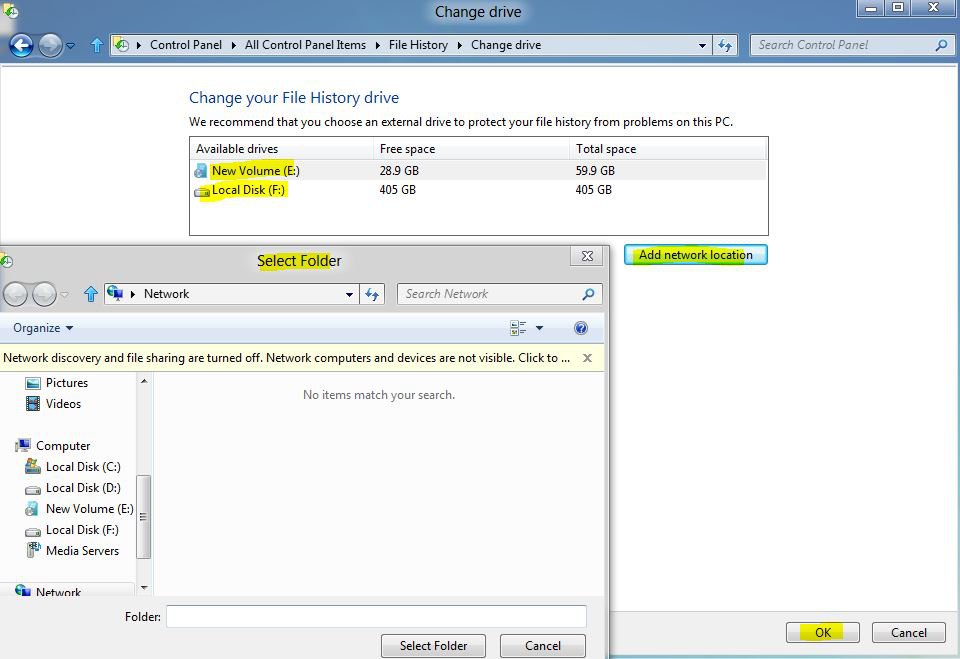
C) Either select a drive or add a network location, and click/tap on OK. (see screenshot below)
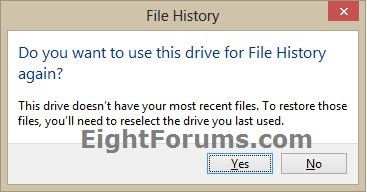
D) If prompted, click/tap on Yes to use the selected drive again for File History if it has been previously used before. (see screenshot below)
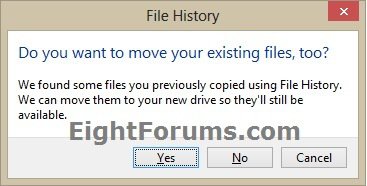
E) If prompted, click/tap on Yes or No to move any files previously copied using File History at other locations to the new selected drive. (see screenshot below)
F) File History will now be turned on automatically. Go to step 5 below.
4. To Turn On or Off File History
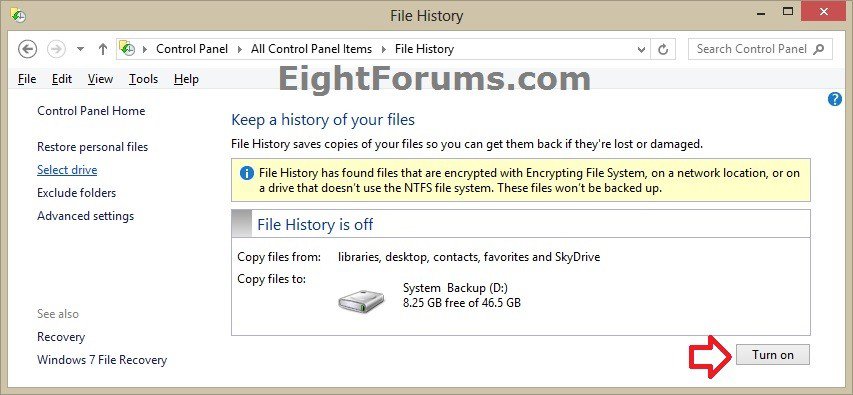
A) In File History, click/tap on Turn On to use File History. (see screenshot below)
5. Do step 6 and/or 7 below for what you would like to do.
6. To Add or Remove Folders to be Excluded from File History
File History only saves copies of files that are in your libraries, contacts (C:\Users\(user-name)\Contacts), Internet Explorer favorites (C:\Users\(user-name)\Favorites), Microsoft SkyDrive(C:\Users\(user-name)\SkyDrive), and your desktop (C:\Users\(user-name)\Desktop).
If you have files or folders elsewhere that you want backed up, you can add them to one of your existing libraries or create a new library.
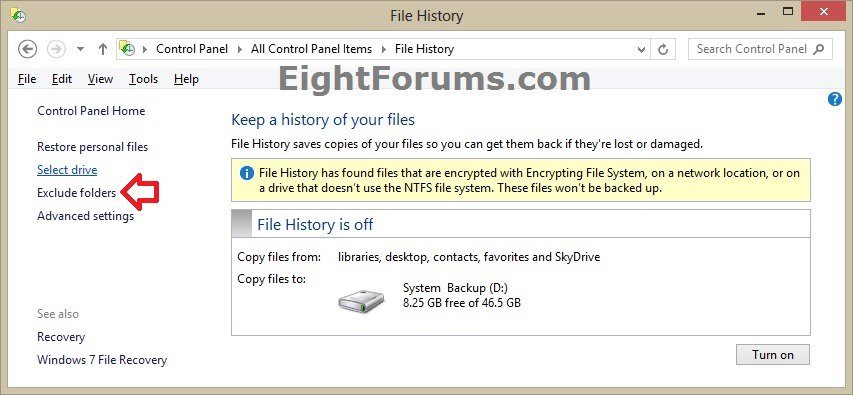
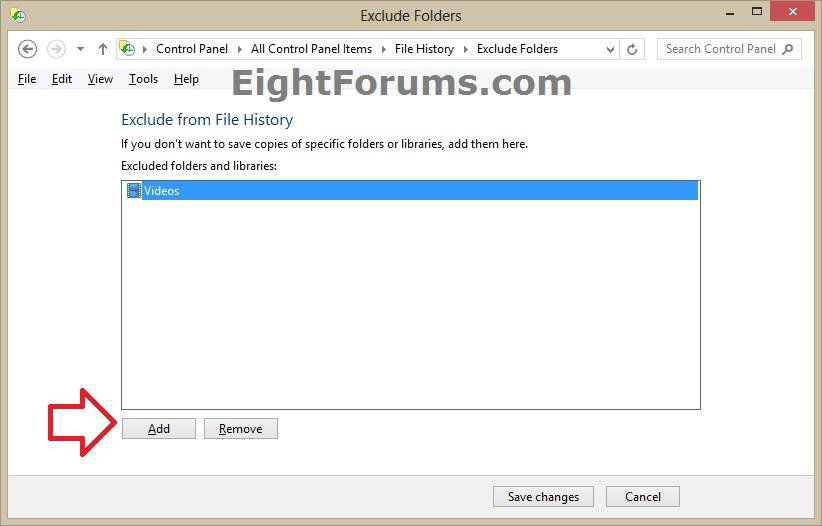
A) On the left side in File History, click/tap on Exclude folders. (see screenshot below)
B) To remove a folder to no longer be excluded from File History, select an excluded drive, folder, or library (ex: Videos library), and click/tap on Remove. (see screenshot below)
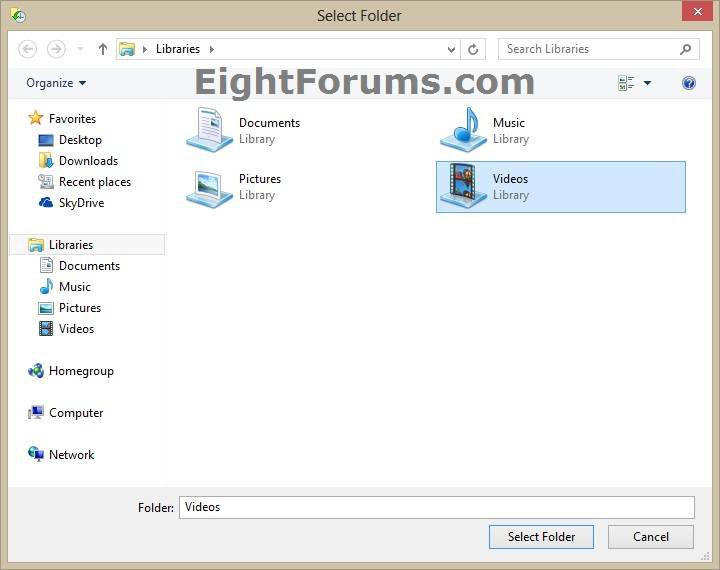
C) To add a folder to be excluded from File History, click/tap on the Add button, navigate to and select either a drive, folder, library, an added folder in a library, or SkyDrive folder, and click/tap on Select Folder. (see screenshots above and below)
D) When finished, click/tap on Save changes. (see screenshot below step 6B)
7. To Set Offline Cache Size, and how Often and Long to Keep Files Saved by File History
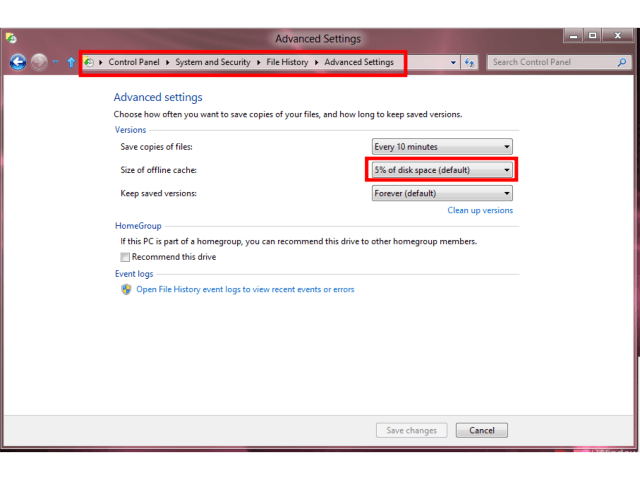
A) On the left side in File History, click/tap on Advanced settings. (see screenshot below)
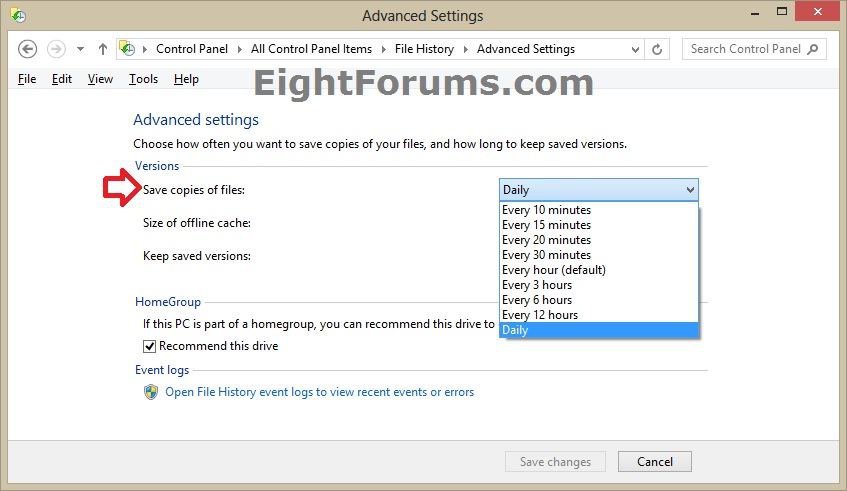
B) In the Save copies of files drop down menu, select how often you want File History to save copies of your files to the selected drive. (see screenshot below)
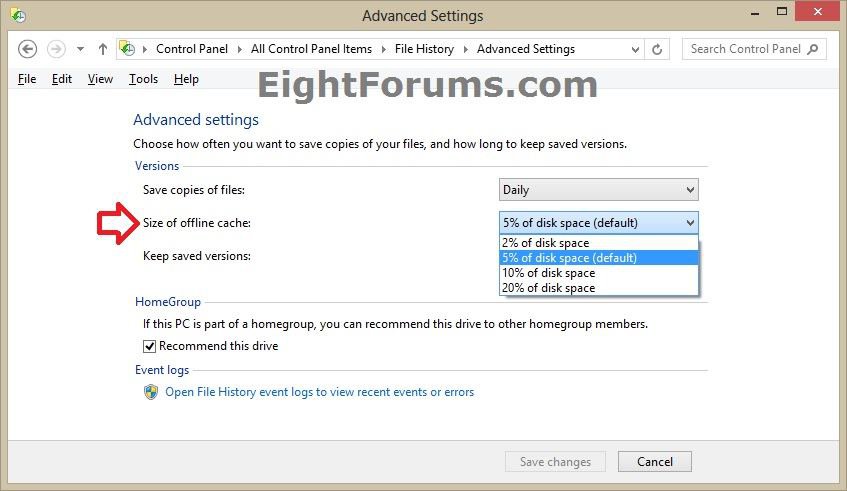
C) In the Size of offline cache drop down menu, select the maximum percentage of disk space the local File History cache can be that's used when the selected drive is not present. (see screenshot below)
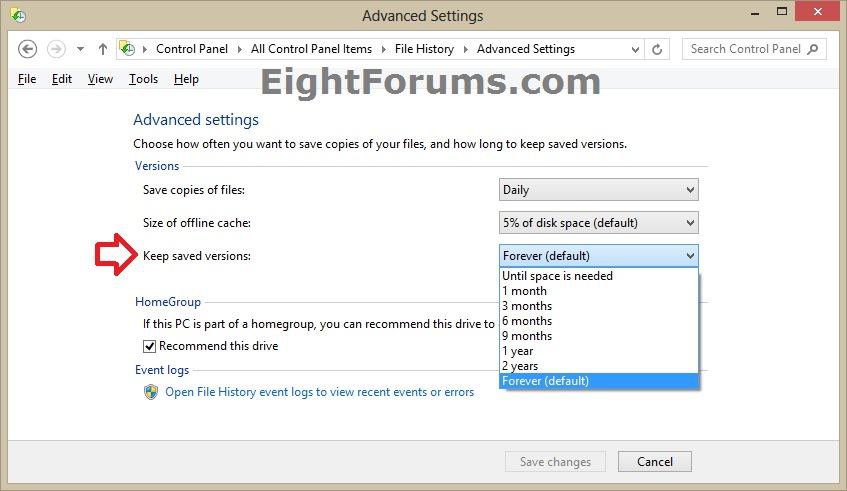
D) In the Keep saved versions drop down menu, select how long to keep saved versions of File History. (see screenshot below)
The retention policy is only used when the selected storage drive is full, and not before that.
If your selected drive fills up, backup versions of your files that are older than the age specified by your retention policy in your Keep saved versions settings are deleted, but the most recent backup copy of each file is always retained regardless of its age.
If you have sufficient disk space on the selected drive, File History will continue to save versions of files and folders on the selected drive as set in your advanced settings.
If you are concerned about disk space on the selected drive, you can also manually clean up versions of older files and folders saved by File History.
E) When finished, click/tap on Save changes. (see screenshot below)
8. When finished, you can close File History.
That's it.
Airbot
Related Tutorials
- How to Recommend your File History Drive to Homegroup in Windows 8 and 8.1
- How to Restore Previous Versions of your Files with File History in Windows 8 and 8.1
- How to Create a "File History Home" Shortcut in Windows 8 and 8.1
- How to Use File History Cleanup to Delete Older Versions of Files in Windows 8 and 8.1
- How to Reset File History to Default in Windows 8 and 8.1
- How to Create a "File History" Shortcut in Windows 8 and 8.1
- How to Enable or Disable File History in Windows 8 and 8.1
- How to Create a System Image in Windows 8 and 8.1
- How to Create or Set Up Windows Backup to Back Up Files in Windows 8
- How to Turn On or Off the Backup Schedule in Windows 8
- How to Restore Files and Folders from a Backup in Windows 8
- How to Manually Extract System Image Files using Disk Management in Windows 8 and 8.1
- How to Save Your Music, Pictures, and Videos to Removable Drive by Default in Windows 8.1
- How to Save Your Documents to SkyDrive by Default in Windows 8.1
Attachments
Last edited by a moderator:

