DISM - Fixing Component Store Corruption in Windows 8

How to Use DISM to Fix Component Store Corruption in Windows 8 and Windows Server 2012

One of the most used tools when fixing corruption for Vista, Windows 7, Windows Server 2008 and Windows Server 2008 R2 was the System Update and Readiness Tool (KB947821), commonly called CheckSUR. The CheckSUR tool was an excellent way for most people to see what corruption had happened on their store, and potentially fix that corruption if the tool contained the payload to do so.

In Windows 8/8.1 and Windows Server 2012, this has changed. It’s called Inbox Corruption Repair and it brings the functionality of CheckSUR into Windows rather than requiring a separate download to get the utility like you do now. This is exposed in two ways, the first is really unseen by the end user and happens when Windows detects a corrupted state when attempting to install fixes via Windows Update. When this happens, Windows fix the corruption silently and then re-install the prior packages. The manual way to use this tool is via DISM (Deployment Imaging and Servicing Management). The way this is exposed is via the DISM /Cleanup-Image functionality.

If a Windows image (Windows component store) becomes unserviceable, you can use the Deployment Imaging and Servicing Management (DISM) tool to update the files and correct the problem.

For example:

  • To use to fix Windows component store corruption when a SFC /SCANNOW command is unable to repair corrupted system files because the store (source) is corrupted, then run the SFC command again.
  • To use to fix Windows component store corruption when the same Windows Updates continue to appear to be available to install even though they already show successfully installed in update history.

For more information, see:


This tutorial will show you how to do an Inbox Corruption Repair with the DISM /Cleanup-Image tool to fix component store corruption in Windows 8 and Windows Server 2012.

You must be signed in as an administrator to be able to do an Inbox Corruption Repair with the Deployment Imaging and Servicing Management (DISM) tool.

Note   Note
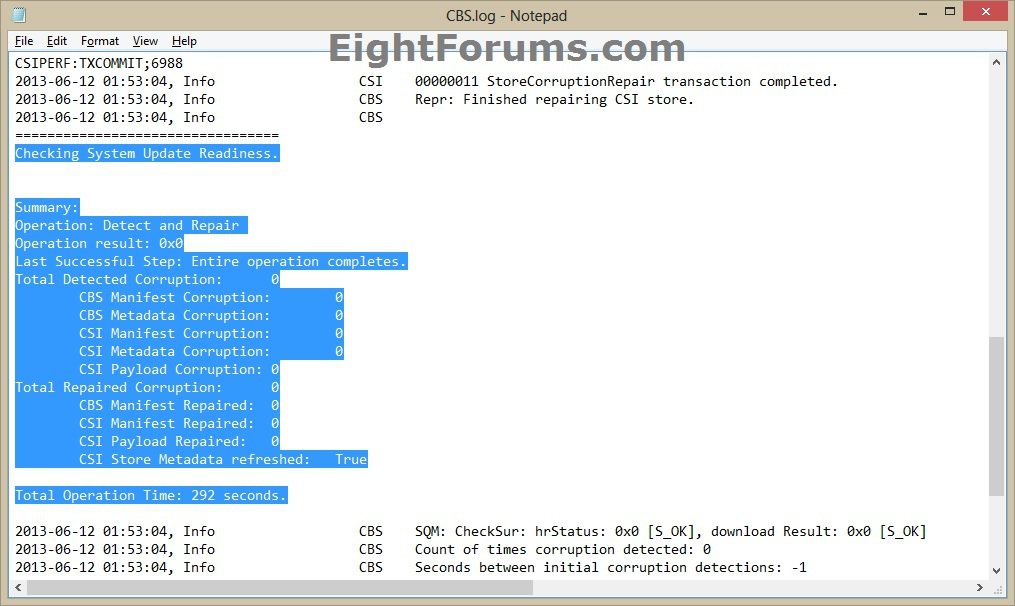
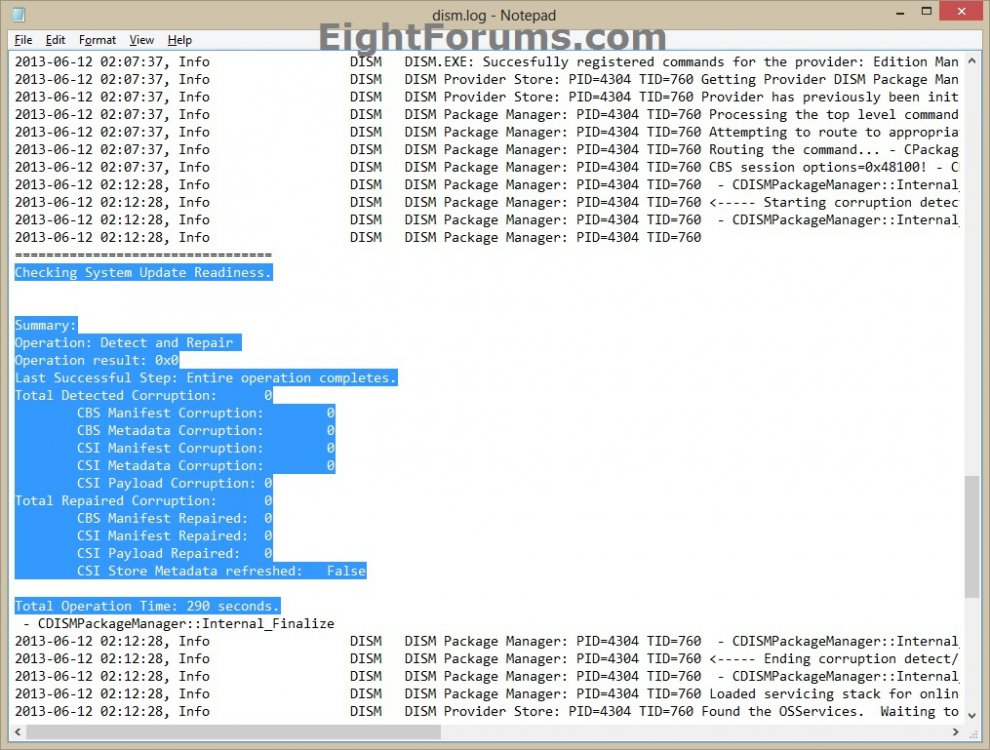
The DISM /Cleanup-Image tool saves it's log files in the file locations below. To be able to view these logs, you would need to copy them from the locations below to your desktop, then open them from your desktop.

C:\Windows\Logs\CBS\CBS.log

C:\Windows\Logs\DISM\dism.log


CBS.log.jpg

DISM.log.jpg

Tip   Tip
If you get an error like below when running a DISM command in an option below, then run the command below and try again afterwards.

Dism.exe /online /Cleanup-Image /StartComponentCleanup


Note   Note
Error: 0x80240021

Failure DISM. No operation was performed.


CONTENTS:

  • Option One: To Run "DISM /Cleanup-Image" tool in an Elevated Command Prompt
  • Option Two: To Run "DISM /Cleanup-Image" tool in an Elevated PowerShell


OPTION ONE

To Run "DISM /Cleanup-Image" tool in an Elevated Command Prompt


1. Open an elevated command prompt.

2. Do step3, step 4, step 5, or step 6 below for what DISM command you would like to use.


3. To Use DISM /CheckHealth Command
Note   Note
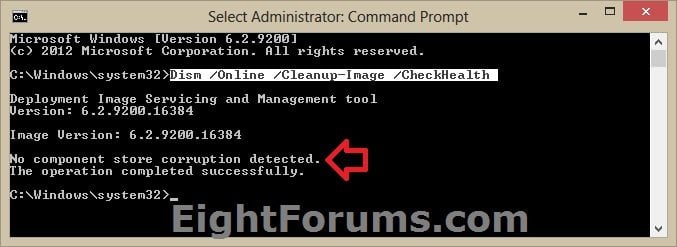
You would use /CheckHealth to only check whether the image has been flagged as corrupted by a failed process and whether the corruption can be repaired. This is just a quick way to see if corruption currently exists, and to inform you if there is corruption. This does not fix anything or create a log. This will finish running almost instantly.


A) In the elevated command prompt, copy and paste the command below, press Enter, and go to step 7 below. (see screenshot below)

:ar: Dism /Online /Cleanup-Image /CheckHealth
CMD_CheckHealth.jpg


4. To Use DISM /ScanHealth Command
Note   Note
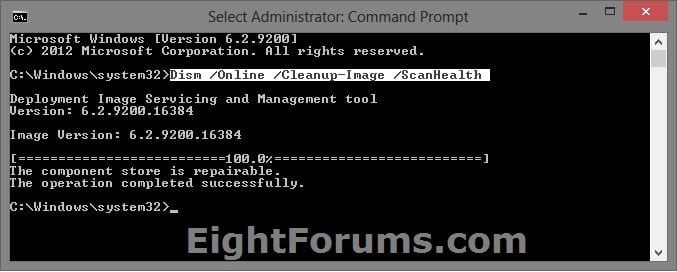
You would use /ScanHealth to scan the image for component store corruption. This option does not fix any corruption. It only checks for component store corruption and records that corruption to the log file. This can take around 5-10 minutes to finish. It will stay at 20% for a while before continuing.


A) In the elevated command prompt, copy and paste the command below, press Enter, and go to step 7 below. (see screenshot below)

:ar: Dism /Online /Cleanup-Image /ScanHealth
CMD_ScanHealth.jpg


5. To Use DISM /RestoreHealth Command
Note   Note
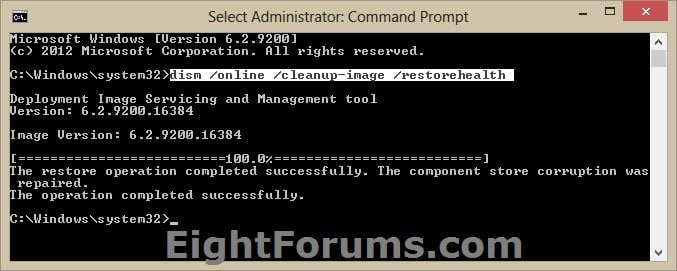
(recommended) You would use /RestoreHealth to scan the image for component store corruption, perform repair operations automatically, and records that corruption to the log file. This can take around 10-15 minutes up to a few hours to finish depending on the level of corruption. It will stay at 20% for a while before continuing.


A) In the elevated command prompt, copy and paste the command below, press Enter, and go to step 7 below. (see screenshot below)

:ar: Dism /Online /Cleanup-Image /RestoreHealth
CMD_RestoreHealth.jpg


6. To Use DISM /RestoreHealth /Source:wim Command
Note   Note
You would use /Source with /RestoreHealth to specify the location of an install.wim file as the source of known good versions of files that can be used for the repair. This can take around 10-15 minutes up to a few hours to finish depending on the level of corruption. It will stay at 20% for a while before continuing.

This can be useful if step 5 above was not able to repair the Windows image (component store).


The install.wim file will be in the Sources folder of a mounted Windows 8.1 ISO file.


A) In the elevated command prompt, type the command below you want to use, press Enter, and go to step 7 below. (see screenshot below)

:ar: Dism /Online /Cleanup-Image /RestoreHealth /Source:wim:Full Path to install.wim file:1

OR

(To prevent DISM from using Windows Update for online images)
:ar: Dism /Online /Cleanup-Image /RestoreHealth /Source:wim:Full Path to install.wim file:1 /limitaccess

For example:

:ar: Dism /Online /Cleanup-Image /RestoreHealth /Source:wim:D:\sources\install.wim:1 /limitaccess

DISM_RestoreHealth_wim_sources.png


7. If you did step 5 or step 6 above, it is recommended to restart the computer to fully apply.


OPTION TWO

To Run "DISM /Cleanup-Image" tool in an Elevated PowerShell


1. Open an elevated PowerShell.

2. Do step3, step 4, step 5, or step 6 below for what DISM command you would like to use.


3. To Use DISM /CheckHealth Command
Note   Note
You would use /CheckHealth to only check whether the image has been flagged as corrupted by a failed process and whether the corruption can be repaired. This is just a quick way to see if corruption currently exists, and to inform you if there is corruption. This does not fix anything or create a log. This will finish running almost instantly.


A) In the elevated command prompt, copy and paste the command below, press Enter, and go to step 7 below. (see screenshot below)

:arrow: Repair-WindowsImage /Cleanup-Image /CheckHealth

PowerShell_CheckHealth.jpg


4. To Use DISM /ScanHealth Command
Note   Note
You would use /ScanHealth to scan the image for component store corruption. This option does not fix any corruption. It only checks for component store corruption and records that corruption to the log file. This can take around 5-10 minutes to finish. It will stay at 20% for a while before continuing.


A) In the elevated command prompt, copy and paste the command below, press Enter, and go to step 7 below. (see screenshot below)

:arrow: Repair-WindowsImage /Cleanup-Image /ScanHealth

PowerShell_ScanHealth.jpg


5. To Use DISM /RestoreHealth Command
Note   Note
(recommended) You would use /RestoreHealth to scan the image for component store corruption, perform repair operations automatically, and records that corruption to the log file. This can take around 10-15 minutes up to a few hours to finish depending on the level of corruption. It will stay at 20% for a while before continuing.


A) In the elevated command prompt, copy and paste the command below, press Enter, and go to step 7 below. (see screenshot below)

:arrow: Repair-WindowsImage /Cleanup-Image /RestoreHealth

PowerShell_RestoreHealth.jpg


6. To Use DISM /RestoreHealth /Source:wim Command
Note   Note
You would use /Source with /RestoreHealth to specify the location of an install.wim file as the source of known good versions of files that can be used for the repair. This can take around 10-15 minutes up to a few hours to finish depending on the level of corruption. It will stay at 20% for a while before continuing.

This can be useful if step 5 above was not able to repair the Windows image (component store).


The install.wim file will be in the Sources folder of a mounted Windows 8.1 ISO file.


A) In the elevated command prompt, type the command below you want to use, press Enter, and go to step 7 below. (see screenshot below)

:ar: Dism /Online /Cleanup-Image /RestoreHealth /Source:wim:Full Path to install.wim file:1

OR

(To prevent DISM from using Windows Update for online images)
:ar: Dism /Online /Cleanup-Image /RestoreHealth /Source:wim:Full Path to install.wim file:1 /limitaccess

For example:

:ar: Dism /Online /Cleanup-Image /RestoreHealth /Source:wim:D:\sources\install.wim:1 /limitaccess

PowerShell_DISM_RestoreHealth_wim_sources.png


7. If you did step 5, step 6, or step 7 above, it is recommended to restart the computer to fully apply.


That's it,
Shawn


Attachments

  • Command_Prompt.png
    Command_Prompt.png
    3.4 KB · Views: 579
Last edited by a moderator:
My Computer

System One

  • OS
    Windows 8.1 Update Pro in Hyper-V/Windows 10 Pro 64 bit
    Computer type
    PC/Desktop
    System Manufacturer/Model
    Cliff's Black & Blue Wonder
    CPU
    Intel Core i9-9900K
    Motherboard
    ASUS ROG Maximus X Hero
    Memory
    32 GB Quad Kit, G.Skill Trident Z RGB Series schwarz, DDR4-3866, 18-19-19-39-2T
    Graphics Card(s)
    ASUS GeForce RTX 3090 ROG Strix O24G, 24576 MB GDDR6X
    Sound Card
    (1) HD Webcam C270 (2) NVIDIA High Definition Audio (3) Realtek High Definition Audio
    Monitor(s) Displays
    BenQ BL2711U(4K) and a hp 27vx(1080p)
    Screen Resolution
    1920 x 1080 x 32 bits (4294967296 colors) @ 60 Hz
    Hard Drives
    C: Samsung 960 EVO NVMe M.2 SSD
    E: & O: Libraries & OneDrive-> Samsung 850 EVO 1TB
    D: Hyper-V VM's -> Samsung PM951 Client M.2 512Gb SSD
    G: System Images -> HDD Seagate Barracuda 2TB
    PSU
    Corsair HX1000i High Performance ATX Power Supply 80+ Platinum
    Case
    hanteks Enthoo Pro TG
    Cooling
    Thermaltake Floe Riing RGB TT Premium-Edition 360mm and 3 Corsair blue LED fans
    Keyboard
    Trust GTX THURA
    Mouse
    Trust GTX 148
    Internet Speed
    25+/5+ (+usually faster)
    Browser
    Edge; Chrome; IE11
    Antivirus
    Windows Defender of course & Malwarebytes Anti-Exploit as a
    Other Info
    Router: FRITZ!Box 7590 AX V2
    Sound system: SHARP HT-SBW460 Dolby Atmos Soundbar
    Webcam: Logitech BRIO ULTRA HD PRO WEBCAM 4K webcam with HDR
brokensoftware, seeing that you have the ISO mount it in file explorer and do a repair install: http://www.eightforums.com/tutorials/26095-repair-install-windows-8-a.html

Yeah, I saw that the other day when doing a Google Search trying to track down methods to repair without destroying - on reading it certainly looks like something worth trying.

First, an image backup of both drives (via Clonezilla) then I'll give it a try - thanks for the suggestion.

=====

BTW - have any clue about that path munging shown with the "dism ... /Source..." attempt as shown above (post #256)? It looks like my current directory was tacked onto the whole string that was after "/Source:" and then that new string used as the path to search for sources. That simply doesn't make sense unless SOME, say, "dll" file is seriously confused about how to parse that path.
 

My Computer

System One

  • OS
    Windows 8.1, 10, various Linux
    Computer type
    PC/Desktop
    System Manufacturer/Model
    homebuilt
BTW - have any clue about that path munging shown with the "dism ... /Source..." attempt as shown above (post #256)? It looks like my current directory was tacked onto the whole string that was after "/Source:" and then that new string used as the path to search for sources. That simply doesn't make sense unless SOME, say, "dll" file is seriously confused about how to parse that path.

That's more KYHI' or axe0's area of expertise.
 

My Computer

System One

  • OS
    Windows 8.1 Update Pro in Hyper-V/Windows 10 Pro 64 bit
    Computer type
    PC/Desktop
    System Manufacturer/Model
    Cliff's Black & Blue Wonder
    CPU
    Intel Core i9-9900K
    Motherboard
    ASUS ROG Maximus X Hero
    Memory
    32 GB Quad Kit, G.Skill Trident Z RGB Series schwarz, DDR4-3866, 18-19-19-39-2T
    Graphics Card(s)
    ASUS GeForce RTX 3090 ROG Strix O24G, 24576 MB GDDR6X
    Sound Card
    (1) HD Webcam C270 (2) NVIDIA High Definition Audio (3) Realtek High Definition Audio
    Monitor(s) Displays
    BenQ BL2711U(4K) and a hp 27vx(1080p)
    Screen Resolution
    1920 x 1080 x 32 bits (4294967296 colors) @ 60 Hz
    Hard Drives
    C: Samsung 960 EVO NVMe M.2 SSD
    E: & O: Libraries & OneDrive-> Samsung 850 EVO 1TB
    D: Hyper-V VM's -> Samsung PM951 Client M.2 512Gb SSD
    G: System Images -> HDD Seagate Barracuda 2TB
    PSU
    Corsair HX1000i High Performance ATX Power Supply 80+ Platinum
    Case
    hanteks Enthoo Pro TG
    Cooling
    Thermaltake Floe Riing RGB TT Premium-Edition 360mm and 3 Corsair blue LED fans
    Keyboard
    Trust GTX THURA
    Mouse
    Trust GTX 148
    Internet Speed
    25+/5+ (+usually faster)
    Browser
    Edge; Chrome; IE11
    Antivirus
    Windows Defender of course & Malwarebytes Anti-Exploit as a
    Other Info
    Router: FRITZ!Box 7590 AX V2
    Sound system: SHARP HT-SBW460 Dolby Atmos Soundbar
    Webcam: Logitech BRIO ULTRA HD PRO WEBCAM 4K webcam with HDR
Shawn you're really getting famous amongst Geeks!:)
Remember I told you about one of your tuts either in 10 or 8 forums being recommended in the Microsoft community?

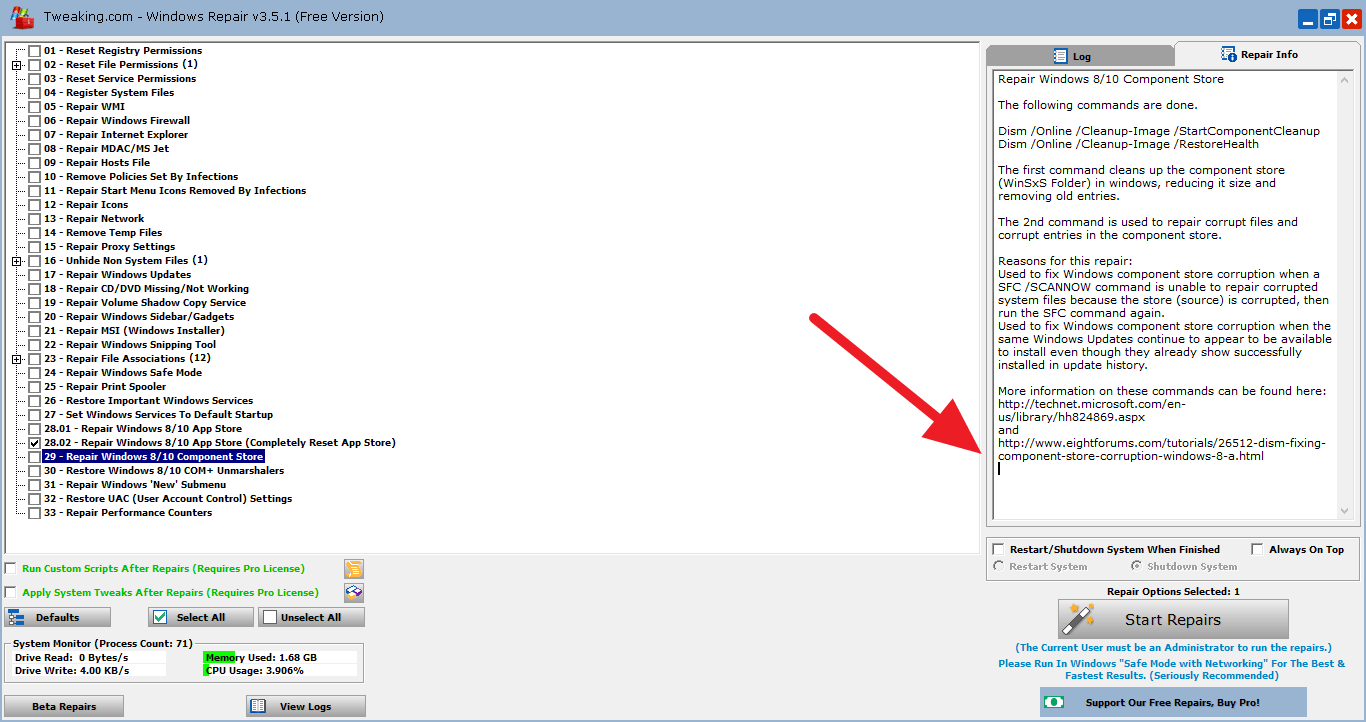
Now I just saw that this one is recommended in Tweaking(dot)com's Windows Repair:D

Repair Windows 8/10 Component Store
The following commands are done.
Dism /Online /Cleanup-Image /StartComponentCleanup
Dism /Online /Cleanup-Image /RestoreHealth
The first command cleans up the component store (WinSxS Folder) in windows, reducing it size and removing old entries.
The 2nd command is used to repair corrupt files and corrupt entries in the component store.
Reasons for this repair:
Used to fix Windows component store corruption when a SFC /SCANNOW command is unable to repair corrupted system files because the store (source) is corrupted, then run the SFC command again.
Used to fix Windows component store corruption when the same Windows Updates continue to appear to be available to install even though they already show successfully installed in update history.
More information on these commands can be found here:
Repair a Windows Image
and
http://www.eightforums.com/tutorials/26512-dism-fixing-component-store-corruption-windows-8-a.html
Image 1.png
 

My Computer

System One

  • OS
    Windows 8.1 Update Pro in Hyper-V/Windows 10 Pro 64 bit
    Computer type
    PC/Desktop
    System Manufacturer/Model
    Cliff's Black & Blue Wonder
    CPU
    Intel Core i9-9900K
    Motherboard
    ASUS ROG Maximus X Hero
    Memory
    32 GB Quad Kit, G.Skill Trident Z RGB Series schwarz, DDR4-3866, 18-19-19-39-2T
    Graphics Card(s)
    ASUS GeForce RTX 3090 ROG Strix O24G, 24576 MB GDDR6X
    Sound Card
    (1) HD Webcam C270 (2) NVIDIA High Definition Audio (3) Realtek High Definition Audio
    Monitor(s) Displays
    BenQ BL2711U(4K) and a hp 27vx(1080p)
    Screen Resolution
    1920 x 1080 x 32 bits (4294967296 colors) @ 60 Hz
    Hard Drives
    C: Samsung 960 EVO NVMe M.2 SSD
    E: & O: Libraries & OneDrive-> Samsung 850 EVO 1TB
    D: Hyper-V VM's -> Samsung PM951 Client M.2 512Gb SSD
    G: System Images -> HDD Seagate Barracuda 2TB
    PSU
    Corsair HX1000i High Performance ATX Power Supply 80+ Platinum
    Case
    hanteks Enthoo Pro TG
    Cooling
    Thermaltake Floe Riing RGB TT Premium-Edition 360mm and 3 Corsair blue LED fans
    Keyboard
    Trust GTX THURA
    Mouse
    Trust GTX 148
    Internet Speed
    25+/5+ (+usually faster)
    Browser
    Edge; Chrome; IE11
    Antivirus
    Windows Defender of course & Malwarebytes Anti-Exploit as a
    Other Info
    Router: FRITZ!Box 7590 AX V2
    Sound system: SHARP HT-SBW460 Dolby Atmos Soundbar
    Webcam: Logitech BRIO ULTRA HD PRO WEBCAM 4K webcam with HDR
I'm happy to hear that it's found to be helpful by them. :)
 

My Computer

System One

  • OS
    64-bit Windows 10
    Computer type
    PC/Desktop
    System Manufacturer/Model
    Custom self built
    CPU
    Intel i7-8700K OC'd to 5 GHz
    Motherboard
    ASUS ROG Maximus XI Formula Z390
    Memory
    64 GB (4x16GB) G.SKILL TridentZ RGB DDR4 3600 MHz (F4-3600C18D-32GTZR)
    Graphics Card(s)
    ASUS ROG-STRIX-GTX1080TI-O11G-GAMING
    Sound Card
    Integrated Digital Audio (S/PDIF)
    Monitor(s) Displays
    2 x Samsung Odyssey G7 27"
    Screen Resolution
    2560x1440
    Hard Drives
    1TB Samsung 990 PRO M.2,
    4TB Samsung 990 PRO PRO M.2,
    8TB WD MyCloudEX2Ultra NAS
    PSU
    OCZ Series Gold OCZZ1000M 1000W
    Case
    Thermaltake Core P3
    Cooling
    Corsair Hydro H115i
    Keyboard
    Logitech wireless K800
    Mouse
    Logitech MX Master 3
    Internet Speed
    1 Gb/s Download and 35 Mb/s Upload
    Browser
    Internet Explorer 11
    Antivirus
    Malwarebyte Anti-Malware Premium
    Other Info
    Logitech Z625 speaker system,
    Logitech BRIO 4K Pro webcam,
    HP Color LaserJet Pro MFP M477fdn,
    APC SMART-UPS RT 1000 XL - SURT1000XLI,
    Galaxy S23 Plus phone
Oh and by the way, to get to the logs(any log actually) all a user needs to do is copy & paste the address you post into Run dialog(except when a user folder is involved) and notepad pops up;)
 

My Computer

System One

  • OS
    Windows 8.1 Update Pro in Hyper-V/Windows 10 Pro 64 bit
    Computer type
    PC/Desktop
    System Manufacturer/Model
    Cliff's Black & Blue Wonder
    CPU
    Intel Core i9-9900K
    Motherboard
    ASUS ROG Maximus X Hero
    Memory
    32 GB Quad Kit, G.Skill Trident Z RGB Series schwarz, DDR4-3866, 18-19-19-39-2T
    Graphics Card(s)
    ASUS GeForce RTX 3090 ROG Strix O24G, 24576 MB GDDR6X
    Sound Card
    (1) HD Webcam C270 (2) NVIDIA High Definition Audio (3) Realtek High Definition Audio
    Monitor(s) Displays
    BenQ BL2711U(4K) and a hp 27vx(1080p)
    Screen Resolution
    1920 x 1080 x 32 bits (4294967296 colors) @ 60 Hz
    Hard Drives
    C: Samsung 960 EVO NVMe M.2 SSD
    E: & O: Libraries & OneDrive-> Samsung 850 EVO 1TB
    D: Hyper-V VM's -> Samsung PM951 Client M.2 512Gb SSD
    G: System Images -> HDD Seagate Barracuda 2TB
    PSU
    Corsair HX1000i High Performance ATX Power Supply 80+ Platinum
    Case
    hanteks Enthoo Pro TG
    Cooling
    Thermaltake Floe Riing RGB TT Premium-Edition 360mm and 3 Corsair blue LED fans
    Keyboard
    Trust GTX THURA
    Mouse
    Trust GTX 148
    Internet Speed
    25+/5+ (+usually faster)
    Browser
    Edge; Chrome; IE11
    Antivirus
    Windows Defender of course & Malwarebytes Anti-Exploit as a
    Other Info
    Router: FRITZ!Box 7590 AX V2
    Sound system: SHARP HT-SBW460 Dolby Atmos Soundbar
    Webcam: Logitech BRIO ULTRA HD PRO WEBCAM 4K webcam with HDR
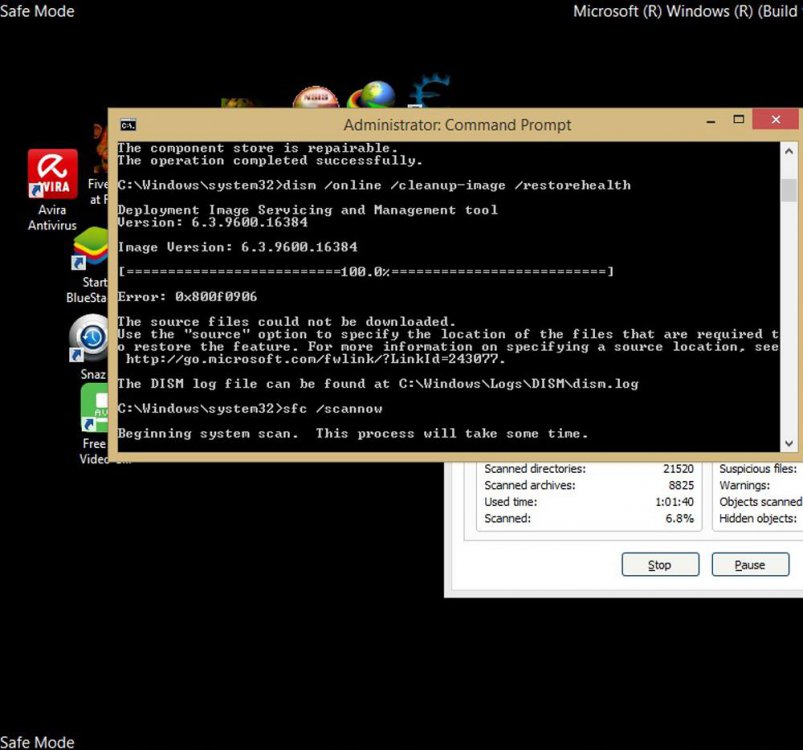
Guys please help I tried a sfc /scannow and then after the scan it says corrupted files where found but was unable to fix some of them so I did a dism /restorehealth then it says the source files could not be found. I already tried downloading net frame work 3.5 on windows update but it only got corrupted and lead me to a undoing changes restart loop. so I delete the update. I also tried this code:

net stop wuauerv

cd%systemroot%\softwaredistribution

ren download download.old

net start wuauserv

net stop bits

net start bits

net stop cryptsvc

cd%systemroot%\system32

ren catroot2 catroot2old

net start cryptsvc

then it says dism failed no operation was performed. please help I dont know what to do. I'm also a computer noob and I dont want to reformat or fresh install my laptop. My system restore also dont work because of the corrupted files. :(
 

My Computer

System One

  • OS
    windows 8.1
Hello Mike, :)

If you haven't already, see if you may be able to use step 6 in Option 1 or 2 to run the DISM command with a mounted Windows 8.1 ISO file.

If that is successful, try running SFC again.
 

My Computer

System One

  • OS
    64-bit Windows 10
    Computer type
    PC/Desktop
    System Manufacturer/Model
    Custom self built
    CPU
    Intel i7-8700K OC'd to 5 GHz
    Motherboard
    ASUS ROG Maximus XI Formula Z390
    Memory
    64 GB (4x16GB) G.SKILL TridentZ RGB DDR4 3600 MHz (F4-3600C18D-32GTZR)
    Graphics Card(s)
    ASUS ROG-STRIX-GTX1080TI-O11G-GAMING
    Sound Card
    Integrated Digital Audio (S/PDIF)
    Monitor(s) Displays
    2 x Samsung Odyssey G7 27"
    Screen Resolution
    2560x1440
    Hard Drives
    1TB Samsung 990 PRO M.2,
    4TB Samsung 990 PRO PRO M.2,
    8TB WD MyCloudEX2Ultra NAS
    PSU
    OCZ Series Gold OCZZ1000M 1000W
    Case
    Thermaltake Core P3
    Cooling
    Corsair Hydro H115i
    Keyboard
    Logitech wireless K800
    Mouse
    Logitech MX Master 3
    Internet Speed
    1 Gb/s Download and 35 Mb/s Upload
    Browser
    Internet Explorer 11
    Antivirus
    Malwarebyte Anti-Malware Premium
    Other Info
    Logitech Z625 speaker system,
    Logitech BRIO 4K Pro webcam,
    HP Color LaserJet Pro MFP M477fdn,
    APC SMART-UPS RT 1000 XL - SURT1000XLI,
    Galaxy S23 Plus phone
i tried doing DISM /Online /Cleanup-Image /RestoreHealth /source:WIM:c:\Sources\Install.wim:1 /LimitAccess because it was my c drive that was corrupt and then it says error 0x800f081f the source files could not be found. did i do something wrong with the code? is this what you mean dism restore with iso mount? :(
 
Last edited:

My Computer

System One

  • OS
    windows 8.1
It sounds like you didn't use the correct drive letter in the command for the source mounted ISO file.
 

My Computer

System One

  • OS
    64-bit Windows 10
    Computer type
    PC/Desktop
    System Manufacturer/Model
    Custom self built
    CPU
    Intel i7-8700K OC'd to 5 GHz
    Motherboard
    ASUS ROG Maximus XI Formula Z390
    Memory
    64 GB (4x16GB) G.SKILL TridentZ RGB DDR4 3600 MHz (F4-3600C18D-32GTZR)
    Graphics Card(s)
    ASUS ROG-STRIX-GTX1080TI-O11G-GAMING
    Sound Card
    Integrated Digital Audio (S/PDIF)
    Monitor(s) Displays
    2 x Samsung Odyssey G7 27"
    Screen Resolution
    2560x1440
    Hard Drives
    1TB Samsung 990 PRO M.2,
    4TB Samsung 990 PRO PRO M.2,
    8TB WD MyCloudEX2Ultra NAS
    PSU
    OCZ Series Gold OCZZ1000M 1000W
    Case
    Thermaltake Core P3
    Cooling
    Corsair Hydro H115i
    Keyboard
    Logitech wireless K800
    Mouse
    Logitech MX Master 3
    Internet Speed
    1 Gb/s Download and 35 Mb/s Upload
    Browser
    Internet Explorer 11
    Antivirus
    Malwarebyte Anti-Malware Premium
    Other Info
    Logitech Z625 speaker system,
    Logitech BRIO 4K Pro webcam,
    HP Color LaserJet Pro MFP M477fdn,
    APC SMART-UPS RT 1000 XL - SURT1000XLI,
    Galaxy S23 Plus phone
so what letter should I use then if it was my c drive that was corrupt? please tell me the step by step instructions because I'm not sure how to do it. :(
 

My Computer

System One

  • OS
    windows 8.1

My Computer

System One

  • OS
    64-bit Windows 10
    Computer type
    PC/Desktop
    System Manufacturer/Model
    Custom self built
    CPU
    Intel i7-8700K OC'd to 5 GHz
    Motherboard
    ASUS ROG Maximus XI Formula Z390
    Memory
    64 GB (4x16GB) G.SKILL TridentZ RGB DDR4 3600 MHz (F4-3600C18D-32GTZR)
    Graphics Card(s)
    ASUS ROG-STRIX-GTX1080TI-O11G-GAMING
    Sound Card
    Integrated Digital Audio (S/PDIF)
    Monitor(s) Displays
    2 x Samsung Odyssey G7 27"
    Screen Resolution
    2560x1440
    Hard Drives
    1TB Samsung 990 PRO M.2,
    4TB Samsung 990 PRO PRO M.2,
    8TB WD MyCloudEX2Ultra NAS
    PSU
    OCZ Series Gold OCZZ1000M 1000W
    Case
    Thermaltake Core P3
    Cooling
    Corsair Hydro H115i
    Keyboard
    Logitech wireless K800
    Mouse
    Logitech MX Master 3
    Internet Speed
    1 Gb/s Download and 35 Mb/s Upload
    Browser
    Internet Explorer 11
    Antivirus
    Malwarebyte Anti-Malware Premium
    Other Info
    Logitech Z625 speaker system,
    Logitech BRIO 4K Pro webcam,
    HP Color LaserJet Pro MFP M477fdn,
    APC SMART-UPS RT 1000 XL - SURT1000XLI,
    Galaxy S23 Plus phone
i dont know how to find my product key and will this erase all my computer programs and files cause I dont want that?


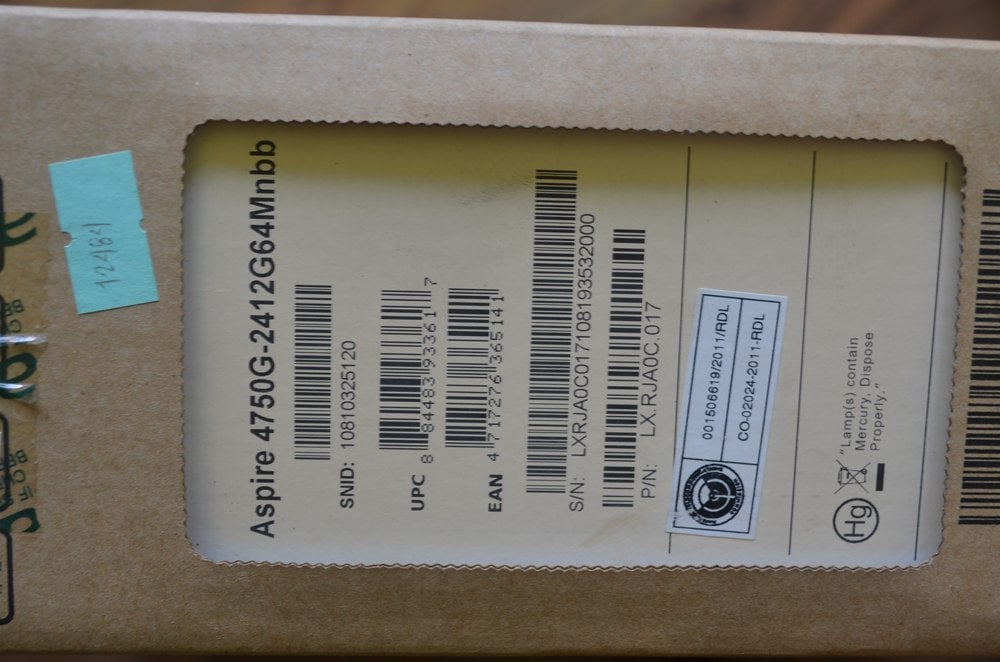
according to my asus box it says the following by the way i choose windows 8.1 pro/N iso. im not sure if I choose the right one all I know is I'm windows 8.1

DSC_0001.JPGDSC_0002.JPG
 

My Computer

System One

  • OS
    windows 8.1
No. Running the DISM command will only attempt to repair your Windows image to hopefully then let SFC to be able to repair your system files it found to be corrupted.
 

My Computer

System One

  • OS
    64-bit Windows 10
    Computer type
    PC/Desktop
    System Manufacturer/Model
    Custom self built
    CPU
    Intel i7-8700K OC'd to 5 GHz
    Motherboard
    ASUS ROG Maximus XI Formula Z390
    Memory
    64 GB (4x16GB) G.SKILL TridentZ RGB DDR4 3600 MHz (F4-3600C18D-32GTZR)
    Graphics Card(s)
    ASUS ROG-STRIX-GTX1080TI-O11G-GAMING
    Sound Card
    Integrated Digital Audio (S/PDIF)
    Monitor(s) Displays
    2 x Samsung Odyssey G7 27"
    Screen Resolution
    2560x1440
    Hard Drives
    1TB Samsung 990 PRO M.2,
    4TB Samsung 990 PRO PRO M.2,
    8TB WD MyCloudEX2Ultra NAS
    PSU
    OCZ Series Gold OCZZ1000M 1000W
    Case
    Thermaltake Core P3
    Cooling
    Corsair Hydro H115i
    Keyboard
    Logitech wireless K800
    Mouse
    Logitech MX Master 3
    Internet Speed
    1 Gb/s Download and 35 Mb/s Upload
    Browser
    Internet Explorer 11
    Antivirus
    Malwarebyte Anti-Malware Premium
    Other Info
    Logitech Z625 speaker system,
    Logitech BRIO 4K Pro webcam,
    HP Color LaserJet Pro MFP M477fdn,
    APC SMART-UPS RT 1000 XL - SURT1000XLI,
    Galaxy S23 Plus phone
No i mean will mounting the iso not the dism command erase my programs.

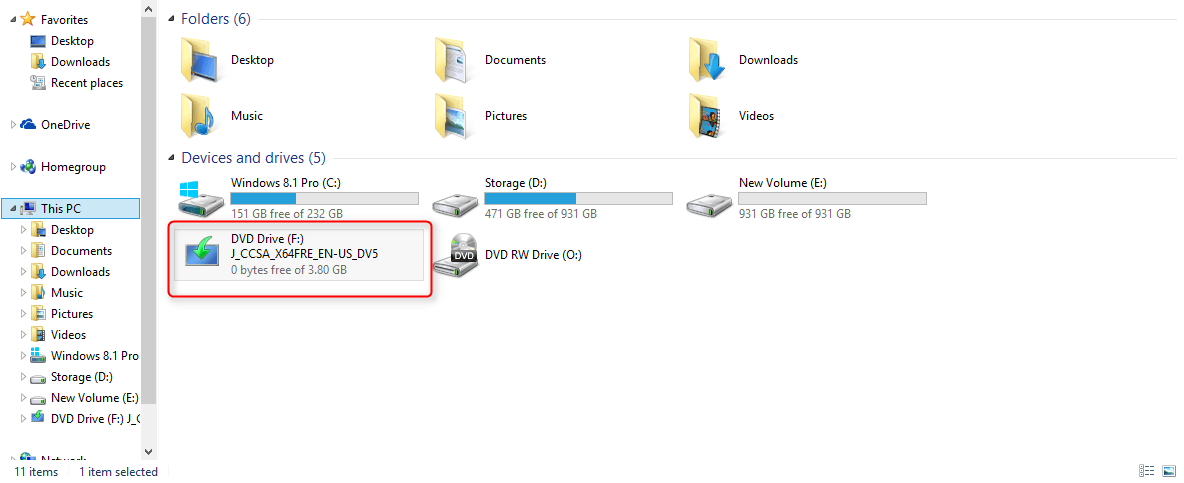
No, it wont erase anything. It just acts like another optical drive when mounted,

2015-11-24_23h47_18.png
 

My Computer

System One

  • OS
    Win 10 Pro x64
    Computer type
    PC/Desktop
    System Manufacturer/Model
    Self Built
    CPU
    Intel I5-2500K @3.3GHz
    Motherboard
    Asrock P67 Extreme4
    Memory
    16GB G.Skill Ripjaws X (4x4GB)
    Graphics Card(s)
    EVGA GeForce 750 Ti SC 2GB
    Sound Card
    ASUS Xonar DG 5.1 Channels 24-bit 96KHz PCI Interface Sound Card
    Monitor(s) Displays
    auria eq2367
    Screen Resolution
    1920 x 1080
    Hard Drives
    250GB Samsung 850 EVO SSD
    1TB WD Blue
    1TB Hitachi
    PSU
    SeaSonic X 650W 80 Plus Gold
    Case
    Corsair Obsidian 750D
    Cooling
    Corsair H60, Three 140mm case fans
    Keyboard
    Logitech Wireless Keyboard K520
    Mouse
    Logitech Wireless Mouse M310
    Internet Speed
    Wave Broadband ~ 100 dn 5 up
    Browser
    Chrome
    Antivirus
    Defender, Malwarebytes Premium
    Other Info
    Laptop specs: HP g7-1365dx /
    CPU: AMD A6-3420M APU with Radeon(tm) HD Graphics /
    RAM: Crucial 8Gb (2x4Gb) /
    SSD: Crucial M4-CT128M4SSD2 ATA Device/ FW 000F /
    GFX: AMD Radeon HD 6520G /
    OS: Windows 10 Pro x64
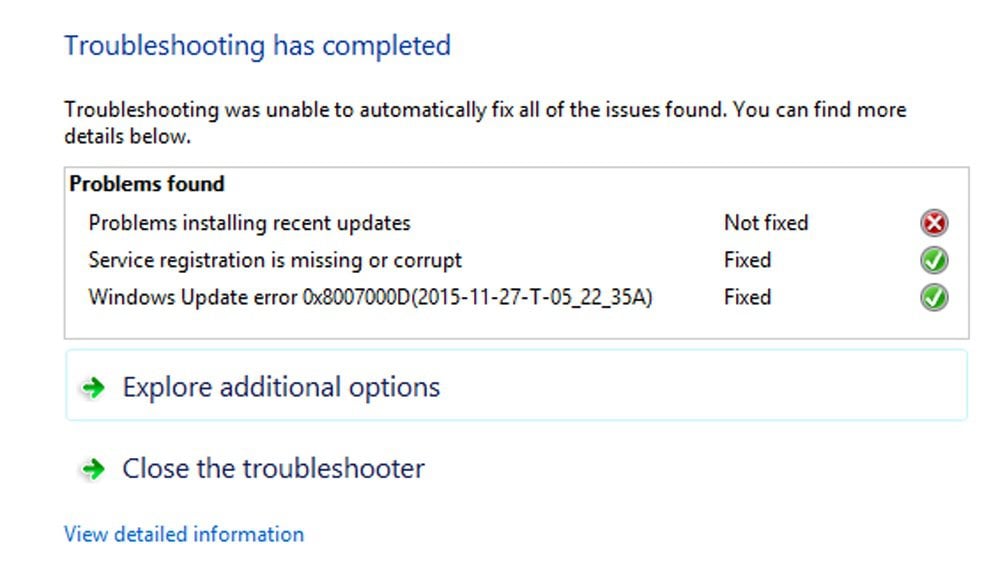
Guys I just found out that it's my windows update that is corrupt when I click an update a message pops out saying if I want to make the following changes with this program and then nothing happens it doesn't install or anything. AndUntitled.jpg when I use Windows update troubleshooter this pops out. Untitled-1.jpg I also tried the following as well Open an administrative Command Prompt window.Type the following commands, and press Enter after each command:
net stop cryptsvc
md %systemroot%\system32\catroot2.old
xcopy %systemroot%\system32\catroot2 %systemroot%\system32\catroot2.old /s
Delete all contents of the catroot2 folder, but do not delete the catroot2 folder.
Type the following command, and then press Enter:
net start cryptsvc
Exit the Command Prompt window.


Open an administrative Command Prompt window.
At the command prompt, type the following command:
REGSVR32 WUPS2.DLL /S
REGSVR32 WUPS.DLL /S
REGSVR32 WUAUENG.DLL /S
REGSVR32 WUAPI.DLL /S
REGSVR32 WUCLTUX.DLL /S
REGSVR32 WUWEBV.DLL /S
REGSVR32 JSCRIPT.DLL /S
REGSVR32 MSXML3.DLL /S
Try to install updates again.


To do this, follow these steps:
Open an administrative Command Prompt window.
At the command prompt, type the following commands, and press Enter after each command:


Net stop bits
Net stop wuauserv
Ipconfig /flushdns
cd \documents and settings\all users\application data\microsoft\network\downloader
Del qmgr0.dat
Del qmgr1.dat
Net start bits
Net start wuauserv
Note After you complete these steps, the BITS queue is cleared.
Try to install updates again.


To do this, follow these steps:
Open an administrative Command Prompt window.
At the command prompt, type the following command:
takeown /f C:\Windows\winsxs\pending.xml
Rename the c:\windows\winsxs\pending.xml path by using the following command:
Ren c:\windows\winsxs\pending.xml pending.old

Automatic repair also do not work

For some reason none of this work. Please help I don't know what to do and I don't want to reformat my laptop.
 

My Computer

System One

  • OS
    windows 8.1

My Computer

System One

  • OS
    64-bit Windows 10
    Computer type
    PC/Desktop
    System Manufacturer/Model
    Custom self built
    CPU
    Intel i7-8700K OC'd to 5 GHz
    Motherboard
    ASUS ROG Maximus XI Formula Z390
    Memory
    64 GB (4x16GB) G.SKILL TridentZ RGB DDR4 3600 MHz (F4-3600C18D-32GTZR)
    Graphics Card(s)
    ASUS ROG-STRIX-GTX1080TI-O11G-GAMING
    Sound Card
    Integrated Digital Audio (S/PDIF)
    Monitor(s) Displays
    2 x Samsung Odyssey G7 27"
    Screen Resolution
    2560x1440
    Hard Drives
    1TB Samsung 990 PRO M.2,
    4TB Samsung 990 PRO PRO M.2,
    8TB WD MyCloudEX2Ultra NAS
    PSU
    OCZ Series Gold OCZZ1000M 1000W
    Case
    Thermaltake Core P3
    Cooling
    Corsair Hydro H115i
    Keyboard
    Logitech wireless K800
    Mouse
    Logitech MX Master 3
    Internet Speed
    1 Gb/s Download and 35 Mb/s Upload
    Browser
    Internet Explorer 11
    Antivirus
    Malwarebyte Anti-Malware Premium
    Other Info
    Logitech Z625 speaker system,
    Logitech BRIO 4K Pro webcam,
    HP Color LaserJet Pro MFP M477fdn,
    APC SMART-UPS RT 1000 XL - SURT1000XLI,
    Galaxy S23 Plus phone
i did what the tutorial said and looks like it installed properly and when i go to windows update troubleshoot it says everything was fixed including the installing recent updates but when i use sfc /scannow it still says corrupted files where found but was unable to fix some of them and when i use dism /restorehealth it says source files could not be downloaded. So what do i do now?

i also attached my cbs log below so maybe you guys can help me figure it out becuase i dont know how to analyze the cbs log.

cbs log
 
Last edited:

My Computer

System One

  • OS
    windows 8.1

My Computer

System One

  • OS
    64-bit Windows 10
    Computer type
    PC/Desktop
    System Manufacturer/Model
    Custom self built
    CPU
    Intel i7-8700K OC'd to 5 GHz
    Motherboard
    ASUS ROG Maximus XI Formula Z390
    Memory
    64 GB (4x16GB) G.SKILL TridentZ RGB DDR4 3600 MHz (F4-3600C18D-32GTZR)
    Graphics Card(s)
    ASUS ROG-STRIX-GTX1080TI-O11G-GAMING
    Sound Card
    Integrated Digital Audio (S/PDIF)
    Monitor(s) Displays
    2 x Samsung Odyssey G7 27"
    Screen Resolution
    2560x1440
    Hard Drives
    1TB Samsung 990 PRO M.2,
    4TB Samsung 990 PRO PRO M.2,
    8TB WD MyCloudEX2Ultra NAS
    PSU
    OCZ Series Gold OCZZ1000M 1000W
    Case
    Thermaltake Core P3
    Cooling
    Corsair Hydro H115i
    Keyboard
    Logitech wireless K800
    Mouse
    Logitech MX Master 3
    Internet Speed
    1 Gb/s Download and 35 Mb/s Upload
    Browser
    Internet Explorer 11
    Antivirus
    Malwarebyte Anti-Malware Premium
    Other Info
    Logitech Z625 speaker system,
    Logitech BRIO 4K Pro webcam,
    HP Color LaserJet Pro MFP M477fdn,
    APC SMART-UPS RT 1000 XL - SURT1000XLI,
    Galaxy S23 Plus phone
Back
Top