How to Restore Files and Folders from a Backup in Windows 8
This tutorial will show you how to restore selected files and folders from a Windows Backup that you previously created in Windows 8.
If you upgraded to Windows 8 from a previous version of Windows (ex: Vista or Windows 7) and had scheduled backups set up in Backup and Restore, Windows will continue to use your backup schedule. If you used Backup and Restore in a previous version of Windows, you can still restore files from those backups.
If you upgraded to Windows 8 from a previous version of Windows (ex: Vista or Windows 7) and had scheduled backups set up in Backup and Restore, Windows will continue to use your backup schedule. If you used Backup and Restore in a previous version of Windows, you can still restore files from those backups.
New backups are saved in this format:
drive letter:\computer name\Backup Set YYYY-MM-DD HHMMSS
To help maximize your disk space, Windows Backup will only do a new full backup of all files in your selected folders the first time it runs, and then only does an incremental backup of files that are new or have been changed since the last scheduled backup was made.
Each new full differential backup is created in a set known as a backup period labeled with date ranges as the Backup Set YYYY-MM-DD HHMMSS folder(s) in the computer name (ex: BRINK-PC) folder. This is when you setup a backup for the first time (step 3 below), or create a new full backup.
Incremental backups are the Backup Files YYYY-MM-DD HHMMSS folder(s) created in the Backup Set YYYY-MM-DD HHMMSS folder when you click/tap on Back up now (step 5 below) for the existing backup you setup. Each Backup Files YYYY-MM-DD HHMMSS folder contains Backup files #.zip folders that contain your actual backed up files for that date and time.
drive letter:\computer name\Backup Set YYYY-MM-DD HHMMSS
For example: If your computer name is Brink-PC, your backup location is on hard drive (network or local) D: , and you backed up on August 29th 2012 at 1:53:41 PM (it will use 24 hour time), then your backup would be located in the folder below. You will need to right click on BRINK-PC (computer name), and click/tap on Open to be able to see the Backup Set YYYY-MM-DD HHMMSS folder.
D:\BRINK-PC\Backup Set 2012-08-29 135341
To help maximize your disk space, Windows Backup will only do a new full backup of all files in your selected folders the first time it runs, and then only does an incremental backup of files that are new or have been changed since the last scheduled backup was made.
Each new full differential backup is created in a set known as a backup period labeled with date ranges as the Backup Set YYYY-MM-DD HHMMSS folder(s) in the computer name (ex: BRINK-PC) folder. This is when you setup a backup for the first time (step 3 below), or create a new full backup.
Incremental backups are the Backup Files YYYY-MM-DD HHMMSS folder(s) created in the Backup Set YYYY-MM-DD HHMMSS folder when you click/tap on Back up now (step 5 below) for the existing backup you setup. Each Backup Files YYYY-MM-DD HHMMSS folder contains Backup files #.zip folders that contain your actual backed up files for that date and time.
In Windows 8.1 and Windows RT 8.1, the Windows 7 File Recovery (aka: Windows Backup) feature in this tutorial is no longer available.
If you like, you could use File History instead of Windows Backup, and a custom refresh image instead of System Image. You could also use a 3rd party program like Macrium Reflect instead.
If you like, you could use File History instead of Windows Backup, and a custom refresh image instead of System Image. You could also use a 3rd party program like Macrium Reflect instead.
OPTION ONE
To Restore Backup Files and Folders from the Backup Location
NOTE: You must be signed in as an administrator to be able to use this option.
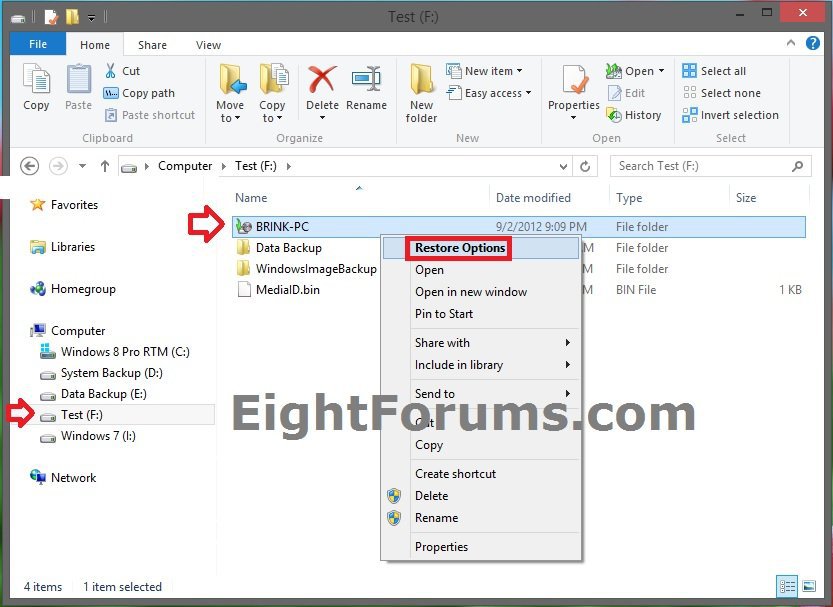
1. Open the backup drive location that you saved your backup to, then double click/tap on the computer name shortcut (ex: Brink-PC). (see screenshot below)
NOTE: You could also right click on the computer name shortcut, and click/tap on Restore Options.
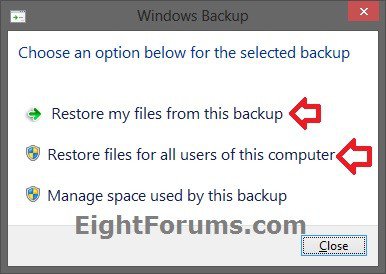
2. If this is your current backup location (ex: System Backup D: ), then click/tap on the restore option you would like to use. (see screenshot below)
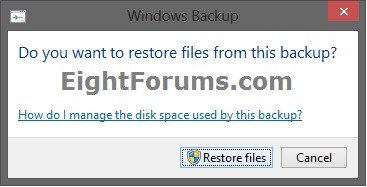
3. If this is NOT your current backup location, then click/tap on Restore files. (see screenshot below)
4. If prompted by UAC, then click/tap on Yes.
5. Go to step 6 in OPTION TWO below.
OPTION TWO
To Restore Backup Files and Folders from "Windows 7 File Recovery"
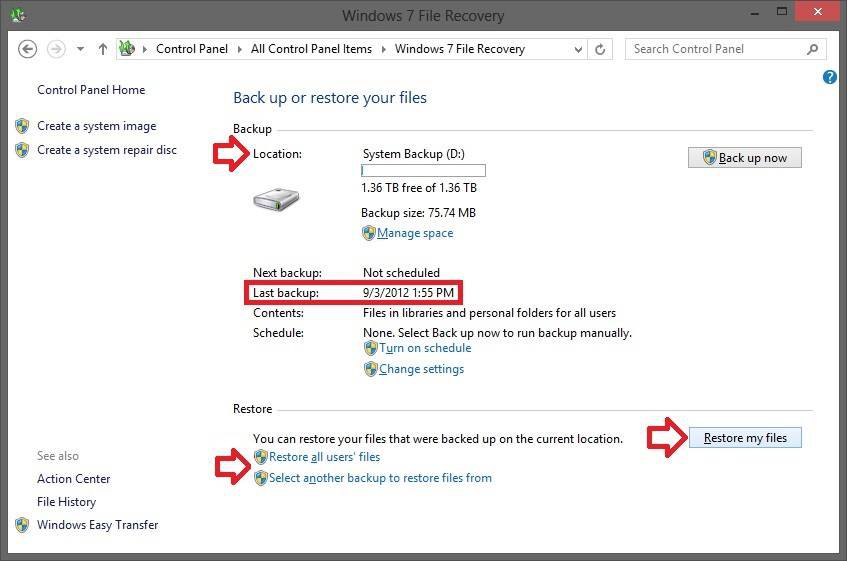
1. Open the Control Panel (icons view), and click/tap on the Windows 7 File Recovery icon.
2. Do step 3, 4, or 5 below depending on how and what you would like to restore. (see screenshot below)
3. To Restore Your Files and Folders from Current Backup Location
NOTE: You can be signed in as any type (ex: standard or administrator) of user to use this step.
A) Click/tap on the Restore my files button, and go to step 6 below. (see screenshot below step 2)
4. To Restore All Users' Files and Folders from Current Backup Location
NOTE: You must be signed in as an administrator to be able to use this step.
A) Click/tap on the Restore all users' files link, click/tap on Yes if prompted by UAC, and go to step 6 below. (see screenshot below step 2)
5. To Select Another Backup Location to Restore Files and Folders from
NOTE: You must be signed in as an administrator to be able to use this step.
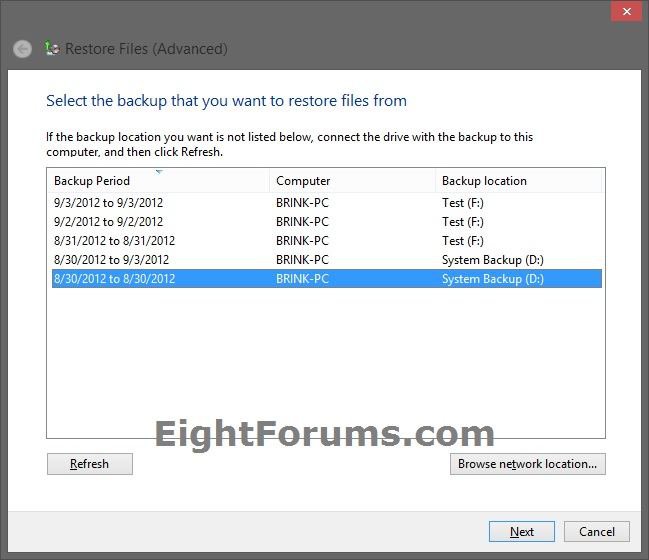
A) Click/tap on the Select another backup to restore files from link, and click/tap on Yes if prompted by UAC. (see screenshot below step 2)
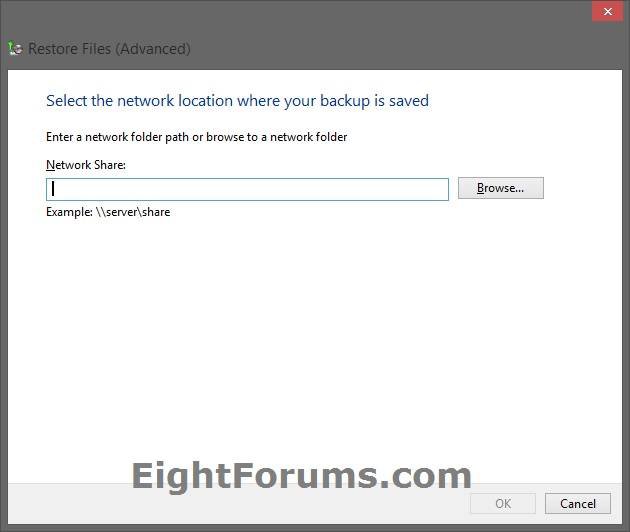
B) If you wanted to select a backup from a network location, then click/tap on the Browse network location button, enter a network folder path or browse to and select a network folder, and click/tap on OK. (see screenshots below)
C) Select a backup period from a backup location that you would like to restore files and folders from, then click/tap on the Next button. (see left screenshot above)
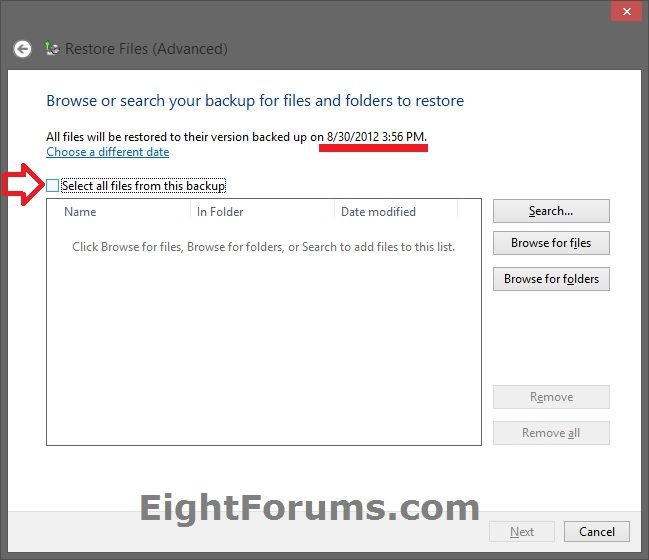
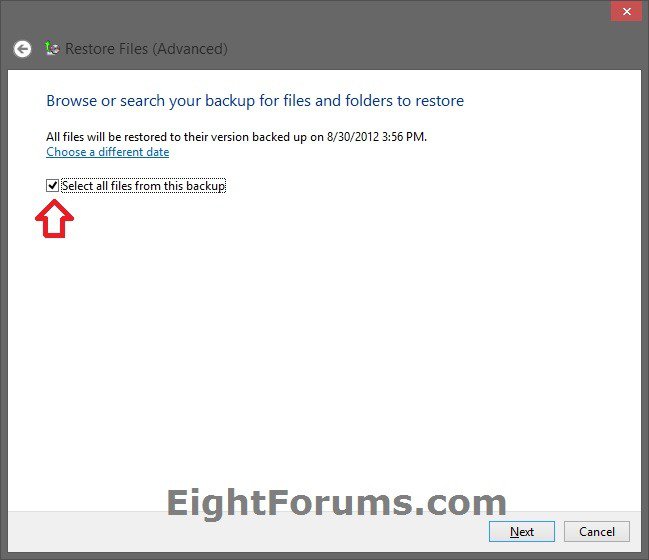
D) If you would like to restore all files and folders from the selected backup period, then check the Select all files from this backup box, click/tap on Next, and go to step ## below. (see screenshots below)
E) If not, then leave the Select all files from this backup box unchecked and go to step 6 below.
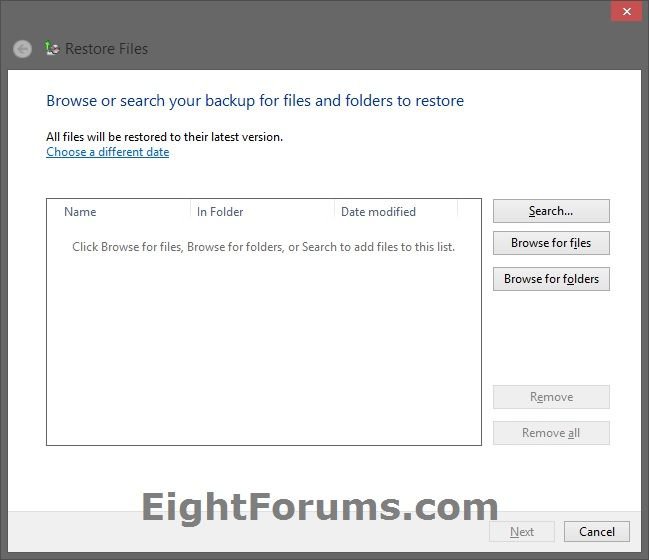
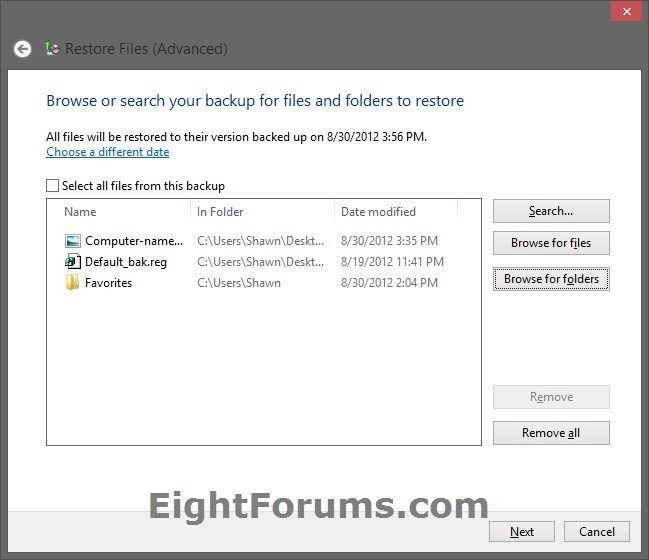
6. Do step 7, 8, 9, and/or 10 below for what you would like to restore. (see screenshot below)
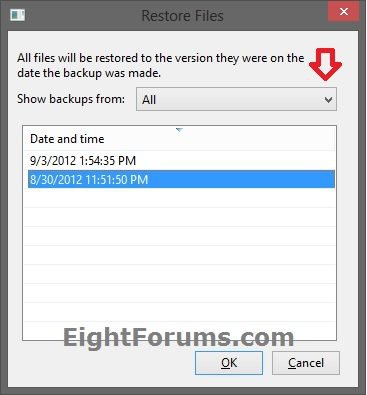
7. To Choose a Different Date and Time a Backup was Made
NOTE: This will allow you to select a data and time a backup was made to be able to restore the version of files and folders as they were at that date and time. Choosing a different date will remove all items you currently have in the restore list.
A) Click/tap on the Choose a different date link. (see screenshot below step 6)
B) Select to show backups from the period (ex: All, last week, etc...) you want. (see screenshot below)
C) Select a date and time for the version of files and folders you want to restore from, and click/tap on OK. (see screenshot below)
D) Do step 8, 9, and/or 10 below for what you would like to restore.
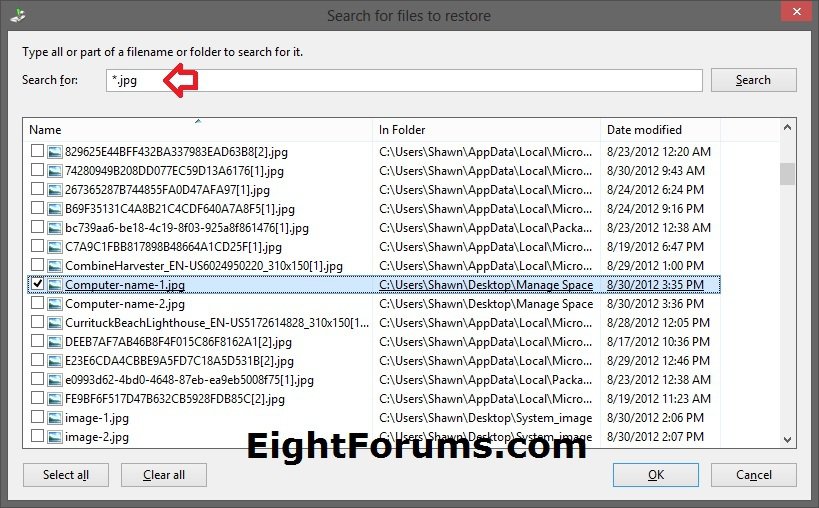
8. To Search for a File or Folder to Restore
NOTE: This will allow you to do a search for a file and folder from the selected backup date and time to add to the restore list.
A) Click/tap on the Search button. (see screenshot below step 6)
B) Type all or part of a file or folder name you want to search for, and click/tap on Search. (see screenshot below)
NOTE: You can also use wildcard characters such as *.jpg to search for all .jpg files in the backup.
C) In the search results, check the boxes of any files and folders you would like to add to the restore list, and click/tap on OK when finished. (see screenshot above)
D) Go to step 11 below.
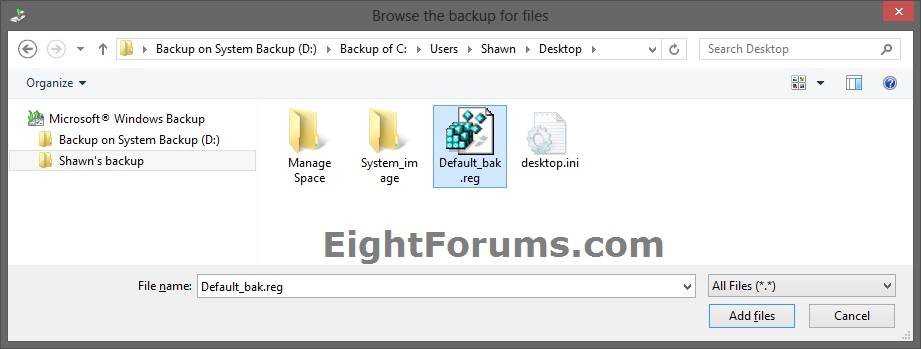
9. To Select a File to Restore
NOTE: This will allow you to browse and select a file from the selected backup date and time to add to the restore list.
A) Click/tap on the Browse for files button. (see screenshot below step 6)
B) Navigate to and select (highlight) one or more file(s) that you want to add to the restore list, and click/tap on the Add files button. (see screenshot below)
C) Go to step 11 below.
10. To Select a Folder to Restore
NOTE: This will allow you to browse and select a folder from the selected backup date and time to add to the restore list. All files in the selected folder will be included as well.
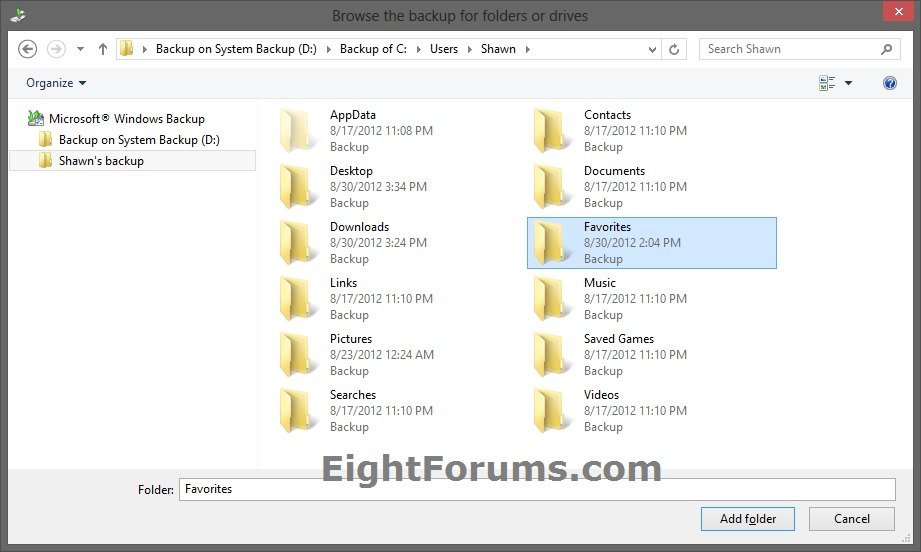
A) Click/tap on the Browse for folders button. (see screenshot below step 6)
B) Navigate to and select a folder that you want to add to the restore list, and click/tap on the Add folder button. (see screenshot below)
NOTE: This will include all files and subfolders in the selected folder.
C) Go to step 11 below.
11. If you like, you can repeat steps 8, 9, and 10 above to add more files and folders to the list.
12. If you made any mistakes, you can select an added file or folder, and click/tap on Remove to remove it from the restore list. (see screenshot below)
13. When finished, click/tap on Next. (see screenshot above)
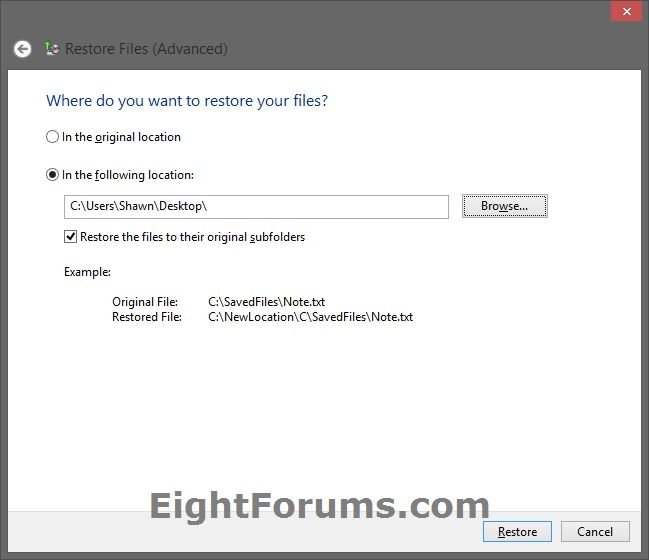
14. Select (dot) where you want to restore the backup files to, and click/tap on the Restore button. (see screenshot below)
- In the original location - Restores the files and folders on the restore list to the same locations on the computer as they were originally backed up from.
- In the following location - Allows you to restore files and folders on the restore list to a location of your choice instead. For example, all in a folder on your desktop.
- You have the choice to restore the files to their original subfolders (checked) or to restore only the selected files and folders (unchecked) in a folder at the selected location.
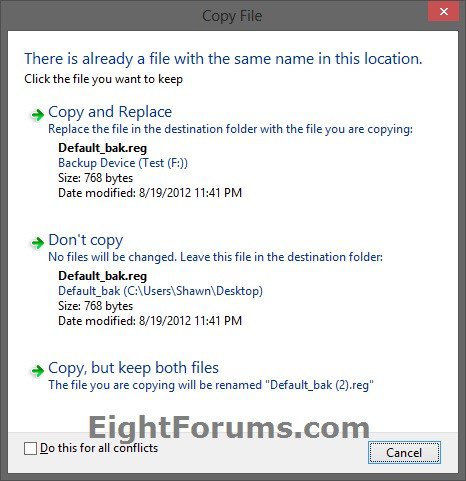
15. If you already have existing copies of the selected files and folders to restore at the location you have selected in step 14, then click/tap on the option you would like to do. (see screenshot below)
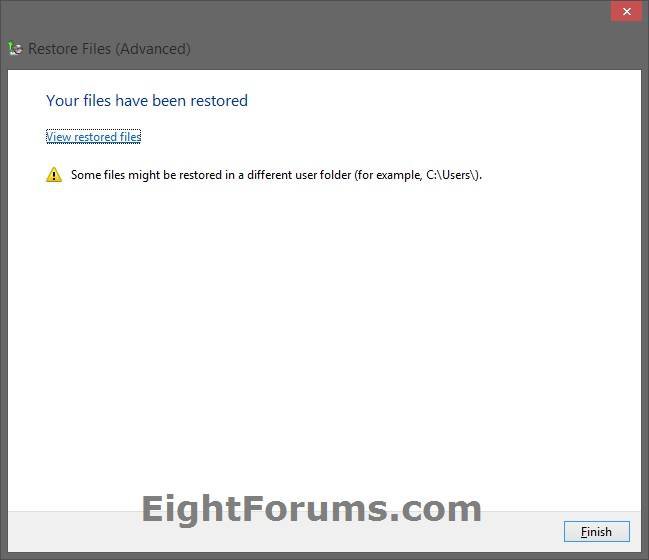
16. When it is finished restoring the files and folders from the restore list, click/tap on the Finish button. (see screenshot below)
NOTE: You could also click/tap on the View restore files link to view the restored files and folders.
17. When finished, you can close the Windows 7 File Recovery window if you like. (see screenshot below step 2)
That's it,
Shawn
Related Tutorials
- Create a "Restore Backup User and System Files" Shortcut in Windows 7 and Windows 8
- How to Create or Set Up Windows Backup to Backup Files in Windows 8
- How to Turn On or Off the Backup Schedule in Windows 8
- How to View and Manage Space for Backups in Windows 8
- How to Set up and Use File History in Windows 8
- How to Restore Previous Versions of your Files with File History in Windows 8
- How to Do a System Restore in Windows 8
- How to Do a System Image Recovery in Windows 8
- How to Manually Extract System Image Files Using Disk Management in Windows 8
Attachments
Last edited:

