UEFI Bootable USB Flash Drive - Create in Windows

How to Create a Bootable UEFI USB Flash Drive for Installing Windows 7, Windows 8, or Windows 8.1

This tutorial will show you how to create a Windows 7 or Windows 8 or 8.1 installation bootable USB flash drive for UEFIfrom either a Windows 7 or Windows 8/8.1 installation ISO or DVD.

Requirements:
  • At least a 4GB USB flash drive
  • 64-bit Windows 7 ISO or DVD (If you want to install Windows 7)
  • 64-bit Windows 8 ISO or DVD (If you want to install Windows 8)
  • 64-bit Windows 8.1 ISO or DVD (If you want to install Windows 8.1)
  • 32-bit is not supported.
  • Set the boot mode to use UEFI and not CSM (Compatibility Support Module) in your UEFI firmware settings.
  • Temporarily disable Secure Boot in your UEFI firmware settings. Some motherboards will not boot from a USB unless you do this first. When the Windows installation is finished, you can enable secure boot if you like.
  • If you have fast boot or ultra-fast boot enabled in your UEFI firmware (if supported), then you may need to temporarily disable it until Windows has finished installing to be able to boot from a USB flash drive at boot.

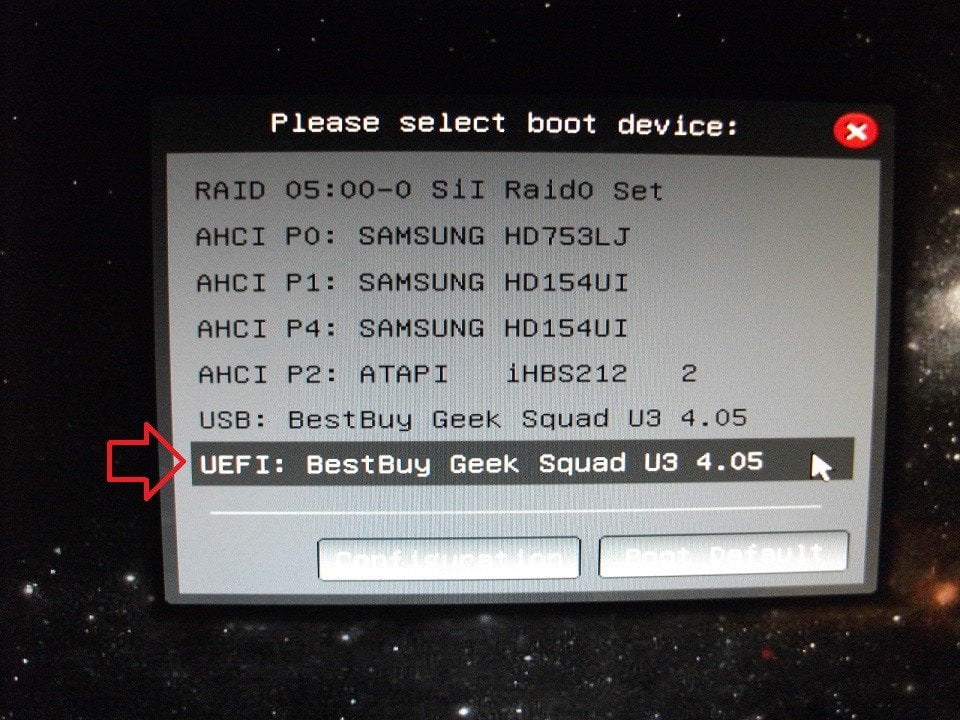
EXAMPLE: UEFI Bootable USB Flash Drive
NOTE: This is it listed in the motherboard's boot menu.
UEFI_USB_Boot_Menu.jpg


OPTION ONE

To Create a Bootable UEFI USB Flash Drive using Free Program "Rufus"


1. Download the latest version of Rufus at the link below, and save it's .exe file to your desktop.

Note   Note
This is a standalone exe file that doesn't install anything to your PC
For Rufus FAQs, see: FAQ · pbatard/rufus Wiki · GitHub


Rufus - Create bootable USB drives the easy way


2. Connect your USB flash drive if you have not already.

3. Run the rufus_v###.exe file, and click/tap on Yes if prompted by UAC.
NOTE: ### = latest version number.

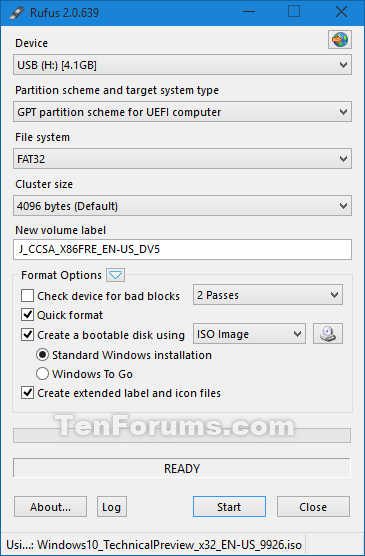
4. Set Rufus with the settings below: (see screenshot below step 5)


  • Under Device, select the USB flash drive you want to format and use.
  • Under Format Options, check Create a bootable disk using, click/tap on the browse icon icon.jpg to navigate to and select your 64-bit Windows 7 or Windows 8 or Windows 8.1 ISO file, and then make sure that Standard Windows installation is selected (dotted).
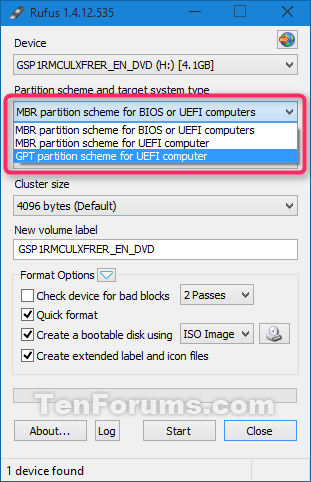
  • Under Partition scheme and target system type, select GPT partition scheme for UEFI computer.
  • Under File system, select FAT32.
  • Under Cluster size, select the (Default) (ex: 16 kilobytes or 4096 bytes) it has listed.
  • Under Format Options, check Quick format.
  • Under Format Options, check Create extended label and icon files.
  • Under New volume label, you can enter any name you like for the USB flash drive, or leave the default name.

5. When ready, click/tap on Start. (see screenshot below)

Rufus_UEFI.png


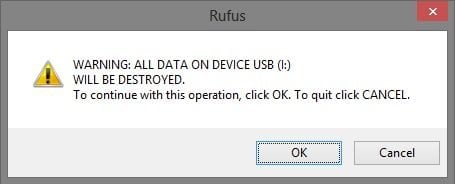
6. Click/tap on OK to confirm. (see screenshot below)
Rufus-confirm.jpg


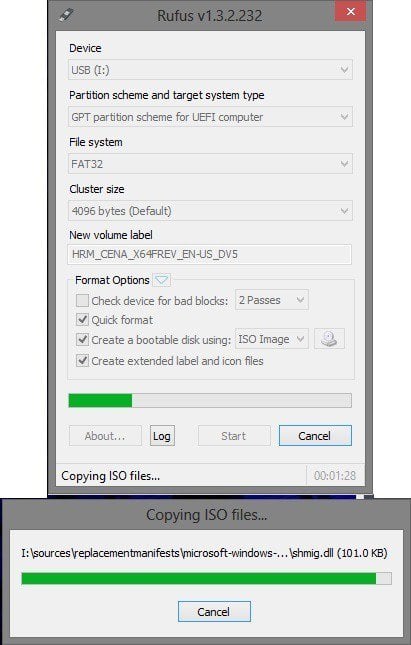
7. Rufus will now start creating the bootable UEFI USB flash drive. (see screenshot below)
Rufus_working.jpg


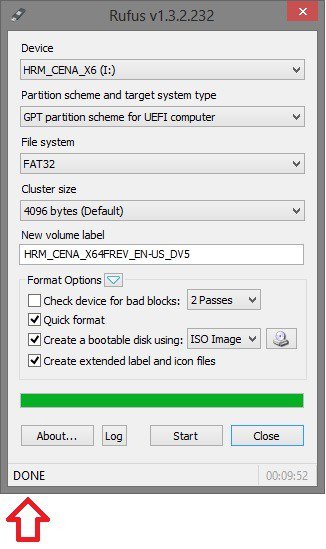
8. When Rufus is "DONE", you can close Rufus. (see screenshot below)
NOTE: It could take a little while to finish.
Rufus_Done.jpg


9. You are now ready to do a clean install of Windows 7 or Windows 8/8.1 using UEFI with your bootable UEFI USB flash drive.


OPTION TWO

To Manually Create a Bootable UEFI USB Flash Drive


1. Connect the USB flash drive.

2. Open an elevated command prompt in Windows 7 or Windows 8/8.1.

3. In the elevated command prompt, type the commands below one at a time and press Enter after each one. (see screenshot below step 5)

  • diskpart
  • list disk

4. Make note of the Disk # (ex: Disk 4) for the USB flash drive. (see screenshot below step 5)

It is critical that you use the correct disk #. If you do not, then you could delete the wrong drive below and lose everything on it


5. In the elevated command prompt, type the commands below one at a time and press Enter after each one. (see screenshot below)
NOTE: Substitute # in the first command with the actual disk # from step 4 above. For example: select disk 4
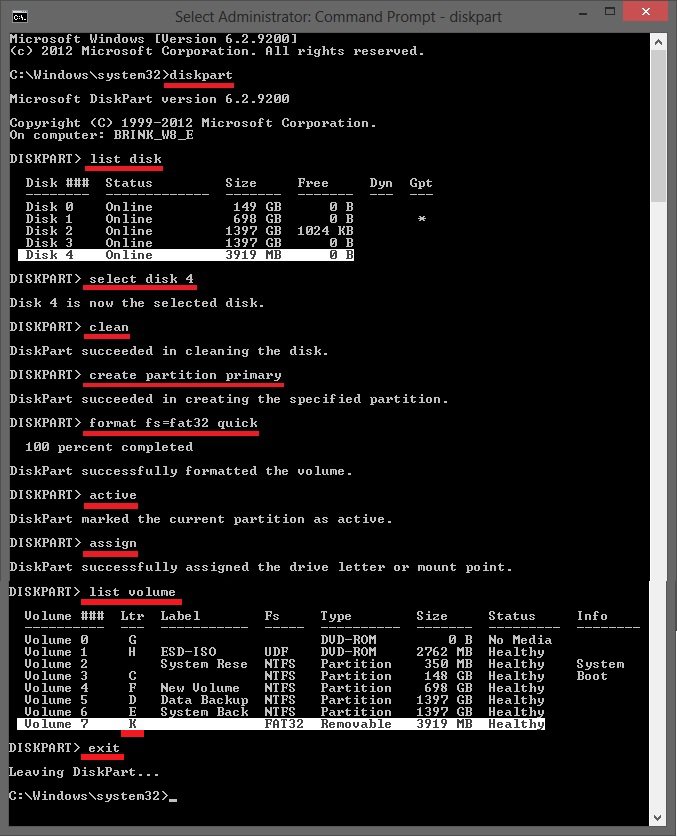

  • select disk #
  • detail disk (this is to verify that you selected the correct disk before using "clean" below)
  • clean
  • create partition primary
  • format fs=fat32 quick
  • active
  • assign
  • list volume
  • exit

Create_UEFI_USB-1.jpg


6. Make note of the volume letter (ex: K) for the USB flash drive in the command prompt. (see screenshot above)

7. Do step 8, step 9, or step 10 below depending on if you are using a Windows 7/8/8.1 ISO or DVD.

warning   Warning
It has been reported that using the downloaded Windows 8 upgrade ISO does not always give you an UEFI bootable USB option in the boot menu.

If this happens to you, then use the ESD-TO-ISO.exe program created by our member Simon (SIW2) below to create an ISO that will work with UEFI. Afterwards, start this tutorial over using this new ISO instead.

See OPTION TWO here: Windows 8 and Windows 8.1 ISO - Download or Create

download


8. If Using a Windows 7 or Windows 8/8.1 ISO File in Windows 8
NOTE: For a Windows 7 ISO or Windows 8/8.1 ISO file.


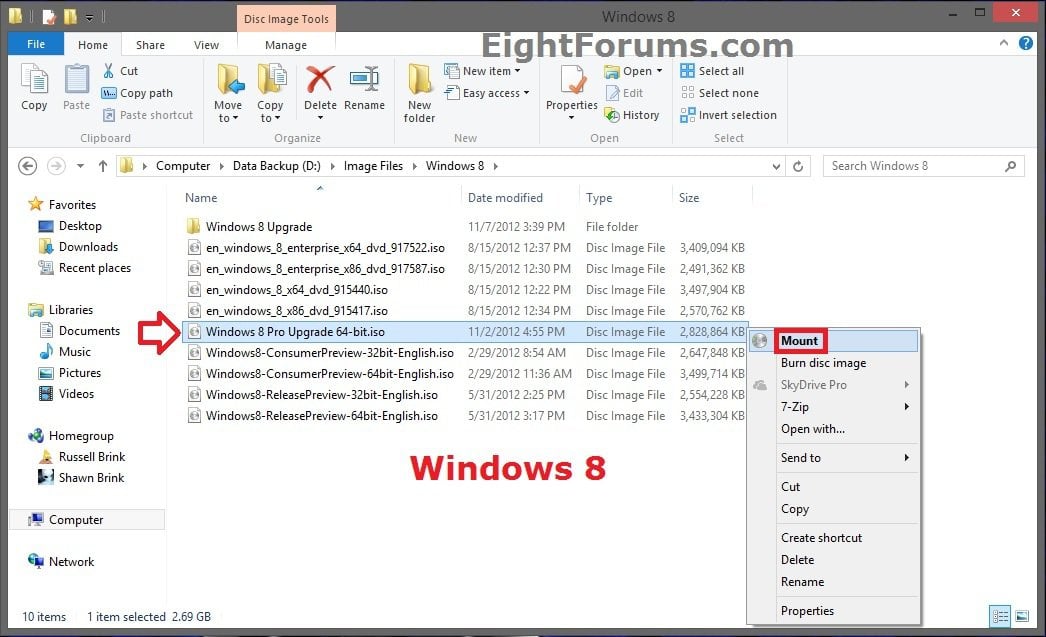
A) Open File Explorer, navigate to the .iso file, right click or press and hold on the .iso file, then click/tap on Mount. (see screenshot below)


W8_ISO.jpg


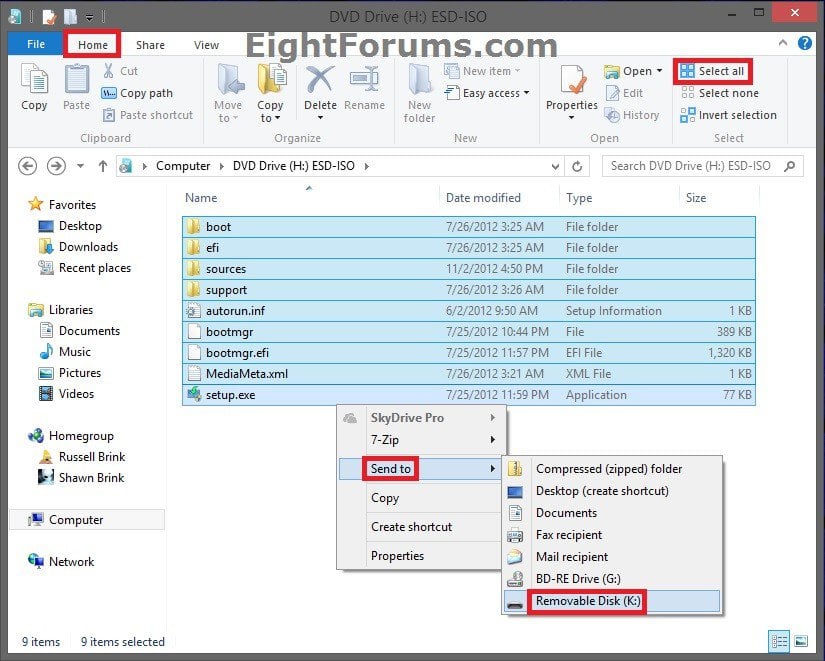
B) The mounted .iso file will now automatically open. Select all files in it, right click or press and hold on the selected files, click/tap on Send to and the Removable Disk for your USB flash drive letter (ex: K) from step 6 above. (see screenshot below)


Copy.jpg


C) This could take a bit to copy the ISO contents to the USB.

D) When finished, go to step 11 below.

9. If Using a Windows 7 or Windows 8/8.1 ISO File in Windows 7
NOTE: For a Windows 7 ISO or Windows 8/8.1 ISO file.


A) If you have not already, you will need to download and install the latest alpha version of the free program 7-Zip.
NOTE: You can use any program that performs the same function to extract or mount an ISO, but I just find 7-Zip easier to use.

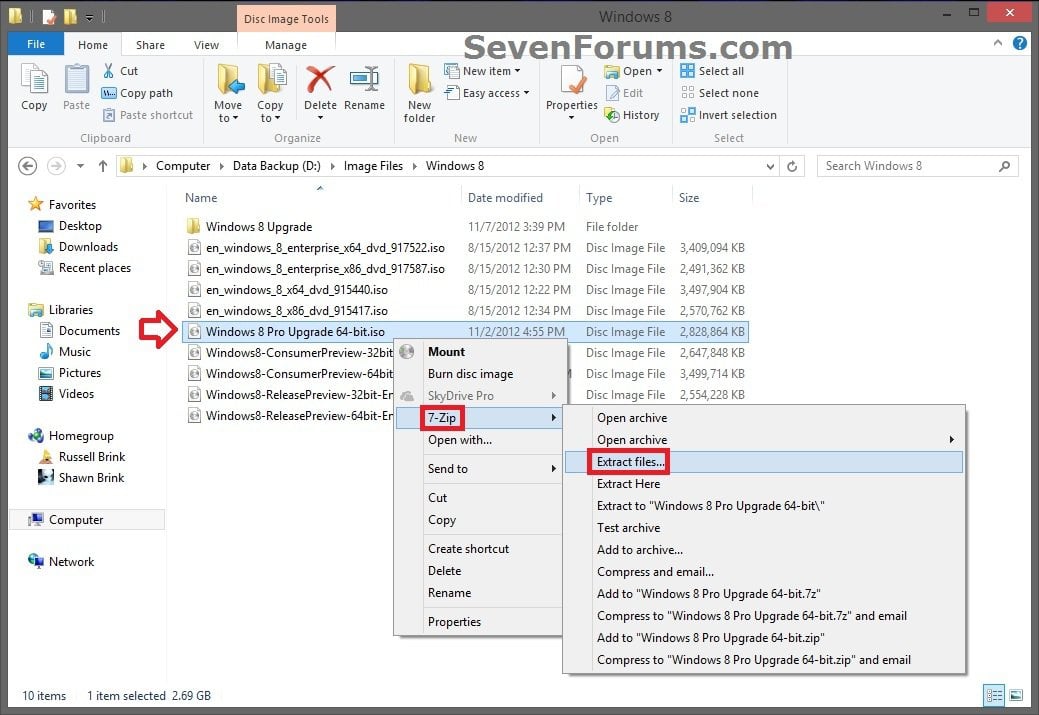
B) Open Windows Explorer, navigate to the .iso file, right click on the .iso file, then click on 7-Zip and Extract files. (see screenshot below)


W7_ISO-1.jpg


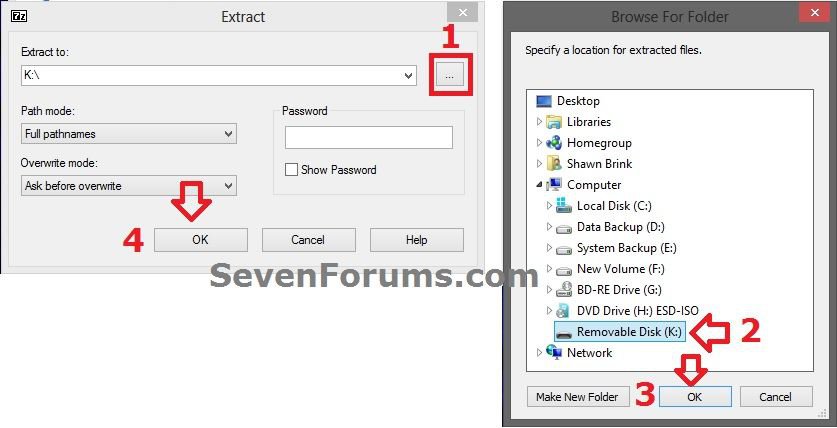
C) In the Extract dialog, click on the browse button, select the Removable Disk for your USB flash drive letter (ex: K) from step 6 above, and click on OK, and OK. (see screenshots below)


W7_ISO-2.jpg


D) This could take a bit to copy the ISO contents to the USB.

E) When finished, go to step 11 below.

10. If Using a Windows 7 or Windows 8/8.1 Installation DVD


A) Insert the Windows 7 or Windows 8 installation DVD into the CD/DVD drive.

B) In the Computer window, open the DVD. (see screenshot below)
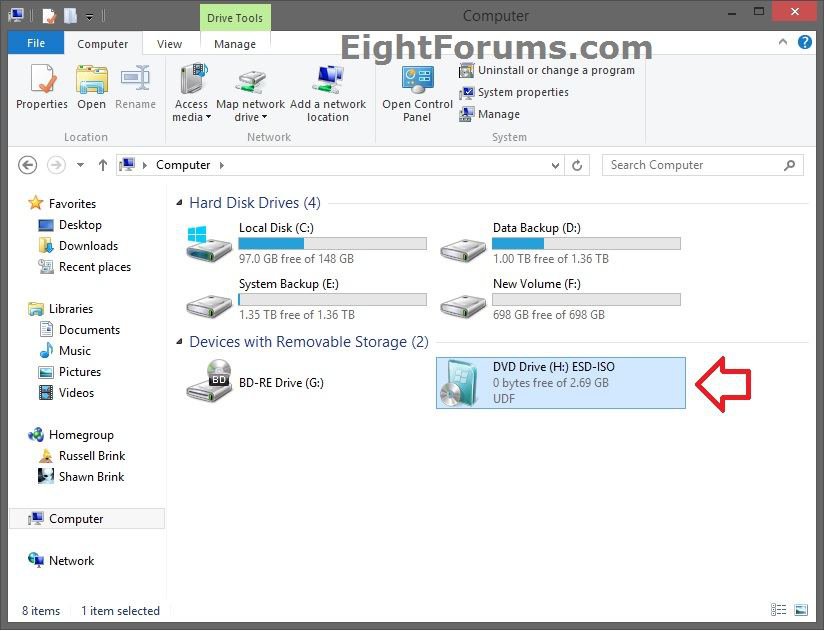


DVD.jpg


C) Select all files in it, right click or press and hold on the selected files, click/tap on Send to and the Removable Disk for your USB flash drive letter (ex: K) from step 6 above. (see screenshot below)


Copy.jpg


D) This could take a bit to copy the DVD contents to the USB.

E) When finished, go to step 11 below.


11. If Using 64-bit Windows 7

Note   Note
Thanks to theog for this step

You do not need to do this step unless you are creating a 64-bit Windows 7 UEFI USB flash drive.

If you are not, then go to step 12 below instead.


A) On the USB flash drive, "copy" the efi\microsoft\boot folder up one level into the efi folder as efi\boot. (see screenshot below)
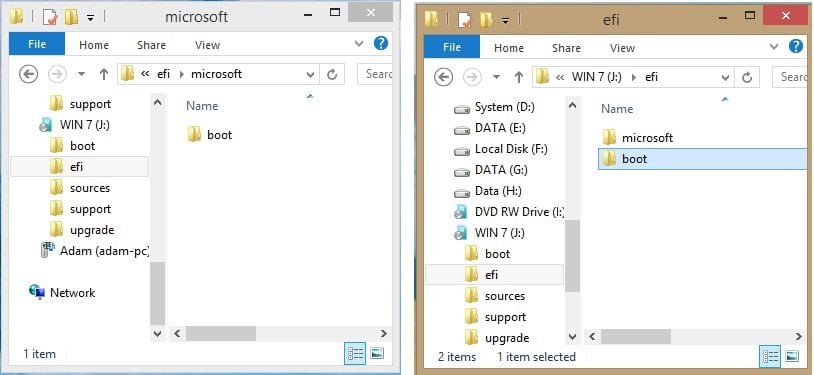


11A.jpg


B) If you have not already, download and install the latest alpha version of the free program 7-Zip, then run 7-Zip.

C) In 7-Zip, navigate to the sources\install.wim\1\Windows\Boot\EFI\bootmgfw.efi on the USB flash drive, select the bootmgfw.efi file, copy it to your desktop, click/tap on OK, and close 7-Zip. (see screenshot below)
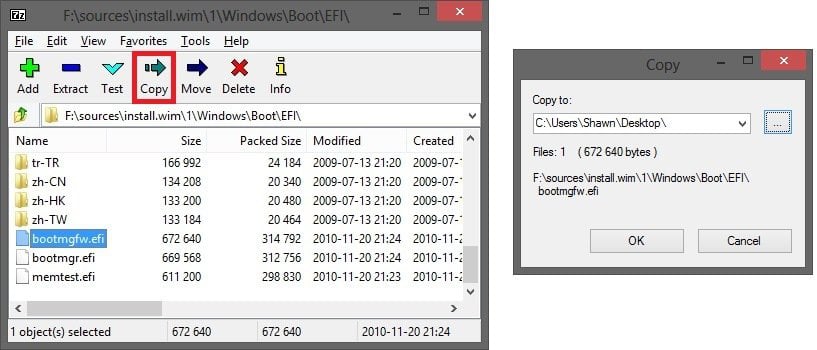


7-Zip.jpg


D) Rename the bootmgfw.efi file on your desktop to bootx64.efi.


E) Copy/Move the renamed bootx64.efi file into the efi/boot folder (step 11A) on the USB flash drive.
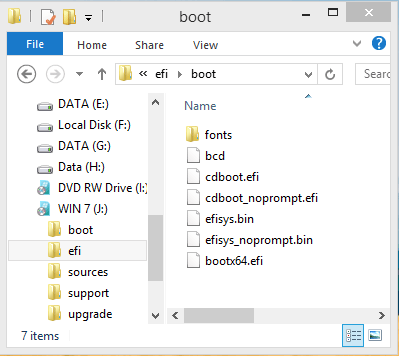


efi-boot.PNG


F) Go to step 12 below.

12. You are now ready to do a clean install of Windows 7 or Windows 8/8.1 using UEFI with your bootable UEFI USB flash drive.


That's it,
Shawn


Attachments

  • ESD-TO-ISO.zip
    341.8 KB · Views: 34,433
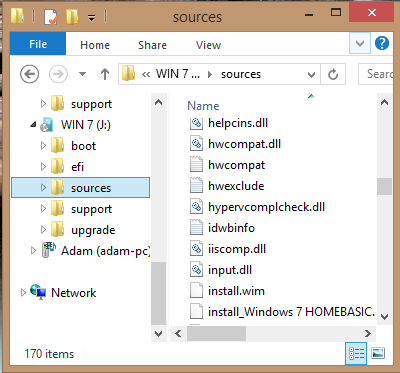
  • install.wim.png
    install.wim.png
    10.2 KB · Views: 103,124
  • USB_Drive.png
    USB_Drive.png
    10.2 KB · Views: 835
Last edited by a moderator:
The 1st option from your guide ("1. How to create UEFI Boot Mode compatible Windows 8 64-bit USB flash drive, which is only bootable in UEFI Boot Mode.") seems to be missing something. It says that you just need to format the flash drive in FAT32 and then copy (extract) the contents of the Windows 8.1 ISO to the USB flash drive. But, I think it's not going to be bootable because the flash drive is not marked as 'active'.

UEFI boot mode do not use boot sectors on the USB flash drive (and the hard drive) and do not require active partition to be set.

While the 3rd option ("3. How to create Legacy BIOS Boot Mode compatible Windows 7/8 32/64-bit USB flash drive, which is only bootable in Legacy BIOS Boot Mode.") Correct me if I'm wrong but, isn't it that as writen in Rufus in Partition scheme and target system type: MBR partition scheme for BIOS or UEFI computers -- shouldn't it be for both UEFI and legacy BIOS bootable, provided that you set the file system as FAT32 instead of NTFS?

I have not tried, but...

https://github.com/pbatard/rufus/wi..._that_can_be_booted_in_both_BIOS_and_EFI_mode

Why doesn't Rufus create a Windows installation USB that can be booted in both BIOS and EFI mode?

If you are using a Windows ISO that can be dual booted in EFI or BIOS mode, you may find that the USB created by Rufus does not preserve the dual EFI+BIOS boot feature.

Especially, the Windows 8 installation ISOs, that support both EFI and BIOS boot, will be converted to either one or the other mode, depending on the option you selected under Partition scheme and target type: If you select the first option (MBR partition scheme for BIOS or UEFI computers), the USB will be bootable in BIOS-mode only (even on UEFI systems), and if you select any of the other options, the USB will be bootable in EFI mode only (and not bootable on a BIOS system at all).

This is done to avoid confusion, as it can be difficult for non expert users to know whether they actually booted in EFI or BIOS mode, when an USB Flash Drive can be booted in both modes, and installation is meant to be a one-off operation, targeting a very specific machine and boot mode. You probably don't want to go through a full Windows installation, only to realize that it was installed in BIOS mode, when you really wanted it installed in EFI mode.

By ensuring that only one or the other can be used for Windows installation, there is no room for error with regards to which mode that was used for installation.

Note that this does not apply for Windows To Go, and that you can also enable dual EFI+BIOS boot by using the Alt-E cheat mode (see below) with Rufus 2.0 or higher.
 

My Computer

System One

  • OS
    Windows 10
    Computer type
    Laptop
    System Manufacturer/Model
    Lenovo G580
    CPU
    Intel Core i5-3230M
    Memory
    8 GB
    Graphics Card(s)
    Intel HD Graphics 4000
    Browser
    Microsoft Edge
    Antivirus
    Windows Defender, standard user account
    Other Info
    UEFI firmware (BIOS) embedded Windows 8 product key.
I create mine with diskaprt for my wife's Acer Laptop. It is very fussy as how the thumb drive is created. That laptop never ever lists a UEFI install option for the thumb drive. It did install in UEFI mode though.
Option 2
select disk #clean
create partition primary
format fs=fat32 quick
active
assign
list volume
exit
My ASUS laptop on the other hand is fine with NTFS formatted drives, even for UEFI installs. I use the Windows 7 DVD download tool to create its thumb drive, and install thumb drives for my two desktop PC's. They don't have UEFI BIOS. Up until we got the Acer I always used the Windows 7 DVD Download Tool.

Thanks alphnumeric! One last thing though, If I you use the Option 2 which is as you described the Diskpart method, will the created thumb drive installer be both UEFI and BIOS bootable (provided that you set the correct boot mode in the UEFI settings)?
With regards to your ASUS laptop being able to install in UEFI even in NTFS formatted thumbdrive, I read your discussions with Akeo and if I remember correctly, I think Akeo said that it is due to the ASUS UEFI firmware having both a FAT and NTFS driver or module and hence, it allows install of UEFI in NTFS formatted thumbdrive.

The 1st option from your guide ("1. How to create UEFI Boot Mode compatible Windows 8 64-bit USB flash drive, which is only bootable in UEFI Boot Mode.") seems to be missing something. It says that you just need to format the flash drive in FAT32 and then copy (extract) the contents of the Windows 8.1 ISO to the USB flash drive. But, I think it's not going to be bootable because the flash drive is not marked as 'active'.

UEFI boot mode do not use boot sectors on the USB flash drive (and the hard drive) and do not require active partition to be set.

Oh ok. I learned something new today.

While the 3rd option ("3. How to create Legacy BIOS Boot Mode compatible Windows 7/8 32/64-bit USB flash drive, which is only bootable in Legacy BIOS Boot Mode.") Correct me if I'm wrong but, isn't it that as writen in Rufus in Partition scheme and target system type: MBR partition scheme for BIOS or UEFI computers -- shouldn't it be for both UEFI and legacy BIOS bootable, provided that you set the file system as FAT32 instead of NTFS?
I have not tried, but...
https://github.com/pbatard/rufus/wi..._that_can_be_booted_in_both_BIOS_and_EFI_mode

Why doesn't Rufus create a Windows installation USB that can be booted in both BIOS and EFI mode?


If you are using a Windows ISO that can be dual booted in EFI or BIOS mode, you may find that the USB created by Rufus does not preserve the dual EFI+BIOS boot feature.

Especially, the Windows 8 installation ISOs, that support both EFI and BIOS boot, will be converted to either one or the other mode, depending on the option you selected under Partition scheme and target type: If you select the first option (MBR partition scheme for BIOS or UEFI computers), the USB will be bootable in BIOS-mode only (even on UEFI systems), and if you select any of the other options, the USB will be bootable in EFI mode only (and not bootable on a BIOS system at all).

This is done to avoid confusion, as it can be difficult for non expert users to know whether they actually booted in EFI or BIOS mode, when an USB Flash Drive can be booted in both modes, and installation is meant to be a one-off operation, targeting a very specific machine and boot mode. You probably don't want to go through a full Windows installation, only to realize that it was installed in BIOS mode, when you really wanted it installed in EFI mode.

By ensuring that only one or the other can be used for Windows installation, there is no room for error with regards to which mode that was used for installation.

Note that this does not apply for Windows To Go, and that you can also enable dual EFI+BIOS boot by using the Alt-E cheat mode (see below) with Rufus 2.0 or higher.

I always thought that Rufus creates USB flash drive that's both UEFI and BIOS bootable but that seems not to be the case. It's a good thing you pointed it out to me.

Thank you very much genet. You've been of great help!
 

My Computer

System One

  • OS
    Windows 7
    Computer type
    PC/Desktop
I create mine with diskaprt for my wife's Acer Laptop. It is very fussy as how the thumb drive is created. That laptop never ever lists a UEFI install option for the thumb drive. It did install in UEFI mode though.
Option 2
select disk #clean
create partition primary
format fs=fat32 quick
active
assign
list volume
exit
My ASUS laptop on the other hand is fine with NTFS formatted drives, even for UEFI installs. I use the Windows 7 DVD download tool to create its thumb drive, and install thumb drives for my two desktop PC's. They don't have UEFI BIOS. Up until we got the Acer I always used the Windows 7 DVD Download Tool.

Thanks alphnumeric! One last thing though, If I you use the Option 2 which is as you described the Diskpart method, will the created thumb drive installer be both UEFI and BIOS bootable (provided that you set the correct boot mode in the UEFI settings)?
With regards to your ASUS laptop being able to install in UEFI even in NTFS formatted thumbdrive, I read your discussions with Akeo and if I remember correctly, I think Akeo said that it is due to the ASUS UEFI firmware having both a FAT and NTFS driver or module and hence, it allows install of UEFI in NTFS formatted thumbdrive.

I've used thumb drives done via diskpart to install in legacy mode on my desktop PC's. Yes, ny ASUS has the module in it to allow UEFI installs from NTFS drives. It's too bad they all didn't do this as it makes it really easy to do UEFI installs. If they all did it we wouldn't be having this discussion.
 

My Computer

System One

  • OS
    Windows 10 Education 64 Bit
    Computer type
    PC/Desktop
    System Manufacturer/Model
    Asus
    CPU
    AMD Phenom II X4 980 Black Edition Deneb 3.7GHz
    Motherboard
    ASUS M4N68T-M V2 µATX Motherboard
    Memory
    8GB 4GBx2 Kingston PC10600 DDR3 1333 Memory
    Graphics Card(s)
    NVIDIA Geforce GT640 2 Gig DDR3 PCIe
    Sound Card
    VIA VT1708s High Definition Audio 8-channel Onboard
    Monitor(s) Displays
    22" LG E2242 1080p and 2 19" I-INC AG191D
    Screen Resolution
    1280x1024 - 1920x1080 - 1280x1024
    Hard Drives
    Crucial MX100 256 GB SSD and 500 GB WD Blue SATA
    PSU
    Thermaltake TR 620
    Case
    Power Up Black ATX Mid-Tower Case
    Cooling
    Stock heatsink fan
    Keyboard
    Logitech Wireless K350 Wave
    Mouse
    Logitech M570 Trackball and T650 TouchPad
    Internet Speed
    80 Mbps Down 30 Mbps Up
    Browser
    Internet Explorer 11
    Antivirus
    Windows Defender
    Other Info
    HP DVD1040e Lightscribe - External USB2
Ok. Thanks for the confirmation that the Diskpart method works with both UEFI and Legacy BIOS mode.

You're exactly right. If only the other major Board Manufacturers did what Asus has done then all these UEFI problems and limitations wouldn't have existed.
 

My Computer

System One

  • OS
    Windows 7
    Computer type
    PC/Desktop
Hey Shawn... ( or whoever else can jump in and help :party: )

Been at this a while and seriously need some help.... My brain is so cloudy from trying to work this out for 8 hours searching online for an answer and trying anything I can think of, that I even posted this on the 7 forum before realising it should be here so you as OP and writer of tutorial can hopefully sort this out.

Got a new machine (Qosmio X70-B-102) which like most tries to force me to use Windows 8 platform preinstalled... no chance thankyou... my machine and I'll run it how I choose to.

So my plan has always been to do a clean install of 7 x 64 pro which I already own.

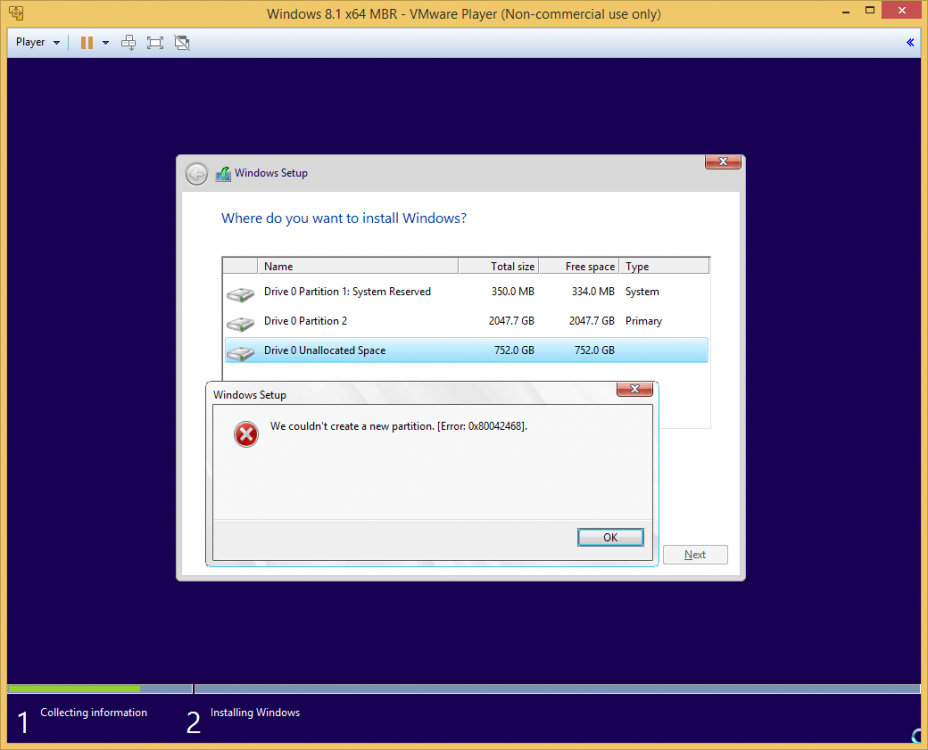
Initially I learn that the BIOS needs to be changed from UEFI to CSM... no prob that's easy... but the hybrid SSHD is set up with GPT partitions and my 7 wont install unless they are MBR.

At the advanced options screen I can delete all partitons and format but I end up with one single unallocated drive that remains as a GPT cos the advanced options don't offer the necessary conversion to MBR.

So... I do some reading and discover that in fact Windows 7 WILL install to GPT providing the installer I use can do that and as you efficiently describe and teach, the RUFUS installer allows us to select 'GPT partition scheme for UEFI computers'

Hmmm... brilliant I thought... I can keep using the UEFI firmware advantages by installing onto GPT partitions.

So I got Rufus and created my bootable windows 7 x64 Pro selecting the 'GPT partition scheme.....'

Only change I then make to the BIOS is to disable secure boot and boot order to USB.... oh AND turn off 'Fast Boot'

Standard 'Windows loading' white progress bar on black screen.... then the recognisable logo begins to go thru it's motions of 'Starting Windows' and the 4 coloured squares fly around to form the logo.... only it never completes and it hangs !!

Question 1.... Are there enough benefits to keeping the UEFI and sticking with GPT partition and trying to pursue with installing this way OR should I just forget that and open a command window from the language screen with Shift + F10 and open DISKPART to clean and convert the new single partition to MBR...?

Question 2... Anyone got any idea why this installer is hanging at the point listed above...? And if so is it fixable?

I used the latest RUFUS available 1.4.12 (although I note there's a beta version 2.0 available and wondering if it may just address this issue..?)

All help greatly appreciated

Nick....
smile.gif
 
Last edited:

My Computer

System One

  • OS
    8.1 pro + Ubuntu
    Computer type
    Laptop
    System Manufacturer/Model
    Samsung RV-511-S01UK
    CPU
    i3 380M @2.53Ghz
    Motherboard
    Samsung
    Memory
    6GB @1066Mhz
    Graphics Card(s)
    Nvidia 315m Discrete 1GB VRAM
    Screen Resolution
    1366 x 768
    Hard Drives
    SSD's
    Antivirus
    kaspersky on 7.... None on 8.1

My Computer

System One

  • OS
    64-bit Windows 10
    Computer type
    PC/Desktop
    System Manufacturer/Model
    Custom self built
    CPU
    Intel i7-8700K OC'd to 5 GHz
    Motherboard
    ASUS ROG Maximus XI Formula Z390
    Memory
    64 GB (4x16GB) G.SKILL TridentZ RGB DDR4 3600 MHz (F4-3600C18D-32GTZR)
    Graphics Card(s)
    ASUS ROG-STRIX-GTX1080TI-O11G-GAMING
    Sound Card
    Integrated Digital Audio (S/PDIF)
    Monitor(s) Displays
    2 x Samsung Odyssey G7 27"
    Screen Resolution
    2560x1440
    Hard Drives
    1TB Samsung 990 PRO M.2,
    4TB Samsung 990 PRO PRO M.2,
    8TB WD MyCloudEX2Ultra NAS
    PSU
    OCZ Series Gold OCZZ1000M 1000W
    Case
    Thermaltake Core P3
    Cooling
    Corsair Hydro H115i
    Keyboard
    Logitech wireless K800
    Mouse
    Logitech MX Master 3
    Internet Speed
    1 Gb/s Download and 35 Mb/s Upload
    Browser
    Internet Explorer 11
    Antivirus
    Malwarebyte Anti-Malware Premium
    Other Info
    Logitech Z625 speaker system,
    Logitech BRIO 4K Pro webcam,
    HP Color LaserJet Pro MFP M477fdn,
    APC SMART-UPS RT 1000 XL - SURT1000XLI,
    Galaxy S23 Plus phone
Hello Nick, and welcome to Eight Forums. :)

With Windows 7, I'd say skip UEFI.

Cheers Shawn... and thanks for the fast reply... I was about to take a break completely.

I'm one of those people who hates being defeated.... do you know 'why' my laptop doesn't like the Rufus USB installer set-up exactly as you describe...?

I read the quote that arkhi listed on his 7 forum tutorial :

"In addition to better interoperability, UEFI firmware provides several technical advantages:"

UEFI (Unified Extensible Firmware Interface) - Install Windows 7 with - Windows 7 Help Forums

This got me thinking that my 7x64 pro would run at it's best on my new machine if it can take advantage of using UEFI.... so any heads up you can enlighten me with as to why my installer 'stalls' would be greatly appreciated.

In the mean time just to get up and running I will go with legacy BIOS and convert the disk to MBR so it will install.

BTW... will my 8GB NAND flash become redundant installing this way...? Just curious... I'll be cloning the Hybrid onto a big SSD once my money tree bears fruit

Nick
 

My Computer

System One

  • OS
    8.1 pro + Ubuntu
    Computer type
    Laptop
    System Manufacturer/Model
    Samsung RV-511-S01UK
    CPU
    i3 380M @2.53Ghz
    Motherboard
    Samsung
    Memory
    6GB @1066Mhz
    Graphics Card(s)
    Nvidia 315m Discrete 1GB VRAM
    Screen Resolution
    1366 x 768
    Hard Drives
    SSD's
    Antivirus
    kaspersky on 7.... None on 8.1
Nick,

Your NAND flash should still be usable,

If you wanted to, you could install 64-bit W7 with UEFI, but you would still need to set firmware to use UEFI instead of legacy, and wipe and convert the disk to MBR first.
 

My Computer

System One

  • OS
    64-bit Windows 10
    Computer type
    PC/Desktop
    System Manufacturer/Model
    Custom self built
    CPU
    Intel i7-8700K OC'd to 5 GHz
    Motherboard
    ASUS ROG Maximus XI Formula Z390
    Memory
    64 GB (4x16GB) G.SKILL TridentZ RGB DDR4 3600 MHz (F4-3600C18D-32GTZR)
    Graphics Card(s)
    ASUS ROG-STRIX-GTX1080TI-O11G-GAMING
    Sound Card
    Integrated Digital Audio (S/PDIF)
    Monitor(s) Displays
    2 x Samsung Odyssey G7 27"
    Screen Resolution
    2560x1440
    Hard Drives
    1TB Samsung 990 PRO M.2,
    4TB Samsung 990 PRO PRO M.2,
    8TB WD MyCloudEX2Ultra NAS
    PSU
    OCZ Series Gold OCZZ1000M 1000W
    Case
    Thermaltake Core P3
    Cooling
    Corsair Hydro H115i
    Keyboard
    Logitech wireless K800
    Mouse
    Logitech MX Master 3
    Internet Speed
    1 Gb/s Download and 35 Mb/s Upload
    Browser
    Internet Explorer 11
    Antivirus
    Malwarebyte Anti-Malware Premium
    Other Info
    Logitech Z625 speaker system,
    Logitech BRIO 4K Pro webcam,
    HP Color LaserJet Pro MFP M477fdn,
    APC SMART-UPS RT 1000 XL - SURT1000XLI,
    Galaxy S23 Plus phone
Shawn...

I'm installed and currently loading the 7x64 drivers having converted the disk to MBR using Diskpart from cmd during installation and of course I'm running in compatibility mode.

So as the disk is now already MBR converted can I simply reinstall in UEFI mode...? where do I go to set the firmware to UEFI instead of legacy...?
 

My Computer

System One

  • OS
    8.1 pro + Ubuntu
    Computer type
    Laptop
    System Manufacturer/Model
    Samsung RV-511-S01UK
    CPU
    i3 380M @2.53Ghz
    Motherboard
    Samsung
    Memory
    6GB @1066Mhz
    Graphics Card(s)
    Nvidia 315m Discrete 1GB VRAM
    Screen Resolution
    1366 x 768
    Hard Drives
    SSD's
    Antivirus
    kaspersky on 7.... None on 8.1
Initially I learn that the BIOS needs to be changed from UEFI to CSM... no prob that's easy...

It's the same as you did above, but change it back to UEFI instead.

Afterwards, yep, you would boot from the UEFI USB, start installation, delete all partitions on the disk so it's unallocated, select the unallocated disk, and let installation finish.
 

My Computer

System One

  • OS
    64-bit Windows 10
    Computer type
    PC/Desktop
    System Manufacturer/Model
    Custom self built
    CPU
    Intel i7-8700K OC'd to 5 GHz
    Motherboard
    ASUS ROG Maximus XI Formula Z390
    Memory
    64 GB (4x16GB) G.SKILL TridentZ RGB DDR4 3600 MHz (F4-3600C18D-32GTZR)
    Graphics Card(s)
    ASUS ROG-STRIX-GTX1080TI-O11G-GAMING
    Sound Card
    Integrated Digital Audio (S/PDIF)
    Monitor(s) Displays
    2 x Samsung Odyssey G7 27"
    Screen Resolution
    2560x1440
    Hard Drives
    1TB Samsung 990 PRO M.2,
    4TB Samsung 990 PRO PRO M.2,
    8TB WD MyCloudEX2Ultra NAS
    PSU
    OCZ Series Gold OCZZ1000M 1000W
    Case
    Thermaltake Core P3
    Cooling
    Corsair Hydro H115i
    Keyboard
    Logitech wireless K800
    Mouse
    Logitech MX Master 3
    Internet Speed
    1 Gb/s Download and 35 Mb/s Upload
    Browser
    Internet Explorer 11
    Antivirus
    Malwarebyte Anti-Malware Premium
    Other Info
    Logitech Z625 speaker system,
    Logitech BRIO 4K Pro webcam,
    HP Color LaserJet Pro MFP M477fdn,
    APC SMART-UPS RT 1000 XL - SURT1000XLI,
    Galaxy S23 Plus phone
Hmmm... so I now need to try and understand whether first of all it's actually worth me working out how to create a UEFI win 7x64 usb installer that works and compare that to the actual tangible benefit of having UEFI mode.

The Rufus installer in GPT/UEFI kept hanging as I said originally tho someone else suggested that it's important to ensure none of the settings are changed once the ISO is loaded and I can't recall if I did... or not... I certainly created the installer several times with same result.

The second option to create looks rather more long winded.

And I'll need to reload all the drivers again.

This laptop is 100% purely for using as a video editor.... with Sony Vegas Pro and possibly a couple of codec utilities.

Would I notice the difference between CSM and UEFI...?
 

My Computer

System One

  • OS
    8.1 pro + Ubuntu
    Computer type
    Laptop
    System Manufacturer/Model
    Samsung RV-511-S01UK
    CPU
    i3 380M @2.53Ghz
    Motherboard
    Samsung
    Memory
    6GB @1066Mhz
    Graphics Card(s)
    Nvidia 315m Discrete 1GB VRAM
    Screen Resolution
    1366 x 768
    Hard Drives
    SSD's
    Antivirus
    kaspersky on 7.... None on 8.1
base,

Using Option One would be the easiest way to create a bootable UEFI USB. Just be sure to double check all the settings before starting.

Personally, I don't think you'll notice any difference in performance between UEFI and Legacy (CSM) with Windows 7.
 

My Computer

System One

  • OS
    64-bit Windows 10
    Computer type
    PC/Desktop
    System Manufacturer/Model
    Custom self built
    CPU
    Intel i7-8700K OC'd to 5 GHz
    Motherboard
    ASUS ROG Maximus XI Formula Z390
    Memory
    64 GB (4x16GB) G.SKILL TridentZ RGB DDR4 3600 MHz (F4-3600C18D-32GTZR)
    Graphics Card(s)
    ASUS ROG-STRIX-GTX1080TI-O11G-GAMING
    Sound Card
    Integrated Digital Audio (S/PDIF)
    Monitor(s) Displays
    2 x Samsung Odyssey G7 27"
    Screen Resolution
    2560x1440
    Hard Drives
    1TB Samsung 990 PRO M.2,
    4TB Samsung 990 PRO PRO M.2,
    8TB WD MyCloudEX2Ultra NAS
    PSU
    OCZ Series Gold OCZZ1000M 1000W
    Case
    Thermaltake Core P3
    Cooling
    Corsair Hydro H115i
    Keyboard
    Logitech wireless K800
    Mouse
    Logitech MX Master 3
    Internet Speed
    1 Gb/s Download and 35 Mb/s Upload
    Browser
    Internet Explorer 11
    Antivirus
    Malwarebyte Anti-Malware Premium
    Other Info
    Logitech Z625 speaker system,
    Logitech BRIO 4K Pro webcam,
    HP Color LaserJet Pro MFP M477fdn,
    APC SMART-UPS RT 1000 XL - SURT1000XLI,
    Galaxy S23 Plus phone
The Rufus installer in GPT/UEFI kept hanging as I said originally tho someone else suggested that it's important to ensure none of the settings are changed once the ISO is loaded and I can't recall if I did... or not... I certainly created the installer several times with same result.

As far as I know, Rufus (by design) only allows to create a USB flash drive that's UEFI bootable ONLY or Legacy BIOS bootable ONLY, and it does not allow to create a USB flash drive that can be booted in both UEFI and Legacy BIOS mode at the same time. I think that is what is causing your hang problem.

If you want to boot and install in CSM mode, you need to set the Partition scheme and target system type in Rufus to "MBR partition scheme for BIOS or UEFI computers" which will make your USB flash drive Legacy BIOS bootable ONLY.

If you want to boot and install in native UEFI mode you need to set the Partition scheme and target system type in Rufus to either "MBR partition scheme for UEFI computer" or "GPT partition scheme for UEFI computer" which will make your USB flash drive UEFI bootable ONLY.

And make sure you set the boot mode in your UEFI firmware settings to UEFI mode or to CSM mode correspondingly -- that is UEFI mode for UEFI bootable flash drive, or CSM mode for BIOS bootable flash drive.

I hope this helps
 

My Computer

System One

  • OS
    Windows 7
    Computer type
    PC/Desktop
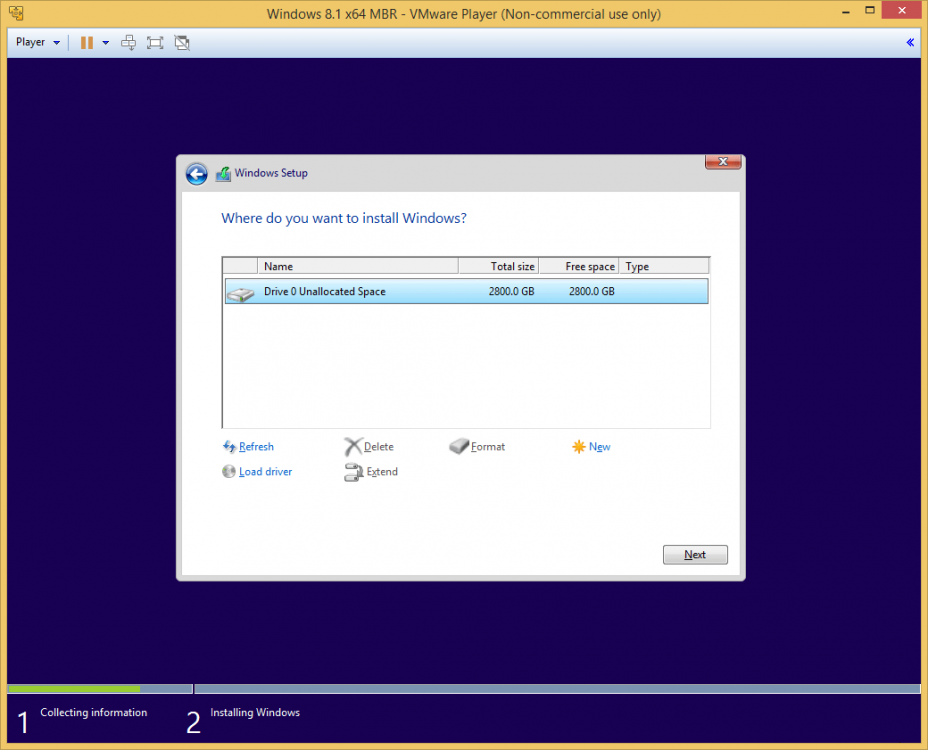
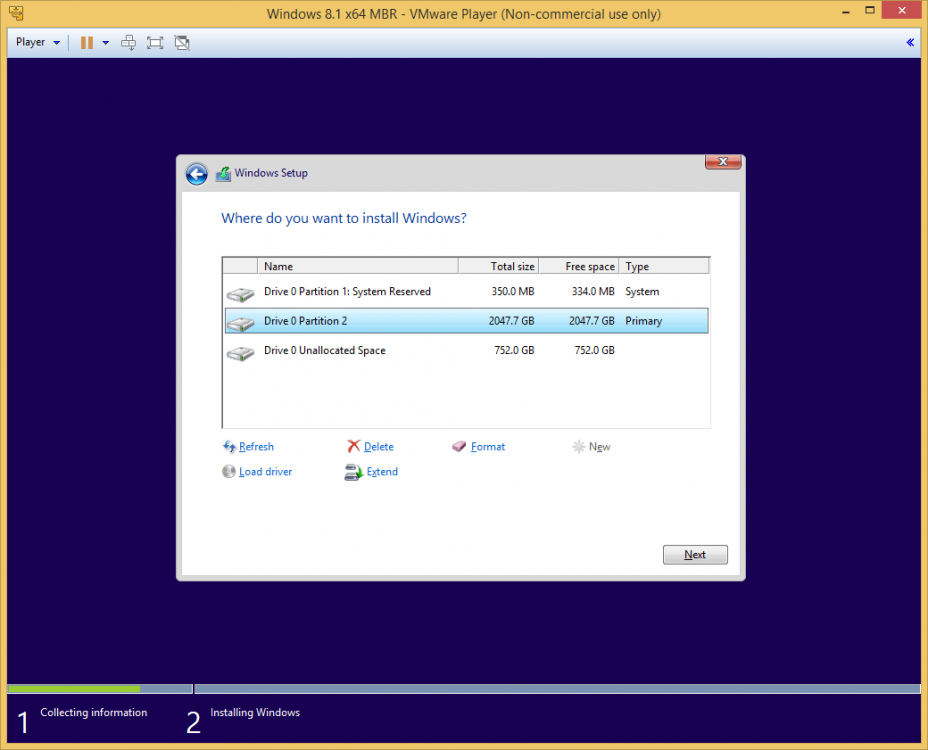
If you install in (CSM) mode in UEFI computer, will it be able to boot from disks over 2 TB?

Yes, but you will not be able to use the disk space beyond 2 TB since MBR does not support hard drives larger than 2 TB.

Legacy BIOS Boot Mode 1.png

Legacy BIOS Boot Mode 2.png

Legacy BIOS Boot Mode 3.png
 

My Computer

System One

  • OS
    Windows 10
    Computer type
    Laptop
    System Manufacturer/Model
    Lenovo G580
    CPU
    Intel Core i5-3230M
    Memory
    8 GB
    Graphics Card(s)
    Intel HD Graphics 4000
    Browser
    Microsoft Edge
    Antivirus
    Windows Defender, standard user account
    Other Info
    UEFI firmware (BIOS) embedded Windows 8 product key.
Thank you very much yet again genet for the very useful information!
 
Last edited:

My Computer

System One

  • OS
    Windows 7
    Computer type
    PC/Desktop
As far as I know, Rufus (by design) only allows to create a USB flash drive that's UEFI bootable ONLY or Legacy BIOS bootable ONLY, and it does not allow to create a USB flash drive that can be booted in both UEFI and Legacy BIOS mode at the same time. I think that is what is causing your hang problem.

If you want to boot and install in CSM mode, you need to set the Partition scheme and target system type in Rufus to "MBR partition scheme for BIOS or UEFI computers" which will make your USB flash drive Legacy BIOS bootable ONLY.

If you want to boot and install in native UEFI mode you need to set the Partition scheme and target system type in Rufus to either "MBR partition scheme for UEFI computer" or "GPT partition scheme for UEFI computer" which will make your USB flash drive UEFI bootable ONLY.

And make sure you set the boot mode in your UEFI firmware settings to UEFI mode or to CSM mode correspondingly -- that is UEFI mode for UEFI bootable flash drive, or CSM mode for BIOS bootable flash drive.

I hope this helps

The "MBR partition scheme for BIOS or UEFI computers" setting will have the USB show up twice in the boot menu for legacy BIOS (CSM) and UEFI.

You just have to have your UEFI firmware set properly, and select the one you want to install Windows with.

Rufus.png
 

My Computer

System One

  • OS
    64-bit Windows 10
    Computer type
    PC/Desktop
    System Manufacturer/Model
    Custom self built
    CPU
    Intel i7-8700K OC'd to 5 GHz
    Motherboard
    ASUS ROG Maximus XI Formula Z390
    Memory
    64 GB (4x16GB) G.SKILL TridentZ RGB DDR4 3600 MHz (F4-3600C18D-32GTZR)
    Graphics Card(s)
    ASUS ROG-STRIX-GTX1080TI-O11G-GAMING
    Sound Card
    Integrated Digital Audio (S/PDIF)
    Monitor(s) Displays
    2 x Samsung Odyssey G7 27"
    Screen Resolution
    2560x1440
    Hard Drives
    1TB Samsung 990 PRO M.2,
    4TB Samsung 990 PRO PRO M.2,
    8TB WD MyCloudEX2Ultra NAS
    PSU
    OCZ Series Gold OCZZ1000M 1000W
    Case
    Thermaltake Core P3
    Cooling
    Corsair Hydro H115i
    Keyboard
    Logitech wireless K800
    Mouse
    Logitech MX Master 3
    Internet Speed
    1 Gb/s Download and 35 Mb/s Upload
    Browser
    Internet Explorer 11
    Antivirus
    Malwarebyte Anti-Malware Premium
    Other Info
    Logitech Z625 speaker system,
    Logitech BRIO 4K Pro webcam,
    HP Color LaserJet Pro MFP M477fdn,
    APC SMART-UPS RT 1000 XL - SURT1000XLI,
    Galaxy S23 Plus phone
Oh, seems I was wrong? So you mean that the "MBR partition scheme for BIOS or UEFI computers" setting in Rufus will have the flash drive bootable and installable in both native UEFI and legacy BIOS (CSM) (provided that you set it in the UEFI firmware properly)? Have yo tested it to be the case?
Because the way I understand it, the "MBR partition scheme for BIOS or UEFI computers" in Rufus is only for legacy BIOS (CSM) as when you point it to that option, it displays a description: "If you have an UEFI computer and want to install an OS in EFI mode however, you should select one of the other options."

I could be wrong and that Rufus might have been updated already to support EFI+BIOS boot but, the FAQ entry of Rufus still states that:

Why doesn't Rufus create a Windows installation USB that can be booted in both BIOS and EFI mode?
If you are using a Windows ISO that can be dual booted in EFI or BIOS mode, you may find that the USB created by Rufus does not preserve the dual EFI+BIOS boot feature.
Especially, the Windows 8 installation ISOs, that support both EFI and BIOS boot, will be converted to either one or the other mode, depending on the option you selected under Partition scheme and target type: If you select the first option (MBR partition scheme for BIOS or UEFI computers), the USB will be bootable in BIOS-mode only (even on UEFI systems), and if you select any of the other options, the USB will be bootable in EFI mode only (and not bootable on a BIOS system at all).
This is done to avoid confusion, as it can be difficult for non expert users to know whether they actually booted in EFI or BIOS mode, when an USB Flash Drive can be booted in both modes, and installation is meant to be a one-off operation, targeting a very specific machine and boot mode. You probably don't want to go through a full Windows installation, only to realize that it was installed in BIOS mode, when you really wanted it installed in EFI mode.
By ensuring that only one or the other can be used for Windows installation, there is no room for error with regards to which mode that was used for installation.
Note that this does not apply for Windows To Go, and that you can also enable dual EFI+BIOS boot by using the Alt-E cheat mode (see below) with Rufus 2.0 or higher.
 

My Computer

System One

  • OS
    Windows 7
    Computer type
    PC/Desktop
Yep, tested and done it several times. :)
 

My Computer

System One

  • OS
    64-bit Windows 10
    Computer type
    PC/Desktop
    System Manufacturer/Model
    Custom self built
    CPU
    Intel i7-8700K OC'd to 5 GHz
    Motherboard
    ASUS ROG Maximus XI Formula Z390
    Memory
    64 GB (4x16GB) G.SKILL TridentZ RGB DDR4 3600 MHz (F4-3600C18D-32GTZR)
    Graphics Card(s)
    ASUS ROG-STRIX-GTX1080TI-O11G-GAMING
    Sound Card
    Integrated Digital Audio (S/PDIF)
    Monitor(s) Displays
    2 x Samsung Odyssey G7 27"
    Screen Resolution
    2560x1440
    Hard Drives
    1TB Samsung 990 PRO M.2,
    4TB Samsung 990 PRO PRO M.2,
    8TB WD MyCloudEX2Ultra NAS
    PSU
    OCZ Series Gold OCZZ1000M 1000W
    Case
    Thermaltake Core P3
    Cooling
    Corsair Hydro H115i
    Keyboard
    Logitech wireless K800
    Mouse
    Logitech MX Master 3
    Internet Speed
    1 Gb/s Download and 35 Mb/s Upload
    Browser
    Internet Explorer 11
    Antivirus
    Malwarebyte Anti-Malware Premium
    Other Info
    Logitech Z625 speaker system,
    Logitech BRIO 4K Pro webcam,
    HP Color LaserJet Pro MFP M477fdn,
    APC SMART-UPS RT 1000 XL - SURT1000XLI,
    Galaxy S23 Plus phone
Oh thanks Brink! So it seems that the "MBR partition scheme for BIOS or UEFI computers" in Rufus does indeed create a flash drive that can boot/install in both BIOS and UEFI mode despite the FAQ entry. It seems that the Ruufus's FAQs just isn't updated I guess.
May I know what version of Rufus have you tested it with?

Thanks!
 

My Computer

System One

  • OS
    Windows 7
    Computer type
    PC/Desktop
Back
Top