Inserting the serial number in an ISO

balubeto

Member
Member
Messages
173
Hi

With MDT 2013, Windows ADK and the Windows 8.1 Update 64 bit (multiple editions) MSDN ISO, how do I create an ISO that allows no more insert the serial number of the Core edition during the its installation?

Thanks

Bye
 

My Computer

System One

  • OS
    Windows 8
When installing Windows 8/8.1, setup.exe uses the following priority logic for product keys:
1. Answer file (Unattended file, EI.cfg, or PID.txt)
2. Product key in the UEFI firmware (BIOS)
3. Product key entry screen
If a key is supplied, the key is attempted to be use with the image that are available on the media being installed. If there is no product key supplied in the step 1 and step 2, you will get the product key prompt during setup.

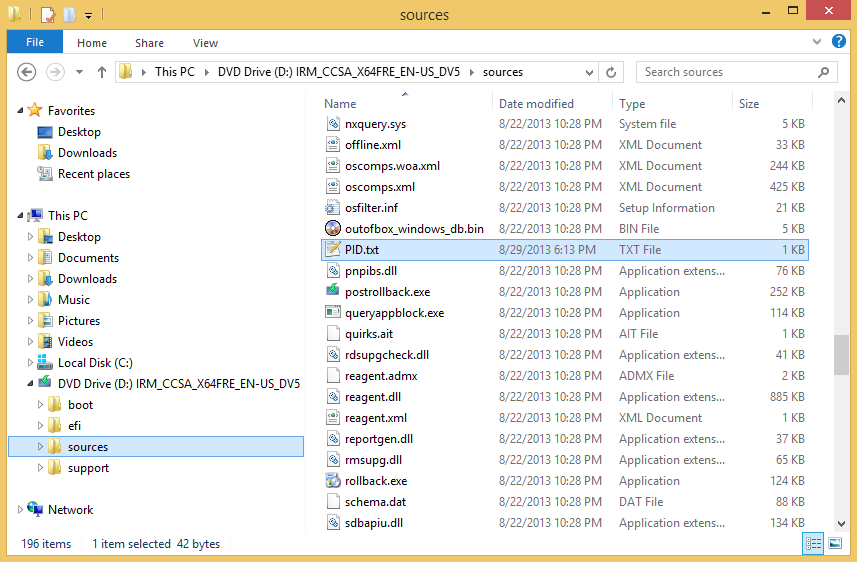
Use a PID.txt in sources folder to automate product key entry, for example:

Windows 8.1 (core) generic product key
PID.txt

Code:
[PID]
Value=334NH-RXG76-64THK-C7CKG-D3VPT

Windows 8.1 Pro generic product key
PID.txt

Code:
[PID]
Value=XHQ8N-C3MCJ-RQXB6-WCHYG-C9WKB

PID.txt in sources folder.png

edit:

How to download and clean install Windows 8.1 if you have an OEM computer with UEFI firmware (BIOS) embedded Windows 8/8.1 product key. -> link
 
Last edited:

My Computer

System One

  • OS
    Windows 10
    Computer type
    Laptop
    System Manufacturer/Model
    Lenovo G580
    CPU
    Intel Core i5-3230M
    Memory
    8 GB
    Graphics Card(s)
    Intel HD Graphics 4000
    Browser
    Microsoft Edge
    Antivirus
    Windows Defender, standard user account
    Other Info
    UEFI firmware (BIOS) embedded Windows 8 product key.
Copy the EI.CFG file to the sources folder.

EI.CFG

Code:
[Channel]
_Default
[VL]
0

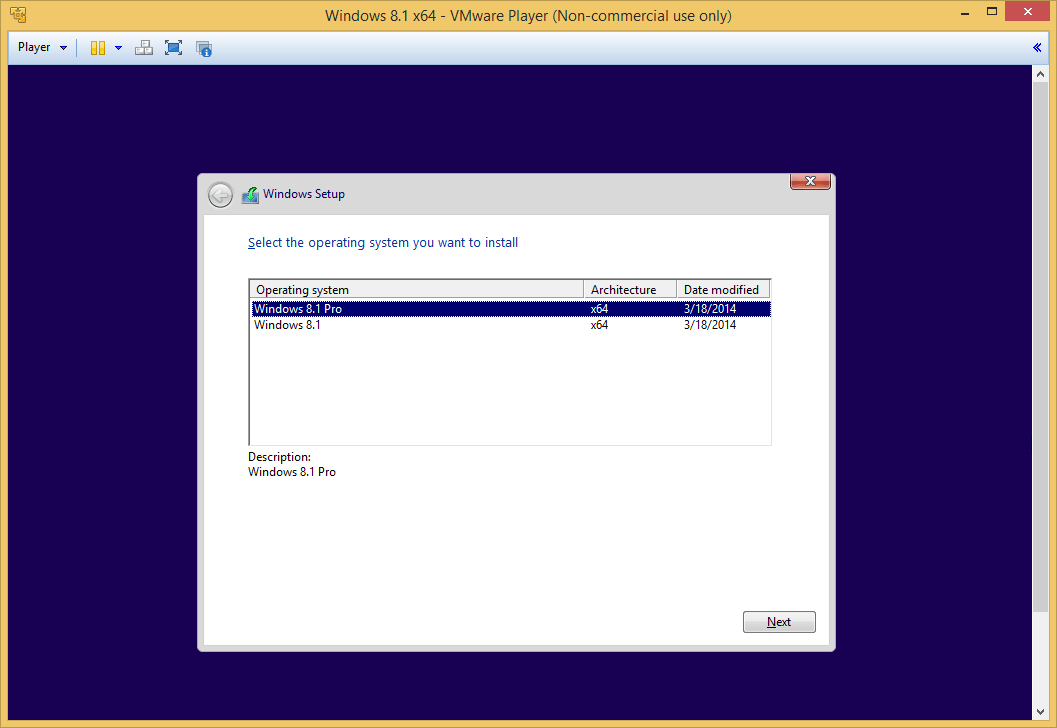
Now install as normal and the Windows 8/8.1 setup won't ask for the retail/OEM product key at the beginning of the setup.

the ei.cfg file in the sources folder 1.png

the ei.cfg file in the sources folder 2.png

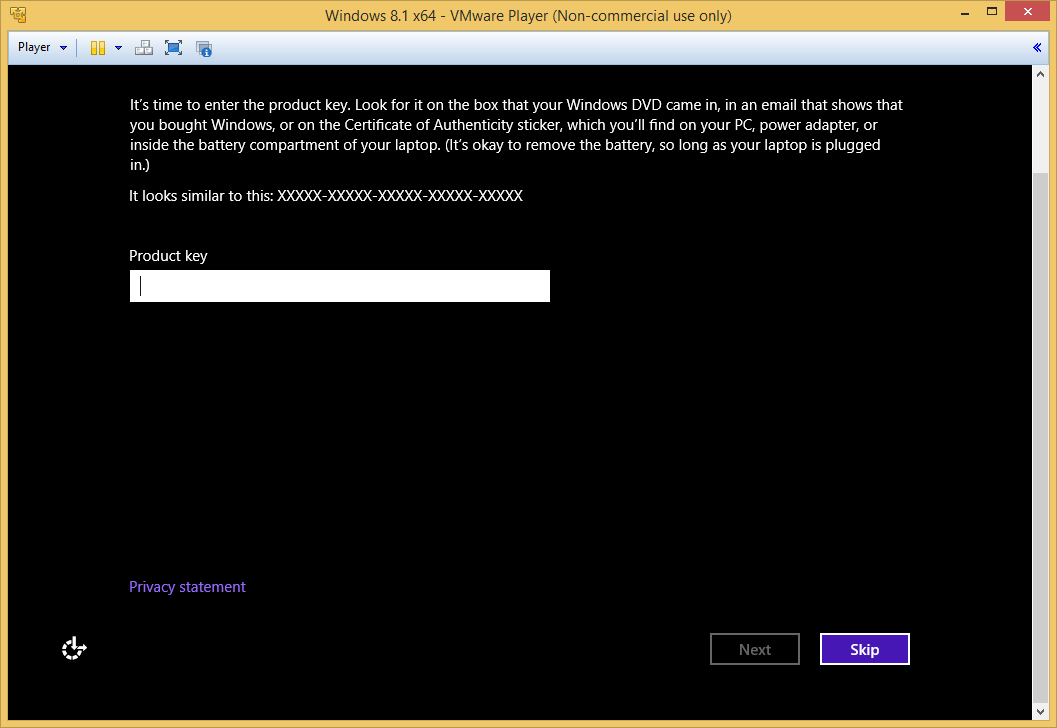
At the end of the Windows 8/8.1 setup, select the "Skip" option if you want to give the product key later (see screenshot below).

the ei.cfg file in the sources folder 3.png
 
Last edited:

My Computer

System One

  • OS
    Windows 10
    Computer type
    Laptop
    System Manufacturer/Model
    Lenovo G580
    CPU
    Intel Core i5-3230M
    Memory
    8 GB
    Graphics Card(s)
    Intel HD Graphics 4000
    Browser
    Microsoft Edge
    Antivirus
    Windows Defender, standard user account
    Other Info
    UEFI firmware (BIOS) embedded Windows 8 product key.
Using only the Microsoft tools, what is the proper procedure to insert the pid.txt or ei.cfg file into iso MSDN and to rebuild the iso modified?

This iso is a VL or retail version?

Thanks

Bye
 
Last edited:

My Computer

System One

  • OS
    Windows 8
Using only the Microsoft tools, what is the proper procedure to insert the pid.txt or ei.cfg file into iso MSDN and to rebuild the iso modified?

If you want to just copy the pid.txt or ei.cfg to ISO image file, the easiest way is to use the program UltraISO or PowerISO (by drag and drop, then save), but it does not work with the free version.

Here is an example of how to use the Windows ADK.

Code:
@echo off
:: Install the "Windows Assessment and Deployment Kit (Windows ADK)"
:: You will only need to install the "Deployment Tools" and "Windows Preinstallation Environment (Windows PE)"
::
:: Create the following folders:
::   C:\my_Distribution
::   C:\my_Distribution\dvd
::   C:\my_Distribution\updates (if you want to integrate updates)
::
:: If you want the Windows 8.1 setup does not ask for product key at the beginning of the setup.
:: - Copy EI.cfg to "C:\my_Distribution"
:: OR
:: If you want to use PID.txt file to automate product key entry.
:: - Copy PID.txt to "C:\my_Distribution"
:: - Note that in this script, the PID.txt will be copied only if you make the Core or Pro version.
::
:: If you want to use SetupComplete.cmd file, copy SetupComplete.cmd to "C:\my_Distribution"
::
:: Copy the files from the Windows 8.1 (x86 or x64) installation media to "C:\my_Distribution\dvd"
::
:: If you want to integrate updates, copy (x86 or x64) update files (*.msu, *.cab) to "C:\my_Distribution\updates"
::
:: Save this file as "Integration.cmd" and copy file to "C:\my_Distribution"
::
:: Run as administrator "Deployment and Imaging Tools Environment"
:: Run the command: C:\my_Distribution\Integration.cmd

:: ----------------------------------------------------------------------------

setlocal EnableExtensions
setlocal EnableDelayedExpansion

set OS=Windows_8.1

:: You can change these variables if you use different file path
set BaseDir=C:\my_Distribution
set WimSource=%BaseDir%\dvd\sources
set updates=%BaseDir%\updates

:: ----------------------------------------------------------------------------

if not exist "%KitsRoot%" (
    echo Error: This script can only be run from an elevated ADK prompt.
    echo Press any key to exit...
    pause >nul
    exit
)

if not exist "%WimSource%\install.wim" (
    echo Error: Missing source files.
    echo Press any key to exit...
    pause >nul
    exit
)

:: ----------------------------------------------------------------------------

:: Setting source WIM image mount folder path variables
if exist "%BaseDir%\mount" rd /s /q "%BaseDir%\mount"
set InstallMount=%BaseDir%\mount\install
md "%InstallMount%"
set BootMount=%BaseDir%\mount\boot
md "%BootMount%"
set WinReMount=%BaseDir%\mount\winre
md "%WinReMount%"

:: ----------------------------------------------------------------------------

echo.
echo Give in the version you want to make: [1] = Pro, [2] = Core, [3] = Pro+Core
choice /c 123 /n /m ":"
if errorlevel 3 goto PRO_and_CORE
if errorlevel 2 goto CORE
if errorlevel 1 goto PRO
:PRO
set Index=1
set Edition=Pro
goto END
:CORE
set Index=2
set Edition=Core
goto END
:PRO_and_CORE
set Index=1
set Edition=PRO_and_CORE
goto END
:END

:: ----------------------------------------------------------------------------

echo.
echo Do you want to add NET Framework 3.5? [Y] [N]
choice /c YN /n /m ":"
if errorlevel 2 goto END
if errorlevel 1 goto NET35
:NET35
set Add_NET35=yes
goto END
:END

:: ----------------------------------------------------------------------------

echo.
echo Do you want to remove Modern apps from the Windows 8.1 ? [Y] [N]
choice /c YN /n /m ":"
if errorlevel 2 goto END
if errorlevel 1 goto MODERN_APPS
:MODERN_APPS
set RemoveModernApps=yes
goto END
:END

:: ----------------------------------------------------------------------------

call :Copy_EI.cfg
call :Copy_PID.txt
call :Copy_SetupComplete.cmd

:: ----------------------------------------------------------------------------

call :INTEGRATION

if "%Edition%"=="PRO_and_CORE" (goto PRO_and_CORE) else (goto END)
:PRO_and_CORE
if "%Index%"=="1" (set Index=2) else (goto END)
call :INTEGRATION
:END

:: ----------------------------------------------------------------------------

call :BUILD_ISO_IMAGE
call :CLEANING_UP

echo.
echo Press any key to exit...
pause >nul
exit

:: ----------------------------------------------------------------------------
:: Copy EI.cfg
:: ----------------------------------------------------------------------------

:Copy_EI.cfg

if exist "%BaseDir%\EI.cfg" (
    xcopy /q /y "%BaseDir%\EI.cfg" "%WimSource%" >nul
    echo.
    echo The EI.cfg file has been copied to the "%WimSource%" folder.
)
goto :eof

:: ----------------------------------------------------------------------------
:: Copy PID.txt
:: ----------------------------------------------------------------------------

:Copy_PID.txt

if exist "%BaseDir%\EI.cfg" goto :eof
if exist "%BaseDir%\PID.txt" (goto PID_TXT) else (goto :eof)
:PID_TXT
if "%Edition%"=="PRO_and_CORE" (goto :eof
) else (
    xcopy /q /y "%BaseDir%\PID.txt" "%WimSource%" >nul
    echo.
    echo The PID.txt file has been copied to the "%WimSource%" folder.
)
goto :eof

:: ----------------------------------------------------------------------------
:: Copy SetupComplete.cmd
:: ----------------------------------------------------------------------------

:Copy_SetupComplete.cmd

if exist "%BaseDir%\SetupComplete.cmd" (
    if not exist "%WimSource%\$OEM$\$$\Setup\Scripts" md "%WimSource%\$OEM$\$$\Setup\Scripts"
    xcopy /q /y "%BaseDir%\SetupComplete.cmd" "%WimSource%\$OEM$\$$\Setup\Scripts" >nul
    echo.
    echo The SetupComplete.cmd file has been copied to the "%WimSource%\$OEM$\$$\Setup\Scripts" folder.
)
goto :eof

:: ============================================================================
:: Start integration
:: ============================================================================

:INTEGRATION

echo.
echo Integrating install WIM image index:%Index%

:: ----------------------------------------------------------------------------
:: Mount install.wim
:: ----------------------------------------------------------------------------

dism /Mount-Image /ImageFile:"%WimSource%\install.wim" /Index:%Index% /MountDir:"%InstallMount%"

:: ----------------------------------------------------------------------------
:: Architecture variables
:: ----------------------------------------------------------------------------

if exist "%InstallMount%\Windows\SysWOW64" set Arch=x64
if not exist "%InstallMount%\Windows\SysWOW64" set Arch=x86

:: ----------------------------------------------------------------------------
:: NET Framework 3.5
:: ----------------------------------------------------------------------------

if "%Add_NET35%"=="yes" (goto ADD_NET35) else (goto END)
:ADD_NET35
dism /Image:"%InstallMount%" /Enable-Feature /FeatureName:NetFX3 /All /LimitAccess /Source:"%WimSource%\sxs"
goto END
:END

:: ----------------------------------------------------------------------------
:: Integrate updates
:: ----------------------------------------------------------------------------

if exist "%updates%\*.cab" goto ADD_PACKAGE
if exist "%updates%\*.msu" goto ADD_PACKAGE
goto END
:ADD_PACKAGE
if exist "%updates%\*.msu" expand "%updates%\*.msu" -F:Win*.cab "%updates%"\ >nul
if exist "%updates%\*.msu" del /f /q "%updates%\*.msu" >nul
dism /Add-Package /Image:"%InstallMount%" /PackagePath:"%updates%"
goto END
:END

:: ----------------------------------------------------------------------------
:: Remove Modern apps
:: ----------------------------------------------------------------------------

:: How to get a list of modern apps?
:: dism /Image:"%InstallMount%" /Get-ProvisionedAppxPackages | clip

:: NOTE: This script is only for Windows 8.1 with Update 12/15/2014 (includes November 2014 update roll up)

if "%RemoveModernApps%"=="yes" (goto REMOVE_MODERN_APPS) else (goto END)
:REMOVE_MODERN_APPS
dism /Image:"%InstallMount%" /Remove-ProvisionedAppxPackage /PackageName:Microsoft.BingFinance_2014.926.253.3184_neutral_~_8wekyb3d8bbwe
dism /Image:"%InstallMount%" /Remove-ProvisionedAppxPackage /PackageName:Microsoft.BingFoodAndDrink_2014.926.254.3803_neutral_~_8wekyb3d8bbwe
dism /Image:"%InstallMount%" /Remove-ProvisionedAppxPackage /PackageName:Microsoft.BingHealthAndFitness_2014.926.255.3988_neutral_~_8wekyb3d8bbwe
dism /Image:"%InstallMount%" /Remove-ProvisionedAppxPackage /PackageName:Microsoft.BingMaps_2014.830.1811.3840_neutral_~_8wekyb3d8bbwe
dism /Image:"%InstallMount%" /Remove-ProvisionedAppxPackage /PackageName:Microsoft.BingNews_2014.926.2134.2947_neutral_~_8wekyb3d8bbwe
dism /Image:"%InstallMount%" /Remove-ProvisionedAppxPackage /PackageName:Microsoft.BingSports_2014.926.258.4003_neutral_~_8wekyb3d8bbwe
dism /Image:"%InstallMount%" /Remove-ProvisionedAppxPackage /PackageName:Microsoft.BingTravel_2014.926.259.4931_neutral_~_8wekyb3d8bbwe
dism /Image:"%InstallMount%" /Remove-ProvisionedAppxPackage /PackageName:Microsoft.BingWeather_2014.928.34.2811_neutral_~_8wekyb3d8bbwe
dism /Image:"%InstallMount%" /Remove-ProvisionedAppxPackage /PackageName:Microsoft.HelpAndTips_2014.716.611.79_neutral_~_8wekyb3d8bbwe
dism /Image:"%InstallMount%" /Remove-ProvisionedAppxPackage /PackageName:Microsoft.Office.OneNote_2014.921.1853.4418_neutral_~_8wekyb3d8bbwe
dism /Image:"%InstallMount%" /Remove-ProvisionedAppxPackage /PackageName:Microsoft.Reader_2014.312.322.1510_neutral_~_8wekyb3d8bbwe
dism /Image:"%InstallMount%" /Remove-ProvisionedAppxPackage /PackageName:Microsoft.SkypeApp_2014.731.933.5139_neutral_~_kzf8qxf38zg5c
dism /Image:"%InstallMount%" /Remove-ProvisionedAppxPackage /PackageName:Microsoft.WindowsAlarms_2013.1204.852.3011_neutral_~_8wekyb3d8bbwe
dism /Image:"%InstallMount%" /Remove-ProvisionedAppxPackage /PackageName:Microsoft.WindowsCalculator_2013.1007.1950.2960_neutral_~_8wekyb3d8bbwe
dism /Image:"%InstallMount%" /Remove-ProvisionedAppxPackage /PackageName:microsoft.windowscommunicationsapps_2014.830.2330.2719_neutral_~_8wekyb3d8bbwe
dism /Image:"%InstallMount%" /Remove-ProvisionedAppxPackage /PackageName:Microsoft.WindowsReadingList_2014.626.1418.1617_neutral_~_8wekyb3d8bbwe
dism /Image:"%InstallMount%" /Remove-ProvisionedAppxPackage /PackageName:Microsoft.WindowsScan_2013.1007.2015.3834_neutral_~_8wekyb3d8bbwe
dism /Image:"%InstallMount%" /Remove-ProvisionedAppxPackage /PackageName:Microsoft.WindowsSoundRecorder_2013.1010.500.2928_neutral_~_8wekyb3d8bbwe
dism /Image:"%InstallMount%" /Remove-ProvisionedAppxPackage /PackageName:Microsoft.XboxLIVEGames_2013.1011.10.5965_neutral_~_8wekyb3d8bbwe
dism /Image:"%InstallMount%" /Remove-ProvisionedAppxPackage /PackageName:Microsoft.ZuneMusic_2014.929.2145.59_neutral_~_8wekyb3d8bbwe
dism /Image:"%InstallMount%" /Remove-ProvisionedAppxPackage /PackageName:Microsoft.ZuneVideo_2014.1002.954.4888_neutral_~_8wekyb3d8bbwe
goto END
:END

:: ----------------------------------------------------------------------------
:: Unmount install.wim
:: ----------------------------------------------------------------------------

dism /Unmount-Image /MountDir:"%InstallMount%" /commit

:: ----------------------------------------------------------------------------
:: Rebuild install.wim
:: ----------------------------------------------------------------------------

dism /Export-Image /SourceImageFile:"%WimSource%\install.wim" /SourceIndex:%Index% /DestinationImageFile:"%WimSource%\install_new.wim" /CheckIntegrity /Compress:max

if "%Edition%"=="PRO_and_CORE" (goto PRO_and_CORE) else (goto FINISHING)
:PRO_and_CORE
if "%Index%"=="1" (goto :eof) else (goto FINISHING)
:FINISHING
del /f /q "%WimSource%\install.wim" >nul
ren "%WimSource%\install_new.wim" "install.wim"
goto :eof

:: ============================================================================
:: Integration complete
:: ============================================================================

:: ----------------------------------------------------------------------------
:: Build ISO image
:: ----------------------------------------------------------------------------

:BUILD_ISO_IMAGE

echo.
echo Building ISO image file for BIOS and UEFI boot mode.
echo.
echo As long as the largest file is under ~4GB, it will fit on a UEFI boot mode compatible FAT32 USB flash drive.

if "%Edition%"=="PRO_and_CORE" (goto PRO_and_CORE) else (goto PRO_or_CORE)
:PRO_and_CORE
set iso_volume_label=%OS%_%Arch%
set iso_file_name=%OS%_%Arch%.iso
goto END
:PRO_or_CORE
set iso_volume_label=%OS%_%Edition%_%Arch%
set iso_file_name=%OS%_%Edition%_%Arch%.iso
goto END
:END

set iso_path=%BaseDir%\iso
if not exist "%iso_path%" md "%iso_path%"
if exist "%iso_path%\%iso_file_name%" del /f /q "%iso_path%\%iso_file_name%" >nul

oscdimg -o -u2 -udfver102 -bootdata:2#p0,e,b"%BaseDir%\dvd\boot\etfsboot.com"#pEF,e,b"%BaseDir%\dvd\efi\microsoft\boot\efisys.bin" -l%iso_volume_label% "%BaseDir%\dvd" "%iso_path%\%iso_file_name%"

goto :eof

:: ----------------------------------------------------------------------------
:: Cleaning up
:: ----------------------------------------------------------------------------

:CLEANING_UP

rd /s /q "%BaseDir%\dvd"
md "%BaseDir%\dvd"
rd /s /q "%BaseDir%\mount"

explorer "%iso_path%"
goto :eof

:: ----------------------------------------------------------------------------

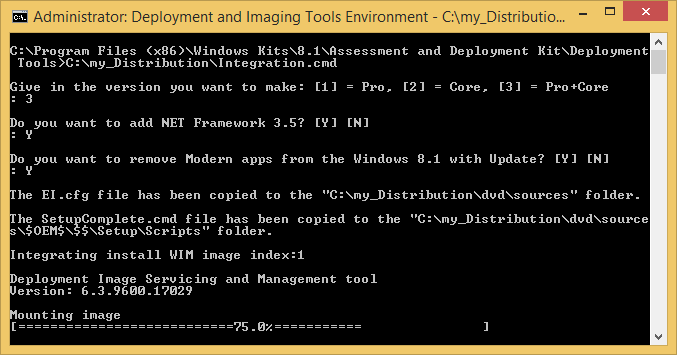
Integration - Windows 8.1 with Update.png

Remove Modern Apps.png

This is sometimes needed, if the integration fails after you have modified the Integration.cmd file.

cleanup.cmd

Code:
@echo off

set basedir=C:\my_Distribution

dism /Unmount-Wim /MountDir:"%basedir%\mount\install" /Discard
dism /Unmount-Wim /MountDir:"%basedir%\mount\boot" /Discard
dism /Unmount-Wim /MountDir:"%basedir%\mount\winre" /Discard

dism /Cleanup-Mountpoints /Quiet
dism /Cleanup-Wim /Quiet

rd /s /q "%basedir%\mount"
rd /s /q "%basedir%\dvd"
md "%basedir%\dvd"

Here is an example of the SetupComplete.cmd

Code:
@echo off

:: Place the SetupComplete.cmd in \sources\$OEM$\$$\Setup\Scripts
:: Note! The per user (HKEY_CURRENT_USER) stuff cannot be done from SetupComplete.cmd
:: Note! In Windows 8/8.1 Setupcomplete.cmd are disabled if an OEM product key is used.

:: Disable Metro tutorial tips
REG ADD "HKLM\SOFTWARE\Policies\Microsoft\Windows\EdgeUI" /V "DisableHelpSticker" /T "REG_DWORD" /D "00000001" /F >NUL

RD /S /Q %windir%\Setup\Scripts >nul
DEL /F /Q %0% >nul
exit

Copy the EI.CFG file to the sources folder. Now install as normal and the Windows 8/8.1 setup won't ask for the retail/OEM product key at the beginning of the setup. At the end of the Windows 8/8.1 setup, select the "Skip" option if you want to give the product key later.

The EI.CFG file.

Code:
[Channel]
Retail
[VL]
0

In the VMware Player, select the option "Use ISO image file" and browse to the location of the ISO image file. You can also test the Windows 8/8.1 installation (only 64-bit) in UEFI boot mode, see the instructions at this link: link
 
Last edited:

My Computer

System One

  • OS
    Windows 10
    Computer type
    Laptop
    System Manufacturer/Model
    Lenovo G580
    CPU
    Intel Core i5-3230M
    Memory
    8 GB
    Graphics Card(s)
    Intel HD Graphics 4000
    Browser
    Microsoft Edge
    Antivirus
    Windows Defender, standard user account
    Other Info
    UEFI firmware (BIOS) embedded Windows 8 product key.
With the oscdimg utility, how do I create an ISO image so that Windows 8.1 Update is started from the computers that have the standard bios or UEFI?

Thanks

Bye
 
Last edited:

My Computer

System One

  • OS
    Windows 8
An example of the command (copied from previous post).

Code:
oscdimg -o -u2 -udfver102 -bootdata:2#p0,e,b"%BaseDir%\dvd\boot\etfsboot.com"#pEF,e,b"%BaseDir%\dvd\efi\microsoft\boot\efisys.bin" -l%iso_volume_label% "%BaseDir%\dvd" "%iso_path%\%iso_file_name%"
 
Last edited:

My Computer

System One

  • OS
    Windows 10
    Computer type
    Laptop
    System Manufacturer/Model
    Lenovo G580
    CPU
    Intel Core i5-3230M
    Memory
    8 GB
    Graphics Card(s)
    Intel HD Graphics 4000
    Browser
    Microsoft Edge
    Antivirus
    Windows Defender, standard user account
    Other Info
    UEFI firmware (BIOS) embedded Windows 8 product key.
An example of the command (copied from previous post).

Code:
oscdimg -o -u2 -udfver102 -bootdata:2#p0,e,b"%BaseDir%\dvd\boot\etfsboot.com"#pEF,e,b"%BaseDir%\dvd\efi\microsoft\boot\efisys.bin" -l%iso_volume_label% "%BaseDir%\dvd" "%iso_path%\%iso_file_name%"

I can not understand the working of the bootdata option. You could explain it to me?

Thanks

Bye
 

My Computer

System One

  • OS
    Windows 8
Create an image file for either a BIOS-based or UEFI-based computer by using a multi-boot command. For example:

Code:
oscdimg -o -u2 -udfver102 [COLOR=#ff0000]-bootdata:2#p0,e,b"%BaseDir%\dvd\[/COLOR][COLOR=#0000ff]boot\etfsboot.com[/COLOR][COLOR=#ff0000]"#pEF,e,b"%BaseDir%\dvd\[/COLOR][COLOR=#0000ff]efi\microsoft\boot\efisys.bin[/COLOR][COLOR=#ff0000]"[/COLOR] -l%iso_volume_label% "%BaseDir%\dvd" "%iso_path%\%iso_file_name%"

- where this command starts the Etfsboot.com boot file for a BIOS image, and then starts the Efisys.bin boot file for a UEFI image.

Oscdimg Command-Line Options

oscdimg [<options>] <sourceLocation> <destinationFile>

-o Uses a MD5 hashing algorithm to compare files.
-u2 Produces an image that contains only the UDF file system.
-udfver102 Specifies UDF file system version 1.02.
-bootdata:<number> Specifies a multi-boot image, followed by the number of boot entries. Do not use spaces.
-l <volumeLabel> Specifies the volume label. Do not use spaces.
<sourceLocation> Specifies the location of the files that you intend to build into an .iso image.
<destinationFile> Specifies the name of the .iso image file.

The following options may be used to generate multi boot entry images and may not be combined with any single boot entry switches.

Each multi-boot entry is seperated via a # token, as well as the number of boot entries. The options for a boot entry are seperated via a comma token. Each boot option must specify the boot code for that option.

-bootdata:<num>#defaultbootentry#bootentry2#bootentryN

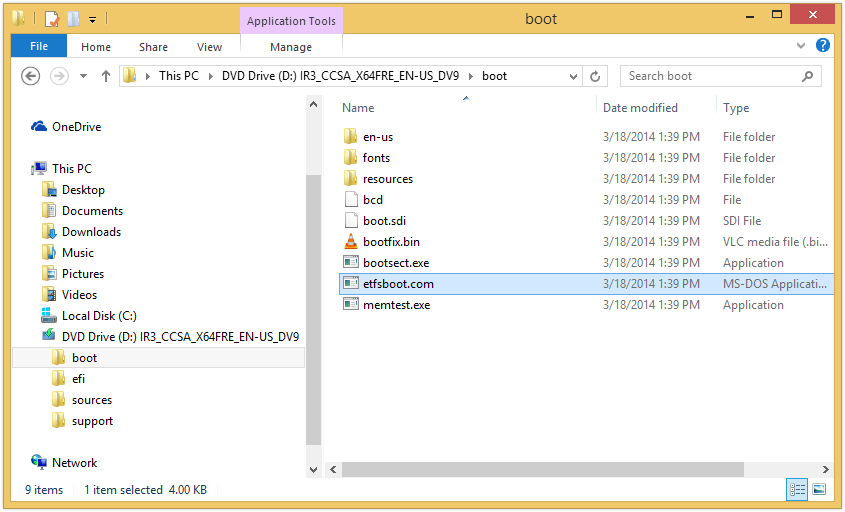
boot\etfsboot.com (see screenshot below)

Screenshot (35).png

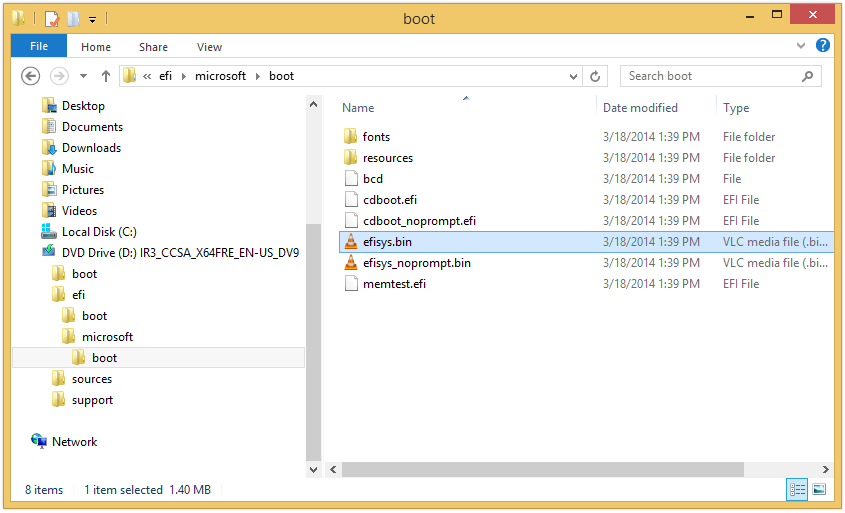
efi\microsoft\boot\efisys.bin (see screenshot below)

Screenshot (36).png

Note that the -m option is not needed.

-m Ignores the maximum size limit of an image. The default value is a 74-minute CD. However, if UDF is used, the default has no maximum size.
 
Last edited:

My Computer

System One

  • OS
    Windows 10
    Computer type
    Laptop
    System Manufacturer/Model
    Lenovo G580
    CPU
    Intel Core i5-3230M
    Memory
    8 GB
    Graphics Card(s)
    Intel HD Graphics 4000
    Browser
    Microsoft Edge
    Antivirus
    Windows Defender, standard user account
    Other Info
    UEFI firmware (BIOS) embedded Windows 8 product key.
In some examples, I have seen that the number of the boot entries of the bootdata option may be even greater than 2. Why this because, apparently, there is only the BIOS and UEFI image?

Thanks

Bye
 

My Computer

System One

  • OS
    Windows 8
I do not know the answer to your question.

In Windows 7/8/8.1 you will need only two multi-boot entry.

-bootdata:<num>#defaultbootentry#bootentry2
 

My Computer

System One

  • OS
    Windows 10
    Computer type
    Laptop
    System Manufacturer/Model
    Lenovo G580
    CPU
    Intel Core i5-3230M
    Memory
    8 GB
    Graphics Card(s)
    Intel HD Graphics 4000
    Browser
    Microsoft Edge
    Antivirus
    Windows Defender, standard user account
    Other Info
    UEFI firmware (BIOS) embedded Windows 8 product key.
A curiosity: The command:

Code:
oscdimg -o -u2 -udfver102 -bootdata:2#p0,e,b"%BaseDir%\dvd\boot\etfsboot.com"#pEF,e,b"%BaseDir%\dvd\efi\microsoft\boot\efisys.bin" -l%iso_volume_label% "%BaseDir%\dvd" "%iso_path%\%iso_file_name%"

is valid to create bootable images for Windows 8.x 32-bit and 64-bit or not?

Thanks

Bye
 

My Computer

System One

  • OS
    Windows 8
Yes.

The boot\etfsboot.com and efi\microsoft\boot\efisys.bin files are also in the Windows 8 32-bit installation media.
 

My Computer

System One

  • OS
    Windows 10
    Computer type
    Laptop
    System Manufacturer/Model
    Lenovo G580
    CPU
    Intel Core i5-3230M
    Memory
    8 GB
    Graphics Card(s)
    Intel HD Graphics 4000
    Browser
    Microsoft Edge
    Antivirus
    Windows Defender, standard user account
    Other Info
    UEFI firmware (BIOS) embedded Windows 8 product key.
I ran this command:

Code:
C:\Program Files (x86)\Windows Kits\8.1\Assessment and Deployment Kit\Deployment Tools>oscdimg -o -u2 -udfver200 -bootdata:2#p0,e,b"C:\Users\Public\Documents\Windows_8,1_Update_x64_Retail\Extract_files\boot\etfsboot.com"#pEF,e,b"C:\Users\Public\Documents\Windows_8,1_Update_x64_Retail\Extract_files\efi\microsoft\boot\efisys.bin" -lWin81UpdateRetail "C:\Users\Public\Documents\Windows_8,1_Update_x64_Retail\Extract_files" "C:\Users\Public\Documents\Windows_8,1_Update_x64_Retail\ISO_Modified\it_windows_8.1_with_update_x64_dvd_Core-Pro_no_serial.iso"

but I get this error:

Code:
OSCDIMG 2.56 CD-ROM and DVD-ROM Premastering Utility
Copyright (C) Microsoft, 1993-2012. All rights reserved.
Licensed only for producing Microsoft authorized content.

ERROR: Could not open boot sector file "C:\Users\Public\Documents\Windows_8"
Error 2
C:\Program Files (x86)\Windows Kits\8.1\Assessment and Deployment Kit\Deployment Tools>

How come?

Thanks

Bye
 

My Computer

System One

  • OS
    Windows 8
ERROR: Could not open boot sector file "C:\Users\Public\Documents\Windows_8"

change this:

C:\Users\Public\Documents\Windows_8,1_Update_x64_Retail

to this:

C:\Users\Public\Documents\Windows_8.1_Update_x64_Retail
 

My Computer

System One

  • OS
    Windows 10
    Computer type
    Laptop
    System Manufacturer/Model
    Lenovo G580
    CPU
    Intel Core i5-3230M
    Memory
    8 GB
    Graphics Card(s)
    Intel HD Graphics 4000
    Browser
    Microsoft Edge
    Antivirus
    Windows Defender, standard user account
    Other Info
    UEFI firmware (BIOS) embedded Windows 8 product key.
change this:

C:\Users\Public\Documents\Windows_8.1_Update_x64_Retail\Extract_files

for example: C:\my_Distribution\dvd

and

C:\Users\Public\Documents\Windows_8.1_Update_x64_Retail\ISO_Modified

for example: C:\my_Distribution\iso

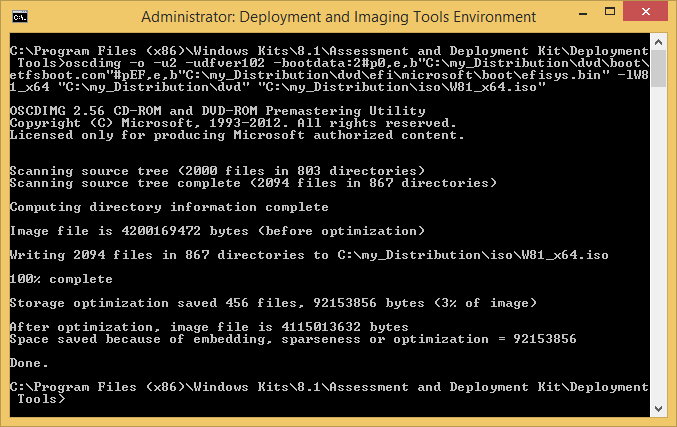
Code:
oscdimg -o -u2 -udfver102 -bootdata:2#p0,e,b"[COLOR=#ff0000]C:\my_Distribution\dvd[/COLOR]\boot\etfsboot.com"#pEF,e,b"[COLOR=#ff0000]C:\my_Distribution\dvd[/COLOR]\efi\microsoft\boot\efisys.bin" -lW81_x64 "[COLOR=#ff0000]C:\my_Distribution\dvd[/COLOR]" "[COLOR=#0000ff]C:\my_Distribution\iso[/COLOR]\W81_x64.iso"

oscdimg.png
 
Last edited:

My Computer

System One

  • OS
    Windows 10
    Computer type
    Laptop
    System Manufacturer/Model
    Lenovo G580
    CPU
    Intel Core i5-3230M
    Memory
    8 GB
    Graphics Card(s)
    Intel HD Graphics 4000
    Browser
    Microsoft Edge
    Antivirus
    Windows Defender, standard user account
    Other Info
    UEFI firmware (BIOS) embedded Windows 8 product key.
Thank you for that detailed posts, genet!

2. Product key in the UEFI firmware (BIOS)

Does that mean I could store my Product Key in my computer's UEFI and then wouldn't need to type it in during installation? Or is this only for OEMs?
 

My Computer

System One

  • OS
    Windows 8.1 Pro
    Computer type
    PC/Desktop
    System Manufacturer/Model
    custom
    CPU
    Intel64 Family 6 Model 60 Stepping 3 GenuineIntel ~3401 Mhz
    Motherboard
    Asus H87-Pro
    Memory
    32 GB
    Graphics Card(s)
    ATI Radeon HD 7970 6GB
    Hard Drives
    SATA only
    2 x 3 TB as RAID 1 = C:, D:
    3 TB = E:
    3 TB = F:
    Keyboard
    Logitech K800 (cordless)
    Mouse
    Logitech G700s (cordless)
    Internet Speed
    Cable (5GBit up, 70GBit down)
    Browser
    IE 11, FF 34
    Antivirus
    Avira
It's only for Windows 8/8.1 OEM computers.
 

My Computer

System One

  • OS
    Windows 10
    Computer type
    Laptop
    System Manufacturer/Model
    Lenovo G580
    CPU
    Intel Core i5-3230M
    Memory
    8 GB
    Graphics Card(s)
    Intel HD Graphics 4000
    Browser
    Microsoft Edge
    Antivirus
    Windows Defender, standard user account
    Other Info
    UEFI firmware (BIOS) embedded Windows 8 product key.
Back
Top