


- Messages
- 347
It's no secret that you can create a toolbar, opening from the Taskbar, for any folder you want. Such a toolbar for the Start Menu folder is a pretty good approximation of the classic Start Menu.
The trouble is, there are two different Start Menu folders (your User SM and the All-Users SM), with some apps in one and some in the other. So, in order to see all apps, you'd have to make two toolbars; and, any time you don't know where an app is, you'd have to look in both of them.
I've arrived at another possible alternative, which you might consider using if you don't trust third-party Start Menus, or for any other reason you don't want to use them.
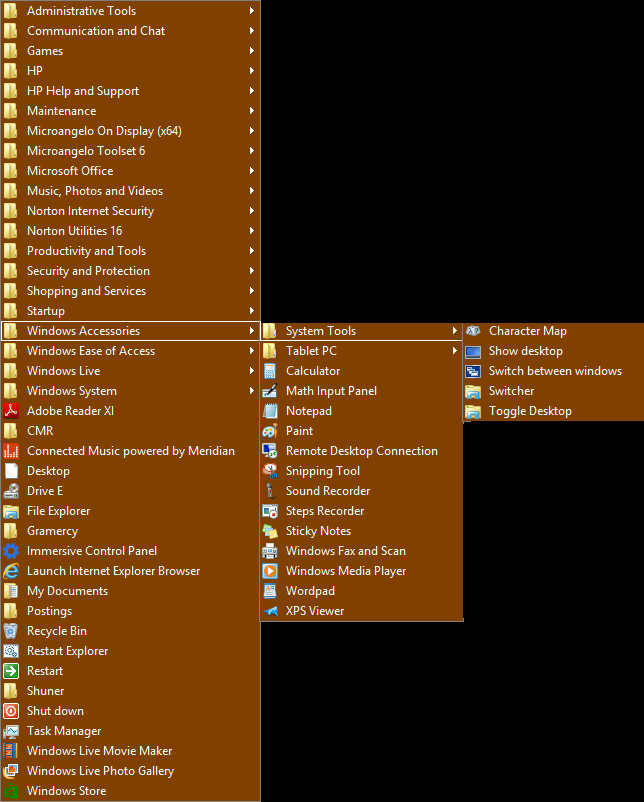
It's no good to try to add things to the Start Menu folders yourself -- that can cause problems. But you can make a folder of your own, with all the contents of both Start Menu folders, to be used simply for your own custom toolbar. When you open the toolbar it will appear vertically with cascading subfolders, like the old Start menu.
Copying each item one at a time would take a week. But recently I remembered that the XCOPY command ("extended copy") can copy the contents of a folder and its subfolders all at once.
On my system the total contents of the two Start Menu folders and all their subfolders are about 150 files -- but all of them are shortcuts, taking only 4KB each. So the resulting folder is only about 600KB in size. It works beautifully as a visual toolbar.
1. Save the batch file here attached, but don't run it yet. Open its "Properties" and select "Unblock." (If you want to look at its contents, right-click it and select "Edit" to open it in Notepad. But don't change its contents, and don't leave it open.)
2. Make sure you're logged in as an Administrator.
3. Create a new folder. (In order not to waste taskbar space, give it a short name like "ALL".) To do this, open your "My Documents" folder, right-click inside it and select "New > Folder" and type "ALL" as its name.
4. Copy a bunch of files (preferably a lot, like 20 or 30) into the new folder temporarily, just for viewing purposes during the toolbar setup. (You'll delete them afterwards.)
5. Right-click the Taskbar and select "Toolbars > New Toolbar."
6. In the window that opens, navigate to "My Documents."
7. Click once on the "ALL" folder to select it, and then click the "Select Folder" button. (When the toolbar first appears it may fill your taskbar with icons, but now we'll fix that.)
8. Unlock the Taskbar. (Right-click it and uncheck the "Lock" box.)
9. Open the toolbar's context menu by right-clicking the name "ALL" on the Taskbar. Then check the "Show Title" box.
10. Open the menu again and UN-check "Show Text".
11. Open it again and check "View > Small Icons". (This won't shrink the other things on the Taskbar; their size is controlled by "Taskbar Properties".)
12. Drag your new toolbar all the way to the left corner, going past the other items (taskbar buttons and pinned icons) which will jump to the right.
13. Grab the first "handle" to the right of the new toolbar and drag it to the left until it's just up against the new toolbar but still to the right of it. Now you see the word "ALL" and the little arrow, but the icons are invisible and the toolbar takes up very little space on your Taskbar.
14. Lock the Taskbar. (Right-click it and check the "Lock" box.)
15. Click the arrow to see how the toolbar appears as a vertical list.
16. Now open your "ALL" folder and delete all the temporary files you put in it. Make sure the folder is empty before you run the batch file.
There is some "overlapping" between the two Start Menu folders; some programs are in both of them, but many are only in one or the other. The batch file uses XCOPY commands to copy into your "ALL" folder the entire contents of both of the Sart Menu folders, including all their nested subfolders.
Because it accesses the Windows System folders, the batch file has to run with "Admin" privileges. If you just double-click it you'll get no results. Of course, you COULD right-click it and select "Run as Admin." But whenever you install any new Desktop programs, you'll have to run it again to add them to the toolbar. So I suggest the following:
17. Put the batch file away somewhere in a folder.
18. Create a shortcut to it on your Desktop.
19. Right-click the shortcut.
20. Open its "Properties" box.
21. Select the "Shortcut" tab.
22. Click the "Advanced" button.
23. Check the "Run as Administrator" box.
24. Click OK, and then click OK again.
25. Double-click the shortcut.
26. Respond "Yes" to the "Allow" prompt that appears.
If it worked, your "ALL" folder should now be a "complete start menu" containing everything from both of the Windows Start Menu folders -- that is, it will contain every program in the Desktop environment (but no data files, and no Metro apps).
Of course, Windows won't recognize your "ALL" folder as a start menu. But now click the arrow to see the "ALL" toolbar again, and it will all be there in the cascading vertical display.
The trouble is, there are two different Start Menu folders (your User SM and the All-Users SM), with some apps in one and some in the other. So, in order to see all apps, you'd have to make two toolbars; and, any time you don't know where an app is, you'd have to look in both of them.
I've arrived at another possible alternative, which you might consider using if you don't trust third-party Start Menus, or for any other reason you don't want to use them.
It's no good to try to add things to the Start Menu folders yourself -- that can cause problems. But you can make a folder of your own, with all the contents of both Start Menu folders, to be used simply for your own custom toolbar. When you open the toolbar it will appear vertically with cascading subfolders, like the old Start menu.
Copying each item one at a time would take a week. But recently I remembered that the XCOPY command ("extended copy") can copy the contents of a folder and its subfolders all at once.
On my system the total contents of the two Start Menu folders and all their subfolders are about 150 files -- but all of them are shortcuts, taking only 4KB each. So the resulting folder is only about 600KB in size. It works beautifully as a visual toolbar.
1. Save the batch file here attached, but don't run it yet. Open its "Properties" and select "Unblock." (If you want to look at its contents, right-click it and select "Edit" to open it in Notepad. But don't change its contents, and don't leave it open.)
2. Make sure you're logged in as an Administrator.
3. Create a new folder. (In order not to waste taskbar space, give it a short name like "ALL".) To do this, open your "My Documents" folder, right-click inside it and select "New > Folder" and type "ALL" as its name.
4. Copy a bunch of files (preferably a lot, like 20 or 30) into the new folder temporarily, just for viewing purposes during the toolbar setup. (You'll delete them afterwards.)
5. Right-click the Taskbar and select "Toolbars > New Toolbar."
6. In the window that opens, navigate to "My Documents."
7. Click once on the "ALL" folder to select it, and then click the "Select Folder" button. (When the toolbar first appears it may fill your taskbar with icons, but now we'll fix that.)
8. Unlock the Taskbar. (Right-click it and uncheck the "Lock" box.)
9. Open the toolbar's context menu by right-clicking the name "ALL" on the Taskbar. Then check the "Show Title" box.
10. Open the menu again and UN-check "Show Text".
11. Open it again and check "View > Small Icons". (This won't shrink the other things on the Taskbar; their size is controlled by "Taskbar Properties".)
12. Drag your new toolbar all the way to the left corner, going past the other items (taskbar buttons and pinned icons) which will jump to the right.
13. Grab the first "handle" to the right of the new toolbar and drag it to the left until it's just up against the new toolbar but still to the right of it. Now you see the word "ALL" and the little arrow, but the icons are invisible and the toolbar takes up very little space on your Taskbar.
14. Lock the Taskbar. (Right-click it and check the "Lock" box.)
15. Click the arrow to see how the toolbar appears as a vertical list.
16. Now open your "ALL" folder and delete all the temporary files you put in it. Make sure the folder is empty before you run the batch file.
There is some "overlapping" between the two Start Menu folders; some programs are in both of them, but many are only in one or the other. The batch file uses XCOPY commands to copy into your "ALL" folder the entire contents of both of the Sart Menu folders, including all their nested subfolders.
Because it accesses the Windows System folders, the batch file has to run with "Admin" privileges. If you just double-click it you'll get no results. Of course, you COULD right-click it and select "Run as Admin." But whenever you install any new Desktop programs, you'll have to run it again to add them to the toolbar. So I suggest the following:
17. Put the batch file away somewhere in a folder.
18. Create a shortcut to it on your Desktop.
19. Right-click the shortcut.
20. Open its "Properties" box.
21. Select the "Shortcut" tab.
22. Click the "Advanced" button.
23. Check the "Run as Administrator" box.
24. Click OK, and then click OK again.
25. Double-click the shortcut.
26. Respond "Yes" to the "Allow" prompt that appears.
If it worked, your "ALL" folder should now be a "complete start menu" containing everything from both of the Windows Start Menu folders -- that is, it will contain every program in the Desktop environment (but no data files, and no Metro apps).
Of course, Windows won't recognize your "ALL" folder as a start menu. But now click the arrow to see the "ALL" toolbar again, and it will all be there in the cascading vertical display.
Attachments
Last edited:
My Computer
System One
-
- OS
- 64-bit Windows 8
- System Manufacturer/Model
- HP 23-D030